the12volt.com spacer
icon

2011 Hyundai Sonata Remote Start w/Keyless Pictorial


Post ReplyPost New Topic
< Prev Topic Next Topic >
bseal 
Member - Posts: 1
Member spacespace
Joined: March 27, 2013
Location: Utah, United States
Posted: March 27, 2013 at 10:52 AM / IP Logged  
Does anyone know if you can find the different male and female wiring connectors for the different plugs on the fuse box. I don't really want to splice into my wiring. I'd Rather use female plug and tie in to the wires i need from there, then route it back to the fuse box via another male connector coming from the female.
Sorry if this is confusing...
- Brian
kreg357 
Platinum - Posts: 7,783
Platinum spaceThis member has made a donation to the12volt.com. Click here for more info.spaceThis member has been recognized as an authority in Electrical Theory. Click here for more info.spaceThis member has been recognized as an authority in Mobile Security and Convenience. Click here for more info.spacespace
Joined: January 30, 2009
Location: Pennsylvania, United States
Posted: March 28, 2013 at 9:41 AM / IP Logged  

Hi Brian,

It sounds like you would like to fabricate a "T-Connector" for the various harnesses that

must be spliced into for the remote starter / alarm systems' connections.  While this was
done for the ignition harness of some very popular vehicles by Bulldog Security, it has
faded away due to the ever changing plugs and connectors used.  Here is a link to Bulldog
Security's current offerings : http://www.bulldogsecurity.com/Category/1020-t-harnesses.aspx
They don't list the Sonata, but if this "T-Connector" matches your idea, it might be possible to
do but very expensive.

Some vehicle manufacturers have a connector repair kit available at the parts counter that

would provide you the harness end connector.  However finding the connector style physically
located in the fuse box assy or other computer modules ( BCM, ECM, etc. ) could be a problem.

That being said, a search of the WEB turned up this site :  http://www.aeromotive.us/product_connectors.html

From their info, it appears that they might be able to supply you the connectors you seek, with
some limitations ( Connectors with over 6 cavities will only come with 6 wire leads ).   I have never
dealt with them and don't know their policies ( they might have a minimum qty per order, etc ).
There are many harnesses tapped into ( looks like 9 in the pictorial ) and most of them are more
that 6 pins so you will need to ask for extra M & F pins, if they won't supply fully pinned connectors.
 
Good luck and please provide an update with you results.

Soldering is fun!
howie ll 
Pot Metal - Posts: 16,466
Pot Metal spacespace
Joined: January 09, 2007
Location: United Kingdom
Posted: April 08, 2013 at 9:45 AM / IP Logged  
Sorry, but I just noticed something, better late than never, Essentially yes, the diode is nothing more than an electrical one way 'valve'. However, depending on the signal (+) vs (-), depends on which way the band of the diode faces. With the door pin wires (all (-) signals), you will want all of the bands facing towards the AK unit. So it will be: AK Input --> 6 diodes (band towards AK unit) --> one diode to each door / trunk input.
Shouldn't the diode bands be towards the switches and AWAY from the unit.
sakamakik 
Member - Posts: 1
Member spacespace
Joined: July 05, 2013
Location: Quebec, Canada
Posted: December 25, 2013 at 9:48 PM / IP Logged  
Thanks for the pictures! It was very helpful. I could install my first remote starter by myself.
What I bought.
1) Avital 4103LX Remote Start System with Two 4-Button Remote ($38.58)
2) Xpres DBALL Kit Databus all Interface Module ($44.47)
3) Directed Electronics Inc XKLOADER2 XpressKit ($26.49)
Including Tax & Shipping, total cost was $148.59 (by amazon.com)
Here is the wiring diagram.
https://dl.dropboxusercontent.com/u/12288608/Wiring.pdf
kreg357 
Platinum - Posts: 7,783
Platinum spaceThis member has made a donation to the12volt.com. Click here for more info.spaceThis member has been recognized as an authority in Electrical Theory. Click here for more info.spaceThis member has been recognized as an authority in Mobile Security and Convenience. Click here for more info.spacespace
Joined: January 30, 2009
Location: Pennsylvania, United States
Posted: December 26, 2013 at 6:55 AM / IP Logged  

Wow, very nice diagram!  2011 Hyundai Sonata Remote Start w/Keyless Pictorial - Page 2 -- posted image.  The Avital 4103 is a good system and should perform well.

Only a few things to make note of.

1.  The main purpose of the DB-ALL is the transponder by-pass.  While the U.S. market vehicles do not have this transponder

based ignition immobilizer system, the Canadian market vehicles do.  The added plus with the DB-ALL is that it will handle many
other functions for you and save time during the installation.  ( Locks, alarm, tach, trunk release, etc )  The XKLoader2 cable is
used to flash the DB-ALL with the correct firmware, 401.HKHT1 v1.09.

2.  While you could go with the D2D connection between the 4103 and the DB-ALL, going with W2W connections, as shown in the

excellent diagram will absolutely work flawlessly.

The only additions I would make, although not shown in the DB-ALL install guide, would be to use the 4103's Pink/White Flex

Relay output for the vehicles Blue Accessory2 ignition wire.  It's there and this will completely duplicate a normal key start.
Program the Avital Menu 2, Item 6 to Option 2.

I believe the Canadian vehicles have a similar Parking Light system, so setting the 4103 for (-) Parking Light output and connecting

the 4103's White H1/9 Parking Light wire to the Sonata's Pink wire shown in the Pictorial will give Parking Light confirmation.

And lastly, the 4103's Brown H1/6 Horn Output wire is an optional connection for those that want audible command confirmation

and use of the Avital's Panic Mode.  Connect this wire to the Sonata's White wire shown in DKP and use the Avital's Menu 1, Item 1
options to set the desired horn beep output length.

Very nice diagram and a great addition to this Pictorial for the Canadian market vehicles.  Thanks!  2011 Hyundai Sonata Remote Start w/Keyless Pictorial - Page 2 -- posted image.

Soldering is fun!
willny89 
Member - Posts: 1
Member spacespace
Joined: January 23, 2014
Location: Connecticut, United States
Posted: January 23, 2014 at 4:13 PM / IP Logged  
My 2012 Hyundai Sonata has the manufacturer installed remote starter. Yesterday morning I noticed that the heating controls had no power. Once I turned the key to the "on" position the temperature controls regained power and the heat came on. I was going to take a look at the wiring tonight and see if a wire came loose/fuse blew.
I was hoping to get pointed in the right direction on which wire/fuse I should be looking for before I go on a wild goose chase. Thanks for the article.
kreg357 
Platinum - Posts: 7,783
Platinum spaceThis member has made a donation to the12volt.com. Click here for more info.spaceThis member has been recognized as an authority in Electrical Theory. Click here for more info.spaceThis member has been recognized as an authority in Mobile Security and Convenience. Click here for more info.spacespace
Joined: January 30, 2009
Location: Pennsylvania, United States
Posted: January 23, 2014 at 5:46 PM / IP Logged  
The factory remote start system looks like it is pretty much plug-n-play.  I was not able to find an install guide for that system to
see if there were fuses for the Ignition output wires.  My first thought would be that perhaps your 2012 vehicle was still covered
by the Hyundai warranty and a trip to the dealer would be the best first option.
Soldering is fun!
trynastaytuned 
Member - Posts: 1
Member spacespace
Joined: November 09, 2014
Location: Illinois, United States
Posted: November 09, 2014 at 8:45 AM / IP Logged  
kreg357 wrote:

2011 Hyundai Sonata remote start with keyless entry DIY pictorial.

Notes :

This was a basic U.S. domestic market Sonata GLS.  This vehicle has a Factory Alarm and a standard key ( non-PTS ).
U.S. market Sonata's without Push To Start do not have a transponder immobilizer system, so no bypass module is
necessary.  The Factory FOB's do not work while the engine is running so a R/S system with keyless entry is suggested. 
The Factory Alarm will not trigger with just a remote start so a Disarm is only necessary with an Unlock or Trunk
Release.  This vehicle does not have "one touch starting" so it is a candidate for Anti-Grind and Tach Mode starting.

Disassembly :

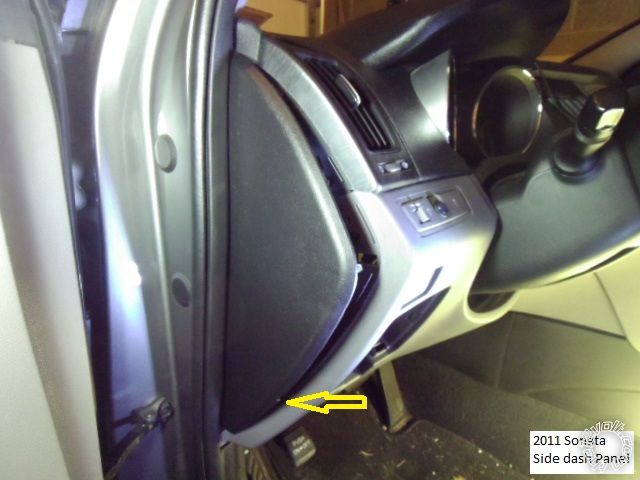
Using a non-marring trim tool, remove the dash side panel.  The arrow indicates a notch for trim tool insertion.

2011 Hyundai Sonata Remote Start w/Keyless Pictorial - Page 2 -- posted image.

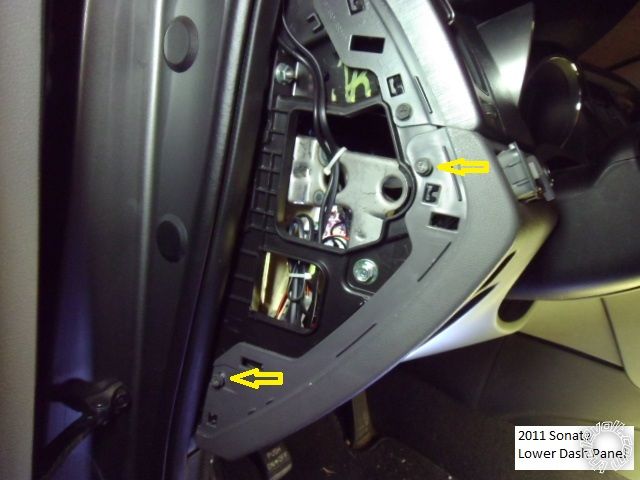
Remove the two screws indicated in this photo :

2011 Hyundai Sonata Remote Start w/Keyless Pictorial - Page 2 -- posted image.

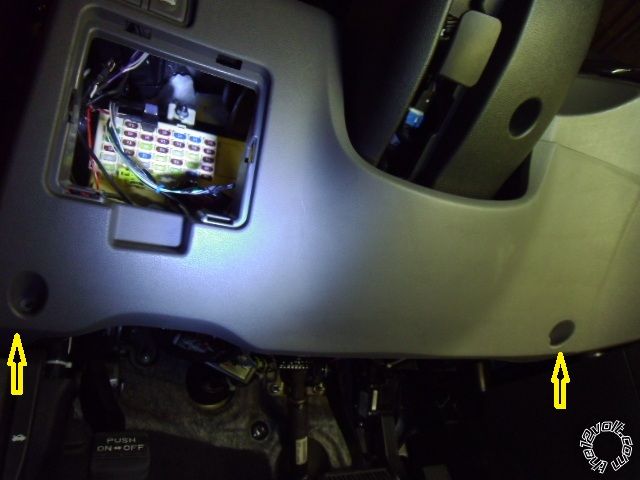
Remove the two screws shown in this picture and release the lower dash panel from the side and then pull straight
away from the dash.  The are three retainer clips along the top edge.

2011 Hyundai Sonata Remote Start w/Keyless Pictorial - Page 2 -- posted image.

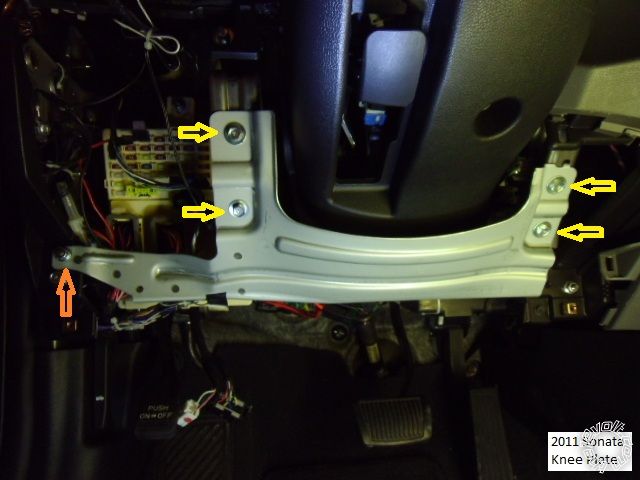
Remove the knee plate by removing the four 10mm bolts shown with Yellow arrows and the one 10mm nut shown
with the orange arrow.

2011 Hyundai Sonata Remote Start w/Keyless Pictorial - Page 2 -- posted image.

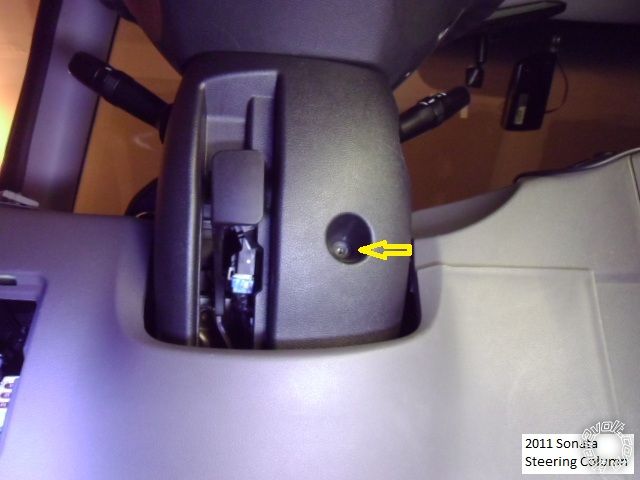
Remove the one screw shown at the underside of the steering column.

2011 Hyundai Sonata Remote Start w/Keyless Pictorial - Page 2 -- posted image.

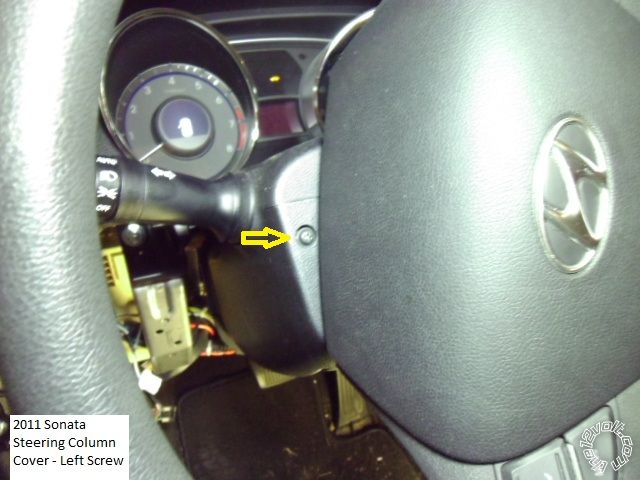
Remove two screws located at 3 and 9 O'Clock ( 3 O'Clock shown ).  Then separate the upper and lower halves of the
steering column cover and remove both.

2011 Hyundai Sonata Remote Start w/Keyless Pictorial - Page 2 -- posted image.

Not shown is the Drivers Kick Panel removal.  The hood release lever is remover by compressing the pivot shaft fingers
and pulling the lever straight off the shaft.  Remove the door sill trim by lifting it straight up then grasp the DKP
and remove it by pulling it back and away.

Wiring :

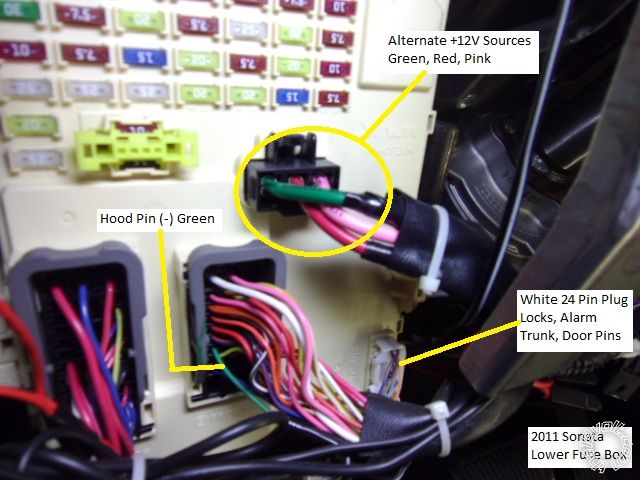
This is a picture of the lower right corner of the dash fuse box.  The three wires in the Black plug are an alternate

+12V power source, each at 30 Amps.  Close-ups to follow.

2011 Hyundai Sonata Remote Start w/Keyless Pictorial - Page 2 -- posted image.

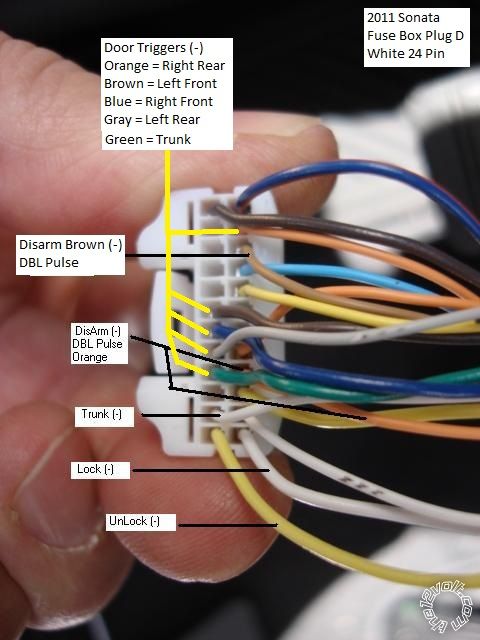
This is a close up of the White 24 Pin Plug with the wire marked.

2011 Hyundai Sonata Remote Start w/Keyless Pictorial - Page 2 -- posted image.

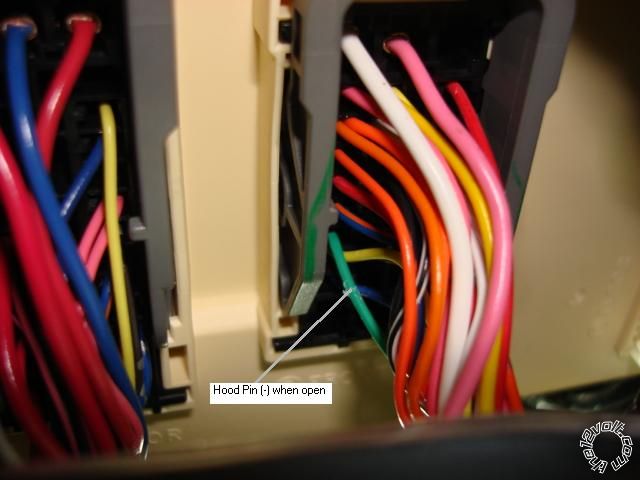
This is a close-up of the Hood Pin wire.

2011 Hyundai Sonata Remote Start w/Keyless Pictorial - Page 2 -- posted image.

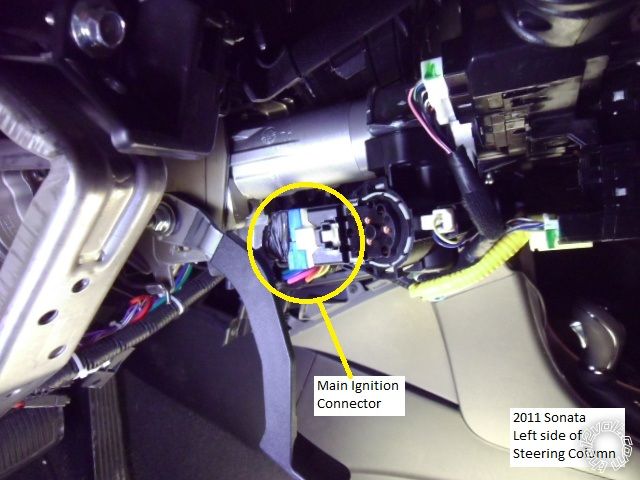
Here is a shot of the left side of the steering column.

2011 Hyundai Sonata Remote Start w/Keyless Pictorial - Page 2 -- posted image.

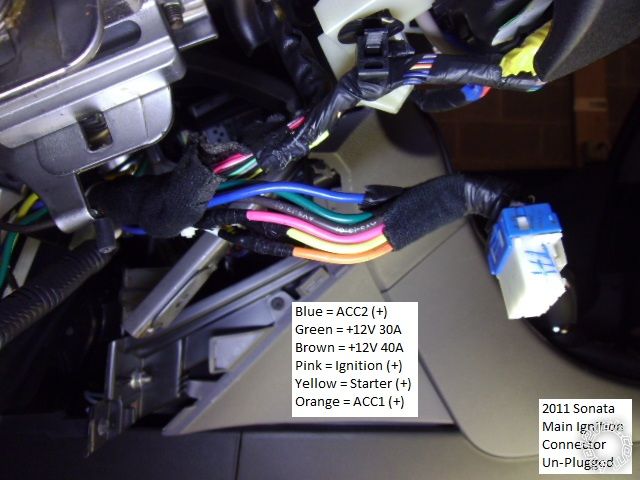
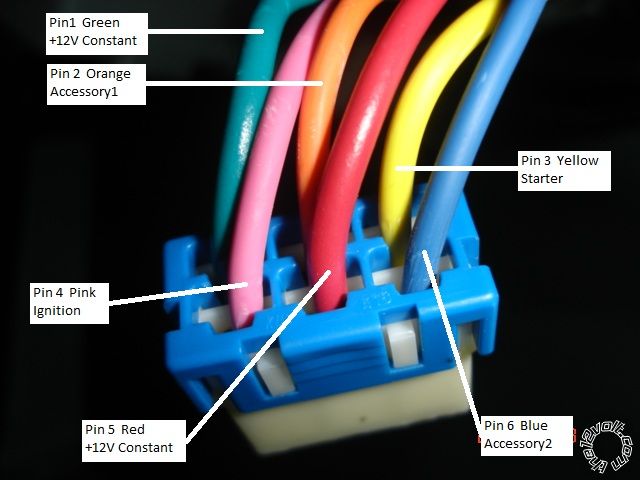
This is a close up of the Main Ignition Harness.  Use caution / be gentle when disconnecting this plug, it can cause
the ignition switch to come apart.

2011 Hyundai Sonata Remote Start w/Keyless Pictorial - Page 2 -- posted image.

2011 Hyundai Sonata Remote Start w/Keyless Pictorial - Page 2 -- posted image.

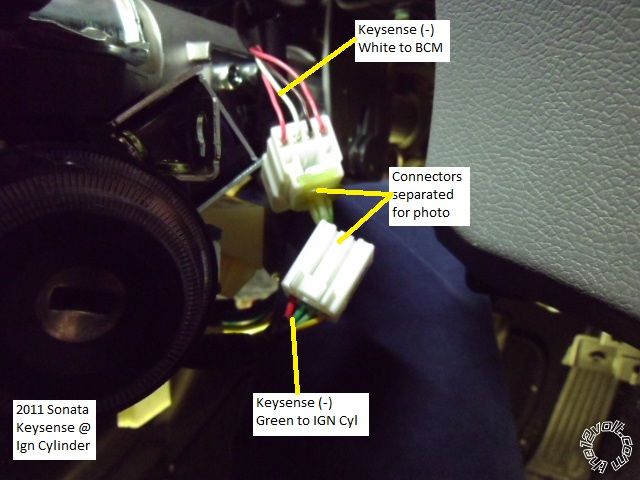
This is a picture of the Keysense wire at the right side of the steering column.  Note that the wire color changes
at each side of the connector junction.

2011 Hyundai Sonata Remote Start w/Keyless Pictorial - Page 2 -- posted image.

Here is a photo of the Driver Kick Panel area.

2011 Hyundai Sonata Remote Start w/Keyless Pictorial - Page 2 -- posted image.

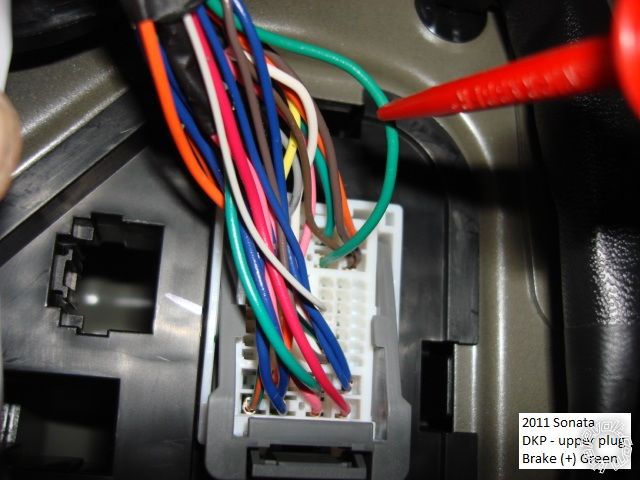
The Brake wire is located in the DKP, top plug, pictured below (close-up).

2011 Hyundai Sonata Remote Start w/Keyless Pictorial - Page 2 -- posted image.

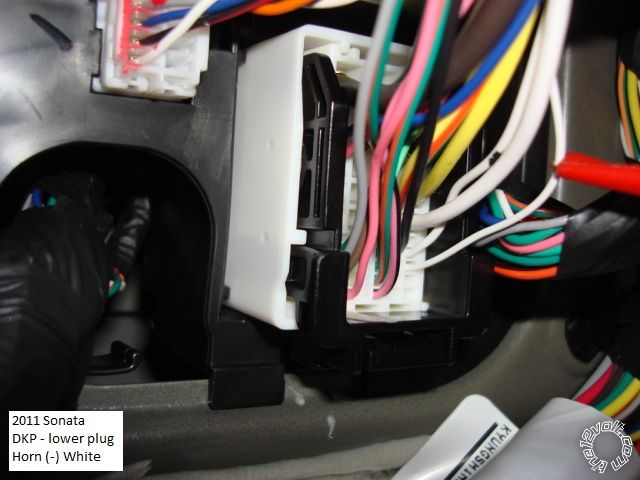
Also in the DKP, bottom plug, is the Horn wire (close-up).

2011 Hyundai Sonata Remote Start w/Keyless Pictorial - Page 2 -- posted image.

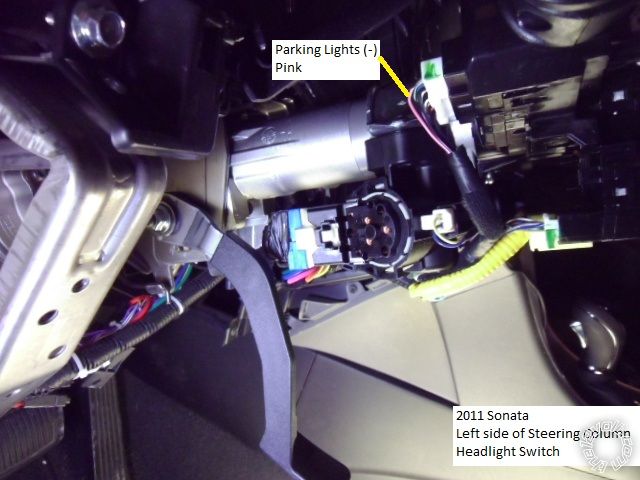
The Parking Lights can be found either at the Headlight Switch connector in the steering column...

2011 Hyundai Sonata Remote Start w/Keyless Pictorial - Page 2 -- posted image.

or the BCM, which in located under the dash to the right side of the steering column.  Also shown is the Rear Defrost
wire and the Auto Headlights wire.  The Rear Defrost requires a (-) pulse to turn on and will light the Defrost light
at the console switch.  Another pulse will turn it off.

2011 Hyundai Sonata Remote Start w/Keyless Pictorial - Page 2 -- posted image.

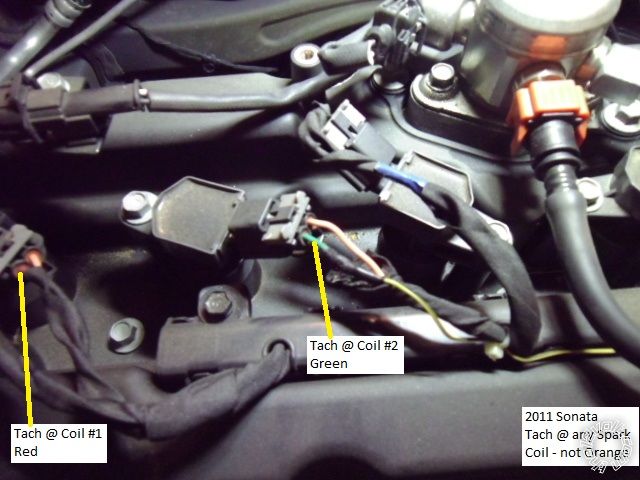
This is a picture of a Tach source, found at any Spark Plug Coil.  ( Engine cover removed, lift straight up, retained
by four pins.)

2011 Hyundai Sonata Remote Start w/Keyless Pictorial - Page 2 -- posted image.

Notes :

There are several large grommets located in the firewall for wire pass thru.
On this vehicle, a double pulse to the two Disarm wires ( Orange & Brown ) will also unlock the doors.

Hey everyone,
I'm new to the forum. I have read through your install and I'm very interested if anyone knows or has seen any write up like this for a 2008 Hyundai sonata. I have been looking for months and cannot find anything similar and would really appriciate everyones help.
Any help or advice would be greatly appreciated.
Thanks
P.s.
I just want to say GREAT JOB to Kreg357 for the effort and dedication the resulted in this great write up.
sceva2 
Member - Posts: 13
Member spacespace
Joined: December 07, 2014
Location: Nebraska, United States
Posted: December 07, 2014 at 1:56 PM / IP Logged  
Great write up and conversation.
Can someone suggest a 2-way remote starter kit for DIY for a 2011 Sonata with standard key and no transponder (I am in the US)?
If I cannot get a 2-way (I mean that the FOB transmits and receives data and indicates the car did start) I am leaning toward getting the OEM version - I have found it on eBay for $230.
I would prefer the 2-way because at work I cannot see the car without going outside, which kind of defeats the purpose! But I am a bit lost with the different brands, models, features, availability... I just want remote start with feedback and a range of 500' or so.
I just found the Viper 4806v available on Amazon for $165. I like the look of this one, and Viper seems to be a reliable brand at this time. Anyone have any comments or gotcha's that I should be aware of?
Thanks.
kreg357 
Platinum - Posts: 7,783
Platinum spaceThis member has made a donation to the12volt.com. Click here for more info.spaceThis member has been recognized as an authority in Electrical Theory. Click here for more info.spaceThis member has been recognized as an authority in Mobile Security and Convenience. Click here for more info.spacespace
Joined: January 30, 2009
Location: Pennsylvania, United States
Posted: December 07, 2014 at 3:39 PM / IP Logged  
The Viper 4806V is a nice system and should perform well in your Sonata.  There will be several programming changes necessary.  The Defrost feature and the two-way range make it ideal for your requirements.  Just be advised that the system will come with a brief 2 page guide, not a complete / detailed install guide.  Download the older Viper 5701 guide found in the Downloads section and use that for the wire function descriptions.  Most all of the wire colors have remained the same over the years. 
Soldering is fun!
Page of 6

  Printable version Printable version Post ReplyPost New Topic
You cannot post new topics in this forum
You cannot reply to topics in this forum
You cannot delete your posts in this forum
You cannot edit your posts in this forum
You cannot create polls in this forum
You cannot vote in polls in this forum

  •  
Search the12volt.com
Follow the12volt.com Follow the12volt.com on Facebook
Saturday, April 20, 2024 • Copyright © 1999-2024 the12volt.com, All Rights Reserved Privacy Policy & Use of Cookies
Disclaimer: *All information on this site ( the12volt.com ) is provided "as is" without any warranty of any kind, either expressed or implied, including but not limited to fitness for a particular use. Any user assumes the entire risk as to the accuracy and use of this information. Please verify all wire colors and diagrams before applying any information.

Secured by Sectigo
the12volt.com spacer
Support the12volt.com
Top
the12volt.com spacer