the12volt.com spacer
icon

1999-2002 Silverado Remote Start w/Keyless Pictorial


Post ReplyPost New Topic
< Prev Topic Next Topic >
super dave426 
Member - Posts: 2
Member spacespace
Joined: December 05, 2015
Location: New Jersey, United States
Posted: December 27, 2015 at 4:16 PM / IP Logged Link to Post Post Reply Quote super dave426
Just wanted to add that I found it a little confusing that in the 6 heavy gauge harness (10 Gauge)you tie into the Ignition and Starter wires in the ignition harness and those 2 wires appear to be 16 Gauge, just doesn't seem to match up, but it worked. Looking at the lone yellow wire that just crosses through the entire area made me wonder if that was supposed to be used because of the heavy gauge, so I searched around and found out that it's most likely the Air Bag, good thing I didn't tap it.
Dave
kreg357 
Platinum - Posts: 7,783
Platinum spaceThis member has made a donation to the12volt.com. Click here for more info.spaceThis member has been recognized as an authority in Electrical Theory. Click here for more info.spaceThis member has been recognized as an authority in Mobile Security and Convenience. Click here for more info.spacespace
Joined: January 30, 2009
Location: Pennsylvania, United States
Posted: December 28, 2015 at 9:25 PM / IP Logged Link to Post Post Reply Quote kreg357

Always be careful with yellow plugs and wires.  In this case, that is a yellow sleeve over several airbag wires. 

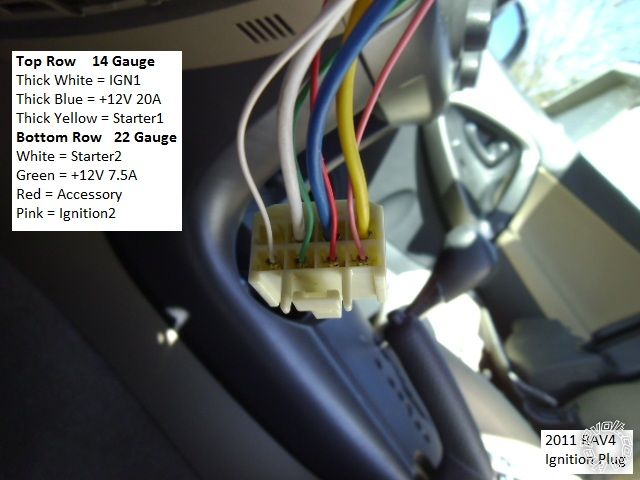
It's becoming common to find wires of difference gauges in the main ignition connector, like this 2011 RAV4 :

1999-2002 Silverado Remote Start w/Keyless Pictorial - Page 7 -- posted image.

Soldering is fun!
zlem 
Member - Posts: 17
Member spacespace
Joined: September 10, 2016
Location: North Dakota, United States
Posted: September 10, 2016 at 6:48 PM / IP Logged Link to Post Post Reply Quote zlem
I have a 1999 silverado and followed this write up to attempt to install a remote start. I went through the brief instructions that came with the unit and hooked everything up according to this write up. Audiovox model# AS-9055T is the remote start I picked up, didn't need anything with keyless entry or security since my truck is not equipped with either. I hooked everything up, tried to program tach rate which I don't know if it was successful, and programmed my remote. The truck fired with the click of the remote and then shut off after a second and the starter continued to crank until I pressed the brake. Any ideas?
lurch228 
Silver - Posts: 1,338
Silver spacespace
Joined: August 08, 2012
Posted: September 10, 2016 at 7:20 PM / IP Logged Link to Post Post Reply Quote lurch228
No keyless or Oem Security doesn't mean no passlock ie VATS which needs a bypass type install. Using the included resistors with the unit as per the VATS instructions. Key cylinder Wires should be small diameter that are White and WHITE/ Black Or WHITE/ Blue and WHITE/ Yellow. Using a relay and matching resistor to the VATS wire #1 (White or WHITE/ Blue). Following the VATS instructions in the Audiovox manual. Resistor is now part of the key cylinder its self instead of being in the key as the manual lists.
You need to check you wiring to starter as it shouldn't continue to crank for more that a few seconds unless you have a bad unit or the wrong wire connected to the starter. Seen one other Audiovox that cranked until you pressed the brake but this years ago.
Disconnect the yellow R/S wire from vehicle and the use a DMM to test it by hitting the R/S, with one test probe to ground and verify that it times out.
kreg357 
Platinum - Posts: 7,783
Platinum spaceThis member has made a donation to the12volt.com. Click here for more info.spaceThis member has been recognized as an authority in Electrical Theory. Click here for more info.spaceThis member has been recognized as an authority in Mobile Security and Convenience. Click here for more info.spacespace
Joined: January 30, 2009
Location: Pennsylvania, United States
Posted: September 10, 2016 at 8:12 PM / IP Logged Link to Post Post Reply Quote kreg357
As Lurch says, you need a Passlock2 bypass. You can achieve this a few ways. If you have a Digital Multi Meter,
various resistors and a relay or two, you can do it following DEI Tech Tip 1048. Here is a link to this document :
https://www.the12volt.com/installbay/file.asp?ID=1206
If you want to save some time and trouble, get a Passlock2 bypass module. My suggestion would be an iDatalink
ADS TB GM, ADS TBSL GM or ADS TBSL PL. All come pre-loaded with the correct firmware and are extremely reliable.
Another decent choice would be the Fortin PASSLOCK-SL2-V2.
It's possible your over-crank condition is due to the Tach learn.
Soldering is fun!
zlem 
Member - Posts: 17
Member spacespace
Joined: September 10, 2016
Location: North Dakota, United States
Posted: September 10, 2016 at 11:16 PM / IP Logged Link to Post Post Reply Quote zlem
Thank you for the quick responses. This is my first install and wasn't aware that the vats bypass needed to be used. I will try the bypass tomorrow and follow the diagram in the manual. Thanks for the assistance
lurch228 
Silver - Posts: 1,338
Silver spacespace
Joined: August 08, 2012
Posted: September 11, 2016 at 2:11 PM / IP Logged Link to Post Post Reply Quote lurch228
You will only cut the one VATS wire #1 (White or WHITE/ Blue) to go thru relay and connect to the other. Test the lock cylinder resistance and match it for the relay to goto the #2 WHITE/ Black OR WHITE/ Yellow.
zlem 
Member - Posts: 17
Member spacespace
Joined: September 10, 2016
Location: North Dakota, United States
Posted: September 11, 2016 at 5:34 PM / IP Logged Link to Post Post Reply Quote zlem
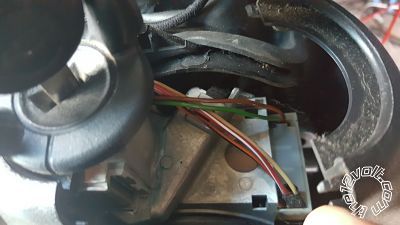
OK so I found 5 wires that go up towards the key cylinder. A group of 3 that go towards the topside of the cylinder (RED / white, ORANGE / black, and yellow), and the group of two which go towards the back of the cylinder (brown and green). I cut the yellow wire in the group of 3 and stripped the ORANGE / black and get no resistance when the key is off or in the on position. I tried from the cut yellow to the RED / white and had a resistance around 6k when key was off and nothing when the key is turned on. Also the truck would not start at all when the yellow wire was cut. Am I looking at the right wires? Why will my key not show a resistance so I can match a resistor?
zlem 
Member - Posts: 17
Member spacespace
Joined: September 10, 2016
Location: North Dakota, United States
Posted: September 11, 2016 at 5:57 PM / IP Logged Link to Post Post Reply Quote zlem
1999-2002 Silverado Remote Start w/Keyless Pictorial - Page 7 -- posted image.
pts760 
Copper - Posts: 403
Copper spacespace
Joined: December 11, 2009
Location: United States
Posted: September 11, 2016 at 7:03 PM / IP Logged Link to Post Post Reply Quote pts760
Your key wont show a resistance because you don't have a VATS system like you have been told. You have a Passlock 2 system and your resistance has to be tested from the yellow wire from the group of three passlock wires.
these are your wires: RED / white (12v), Yellow ( R-code or Resistance), ORANGE / Black (Passlock ground). You will only use yellow and ORANGE / black. Here's a link on how to bypass it (Refer to method one for wiring): Directed Tech Doc 1048
I drink current, eat ohms, and bleed voltage
Page of 15

  Printable version Printable version Post ReplyPost New Topic
You cannot post new topics in this forum
You cannot reply to topics in this forum
You cannot delete your posts in this forum
You cannot edit your posts in this forum
You cannot create polls in this forum
You cannot vote in polls in this forum

  •  
Search the12volt.com
Follow the12volt.com Follow the12volt.com on Facebook
Friday, April 19, 2024 • Copyright © 1999-2024 the12volt.com, All Rights Reserved Privacy Policy & Use of Cookies
Disclaimer: *All information on this site ( the12volt.com ) is provided "as is" without any warranty of any kind, either expressed or implied, including but not limited to fitness for a particular use. Any user assumes the entire risk as to the accuracy and use of this information. Please verify all wire colors and diagrams before applying any information.

Secured by Sectigo
the12volt.com spacer
Support the12volt.com
Top
the12volt.com spacer