Flushing a Remote, Fun Little Project
Printed From: the12volt.com
Forum Name: Fiberglass, Fabrication, and Interiors
Forum Discription: Fiberglass Kick Panels, Subwoofer Enclosures, Plexiglas, Fabrics, Materials, Finishes, etc.
URL: https://www.the12volt.com/installbay/forum_posts.asp?tid=87279
Printed Date: February 22, 2026 at 1:13 PM
Topic: Flushing a Remote, Fun Little Project
Posted By: philaf
Subject: Flushing a Remote, Fun Little Project
Date Posted: December 16, 2006 at 3:23 AM
so this was brought up in a different thread, but i figured i'd share it here for anyone that might want to use it for their installs. this can be done anywhere you have a big enough chunk of plastic, like some center consoles or door armrests. sorry about pic quality, but i did this on a whim at work so all i had on me was my camera phone.. haha. oh well, on with the project step 1.. take the remote apart 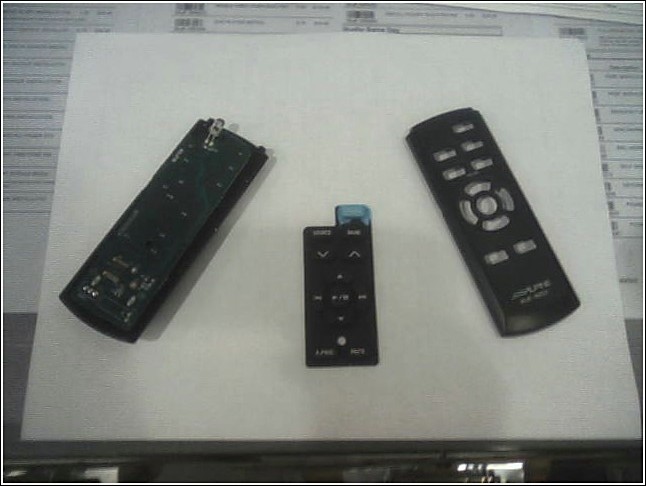 step 2.. trace upper shell onto desired location 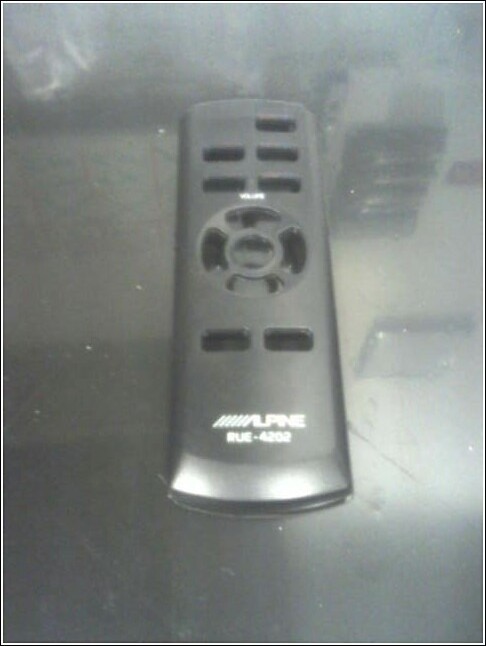 step 3.. start removing material (sucks when you leave your dremel at home) 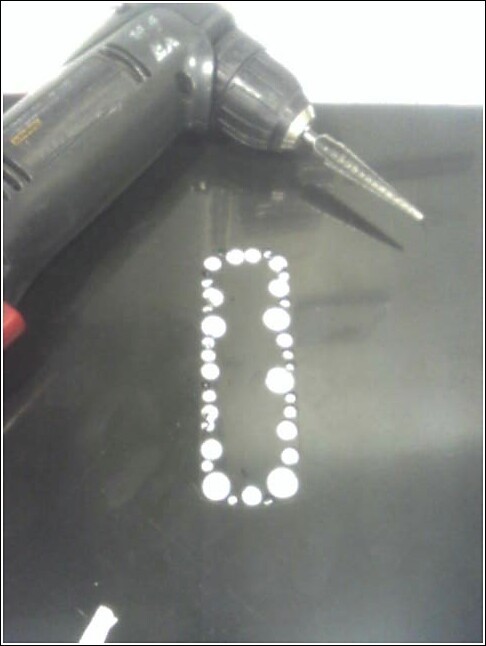 step 4.. test fit the piece. needs to be nice and snug 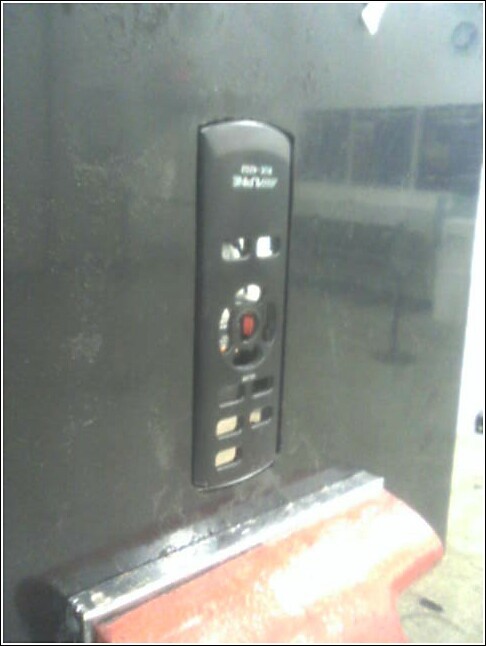 step 5.. epoxy the pieces together, making sure to keep all epoxy on the front 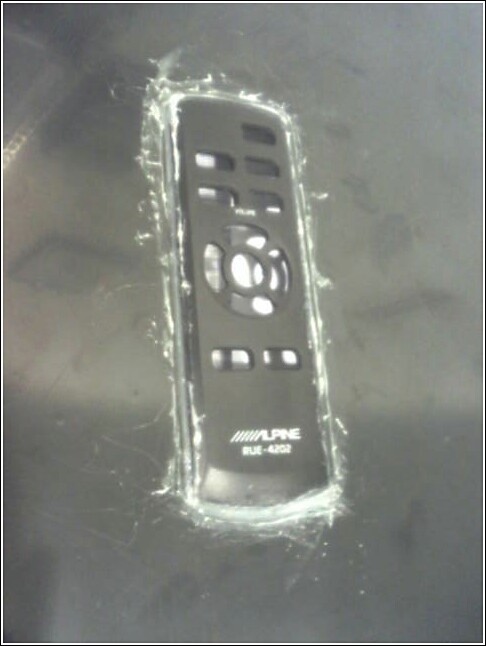 here's a shot from the back, showing the mounting rail sitting above the surface 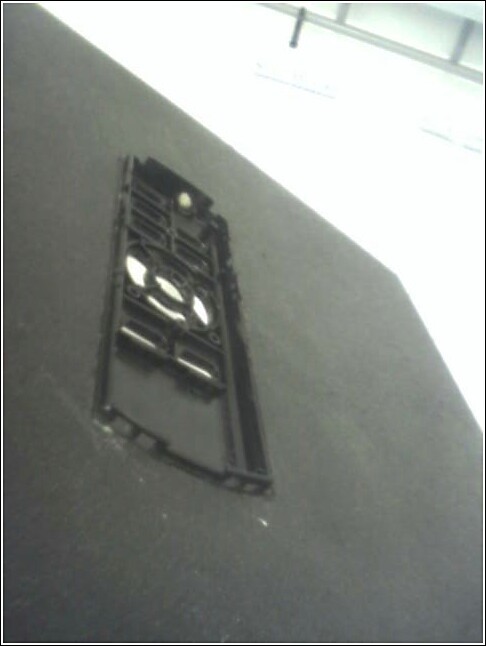 step 6.. slap on some bondo. i kinda over-did it, but oh well, that's what electric sanders are for 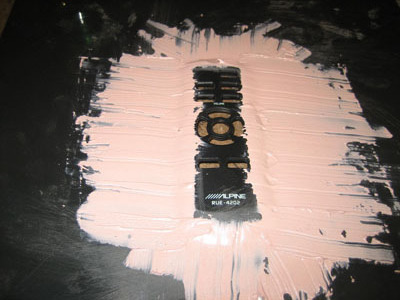 step 7.. sand her nice and smooth, trying to get the pieces to blend together 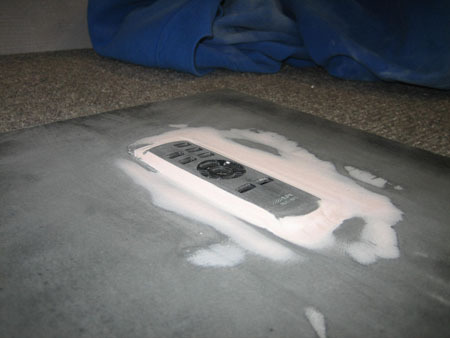 step 8.. paint surface and test fit the button pad to get an idea what the finished product will look like. i used some cool dashboard texture paint i had laying around 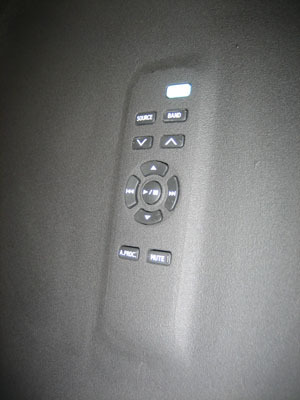 step 9.. snap the remote back together again after extending the led outside the case. i just drilled a simple hole and ran the lines right thru. the same method could be used to extend the battery contacts, i just didn't care to in this project 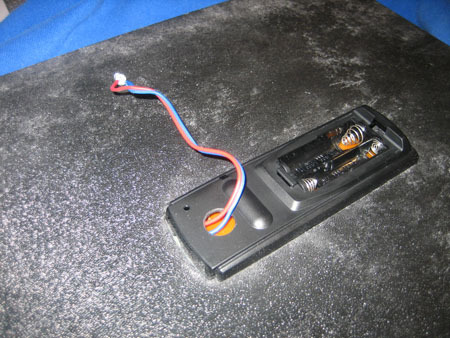 well that's it.. pretty simple, only took about 30 minutes to do (excluding the misc drying times of course) had this been for an actual car i woulda took a bit more time getting the final product a little smoother anyways, hope this gives someone some useful ideas
Replies:
Posted By: mi_what
Date Posted: December 16, 2006 at 10:35 AM
Damn man, good idea. Creative juices are flowing. Of all the projects I have come up with, it never dawned on me to attempt this one. Excellent write up too bro; yours came out tight.
Thanks, I know that I'll be using this sometime in the near future.
Posted By: ss-installer
Date Posted: December 16, 2006 at 11:09 AM
im already looking for a place to put my remote
Posted By: memphis9
Date Posted: December 16, 2006 at 2:22 PM
I like that idea. I think ing how I can do that now.
-------------
G-Boys Customz
Northville, MI
Posted By: philaf
Date Posted: December 16, 2006 at 2:56 PM
thanks guys! glad to help inspire new ideas.. presonally, i'm thinking of doing this with an xbox controller into the center of my steering wheel.. then i just gotta come up with something for the top triggers.. nothing sweeter than sitting in gridlock kicking ass on halo! hahahahaha ... actually, this would be perfect for those long ferry lines/rides. sidenote: wow.. a pinned topic. i'm honored
Posted By: mi_what
Date Posted: December 16, 2006 at 4:42 PM
I think it shall be done with an X-box controller. I would definatly encourage you to figure out how to engineer that one. That would be out of the ordinary. You could probably pull it off if you completely fabed a whole new grip on an existing steering wheel. I could see a certain amount of ease of exposing the triggers but, gripping the controller with enough comfort to be able to play accurately...now that's the tricky part.
I see the trouble of ergonomics playing a role in this build.
But, thanks again for the build process. It deserves the pin.
Posted By: the rah
Date Posted: December 21, 2006 at 7:28 PM
dude !!!!!!!!!!!!!! i got one thing to say...................................................................................bad azzzzzzzzz!!!!!!!!!!!!!!!!!!!!!!!!!!!!!!!!!!!!!!!!!!!!!!!!!1 ------------- rah2son
Posted By: beyondamfm
Date Posted: January 07, 2007 at 7:01 PM
very nice write up man. Looks good ------------- The Clear Bra Guy
KCs premiere paint protection guru
Posted By: yonello
Date Posted: January 11, 2007 at 8:39 AM
Can that go on plastic?????Like dashboard?????? ------------- Yonello Wernet
Posted By: maglin
Date Posted: January 12, 2007 at 3:01 PM
oh man, you shold SOOOOO install a PS2 steering wheel and pedals on passenger side with a tv screen in teh dash, just to seriously love with people. LOL
where's my pos 93 pontiac... thats going to be teh crazy install for it... ontop of the two tone panels and busted door window motors.
Posted By: ants_s2
Date Posted: February 04, 2007 at 2:57 PM
Cool idea! One question though: do you have any creative ideas on what do do with the LED emitter? I mean, you do have to have a line of sight from the LED to the actual component you are controlling, right?
Posted By: philaf
Date Posted: February 17, 2007 at 9:14 PM
ants_s2 wrote:
Cool idea! One question though: do you have any creative ideas on what do do with the LED emitter? I mean, you do have to have a line of sight from the LED to the actual component you are controlling, right?
well yeah.. i usually just drill a small hole somewhere in the center console or wherever and hot glue the led behind it. i've also managed to get it to work from inside a domelight housing before. kinda finicky, but that's prolly cuz i let it just emit the signal thru the clear plastic part. in hindsight, i prolly shoulda flush mounted the emitter into the domelight housing. who's gonna notice a 1/8" hole in a domelight housing right? oh well.. maybe next time. i did just pick up a new project car.. maybe i'll try it with this one. cheers
Posted By: jlsmobilesound
Date Posted: March 13, 2007 at 5:16 PM
Wow! Great idea - something to try on the next multimedia installation! But you HAD to use an Alpine remote? LOL! Kudos on the idea though - I'd never think of it!
-------------
Posted By: mr.devil
Date Posted: April 30, 2007 at 3:59 PM
Sounds like a cool little project. I'll give it some thought. ZAP superglue (thick) works great for filling those gaps and doesn't have to be mixed like epoxy, if you can find it. I believe most hobby shops carry it. Remote looks great!
-------------
Devil's_Workshop
|