How to Wire Through a Door Molex.
Printed From: the12volt.com
Forum Name: Car Audio - Hot Topics
Forum Discription: Stickied topics from our car audio forum. Car Audio FAQs. Read First!
URL: https://www.the12volt.com/installbay/forum_posts.asp?tid=78731
Printed Date: April 18, 2024 at 11:01 PM
Topic: How to Wire Through a Door Molex.
Posted By: forbidden
Subject: How to Wire Through a Door Molex.
Date Posted: June 05, 2006 at 2:11 AM
This tutorial is to aid you when you are faced with the dreaded door molex and how to get your speaker wires past it. This install was done on a 2006 Mazda 3. This is becoming more and more common these days so expect to see it in your new car, be it a Mazda or a Jeep. Here is a great picture of what not to do. I should point out that this method is done frequently by installers who are lazy, or for customers that do not want to pay to have the job done properly. Notice as well the rust starting below where he drilled. This is from the installer not cleaning up his metal shards after drilling. I should also point out, that this customer, a friend of mine in a different city, went for the "deal" and not the quality. He was also told by four local shops, 2 big box and two specialty shops that this is also the only way that they will do this work. Here is the list of excuses he was given. (1) It voids warranty. (2) The wire does not fit. (3) The wire will get cut when the door opens and closes. (4) The wire will chaff in the molex. (5) The electrical switches will no longer work. 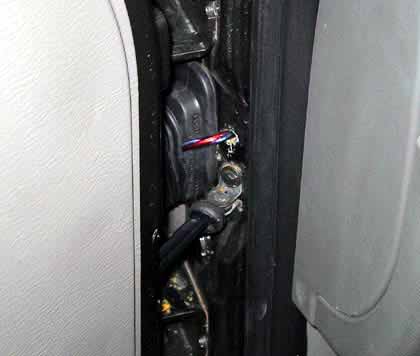
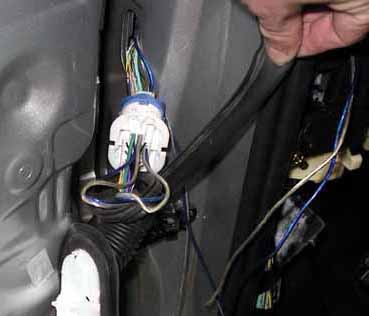
Here is a picture of the suspected offender. Putting your fingers onto the boot where it makes contact with the door, you should be able to feel the plastic molex housing underneath. 
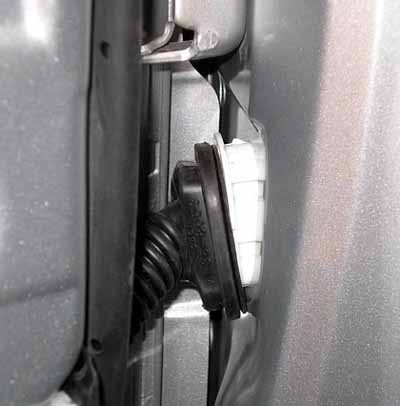
The first thing to do is to peel back the protective rubber boot to expose the molex and to see how it is locked into the door. Use a pick tool or a small common screwdriver to help you here if you cannot get your fingers in the area. If you are going to be putting your fingers into this area, take great care not to move the door as when it swings it might try and cut your fingers off as it swings past. 
Next is the picture of the molex a little closer. If you look closely at the plug, you will see the press down lock tabs in the four corners. Use a pick tool and push the tab down while you pry that corner. Next push the other matching top (or bottom) tab down. Either the top or the bottom of them molex should now be free from the door. Now do the other 2 tabs to release the entire molex and pull it out of the mounting hole. Expect it to be fairly deep so be carefull as to how you pull it out. The metal in the door jamb is sharp, so be carefull not to chaff the factory wires on it! 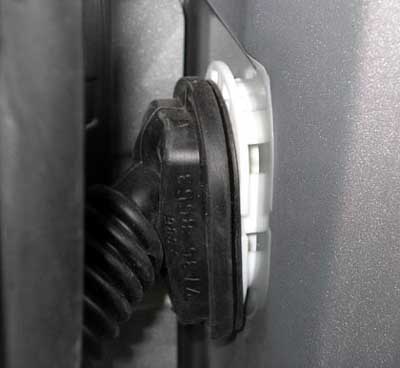
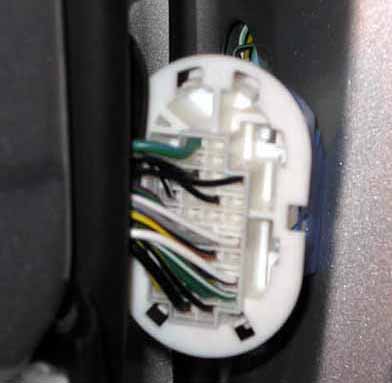
Now for the first look at what you can do. If you notice in the last picture all the unused holes (holes with no wires going into the molex). That is where we shall be running our new wires. You need to look at both the front and the backside of the molex as there very well may be factory wires in the back molex that do not come through on the front side (depending on options in your vehicle). 
The above picture is the back half of the molex after it has been unsnapped from the front. 
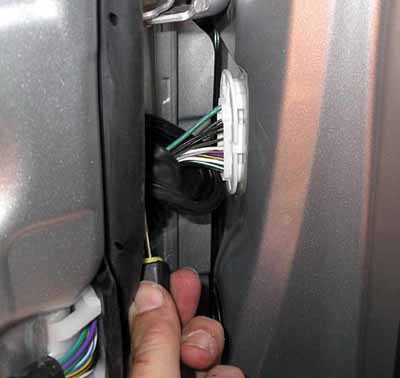
The above picture is the front half of the offensive foul beast that we are soon to torture. The next picture below in this case is where the new wires must enter the boot from on the drivers door. 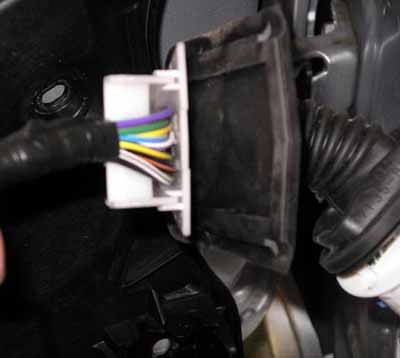
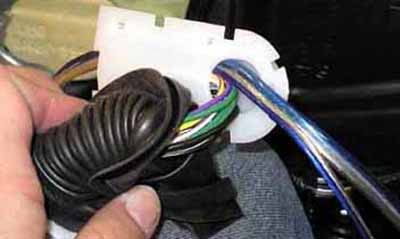
The second picture above is the boot removed from the protective plastic shroud that the factory wires are in. As I am installing components in this car, I have two runs of 18 gauge speaker wire to pass through to the vehicle. The next picture below shows an alternative method (vehicle dependent) of passing a wire through a molex. If the molex has side holes as this one does, then it is a easy method to pass the wires through. It does not require drilling of either front or back molex to pass through. In this vehicle, I chose not to do this method. 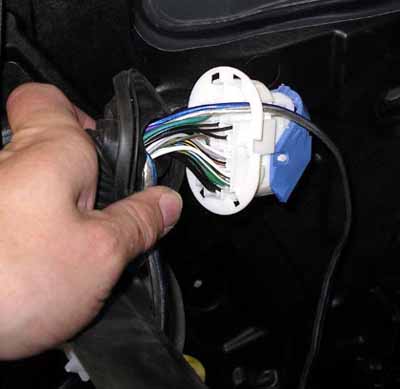

Now onto the business end. There are two ways to drill a molex. One way is to separate the two molex's and drill each indipendent. I generally choose a drill bit that is just under the size of the hole that is there for a factory wire to pass into. As there is no factory wire in the way, it is easy to check. The drill bit size also needs to be just larger than the size of the wire you are trying to pass through. This next picture shows me drilling the front molex from the backside (doorside). The other way to drill the molex is to snap it back together into one large molex and drill from the front to the back. This is my preferred method however, you must be carefull when the drill bit approaches the backside that it does not bind on any factory wires. 
The next picture shows a before and after shot of the rear molex. 

Next you need to split your speaker wire down the center. Pass the wire through the front molex as you see in the next picture. 
Now pass the wire through the rear molex as well. Slowly push the molex's together while you pull the extra speaker wire out. 
Now you should be able to reconnect your molex together, wires ran through it and put the molex back into it's deep dark hole from whenst it came. Take care to secure your speaker wires on both sides of the molex so that the wire cannot move around. 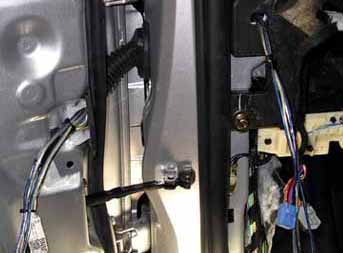
Now you have a new set of speaker wires ran through a molex, properly and with a guage of wire adequate to carry all of that power that new amp of yours is set to give you. ------------- Top Secret, I can tell you but then my wife will kill me.
Replies:
Posted By: DYohn
Date Posted: June 05, 2006 at 8:49 PM
Great work Rob. Thank you for the contribution! ------------- Support the12volt.com
Posted By: spookiestylez
Date Posted: June 05, 2006 at 9:17 PM
Great tutorial, I recently tried to explain this to someone on here...Ill link em to this thread.Great stuff to add to the site! sS ------------- RTFM
Posted By: doibuy
Date Posted: June 05, 2006 at 9:26 PM
This is a great post with tons of detail (photos really help). This is the only way this should be done. I haven't had to do it much with speaker wires, but acutators all the time. Usually with cars getting power locks there aren't many wires in the molex which makes it a lot easier, this example shows that even with a lot of wires in the molex it is still possible. Once again great job!
Posted By: soultinter
Date Posted: June 08, 2006 at 2:31 PM
Damn that is good stuff!!!! Kudos to you !
Posted By: bassplayer24_7
Date Posted: June 09, 2006 at 11:05 AM
very nice
-------------
(2) 12" JL W3V3
(1) 6" JL W0
Phoenix Gold Octane R 8.0:1
Phoenix Gold Octane R 2.0:1
Phoenix Gold Octane R 5.0:4
Clarion Crossover
JVC Head Unit
Posted By: pmh61
Date Posted: June 09, 2006 at 12:17 PM
that first pic looks like the first one i ever did in my 1990 honda accord that was about 6 years ago but yelled at by my uncle and was taught your way lol
Posted By: zhalverson
Date Posted: June 09, 2006 at 7:29 PM
That's just great information. Thanks a ton, I've been wondering the proper way to do that. This site rules! 
Posted By: forbidden
Date Posted: June 10, 2006 at 2:46 AM
What to do for my next trick.......
-------------
Top Secret, I can tell you but then my wife will kill me.
Posted By: KPierson
Date Posted: June 10, 2006 at 10:13 AM
Keep in mind that they use Molex style conntectors because they are waterproof. You just compromised the integrity of the entire connector. This may not be a big deal in all cars, but do this in a G35/350Z and you will have problems in 6 months when the stock BCM is damaged from water dripping on it. These cars hold a LOT of water in their inner door skins, where the wires come out inside the door. The wire provides a path in to the car from the inner door for water to follow. Right below the connector on the car side sits the stock BCM, in a plastic, non weatherproof, enclosure. You really should get in the habit of siliconing at least the car side of the harness before you put it back together. The door typically isn't a big issue because they fill with water anyway when it rains. ------------- Kevin Pierson
Posted By: forbidden
Date Posted: June 10, 2006 at 11:12 AM
Kevin, that is a good point that I did not bring up in the original post, thank you for adding it in. In this vehicle the extra holes were indeed factory drilled all the way through. All that was left in the hole was the plastic retainer clip that would hold in the factory wire pin. In this case at least, this vehicles molex was not a waterproof seal as all of the other unused holes were open from side to side. As Kevin correctly points out, we all should be aware of what sits on the vehicle side of the molex and pay attention to keeping it dry. I think it is a great idea to incorporate a little silicone in the backside and frontside of the molex once it is back together and the new wires are tied down so as not to move (and spread the siliconce all over). The intergrity of the molex is going to change from vehicle to vehicle, in this case, the molex was not waterproof, the black rubber boot was the sole moisture barrier. Kevin, or anyone else, if you come across a molex that is of a waterproof design, do post the pictures up here for us to see.
-------------
Top Secret, I can tell you but then my wife will kill me.
Posted By: arrow12
Date Posted: June 14, 2006 at 8:59 PM
forbidden... If those were your hands, then all I have to say is that you should be a hand model  . In all seriousness though... That is a great thread and thanks for the insight. . In all seriousness though... That is a great thread and thanks for the insight. ------------- That's my opinion. Take it, leave it, or correct me.
Posted By: forbidden
Date Posted: June 14, 2006 at 9:06 PM
If you look close on my left hand you can see the scar from a 2 shaft radio that had a incident with my left hand 20 years ago. My hands have taken beating and will take some more. When I had my fingerprints taken earlier this year for my police application, the guard that took them says "wow, your fingers have been beat to crap, what do you do for a living". He had never in his years seen a set of fingerprints that looked so much like a battleground. My hand won the incident with the 2 shaft radio.  ------------- Top Secret, I can tell you but then my wife will kill me.
Posted By: Melted Fabric
Date Posted: June 27, 2006 at 5:55 PM
I remember you saying I think in the Misc Forum, you were going to do a molex door HowTo, glad to see it is done and finished. I did not know the G35/350Z were at risk, my brother has an 04' 350Z I will pass this info along to him.
-------------
I have not failed. I've just found 10,000 ways that won't work.
When you do not know what you are doing and what you are doing is the best -- that is inspiration.
Posted By: gus1
Date Posted: August 02, 2006 at 11:52 AM
The other, really pimp way to do this if you have access to a pretty vast terminal selection is to actually repin the factory connector.
We try to keep a few terminals in stock at all times for the newer Hondas such as the Ridgeline, Accord, and Odessy, along with the new VW stuff and the Dodges(truck rears). Only takes a couple seconds tocrimp,insert, done. And, you don't need to worry about a body shop cutting your wiring if they need to take the door off.
Just another perspective....
Gus
-------------
Wherever I go, that is where I end up......
Posted By: meltingplastic
Date Posted: August 02, 2006 at 10:31 PM
Ok, speaking of door molex's, how bout for the Kia Amanti? I Had a 2004 in last winter for a rs keyless and to grab the lock wires u had to get through the molex. took me and another installer about 2 hours just to get access to the molex and then get the wires in. Ne tips for that car?
-------------
Driving a Bagged, Caddied 02 s10
Posted By: defjammer
Date Posted: August 11, 2006 at 9:46 AM
OK, what's the secret? How... for the love of god... do you get the rubber boot back on the molex?
Posted By: forbidden
Date Posted: August 11, 2006 at 11:37 AM
You put the boot back on before you push the molex back in the hole.....
-------------
Top Secret, I can tell you but then my wife will kill me.
Posted By: defjammer
Date Posted: August 13, 2006 at 12:59 AM
Now why didn't I think of that, lol. Thank you.
Posted By: jason777
Date Posted: August 15, 2006 at 7:40 PM
Well, I'm screwed now. I pulled off the rubber boot in between the door to expose the wiring that goes into that molex plug. There are 2 tabs on each side of the connector. You push in both tabs to unplug it.
I didnt realize that it was such a tight space in there. I can push in the one tab with a flathead...but there is no way to get an angle to push in the other tab. The only way to get this rubber boot back on is to get this disconnected. I'm screwed cause now I cant shut my door. This is a 2003 Tiburon. Please help!
Posted By: SilkSurgeon
Date Posted: August 16, 2006 at 12:57 AM
This is an excellent post. Keep it up. Molex's are becoming more and more popular.
Posted By: forbidden
Date Posted: August 21, 2006 at 12:32 PM
It helps to have a number of different types of tools to help take out molex connectors, like a angled pick tool for example to push on a tab that might be on the backside of the molex.
-------------
Top Secret, I can tell you but then my wife will kill me.
Posted By: oscarnl86
Date Posted: August 23, 2006 at 11:32 PM
are most cars like that? because i remember when i was yunger i tryed removing the ruber boot but could not get it back into place just wana make sure ------------- i know some stuff and what i dont know ill make it up feel free to ask
Posted By: wranglercory
Date Posted: August 28, 2006 at 1:10 PM
take your time and dont run it around the body
Posted By: dcman41
Date Posted: March 16, 2009 at 1:49 PM
Great tutorial, i just did that my self last night, in my g35 coupe. I drilled through the molex connectors(one on the door side, and one on the car side) since there was alot of empty spots in the connectors, then i ran my 2 sets of 16 gauge speaker wire through it. I had a hard time getting the male connector to snap back in place, the connector that sits in the door jamb, not the one that is coming from the door itself. I then, snaked all my wires through the factory grommet. It took a long time but im glad that i took my time to do it right.
Posted By: bwhvac065@aol.c
Date Posted: April 06, 2009 at 12:12 AM
nice work not too many people know how to do it right. keep up the good work
-------------
Blazerspl
6 rockford 12s
5500 watt pa amp
12.0 cubic enclosure
BIG 3
Posted By: hamzter
Date Posted: April 12, 2009 at 7:30 PM
I think this is the best route especially in the newer vehicles. +1 on the pump Side...
gus1] wrote:
The other, really pump way to do this if you have access to a pretty vast terminal selection is to actually repin the factory connector.
We try to keep a few terminals in stock at all times for the newer Hondas such as the Ridgeline, Accord, and Odessy, along with the new VW stuff and the Dodges(truck rears). Only takes a couple seconds tocrimp,insert, done. And, you don't need to worry about a body shop cutting your wiring if they need to take the door off.
Just another perspective....
Gus
------------- Mark "Hamzter" Cinense
1991 Infiniti G20 w/JDM SR20DE
Eclipse CD8445
MTX Thunder 684
Polk DB6750
Polk DB6500
Optima Red Top in the Trunk
Posted By: soundcontrol
Date Posted: May 20, 2009 at 6:10 PM
Really good post. Did this a few months ago on my wifes 07 mustang. I was really wized when I went to work and found the molex. I was hoping it would die with Dodge/chrysler vehicles. As far as the lazy way, instead of drilling why didn't those jack-a%$es just run the wire to the backside of the head unit and tap onto the factory wire. Even if you have compnonets you can split it inside the car door with the x-overs. It isn't the best option becuase the factory wire isn't as quality as what you are adding, but it would still work really well. When I worked at Ccity years ago and someone didn't want to pay for the wire required to run everywhere that is what we would go with. With an after market radio harness it takes only a few minutes to do with adding the rcas and remote wire. Great pics as well. ------------- Just do something
Posted By: darksidecelica
Date Posted: August 24, 2009 at 8:41 PM
This guide came in handy as I had to do a 4 actuator install on a 07 mazda 6 a few weeks ago. The first one took some time but the last three I breezed through them quickly
Posted By: jas23
Date Posted: March 11, 2010 at 7:50 PM
I signed up to this forum just to say thanks a ton for taking the time to post this up with awsome pictures, I was looking for some info on this for ages before I came across this post.
I am doing an install on a 2008 Mazda 3 at the moment and this is going to be gold for doing those front doors.
Posted By: hintzyboy
Date Posted: June 14, 2010 at 6:47 PM
Sorry to bump up an old thread, but I wanted to thank forbidden for this post. I had been following the install guide by VaBoom (member of Cardomain, Mazda3forums, Caraudio.com, etc), but ran into some issues with the speaker wires. He ran a passive component set, and just tapped into the factory wires behind the headunit. Since I'm running an active setup, I was a little stumped as to how I would run the wires.
I do have one question though, if anyone can help. I have the Molex connector pulled out of the door jamb, but I was wondering if there is any special method to disconnecting the two halves. I don't want to just go yanking on things and mess something up. I've already got that blue lever thing swung back, but the thing still isn't coming apart with gentle pressure.
Posted By: hintzyboy
Date Posted: June 15, 2010 at 3:38 AM
well I got the connector apart. The drivers side cables were just so short, I had a hard time getting the connector at the right angle to let the two pieces slide apart.
To forbidden, one more question. I've got the speaker wires run through the molex connectors now, but I'm having trouble routing the cables into the cabin on the passenger side. How did you manage this? I've shoved every inch of me I can inside the footwell to get a better angle, and fished a snake tool everywhere I can think, but have come up empty. I'll try hitting up the Mazda3Forums for answers too, but I figured you might be able to offer some insight, since you've done this the same exact way on the same car.
TIA
Posted By: calijtee1
Date Posted: August 31, 2010 at 11:34 AM
beautiful work! newer cars cant just be drilled and left looking all crappy, by drilling i think you take more time...lol...great post!
-------------
installers do it best. we got the magic hands!
Posted By: jrock4207
Date Posted: February 22, 2011 at 7:52 AM
Cudos on the write up! Wouldnt have done it any better myself. I myself own a Mazda 3 and its good to see people doing proper work instead of slop jobs like that one pic you posted!!!
Posted By: highbird
Date Posted: April 12, 2011 at 10:20 PM
This has been insanely helpful! I did the non-drill method but I'm having trouble fitting it back into place. I'm doing this in a 2008 Mazda 3 and using a 16 gauge wire.
Posted By: gandalf91
Date Posted: October 02, 2011 at 6:09 PM
Wow...I'll have to keep this in mind next time. I have a Mazda vehicle as well, and I actually went through the painstaking work of fishing my speaker wires through the molex. Took about 15-20 minutes each door. What fun that was. :|
Posted By: forbidden
Date Posted: November 22, 2011 at 10:46 AM
I am down but not out you guys.... I have had a career change after over 20 years of car audio. I still am around from time to time. It is good to hear that my sticky has aided so many people.
-------------
Top Secret, I can tell you but then my wife will kill me.
Posted By: gd2go
Date Posted: May 09, 2012 at 7:11 PM
Great post. I'm a newbie & my problem is there is only one empty spot on the plug unless of course I can removethe door speaker pins, unnfortunateley i havent figured how to do it. Does anyone know how u can remove the pins in them type plugs. Plz & thx
-------------
Dave Rose
Posted By: flynntech
Date Posted: March 01, 2013 at 9:24 PM
Most pins come out the same way. If you don't have a pin removal tool, it is possible you could cheat it out with a very small screwdriver or X-acto blade.
The side where the male and female pins meet is where you would be accessing the release tab(s) from.
You could always tear them out and drill, but then you would have ruined the factory pins which you may want to re-use sometime.
|