Gentex 261 Mirror Repair
Printed From: the12volt.com
Forum Name: Mobile Video, GPS, and Navigation - Hot Topics
Forum Discription: Stickied topics from our Mobile Video and Navigation Forum.
URL: https://www.the12volt.com/installbay/forum_posts.asp?tid=133501
Printed Date: May 05, 2026 at 8:44 AM
Topic: Gentex 261 Mirror Repair
Posted By: ldkraemer
Subject: Gentex 261 Mirror Repair
Date Posted: February 02, 2013 at 7:20 PM
My Gentex GNTX-261 Rear View Mirror quit displaying the Compass Heading and Temperature. I searched the Forum and found two postings that gave me lots more information about my Mirror.
https://www.the12volt.com/installbay/forum_posts.asp~TID~8560~PN~1~TPN~5
https://www.the12volt.com/installbay/forum_posts.asp?tid=65874
I used this information to locate a replacement Mirror and I installed the replacement.
I wondered if I could disassemble the defective mirror and locate the source of the problem, causing no Heading or Temperature Display.
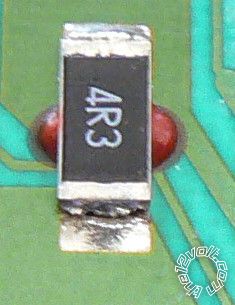
I used a very small, thin blade screwdriver and carefully pried it in the gap of the Front Bezel, carefully pushing it towards the rear of the mirror, and working my way along the mirror. As I approached the lcok tabs the Front Bezel would pop, and move out slightly. I continued working around the mirrors Bezel. Once I had the Front Bezel removed, I removed the Circuit Board along with the Mirror assembly. I looked at the Temperature Circuit board and it was apparent that the Surface Mount Resistor had one side that was not soldered to the Circuit Board. I used 63/37 .050" Solder to to re-solder all three of the Large Surface Mount Resistors.
After half reassembling my Mirror, I tested it and it once again worked.
If you have a similar condition, your problem could be the same.
Thanks.
Larry
Replies:
Posted By: ldkraemer
Date Posted: February 02, 2013 at 7:31 PM
My GNTX-261 Mirror was installed in a 2003 Chevrolet Silverado 2500HD Duramax Diesel Truck.
Attached are the Circuit Board Images, before repair.

Thanks.
Larry
Posted By: Ween
Date Posted: February 02, 2013 at 7:38 PM
thanks for the info
Posted By: ldkraemer
Date Posted: February 02, 2013 at 7:48 PM
To Test and Troubleshoot your GNTX-261 Mirror:
Test #1
To troubleshoot the Mirror I did a test to see if I could Power it "OFF" & "ON". If I pressed and held the TEMP button for ~9 Seconds the small Green Power LED went off. Likewise depressing and holding the TEMP button for ~9 seconds turned the Power back "ON" to the Mirror.
Test #2
Now, I wanted to test the Auto Diming Feature. During Daylight hours I started the truck, and held my finger over the photoeye that is on the back of the mirror (facing to the front of the truck), while watching the Mirror. It started turning dark, and continued to get dark enough I could barley see anything in the display.
That was about all I could do with my DEFECTIVE Mirror. The Temperature & Compass Indicators were never displayed.
I learned that my Mirror has a 16 Pin Plug that plugs into the back of the Mirror. If you unlatch the plug and remove it from the mirror
so that the latch is to the left and the Lime Green wire is positioned at the Top Right position your wiring is as follows:
1 through 8 on the Left from Top to Bottom, and 9 through 16 on the Right Top to Bottom.
1 - Not used
2 - Not Used
3 - Light Blue
4 - Dark Green
5 - Gray
6 - Light Green w/2 White Tracers
7 - Dark Gray w/2 White Tracers
8 - Black
9 - Lime Green
10 - Not Used
11 - Dark Green w/2 White Tracers
12 - Lime Green w/2 Black Tracers
13 - Yellow
14 - Yellow w/2 Black Tracers
15 - Choc Brown w/2 White Tracers
16 - White with Pink mixed on wire
Actual Wiring Detail is discussed on the previous mentioned forums.
The GENTEX site has good documentation on:
1. AutoDimmingReferenceGuide.pdf
2. CompassCalibrationTroubleshooting.pdf
3. CompassReferenceGuideAndTroubleshooting.pdf
https://www.gentex.com/automotive/product-support/product-support-faqs
Thanks.
Larry
Posted By: ldkraemer
Date Posted: February 02, 2013 at 8:04 PM
The sad thing is that I've found hundreds of postings on different Forums requesting information, and help for this specific problem,
with no solution. I took it upon myself to investigate my problem, and post my results.
The GENTEX CORPORATION's information is:
Gentex Corporation - Corporate Headquarters
Investor Relations and Corporate Communications Department
600 North Centennial Street
Zeeland, MI 49464
616 772 1800 - phone
616 772 7348 - fax
https://www.gentex.com
I'm sure they are well aware of the problem as their Case History file is most likely overflowing with duplicate cases of poor Solder Joints.
But, it wouldn't hurt to notify them of your problem, and request
a solution to their Quality Control Problem. You may also want to mention this Forum's Postings.
Thanks.
Larry
Posted By: ldkraemer
Date Posted: February 06, 2013 at 6:54 AM
I noticed that my re-soldered mirror needed to be Calibrated, and although I'd had previously Calibrated my Mirror, I couldn't seem to get it in the Calibrate mode.
My Mirror only had the "COMP" & "TEMP" Pushbuttons.
I depressed the "COMP" Pushbutton for ~6 Seconds and it changed to the Zone Display. Arizona is Zone 5, and I wanted to change from the current setting of 2 to 5. The "COMP" Pushbutton changes from a choice of 1 through 15 zones. The secret is that when you depress it to increment to the correct zone, you have to hold it depressed to get the CAL display. For me I just kept Depressing "COMP" until I saw Zone 4. The next Depress of the "COMP" Pushbutton incremented to 5, and by keeping the Pushbutton Depressed my Mirror displayed CAL and started the CAL procedure. I just started my slow ~5 MPH circles in an Empty Parking Lot until the Mirror had calibrated itself.
Larry
Posted By: ldkraemer
Date Posted: February 09, 2013 at 12:35 PM
GM 2003 Rear View Mirror Wiring Schematic is available here:
https://www.dieselplace.com/forum/showthread.php?t=374316&page=3
Lrry
Posted By: ldkraemer
Date Posted: February 12, 2013 at 4:53 PM
I was told the GNTX-261 Mirror uses a NTC Thermistor, wired to Pin 6
and Pin 7, to sense the temperature. (Negative Co-effiecient Thermistor
decreases Resistance as the Temperature rises.)
Larry
Posted By: ldkraemer
Date Posted: February 18, 2013 at 3:28 PM
Another interesting thing I discovered this morning was, while driving in bright sunlight, I put my finger over the Light Sensor that looks forward on my truck. The mirror started dimming, and when it got almost black my Mirror powered off. I thought GREAT, it quit again. So, while I was disgusted I removed my finger, and kept driving. After about 15 seconds I looked at the Mirror, and it was once again powered up, and working. I tried it a second time, and it duplicated the power off event.
Larry
Posted By: ldkraemer
Date Posted: February 19, 2013 at 10:39 PM
My 2003 Duramax has a Gentex GNTX-261 Mirror with the two Buttons (COMP & TEMP) (No Air Bag Display, & No Onstar)
When the Mirror is powered "ON" (Left Green LED is "ON") the TEMP Button will:
1. Turn "OFF" the Mirror if held depressed about 8 seconds. Left Green LED will be "OFF"
2. Turn "ON" the Mirror if held depressed about 8 seconds. Left Green LED will be "ON".
When the Mirror is powered "ON" (Left Green LED "ON") , and the COMPASS & TEMP Display is "ON", the Temp button switches from
Degrees F to Degrees C.
When the Mirror is powered "ON" (Left Green LED is "ON") the COMP Button will:
1. Turn "OFF" the Display for Heading & Temperature. Mirror is still Powered up, Green LED "ON".
2. Turn "ON" the Display for Heading & Temperature. Mirror is still Powered up, Green LED "ON".
If you Depress the COMP Button, and hold it a bit the Display changes to the current Zone. Possible Zones are 1 through 15. Each depress
of the COMP Button will increment to the next sequential Zone. If you want to calibrate your Mirror for Zone 5 (AZ) and it is displaying Zone 3,
you will need to increment the Zone to 4 (One Depress of Comp). Then, the next depress needs to be held in until the Zone changes to 5, and
the Mirror switches to CALIBRATE Mode, and Displays CAL. At this point you can release the COMP Button, and start your slow circles in a
parking lot until the mirror CALIBRATES itself. It will exit the CAL Mode when it's finished calibrating.
One other note. On a Sunny Day, if you place your finger over the CDS Sensor that faces forward, your Mirror will start to Darken (Auto Dim)
and continue to darken until it is almost black. At that point it will power off. Removing your finger from the forward looking CDS sensor will
cause the mirror to power back up, and be fully functional in about 10-15 seconds.
At least that's how mine works on my 2003 Duramax.
Posted By: pgethea
Date Posted: May 10, 2013 at 10:34 AM
I have a similar problem with a similar mirror, maybe someone can shed some light on it?
My mirror, a Gentex 177 stopped working all together. When I test it off the vehicle, it works IF on a 16 volts power supply, but is completely dead on a 12 volt one.
Any idea what could cause that? maybe a bad capacitor or something? Any ideas or thoughts on where to start looking for a bad component?
Thanks everyone.
Posted By: ldkraemer
Date Posted: May 10, 2013 at 12:24 PM
pgethea,
Without a circuit schematic, it's going to be a problem trying to find the component causing the problem. You might follow (trace) the +12 VDC circuit, and see where it is converted to +5 VDC, or whatever is used on the Temperature Circuit Board.
I'd suggest looking on Ebay for a replacement Mirror and just plug it in. But, I know exactly how you feel because I opened mine up to see what was causing my problem. I was lucky and found the COLD/BAD solder joint. You might be as lucky, and have the same type problem.
I elected to not trace any of the circuits when I opened mine.
Larry
Posted By: pgethea
Date Posted: May 10, 2013 at 12:34 PM
Thanks for the reply. I already bought another one, but while I wait for it, I am thinking of ways I might be able to debug this one. If it was dead I would be fine trashing it, but it works, it just needs a higher voltage to work. I was hoping someone might have seen this before and have an idea of what to look for. I already opened it up and didn't see anything obvious wrong with it, but I will more carefully today.
Why do you think I should try to trace the 12V to the temp control board? my mirror is completely dead with 12V, nothing works,so the problem is not isolated to the temp control board.
Thanks.
Posted By: h8uman
Date Posted: January 13, 2014 at 7:02 PM
THIS IS EXACTLY WHAT WAS WRONG WITH MY MIRROR!!!!!
THANK YOU!!!!!!! 
Posted By: pacrim
Date Posted: July 02, 2014 at 6:56 PM
Your posts are the kind that keep on giving months and months later.
I too am having issues with my RV mirror. I conducted the TS described above on a GNTX-261 and I am starting to suspect that I may have a defective mirror rather than a power supply issues. However, it works intermittently so I am not sure if there is an another circuit giving me grief.
How does one tell which model of GNTX-261 is installed? My mirror has the 16 pin connector with compass/temp/airbag and dimmer, it does not have On-Star. When looking for a replacement, all I can find are the units with On-star. Also, what is the device that is separately mounted on the windshield mount? It is connected to the mirror via a 2 pr wire. None of the wiring diagrams seem to show it. the diagrams show the temp sensor, which is located behind the grill of my truck.
Symptoms:
Upon start up and boot, the unit displays temp and direction; airbag status (on/off) is indicated. after a few minutes, the temp/comp dims or goes out but the airbag indicator stays lit. After a while, the unit does dark. Occasionally, the temp/comp digits start flashing random symbols. It looks like all cells of the display are firing off all at once. In the meantime, the airbag indicator is constant and not flashing. Is this an indicator of unit failure or could it be a fault in the temp sensor? I'd hate to spend the $70 on a new mirror only to find its the sensor.
Any Ideas?
BTW: I have a 2004 Chev Silverado 4wd Z71 with extras.
-------------
In gratitude of your knowledge,
Pacrim
Posted By: ldkraemer
Date Posted: July 03, 2014 at 8:16 AM
I don't think there is an eay way to know, other than the different
buttons on the front side. All units have the number molded in
the plastic case. GNTX-261 But, that is only the Model Number
of the Mirror. It doesn't tell you the features it has.
If your unit is for an RV, the Cad Cell might be remote mounted, to
auto dim the Mirror. Does your Mirror have a hole on the left side
pointing towards the front of the vehicle that dims the mirror when covered and the mirror is powered? If not, I suspect they remote
mounted tha cad cell.
Larry
Posted By: pacrim
Date Posted: July 03, 2014 at 12:33 PM
Just when I thought I had the answer...
Thanks for the model id discussion.
On previous post, I discussed how I tested the mirror and suspected that the unit has a fault in it. As of last night, I have revised my suspicion that it may not be the mirror but rather something going on in one of the vehicle's control modules.
Condition & Symptom:
Parked, motor off, ignition on.
Mirror not working, compass and temp out, airbag indicator lit.
(this is were it gets odd) I activate the power windows to close the windows and the compass/temp light up with accurate heading and temperature. When I release the the window switches the mirror stops working. Activate the window switches again, mirror works, release switch, mirror goes dark. Repeat, same result.
I guess the good thing is I now suspect that the mirror may not need replacing.
Any suggestions?
-------------
In gratitude of your knowledge,
Pacrim
Posted By: ldkraemer
Date Posted: July 04, 2014 at 7:20 AM
pacrim,
Afterlooking at my mirror, I'm thinking that you are referencing
the cable that runs from the Mirror to the Base Unit. That is the
GPS Locator Circuit Board, and is attached to the base, so it can
receive the GPS Satellites.
Larry
Posted By: ldkraemer
Date Posted: July 07, 2014 at 9:25 AM
pacrim,
UMmmm...CHEVY...Have you ever seen the "SERVICE BRAKE SYSTEM" Fault light when you start your Silverado? I've got a 2003 Duramax, and there was a grounding problem that I finally fixed. I kept getting
that error message about every 8 months to a year, intervals.
Mine had a bad GROUND directly under your Left Foot as you sit in the seat. The Ground for the EBC is attached to the Frame there. I had cleaned, scraped, and re-tightened that connection several times, but
that didn't fix it. I finally got a Star Washer and put between the Frame and the Lug. That finally fixed it.
Now, none of my Dash Instruments work for 2-3 minutes after I start the truck. DAD BURN CHEVY's. I always seem to have all the troubles.
Larry
Posted By: yroca23
Date Posted: July 08, 2014 at 9:22 PM
Larry - I stumbled upon this forum while searching for a replacement mirror for my 2003 Tahoe. The mirror compass and temperature was no longer displaying, but the airbag ON/OFF was. I cracked the enclosure and sure enough - the same resistor had a crack in the solder - it was no longer connected on one side. Dropped a little solder in there and hooked it up and it is working again. Thanks a ton for taking the time to post your pictures and your fix!
Posted By: hanale
Date Posted: March 27, 2015 at 11:32 PM
Thanks for all this good information. I also have a Gentex 261 mirror from a 2003 Avalanche. This mirror is fully loaded with Onstar, auto dim, Airbag display, compass and temp. In my case no temp, compass, auto dim and airbag display. It would intermittently come on and turn off on its own. The power button did nothing, but the Onstar buttons did work.
This forum inspired me to take my mirror apart. I also bought a used Gentex 261 mirror with the cable so I can power up my broken mirror to see what was going on. The guys who mentioned that the mirror would work if they raised the voltage gave me the idea that there could be power issues. Most electronic integrated circuits work off +5 Volts. I searched around the main board and found the regulator that takes in the 12 volts coming in and cuts it to +5v. My +5 volt regulator was putting out only +4v. I decided to change this part so I ordered ten 78M05 regulators on Ebay for $4. Ten was the smallest quantity you can buy of this part at the time. 78M05 is the part number of the regulator. I replaced the regulator and now I get the required +5v for the rest of the board and everything works like new airbag, auto dim, comp and temp.
The regulator is on the main circuit board near the comp/temp display board. Sorry I'm new to this forum and this site won't let me upload pictures of the board and 5v chip. Anyway if you don't know what it looks like this regulator is black and has 2 pins at the bottom and a small heat sink at the top. It's about 1/4" square. You should see 78M05 printed on this part. The pin to the left should measure around +12.5v and the output pin to the right should measure +5v. If the output pin should measure much less then +5v change it.
This is a surface mount chip so be very careful to not interrupt the other parts around it. I have a hot air rework station to remove this part which make it very easy to do and you can remove this chip in one piece as apposed to cutting it, but you can also use a soldering iron or hot air gun like the one you use to remove old paint if you have that. Just be very careful not the melt anything around that regulator.
Hope this helps others with their mirrors.
|