Print Page | Close Window

2011 town and country remote start

Printed From: the12volt.com
Forum Name: Car Security and Convenience
Forum Discription: Car Alarms, Keyless Entries, Remote Starters, Immobilizer Bypasses, Sensors, Door Locks, Window Modules, Heated Mirrors, Heated Seats, etc.
URL: https://www.the12volt.com/installbay/forum_posts.asp?tid=129705
Printed Date: May 14, 2024 at 11:14 AM


Topic: 2011 town and country remote start

Posted By: tbird2340
Subject: 2011 town and country remote start
Date Posted: December 15, 2011 at 1:59 PM

I'm installing a Compustar 6200 Brain with the RF-P1B-SS and BLADE-AL bypass..

I have the wiring diagram for both the vehicle and for the BLADE-AL.. I'm a little confused as to what all I need to connect..

Is all that I need to hook up what is shown below from the BLADE-AL guide?

posted_image

According to it all that I would be hooking up to the actual vehicle would be the IGN, the CANH, the CANL, and the parking light wire..

Other than that I would think I just need to hook up my (2) 12V and ground to my brain.. Is that right?

Sorry but it's been a few years since I've done installs and I've never used a Blade.

Appreciate any help!


Replies:

Posted By: tedmond
Date Posted: December 15, 2011 at 2:18 PM
has the blade-al been flashed for your specific vehicle?
never done a 2011 TC but based off the wiring the blade-al will take care of everything for you.

just the power/grounds from the 6pin main harness to the compustar is needed, and follow wiring diagram for blade-al

-------------
Ted
2nd Year Tier 1 Medical School
Still installing as a hobby...pays for groceries
Compustar Expert


Posted By: kreg357
Date Posted: December 15, 2011 at 2:21 PM

Pretty much.  From the CM6200 the two Red +12V power, Black to Chassis Ground, Gray/Black to Hood Pin, and White to Horn ( optional ). 

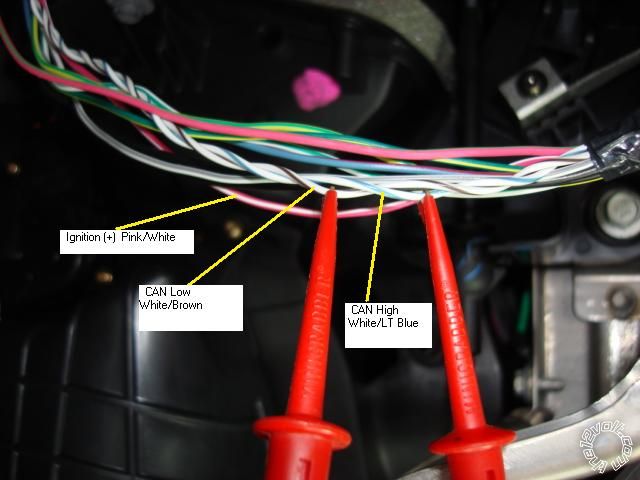
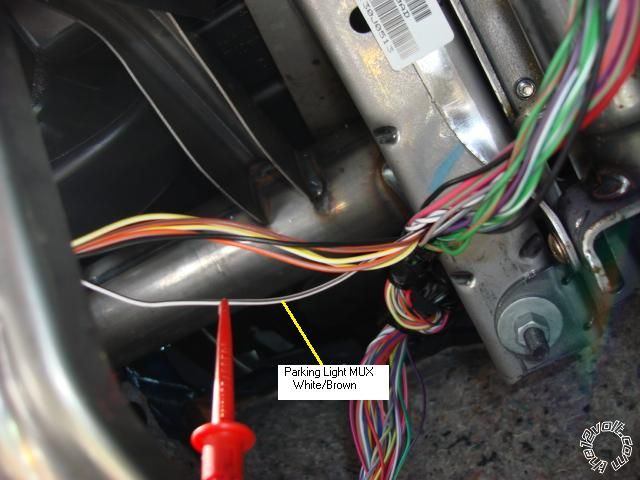
Here are some pics :

posted_image

posted_image

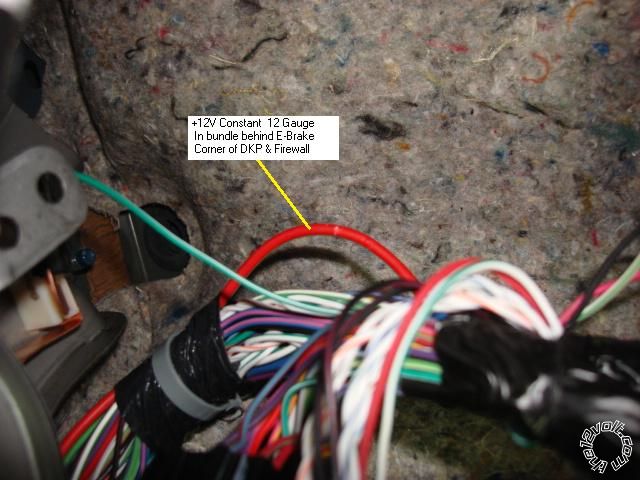
You can fuse down the CM6200 power to 10 Amps ( each ) and connect to this wire :

posted_image


-------------
Soldering is fun!


Posted By: tbird2340
Date Posted: December 15, 2011 at 2:38 PM
Thanks a lot for these pics.. Where are the pictures in the first two pictures in relation to vehicle location?

I can't believe that's all you have to hook up! That's the least amount of wires I've ever had to do.. Awesome!
posted_image posted_image


Posted By: metz35
Date Posted: December 15, 2011 at 2:50 PM
one of my favorite vehicles.... its like a slam dunk in basketball :)


Posted By: kreg357
Date Posted: December 15, 2011 at 3:01 PM

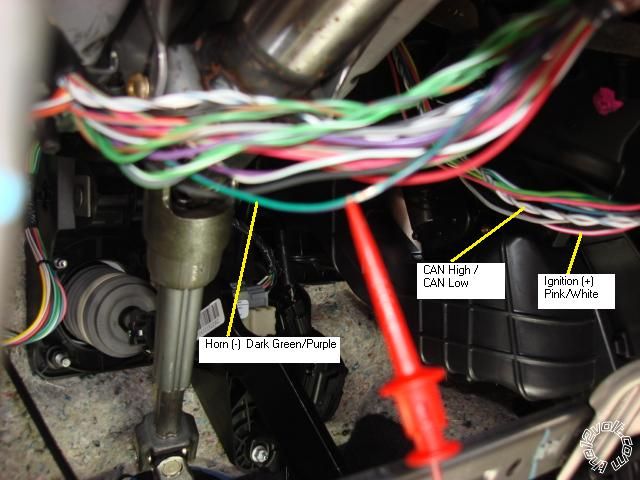
The Ignition and CAN wires are under the drivers dash coming down from the ignition switch.  Here is another picture that is further back ( and shows the Horn wire ) for a better perspective. 

posted_image

When you remove the lower dash panel ( 3 torx screws ) and the metal knee plate ( 4 torx screws ), it is pretty easy to find.

The Parking Light wire picture was taken looking up behind the switch.  The vehicle has a lot of room to work & place the R/S unit.  Like metz35 said, "a real slam dunk"!


-------------
Soldering is fun!


Posted By: tbird2340
Date Posted: December 25, 2011 at 5:56 PM
Anyone know if it would be OK to use a 1N4003 diode? The picture shows a 1N4001 but I actually have a 1N4003 in hand..

Thanks


Posted By: Ween
Date Posted: December 25, 2011 at 7:21 PM
a 1N4003 will work just fine.


Posted By: tbird2340
Date Posted: December 26, 2011 at 7:50 PM
Thanks for all the help. Got this done tonight and it was simple as everyone said! :)


Print Page | Close Window