2009 rav4 remote start needed
Printed From: the12volt.com
Forum Name: Car Security and Convenience
Forum Discription: Car Alarms, Keyless Entries, Remote Starters, Immobilizer Bypasses, Sensors, Door Locks, Window Modules, Heated Mirrors, Heated Seats, etc.
URL: https://www.the12volt.com/installbay/forum_posts.asp?tid=137848
Printed Date: April 27, 2024 at 3:03 PM
Topic: 2009 rav4 remote start needed
Posted By: ocdetails
Subject: 2009 rav4 remote start needed
Date Posted: December 02, 2014 at 5:15 PM
Hey all. I found your site through google searches and I was amazed and the level of information here! WOW!
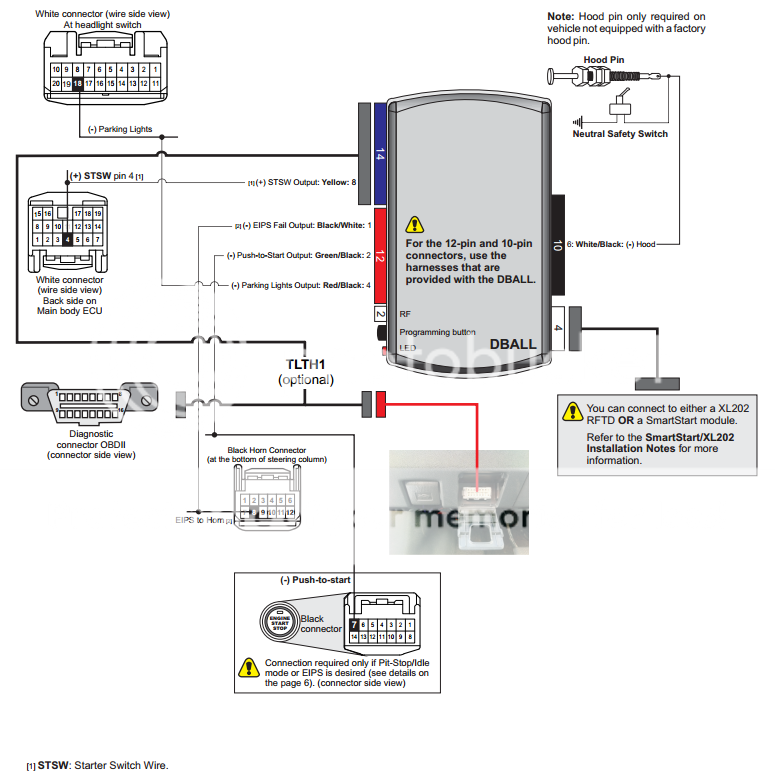
I'm trying to install an Xpresskit TLTH1 harness to my 2009 Rav4 V6 with push button start. The harness just has one yellow wire and the instructions say to connect it to the 'main body ecu' where the STW (starter switch wire) is at. I just need to find where that harness is at and I'm home free. Can anybody help me locate where that would be under the dash? What am I looking for and what color would the wire be? There is a similar install guide for a 2013 Rav4, but it isn't a push button start, so I don't know if this 'starter switch wire' is going to be in the same place. Thank you for any help you can offer.
The instructions are pretty simple on this. It is a harness that connects to the ECU and then to the device. The yellow wire coming out of the harness is all I have to hard wire to the vehicle. Once I do that I will have triple click factory remote access to remote start my car. I'm sooooo looking forward to that!
Replies:
Posted By: pentavolvo
Date Posted: December 02, 2014 at 5:25 PM
3x lock start doesn't work anymore unless you have a module that was programmed months ago
Posted By: ocdetails
Date Posted: December 02, 2014 at 5:31 PM
That I do. ;) I bought it in September and the shop I bought it from had it programmed for me. They actually stopped allowing it in September, but didn't post the notice until October, so they allowed an exception and I got it programmed. Right now I can connect it just to the ECU and get it to turn the car on, just not start it. I need that wire to go to the starter switch wire to complete the installation.
Posted By: tedmond
Date Posted: December 02, 2014 at 8:23 PM
ecu is towards the left side of car. With your head looking up into the dash, the plug you need is on the right side at the backside of the ecu. easy to get to and uplug.
the wire you need is RED Pin 4
-------------
Ted
2nd Year Tier 1 Medical School
Still installing as a hobby...pays for groceries
Compustar Expert
Posted By: Chris Luongo
Date Posted: December 04, 2014 at 7:45 AM
Yes, what Ted said.
Lay down under driver's dash. (So now you're facing backwards....car's pedals are behind your head, your feet are outside the car in the direction of the tail lights, you're looking up.)
Look up and to your right; you'll see the black fuse box cover at the bottom, which also lists what each fuse does.
Now go up at the backside of that fuse box. At the top, there are three plugs.
The plug that's the most to your right (closest to the driver's side of the car), is the one you want.
As long as the car's off, you can unplug that connector for better access. The red wire is in the bottom row, middle pin.
TIPS:
Those wires in the car are very tiny, The insulation is hard and brittle, almost more like plastic than the supple wire insulation we're used to. I don't like it. Very easy to break right in half, and you'll have a great fun time trying to reach up there and connect it back together again.
I'd recommend running the car outside for a little while with maximum heat before working. Keep it running and warm right up until the very MOMENT you're ready to make your connection, then turn the car off, unplug the wire, and do your work while everything is still warm.
I keep a small cigarette lighter in my tool box. I like to warm up the wire with the flame before stripping it. You have to be careful not to burn other stuff in the car while doing this. If you heat the wire up, the insulation will become supple and easy for a few seconds.
Posted By: ocdetails
Date Posted: December 05, 2014 at 11:37 AM
That is incredibly helpful information! Thank you for taking the time to help me with this. I found the harness you are talking about and identified the wire. I need to consider the best way to attach this wire, but you have given me some outstanding advice. What method of splicing into it would you recommend works best?
For anybody curious... This is where you are looking:
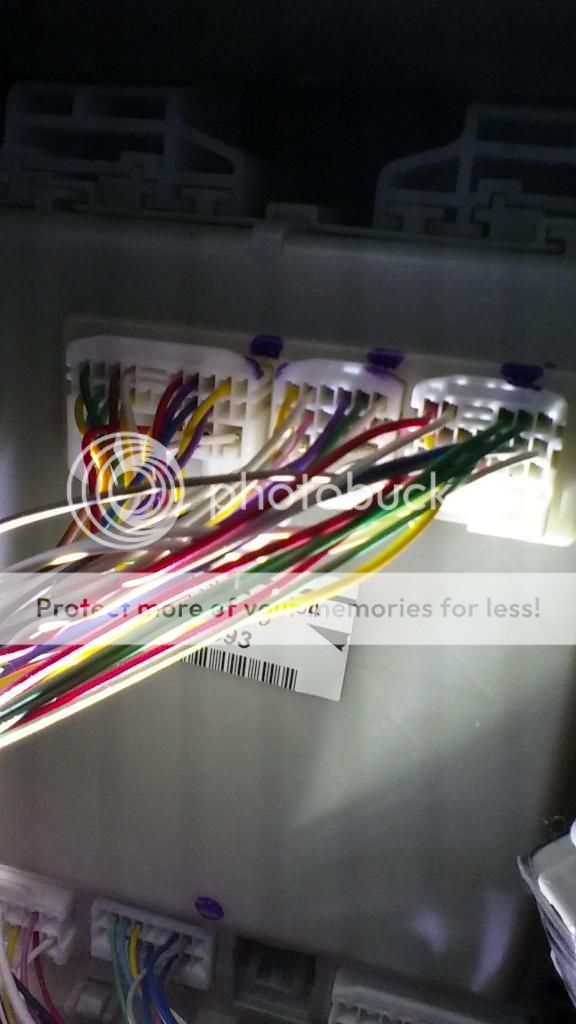
I used the front camera on my phone and used it to look up under the dash. There are all sorts of bundles of wires that obscure the harnesses, but this one is actually pretty easy to get to.
Posted By: tedmond
Date Posted: December 05, 2014 at 3:06 PM
well not sure how the weather is in utah, but keep the car warm for a good 10 minutes. It just makes the wires "less brittle."
the last time i did one of these prior to med school, i had trouble getting my larger wire strippers into the cavity; so i opted to use a knife and slice away the insulation, one side at a time and used my finger to pick away excess insulation.
as far as connections, do a military splice aka poke and twist. tape it up with some good quality 3m super 33+ (Howie's go to) and you're set.
-------------
Ted
2nd Year Tier 1 Medical School
Still installing as a hobby...pays for groceries
Compustar Expert
Posted By: ocdetails
Date Posted: December 10, 2014 at 12:52 PM
Thanks for the help, guys! I got it all wired up on Monday and I'm loving it. It turns off automatically after so long, so no fear of me forgetting that I started it. That is a feature I didn't know about. It shuts off when the doors are unlocked or if the brake is pressed, so more safety there too. I'm very pleased with it and hopefully I don't have any issues with it. Thanks again for your help. It was advice I got here which helped me locate the wire and finally get this thing connected.
Posted By: tedmond
Date Posted: December 10, 2014 at 1:11 PM
!
-------------
Ted
2nd Year Tier 1 Medical School
Still installing as a hobby...pays for groceries
Compustar Expert
Posted By: Chris Luongo
Date Posted: December 15, 2014 at 7:23 AM
ocdetails wrote:
I used the front camera on my phone and used it to look up under the dash. There are all sorts of bundles of wires that obscure the harnesses, but this one is actually pretty easy to get to.
I've been installing professionally for just over 15 years now, I've had a smart phone with a front camera for over 2 years.....and I never ever thought of that before!
Thanks to your tip, I was able to change a burned-out tail light bulb in my girlfriend's car Saturday morning without the need to remove either the tail lamp or the car's interior panels. I just had to open a small storage pocket where there was a gap at the top, put my camera in there, and I could see what I needed to do.
That's what I like about this forum---both the professionals and the do-it-yourselfers learn from each other.
Thanks!
Posted By: howie ll
Date Posted: December 15, 2014 at 7:48 AM
" Very easy to break right in half, and you'll have a great fun time trying to reach up there and connect it back together again. "
But Chris why does it always happen late afternoon, winter and raining.
My little tip and a thought.
I now use a cig lighter (carefully) to heat the insulation to the point where it rolls away.
The thought, why can't they make those damn strippers with a smaller head.
Ted, above strip, military splice actually I do Western Union and SOLDER.
I've been using Scotch 88 recently but it's OTT, going back to 33+
-------------
Amateurs assume, don't test and have problems; pros test first. I am not a free install service.
Read the installation manual, do a search here or online for your vehicle wiring before posting.
|

