the12volt.com spacer
icon

1st fg project tv in steering wheel


Post ReplyPost New Topic
< Prev Topic Next Topic >
whiteboi 
Member - Posts: 6
Member spacespace
Joined: July 19, 2007
Location: United States
Posted: July 19, 2007 at 5:45 AM / IP Logged  
Ok, i have an 04 Mustang. I recently removed the airbag and installed a 5 inch moniter in the steering wheel. Problem is, it just doesnt look "show quality" clean but it does look good. How can I get it to have a flush look to it?? I was thinking fiberglass but I have never even seen fiberglass b4 so im lost. Any suggestions?? Thanxx n advance
If At 1st U don't Succeed, GOOGLE it and try again.
bellsracer 
Silver - Posts: 703
Silver spacespace
Joined: January 14, 2006
Location: United States
Posted: July 19, 2007 at 11:05 AM / IP Logged  

Do you have any pictures of the project are in question? It would be most helpful if we knew what we had to deal with so we can offer the best recommendations/suggestions.

I am assuming that by show quality you mean to not have a trim ring or shroud, correct? Also I am assuming you haven't work with fiberglass much before. With that said, I would recommend taking a look at this tutorial:

https://www.the12volt.com/installbay/forum_posts.asp?tid=82564

Pay special attention to the section where the trim ring is made and how the glass will attach to it, this will be the key step to making a show quality install (besides booger-loads of sanding)

If you have any further questions, please do not hesitate to ask. The only dumb questions are the ones you don't ask.

Last but certainly not least,

WELCOME TO the12volt.com !!!

@@@
@@@@
\@@@/
\\\| ||///
\\| |//
//| |\\

Ganbatte ne!

Never send your ducks to eagle school.
The difference between ordinary and extraordinary is that little extra.
The 3Ls of life: Learn from the Past, Live for the Present, Look to the Future.
whiteboi 
Member - Posts: 6
Member spacespace
Joined: July 19, 2007
Location: United States
Posted: July 19, 2007 at 11:34 PM / IP Logged  

1st fg project tv in steering wheel -- posted image.
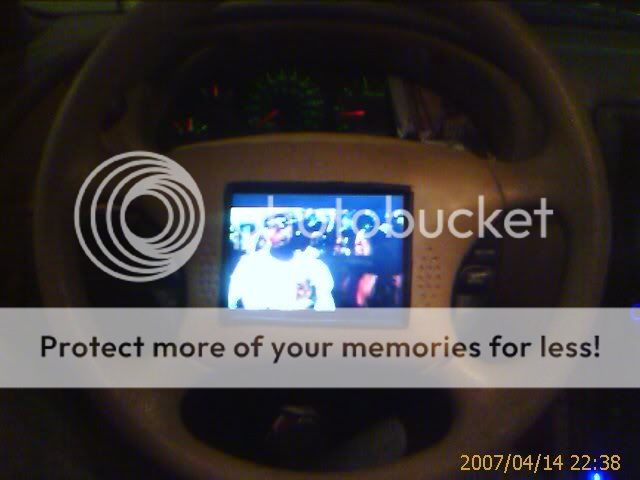
1st of all, thank u for the welcome. I appreciate it. Your assumption was a little bit off. I have NEVER even touched fiberglass. LOL. This will be my 1st tyme ever and I think i can do ok because ive alwayz wanted to do it. Anywho, here are a few pictures. The rubber-looking little collar or whatever u wanna call it that is around the TV isnt there anymore. Thats another reason why I wanna fabricate it so bad. If you need more In-depth pictures, let me kno. I can remove the TV and take pictures of it removed and all the way around it. Once again, thanxx in advance

1st fg project tv in steering wheel -- posted image.

If At 1st U don't Succeed, GOOGLE it and try again.
bellsracer 
Silver - Posts: 703
Silver spacespace
Joined: January 14, 2006
Location: United States
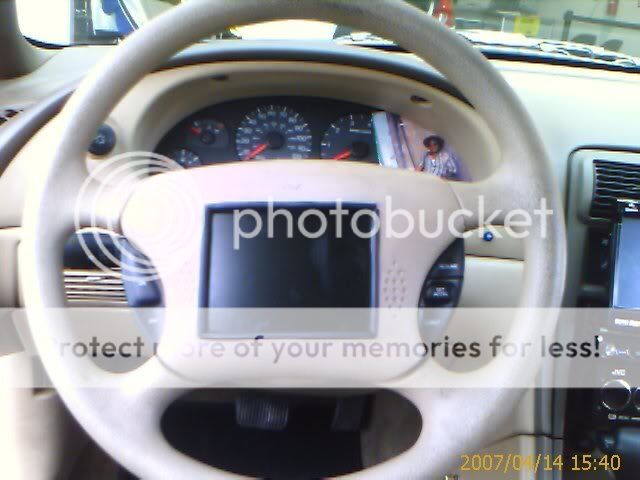
Posted: July 20, 2007 at 12:46 PM / IP Logged  

I would consider two options:

1) (preferred) Remold the center part of the steering wheel in glass or epoxy rubber. Include a frame for the screen in the design. Then trim that down to meet the screen with just a slight bezel. This process has fewer steps, but recommended for advanced installers because you only get one shot at this per molding and it's either all good or all trash. This is particularly important if you use the epoxy rubber.

2) (much easier) Make a trim ring using glass but making a piece of MDF the same size as the screen (including thickness) cover that in a single layer of masking tape with NO overlaps, but butted together. Then spread a generous amount of mold release on it and put it in place of the screen in the steering wheel. Repeat the same for the steering wheel. Using duraglass, apply the material in a rough ring around the "screen" and onto the steering wheel. Don't worry about making it look pretty right now, just get it on because duraglass and most other resin products only have a few minutes of working time. Just get it where it's big enough to make a nice trim ring. Let that cure. (1-2 hours depending on ambient environment) Since the resin is glass reinforced, you should not need glass mat for this project. Sand that down (or grind for the really high spots and spikes) using 60-80 grit sandpaper, then once you have it all even and just about where you want it, go over it again with 120 grit. Then use bondo or any body filler of some sort to make the surface smooth. Sand that down with 220 grit and work your way to 400 grit. After 220 you are not just sanding to smooth out the form perfectly.

Since you have never worked with FG before I HIGHLY recommend that you make the tutorial project. Glass tends to shrink when "hot" (too much hardener) and doesn't cure properly if "cold" (not enough hardener). This project will give you a good idea of what the glass will do and how much it will do for your environment. Spending time on this project will save you a LOT of headaches later without risking your vehicle because you can then see what exactly is going to happen with the glass.

Ganbatte ne!

Never send your ducks to eagle school.
The difference between ordinary and extraordinary is that little extra.
The 3Ls of life: Learn from the Past, Live for the Present, Look to the Future.

Sorry, you can NOT post a reply.
This topic is closed.

  Printable version Printable version Post ReplyPost New Topic
You cannot post new topics in this forum
You cannot reply to topics in this forum
You cannot delete your posts in this forum
You cannot edit your posts in this forum
You cannot create polls in this forum
You cannot vote in polls in this forum

  •  
Search the12volt.com
Follow the12volt.com Follow the12volt.com on Facebook
Wednesday, April 24, 2024 • Copyright © 1999-2024 the12volt.com, All Rights Reserved Privacy Policy & Use of Cookies
Disclaimer: *All information on this site ( the12volt.com ) is provided "as is" without any warranty of any kind, either expressed or implied, including but not limited to fitness for a particular use. Any user assumes the entire risk as to the accuracy and use of this information. Please verify all wire colors and diagrams before applying any information.

Secured by Sectigo
the12volt.com spacer
Support the12volt.com
Top
the12volt.com spacer