


Viper 5906V and Idatalink Alca, 2014 Jeep Wrangler - FYI
Home /
the12volt's Install Bay /
Car Security and Convenience - Hot Topics / Viper 5906V and Idatalink Alca, 2014 Jeep Wrangler - FYI ( Topic Closed)


Posted: January 26, 2015 at 10:11 AM / IP Logged
 Okay sorry if this is a little long but I really hope this helps someone since this forum helped me during the install. I installed my Viper 5906v in my 2014 Jeep Wrangler Unlimited over the weekend and Its working great.
I've attached the Pics of the guides to help if you don't have them.
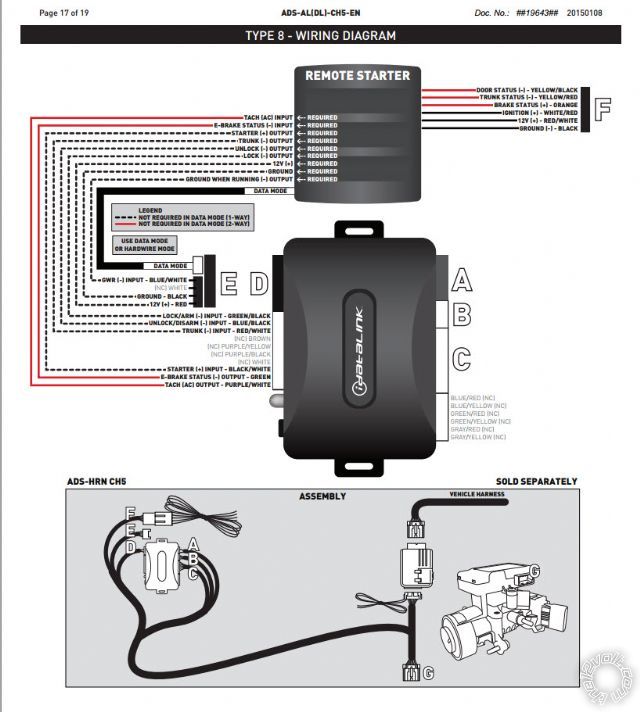
I used the Type 8 install with the T Harness. This makes the install very simple but there were a couple things that stumped me and this is why I'm posting this.
I flashed the Idatalink ALCA with ADS-AL-CH5-EN My install was to be 2-way Data so i flashed it DBI
I programmed the ALCA using the manual to recognize my key.
Per the Idatalink diagram above there should have only been 3 interconnected wires between the idatalink and the viper.
WHITE/ Red Ignition + (On with key)
RED / White Constant 12+
Black (Chassis Ground)
What I found was that this did not work.
I ended up wiring this.
ALCA Viper 5906v
Data out 4pin BL - Data in Red 4 pin cable
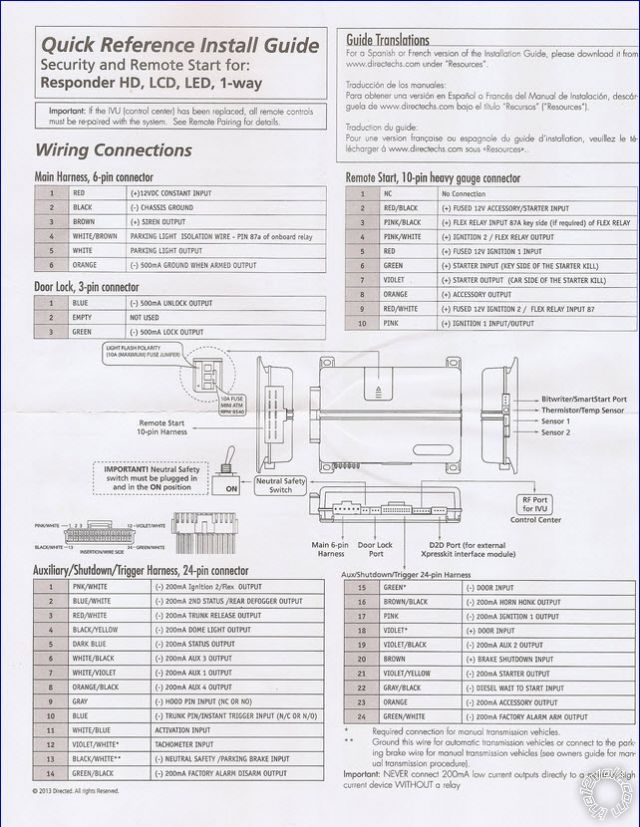
WHITE/ Red - Remote Start 10 Pink (This lets you enter Programming mode)
RED / White - Remote Start 5 Red
RED / White - Main H 1 Red
Black - Main H 2 Black
Black - AST Harn 13 BLACK/ White
- Main H 3 To siren
- AST Harn 9 Grey to hood pin N/O
Ill explain a couple issues I had and the fixes above. First i got started disabled. I had to go into programming and switch to automatic mode. The pink Remote Start 10 wire to Ignition (on with Key) is what allows the viper to recognize the Key ignition on and then off to enter that mode.
Next I was getting an error about the neutral safety switch being off. It wasn't off! I found a post on here about the AST harness 13 BLACK/ White needs to be grounded. That fixed that. I originally had the Remote Start Red wire 4 tied to ignition (on with Key) It says 12+ Ignition 1 input. It should say Constant 12+ This manual is stupid. My remote start did not work until i changed that. 2 hours of research later.
My jeep didn't come with factory door lock so i added my own last year with a VP211. I removed it and connected to three Relays. I'm using progressive unlock using the aux1 output as 2nd unlock. Ill not go into all that here now unless someone would like advise on that.
My jeep fired right up with the wiring above. I hope this saves someone a ton of time.
I know i was looking for this information before i started and had to just wing it. Maybe you wont and can get your done right the first time.
TK
Okay sorry if this is a little long but I really hope this helps someone since this forum helped me during the install. I installed my Viper 5906v in my 2014 Jeep Wrangler Unlimited over the weekend and Its working great.
I've attached the Pics of the guides to help if you don't have them.
I used the Type 8 install with the T Harness. This makes the install very simple but there were a couple things that stumped me and this is why I'm posting this.
I flashed the Idatalink ALCA with ADS-AL-CH5-EN My install was to be 2-way Data so i flashed it DBI
I programmed the ALCA using the manual to recognize my key.
Per the Idatalink diagram above there should have only been 3 interconnected wires between the idatalink and the viper.
WHITE/ Red Ignition + (On with key)
RED / White Constant 12+
Black (Chassis Ground)
What I found was that this did not work.
I ended up wiring this.
ALCA Viper 5906v
Data out 4pin BL - Data in Red 4 pin cable
WHITE/ Red - Remote Start 10 Pink (This lets you enter Programming mode)
RED / White - Remote Start 5 Red
RED / White - Main H 1 Red
Black - Main H 2 Black
Black - AST Harn 13 BLACK/ White
- Main H 3 To siren
- AST Harn 9 Grey to hood pin N/O
Ill explain a couple issues I had and the fixes above. First i got started disabled. I had to go into programming and switch to automatic mode. The pink Remote Start 10 wire to Ignition (on with Key) is what allows the viper to recognize the Key ignition on and then off to enter that mode.
Next I was getting an error about the neutral safety switch being off. It wasn't off! I found a post on here about the AST harness 13 BLACK/ White needs to be grounded. That fixed that. I originally had the Remote Start Red wire 4 tied to ignition (on with Key) It says 12+ Ignition 1 input. It should say Constant 12+ This manual is stupid. My remote start did not work until i changed that. 2 hours of research later.
My jeep didn't come with factory door lock so i added my own last year with a VP211. I removed it and connected to three Relays. I'm using progressive unlock using the aux1 output as 2nd unlock. Ill not go into all that here now unless someone would like advise on that.
My jeep fired right up with the wiring above. I hope this saves someone a ton of time.
I know i was looking for this information before i started and had to just wing it. Maybe you wont and can get your done right the first time.
TK

Posted: February 17, 2015 at 11:14 PM / IP Logged
Posted: February 18, 2015 at 10:40 AM / IP Logged


Posted: February 18, 2015 at 5:56 PM / IP Logged
Posted: February 18, 2015 at 8:06 PM / IP Logged
Sorry, you can NOT post a reply.
This topic is closed.
 Printable version
| You cannot post new topics in this forum You cannot reply to topics in this forum You cannot delete your posts in this forum You cannot edit your posts in this forum You cannot create polls in this forum You cannot vote in polls in this forum |

| Search the12volt.com |
Follow the12volt.com 
Thursday, April 18, 2024 • Copyright © 1999-2024 the12volt.com, All Rights Reserved • Privacy Policy & Use of Cookies

Thursday, April 18, 2024 • Copyright © 1999-2024 the12volt.com, All Rights Reserved • Privacy Policy & Use of Cookies
Disclaimer:
*All information on this site ( the12volt.com ) is provided "as is" without any warranty of any kind, either expressed or implied, including but not limited to fitness for a particular use. Any user assumes the entire risk as to the accuracy and use of this information. Please
verify all wire colors and diagrams before applying any information.
