the12volt.com spacer
icon

viper 791xv won't remote start


Post ReplyPost New Topic
< Prev Topic Next Topic >
lowriderman234 
Member - Posts: 12
Member spacespace
Joined: December 30, 2013
Location: New Hampshire, United States
Posted: October 09, 2014 at 8:39 PM / IP Logged  
So I have another 94 Lexus ES300 that I picked up not too long ago and decided to install a Viper 791XV I got off craigslists for $60. I hooked everything up and it locks and unlocks. Tapped into my parking light with the H1/2 wire and the lights won't flash. Am I doing something wrong?
Here are the wires I used:
H1/2 parking light wire to green w/ silver dot wire just behind the ignition harness.
H1/5 to small RED / white wire under my fuse box
H1/8 to ground
H1/10 to siren
H1/11 to WHITE/ red constant 12v at ignition harness
H2 harness is unused...
Door lock harness used
"Heavy gauge inline connector key switch interface"
1. (+) output to starter circuit (starter side) to BLACK/ white wire of ignition harness
2. Onboard starter kill (key side) to other side of the cut BLACK/ white wire of ignition harness
3. unused
4. (+) output to accessory circuit to pink/blue wire of ignition harness
5. (+) output to primary ignition circuit to BLACK / YELLOW wire of ignition harness
6. unused
7. (+) output to secondary ignition circuit to BLACK/ orange of ignition harness
8. (+) high current 12v input to white wire of the ignition harness
Remote Start Secondary harness:
H3/3 brake shutdown wire to GREEN / WHITE under fuse box
H3/5 goes to neutral safety switch and I grounded the other wire coming from the switch.
kreg357 
Platinum - Posts: 7,783
Platinum spaceThis member has made a donation to the12volt.com. Click here for more info.spaceThis member has been recognized as an authority in Electrical Theory. Click here for more info.spaceThis member has been recognized as an authority in Mobile Security and Convenience. Click here for more info.spacespace
Joined: January 30, 2009
Location: Pennsylvania, United States
Posted: October 09, 2014 at 10:45 PM / IP Logged  

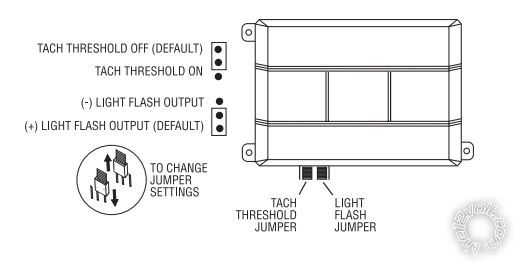
If you verified the Green w/Siler dot (+) Parking Light wire with a DMM, did you ensure the Viper's Internal Jumper is set to (+) position?

Typically, I like to use the (-) Parking Light wire.  It's usually easier to find and draws very little current.

Soldering is fun!
catback 
Silver - Posts: 703
Silver spacespace
Joined: August 13, 2002
Location: Canada
Posted: October 10, 2014 at 9:21 AM / IP Logged  
You need to hook all three high current 12v inputs on the heavy gauge remote start harness.
You should also consider hooking up the tach. It's the most reliable engine sense method.
kreg357 
Platinum - Posts: 7,783
Platinum spaceThis member has made a donation to the12volt.com. Click here for more info.spaceThis member has been recognized as an authority in Electrical Theory. Click here for more info.spaceThis member has been recognized as an authority in Mobile Security and Convenience. Click here for more info.spacespace
Joined: January 30, 2009
Location: Pennsylvania, United States
Posted: October 10, 2014 at 10:09 AM / IP Logged  

Good catch CatBack, I missed that!  viper 791xv won't remote start -- posted image.  The two thick Red wires ( Pins 3 & 6 ) on the "Heavy gauge inline connector key switch interface" must go to +12V constant.  This necessary for the remote start portion to function.

Soldering is fun!
lowriderman234 
Member - Posts: 12
Member spacespace
Joined: December 30, 2013
Location: New Hampshire, United States
Posted: October 10, 2014 at 11:18 AM / IP Logged  
Hey kreg357, how do I set the vipers internal jumper to (+)?
catback 
Silver - Posts: 703
Silver spacespace
Joined: August 13, 2002
Location: Canada
Posted: October 10, 2014 at 11:23 AM / IP Logged  
lowriderman234 wrote:
Hey kreg357, how do I set the vipers internal jumper to (+)?
The programming jumpers. Page 34 of the installation manual or reference the image below.
viper 791xv won't remote start -- posted image.
lowriderman234 
Member - Posts: 12
Member spacespace
Joined: December 30, 2013
Location: New Hampshire, United States
Posted: October 10, 2014 at 11:30 AM / IP Logged  
Never mind... Found it in the booklet after 10 min lol
lowriderman234 
Member - Posts: 12
Member spacespace
Joined: December 30, 2013
Location: New Hampshire, United States
Posted: October 10, 2014 at 11:40 AM / IP Logged  
Thank you for the picture though!
lowriderman234 
Member - Posts: 12
Member spacespace
Joined: December 30, 2013
Location: New Hampshire, United States
Posted: October 10, 2014 at 11:58 AM / IP Logged  
So now I hooked everything for the remote start wires and the car starts then immediately dies?
kreg357 
Platinum - Posts: 7,783
Platinum spaceThis member has made a donation to the12volt.com. Click here for more info.spaceThis member has been recognized as an authority in Electrical Theory. Click here for more info.spaceThis member has been recognized as an authority in Mobile Security and Convenience. Click here for more info.spacespace
Joined: January 30, 2009
Location: Pennsylvania, United States
Posted: October 10, 2014 at 12:08 PM / IP Logged  

Did you connect the Tach wire and do the Tach Learn process?  Think Engine Checking = ON and Engine Checking = Tach Mode is the Default setting on the 791xv.  Here is the procedure :

To learn the tach signal:

1. Start the vehicle with the key.
2. Within 5 seconds, press and HOLD the Valet®/Program switch.
3. The LED will light constant when the tach signal is learned.
4. Release the Valet®/Program switch.

Tach wire info :

Tachometer     Black  (ac)    @ check connector

The check connector is found between the right shock tower and the firewall.

Soldering is fun!
Page of 2

  Printable version Printable version Post ReplyPost New Topic
You cannot post new topics in this forum
You cannot reply to topics in this forum
You cannot delete your posts in this forum
You cannot edit your posts in this forum
You cannot create polls in this forum
You cannot vote in polls in this forum

  •  
Search the12volt.com
Follow the12volt.com Follow the12volt.com on Facebook
Thursday, April 25, 2024 • Copyright © 1999-2024 the12volt.com, All Rights Reserved Privacy Policy & Use of Cookies
Disclaimer: *All information on this site ( the12volt.com ) is provided "as is" without any warranty of any kind, either expressed or implied, including but not limited to fitness for a particular use. Any user assumes the entire risk as to the accuracy and use of this information. Please verify all wire colors and diagrams before applying any information.

Secured by Sectigo
the12volt.com spacer
Support the12volt.com
Top
the12volt.com spacer