the12volt.com spacer
icon

mercedes benz vacuum pump problem


Post ReplyPost New Topic
< Prev Topic Next Topic >
chassis 
Copper - Posts: 244
Copper spacespace
Joined: September 21, 2014
Location: South Africa
Posted: October 27, 2014 at 11:52 PM / IP Logged  
Good day. I have a question today about vacuum pumps. I'm helping a friend of mine with his mercedes benz W124. he has an alarm installed link to his central locking but it no longer works.
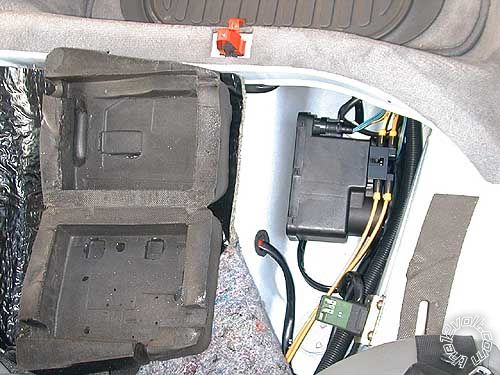
I've already read that there's 3wires from the main switch,1 is always 12v ,1 is always earthed and one changes pulse. i see at the pump at the back under the rear seat,they cut the control wire and connected their wires to it in order to operate with the alarm. I took the alarm wires of and reconnected the control wires as factory. the central locking now works ,it sucks and blows when switching the lock and unlock knob at driver door. I have notice when I arm the alarm,the alarm gives me beeps just after arming,indicates that one of the doors are open,that means the system won't lock or unlock.
I will sort that out tonight, but can someone please give me more clarity on what is happening when the driver switch gets push down and up. how does the switch send signals in order for the pump to suck and blow. and will the central locking still operate manually even though the alarm wires are connected to the control wire,one leg of the alarm to pump side and one leg of the alarm wire to the door side of the control wire. and I would also love to know where all the other wires from the pump are going.mercedes benz vacuum pump problem -- posted image.
Do it once,do it right - This means no short cuts. You never get paid twice for having to do the job twice because it wasn't done right the first time.
howie ll 
Pot Metal - Posts: 16,466
Pot Metal spacespace
Joined: January 09, 2007
Location: United Kingdom
Posted: October 28, 2014 at 4:08 AM / IP Logged  
There are three control wires on that model a long time since I worked on one but two front door key switches are green and blue, trunk (boot) switch I believe yellow.
When a key is turned that wire changes polarity, it's either POS (+) at lock and NEG (-) at unlock or vice versa. Also needs a 3 second lock time to operate.
chassis 
Copper - Posts: 244
Copper spacespace
Joined: September 21, 2014
Location: South Africa
Posted: October 28, 2014 at 4:17 AM / IP Logged  
Thank you howie,Ill have a look again and test wires tonight.
Do it once,do it right - This means no short cuts. You never get paid twice for having to do the job twice because it wasn't done right the first time.
catback 
Silver - Posts: 703
Silver spacespace
Joined: August 13, 2002
Location: Canada
Posted: October 28, 2014 at 9:36 AM / IP Logged  
I'm lost, is something broken or is this a learning expedition?
howie ll 
Pot Metal - Posts: 16,466
Pot Metal spacespace
Joined: January 09, 2007
Location: United Kingdom
Posted: October 28, 2014 at 11:58 AM / IP Logged  
Don't ask me I'm just the teacher. BTW There's another way to do the locks,
Open the plate at the bottom, there are two wires going to the pump motor, you can do them as a 5 wire to control the locks.
I used to know everything about them but in a senior moment I forgot. Think there's an easy total close with them as well. What year?
chassis 
Copper - Posts: 244
Copper spacespace
Joined: September 21, 2014
Location: South Africa
Posted: October 28, 2014 at 2:22 PM / IP Logged  
Hi its a 1997
Do it once,do it right - This means no short cuts. You never get paid twice for having to do the job twice because it wasn't done right the first time.
howie ll 
Pot Metal - Posts: 16,466
Pot Metal spacespace
Joined: January 09, 2007
Location: United Kingdom
Posted: October 28, 2014 at 2:30 PM / IP Logged  
There's a rubberised cable in the front floor loom each side, BROWN / black, RED / black and possibly blue/black, 15 seconds hold on the third closes windows and roof after lock.
chassis 
Copper - Posts: 244
Copper spacespace
Joined: September 21, 2014
Location: South Africa
Posted: October 28, 2014 at 4:58 PM / IP Logged  
I have found a burned tracks on the central locking module. the module that changes the pulse. exactly like the diagram on your site with the 2relays.I have problems uploading it now. what I have notice is,on the this car the doors lock with neg pulse and unlocks with positive pulse. When the driver door is open,the control wire has a +pulse. it cannot lock while open. So when I arm the alarm,a negative signal goes from left relay,the coil activates on the left and goes through the right relay to the vacuum pump motor,when the 3seconds is over the left relay goes back to 87a and touches the driver side wire which is 12V.so the control wire ends up 12v one side and negative one side. can this be the reason the 2 relays burned and the drivers door must be closed?
Do it once,do it right - This means no short cuts. You never get paid twice for having to do the job twice because it wasn't done right the first time.
howie ll 
Pot Metal - Posts: 16,466
Pot Metal spacespace
Joined: January 09, 2007
Location: United Kingdom
Posted: October 28, 2014 at 5:23 PM / IP Logged  
Firstly, why would you want to arm it with the door open?
In fact under normal circumstances arm the alarm with a door open, it simply won't lock.
Second they aren't pulses that flip flop from the locks, they are constant.
Very unlikely you damaged tracks, a fuse would have gone first.
Build quality on the SA models back in the 80s was awful but even the Euro builds suffered corrosion problems on that vacuum pump control board, even more so when trunk (boot) mounted, sometimes even when under the back seat and here we have a 17 year old car.
chassis 
Copper - Posts: 244
Copper spacespace
Joined: September 21, 2014
Location: South Africa
Posted: October 28, 2014 at 5:48 PM / IP Logged  
I assume that is what happened because the central locking did not work. so everytime a owner closes his driver side door improperly and arms his alarm he will fry his central locking module on this one wire vacuum pump system?
Do it once,do it right - This means no short cuts. You never get paid twice for having to do the job twice because it wasn't done right the first time.
Page of 2

  Printable version Printable version Post ReplyPost New Topic
You cannot post new topics in this forum
You cannot reply to topics in this forum
You cannot delete your posts in this forum
You cannot edit your posts in this forum
You cannot create polls in this forum
You cannot vote in polls in this forum

  •  
Search the12volt.com
Follow the12volt.com Follow the12volt.com on Facebook
Thursday, April 25, 2024 • Copyright © 1999-2024 the12volt.com, All Rights Reserved Privacy Policy & Use of Cookies
Disclaimer: *All information on this site ( the12volt.com ) is provided "as is" without any warranty of any kind, either expressed or implied, including but not limited to fitness for a particular use. Any user assumes the entire risk as to the accuracy and use of this information. Please verify all wire colors and diagrams before applying any information.

Secured by Sectigo
the12volt.com spacer
Support the12volt.com
Top
the12volt.com spacer