the12volt.com spacer
icon

Viper 211HV Install in Modified Vehicle


Post ReplyPost New Topic
< Prev Topic Next Topic >
mercury man 
Member - Posts: 3
Member spacespace
Joined: March 02, 2021
Location: Wisconsin, United States
Posted: March 02, 2021 at 8:57 PM / IP Logged Link to Post Post Reply Quote mercury man
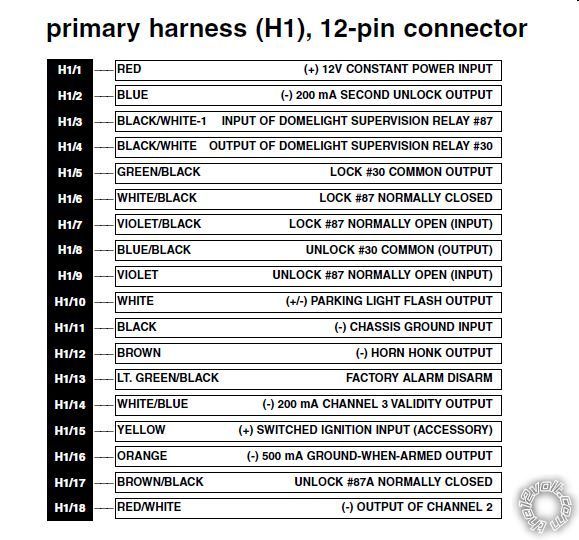
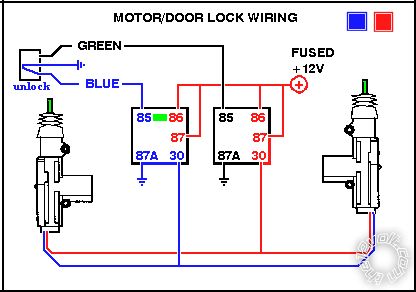
I am looking for some advise installing a Viper 211HV keyless entry system in my car. The car has an aftermarket wiring harness because it is heavily modified, it has Spal actuators mounted to the factory door locks, they are controlled by single rocker switch. The power locks work perfectly but I would like to be able to lock and unlock the doors with a remote key fob. I have attached a drawing of how the actuators are wired using two relays. I have also attached the wiring for the Viper system. I have bench tested the system, the dome light, parking light, and the positive (12v) leads for the door locks work fine but I believe I need a negative signal to the relays to operate the actuators. I would appreciate some guidance on what wires to use and where on the relays to connect them.
Also the Viper system has an output (200ma) for an extra feature, I would like to use this for a power trunk release. How would I attach the output wire to a relay that would trigger the 12 volt trunk release?
I hope I have explained this clearly.
Thank You!
Viper 211HV Install in Modified Vehicle -- posted image.
Thank You,
Mr Mercury
kreg357 
Platinum - Posts: 7,783
Platinum spaceThis member has made a donation to the12volt.com. Click here for more info.spaceThis member has been recognized as an authority in Electrical Theory. Click here for more info.spaceThis member has been recognized as an authority in Mobile Security and Convenience. Click here for more info.spacespace
Joined: January 30, 2009
Location: Pennsylvania, United States
Posted: March 02, 2021 at 9:20 PM / IP Logged Link to Post Post Reply Quote kreg357
This wiring will provide a (-) output for Lock and Unlock from the Viper 211HV.
H1/5 to Green wire at switch
H1/6 not used - insulate     *the 87 is a typo. It is actually 87A.
H1/7 to Chassis Ground
H1/8 to Blue wire at switch
H1/9 to Chassis Ground
H1/17 not used - insulate
If you want a +12V pulse output from the 211HV'sTrunk Release button use a 30/40 Amp SPDT Bosch style relay as follows :
Relay Pin 85 to 211HV H1/18 RED/WHITE
Relay Pins 86 and 87 to +12V constant through 15 Amp fuse
Relay Pin 30 to Truck Release solenoid
Soldering is fun!
mercury man 
Member - Posts: 3
Member spacespace
Joined: March 02, 2021
Location: Wisconsin, United States
Posted: March 02, 2021 at 9:30 PM / IP Logged Link to Post Post Reply Quote mercury man
Thank you for the prompt reply! I will work on the connections tomorrow and report back here.
I appreciate your knowledge and guidance.
Mr. Mercury
Thank You,
Mr Mercury
mercury man 
Member - Posts: 3
Member spacespace
Joined: March 02, 2021
Location: Wisconsin, United States
Posted: March 03, 2021 at 8:33 PM / IP Logged Link to Post Post Reply Quote mercury man
kreg357 wrote:
This wiring will provide a (-) output for Lock and Unlock from the Viper 211HV.
H1/5 to Green wire at switch
H1/6 not used - insulate     *the 87 is a typo. It is actually 87A.
H1/7 to Chassis Ground
H1/8 to Blue wire at switch
H1/9 to Chassis Ground
H1/17 not used - insulate
If you want a +12V pulse output from the 211HV'sTrunk Release button use a 30/40 Amp SPDT Bosch style relay as follows :
Relay Pin 85 to 211HV H1/18 RED/WHITE
Relay Pins 86 and 87 to +12V constant through 15 Amp fuse
Relay Pin 30 to Truck Release solenoid
Tonight I spent some time wiring the system as you directed in the above message. Everything works perfectly!! I connected the horn, parking lights and inside courtesy lights, they all function as they should. I really appreciate the help with this issue, You saved me much time and frustration.
Regards
Thank You,
Mr Mercury
kreg357 
Platinum - Posts: 7,783
Platinum spaceThis member has made a donation to the12volt.com. Click here for more info.spaceThis member has been recognized as an authority in Electrical Theory. Click here for more info.spaceThis member has been recognized as an authority in Mobile Security and Convenience. Click here for more info.spacespace
Joined: January 30, 2009
Location: Pennsylvania, United States
Posted: March 03, 2021 at 9:02 PM / IP Logged Link to Post Post Reply Quote kreg357
Glad everything worked out well. Enjoy your ride, Mr Mercury!
Soldering is fun!

If you wish to post a reply to this topic, you must first login.
If you are not already registered, you must first register.

  Printable version Printable version Post ReplyPost New Topic
You cannot post new topics in this forum
You cannot reply to topics in this forum
You cannot delete your posts in this forum
You cannot edit your posts in this forum
You cannot create polls in this forum
You cannot vote in polls in this forum

  •  
Search the12volt.com
Follow the12volt.com Follow the12volt.com on Facebook
Friday, April 19, 2024 • Copyright © 1999-2024 the12volt.com, All Rights Reserved Privacy Policy & Use of Cookies
Disclaimer: *All information on this site ( the12volt.com ) is provided "as is" without any warranty of any kind, either expressed or implied, including but not limited to fitness for a particular use. Any user assumes the entire risk as to the accuracy and use of this information. Please verify all wire colors and diagrams before applying any information.

Secured by Sectigo
the12volt.com spacer
Support the12volt.com
Top
the12volt.com spacer