the12volt.com spacer
icon

Making Sense Of Wiring In A Home Made Child’s Toy Car


Post ReplyPost New Topic
< Prev Topic Next Topic >
wamphray 
Member - Posts: 10
Member spacespace
Joined: April 26, 2021
Location: United Kingdom
Posted: April 26, 2021 at 7:53 AM / IP Logged Link to Post Post Reply Quote wamphray
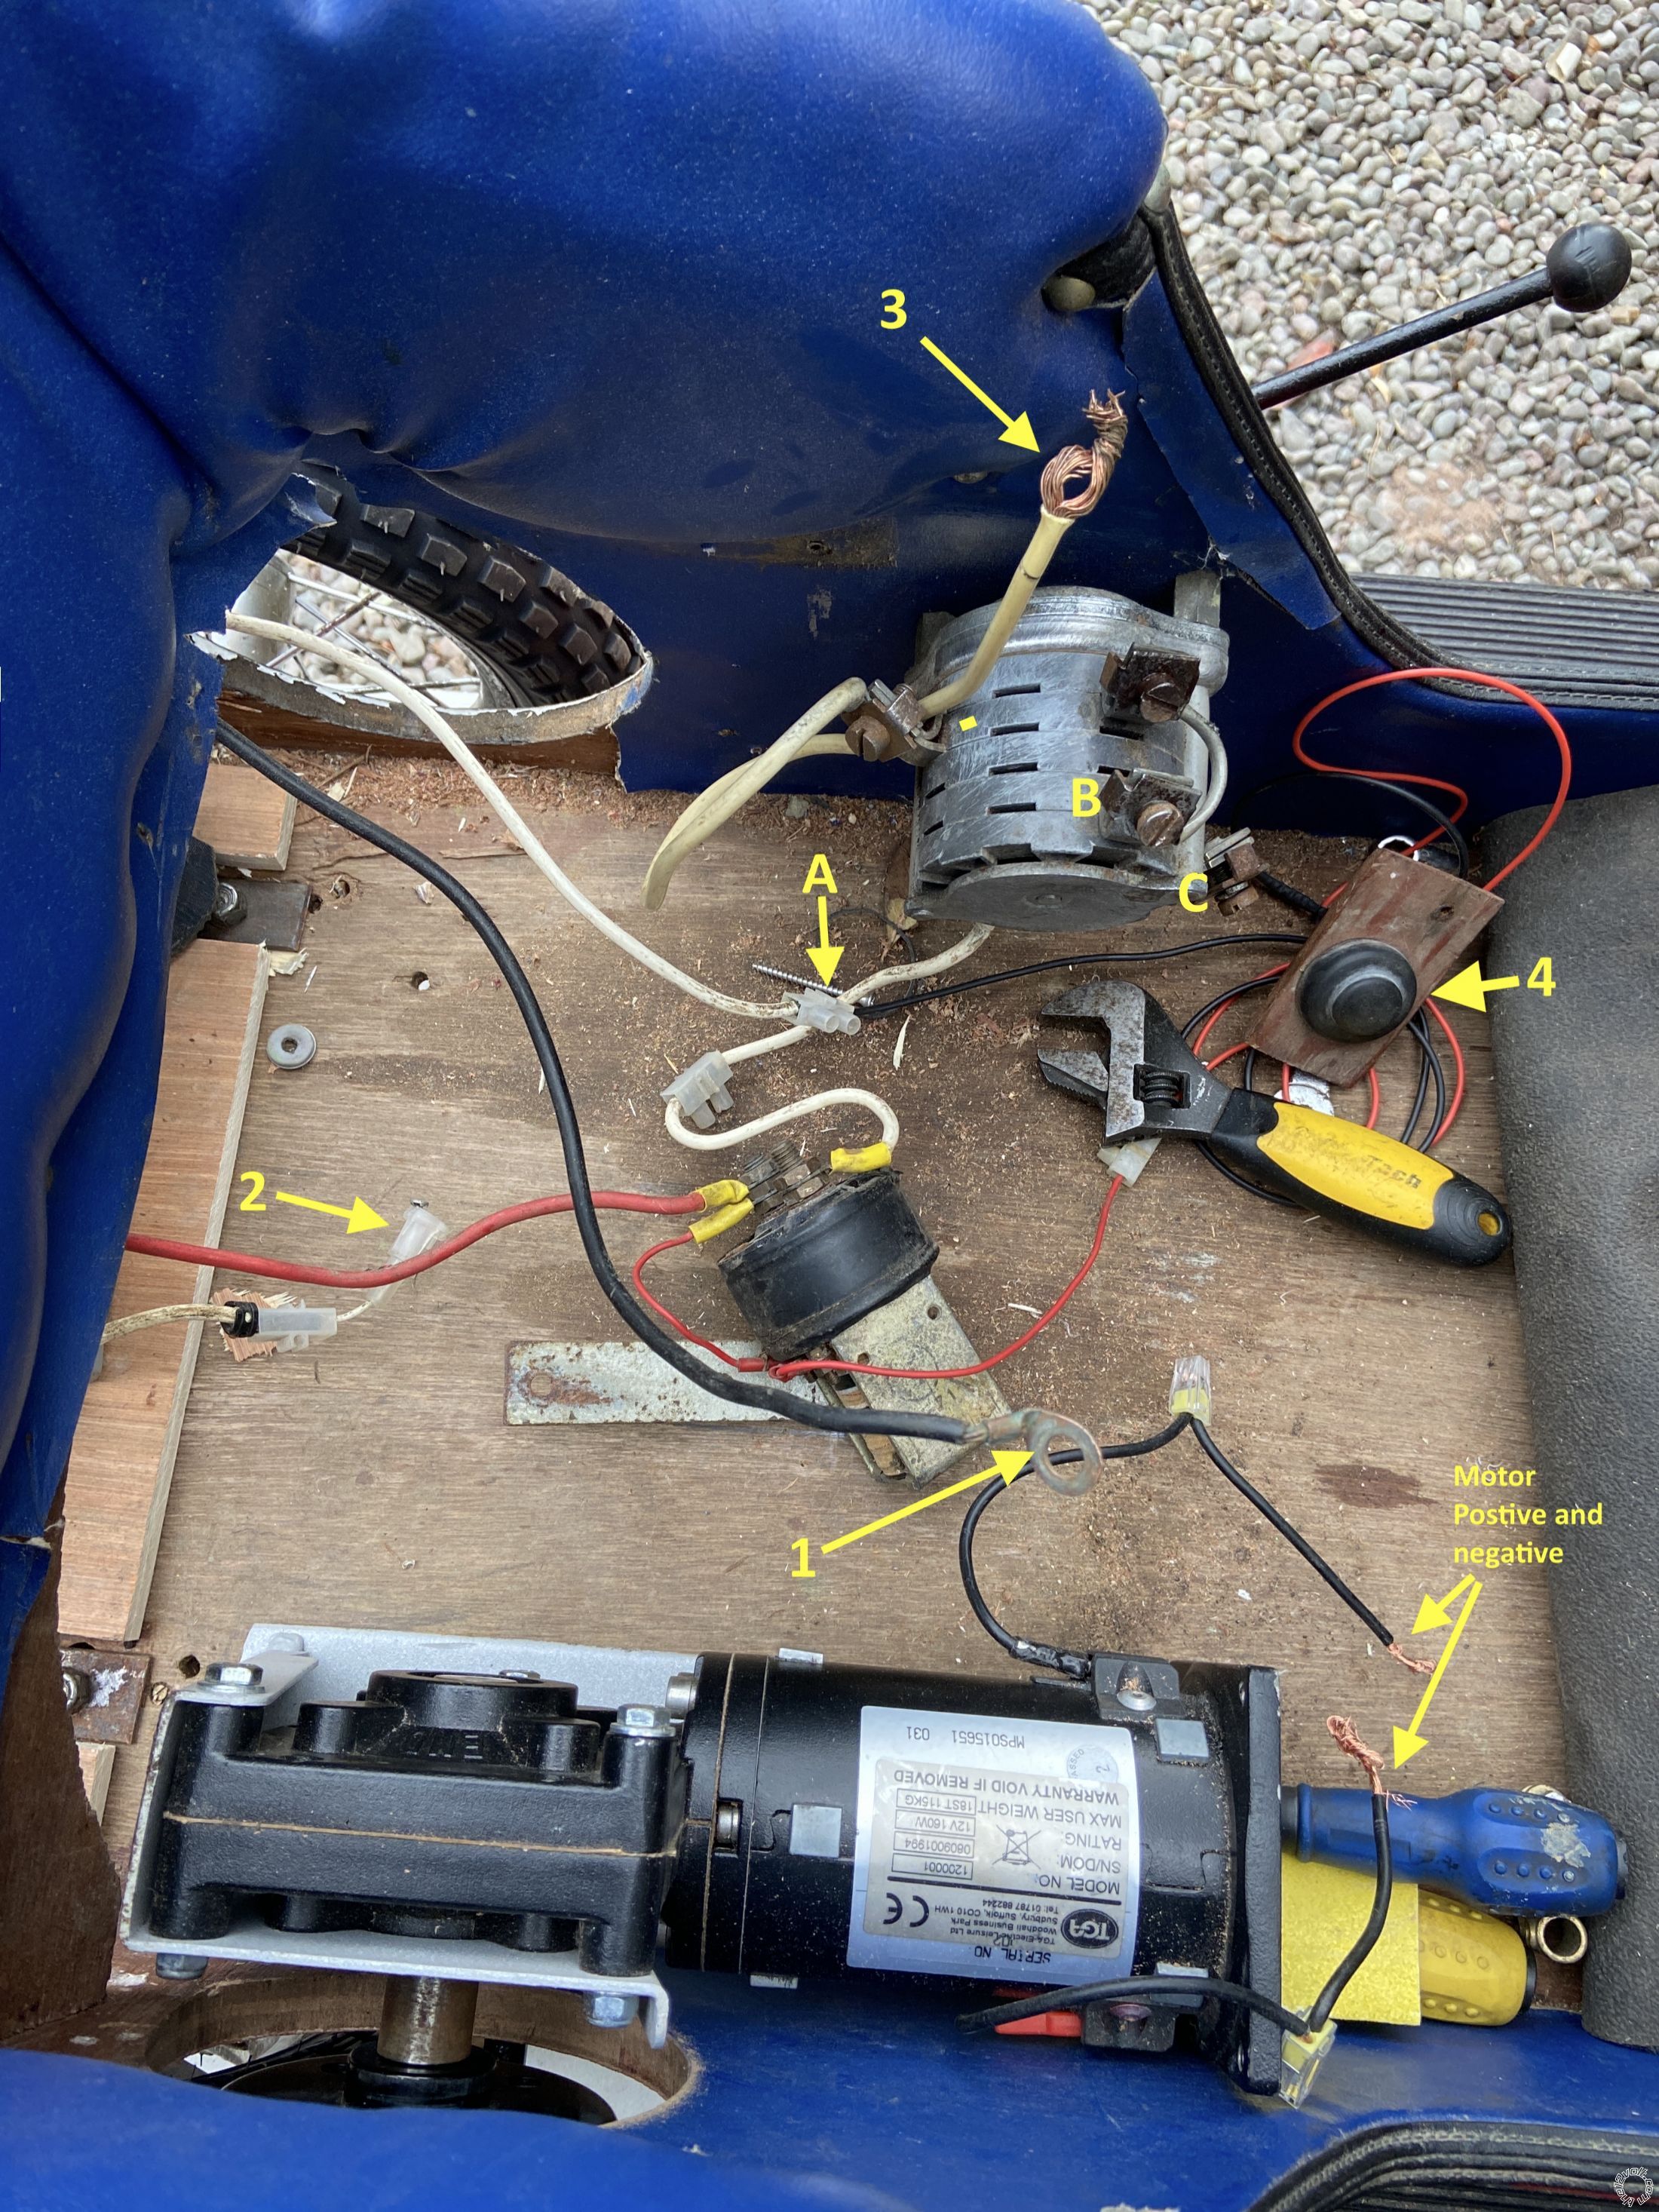
Can anyone help me make sense of the wiring on a child’s toy car, made out of an elderly electric wheelchair thirty years ago, and now being refurbed. The original motor has gone and I can’t work out where the wires should go when trying to fit in a new motor.
The attached picture shows the set up. The black handle at the top of the picture made the car go forward or back. It used to drive the wheel seen at the top left but the new motor is mounted to drive the opposite wheel. I haven’t yet blanked off the hole left by the removal of the old motor.
No 4 is the button which makes the thing go. It sat on the floor and was pressed with the foot. One wire goes from it to the side of the solenoid. The other goes - through a Terminal Block and white wire (marked A) to the negative terminal on the battery. At the moment, when power is applied, the solenoid makes a clunk noise.
Wire No 1 goes straight back to the negative terminal on the battery.
Wire No 2 (which must once have gone to an in-line fuse) goes to the positive terminal on the battery.
The terminal at B was loose and I don’t know if anything was attached to it (or should be).
The terminal at C seems to have had something attached to it.
I am enthusiastic but not very good with electrics. If anyone can tell me how to wire it up to make it go forward or backwards it make my granddaughter very happy.
Thanks in advance for any help.
John
Making Sense Of Wiring In A Home Made Child’s Toy Car -- posted image.
wamphray 
Member - Posts: 10
Member spacespace
Joined: April 26, 2021
Location: United Kingdom
Posted: April 26, 2021 at 7:58 AM / IP Logged Link to Post Post Reply Quote wamphray
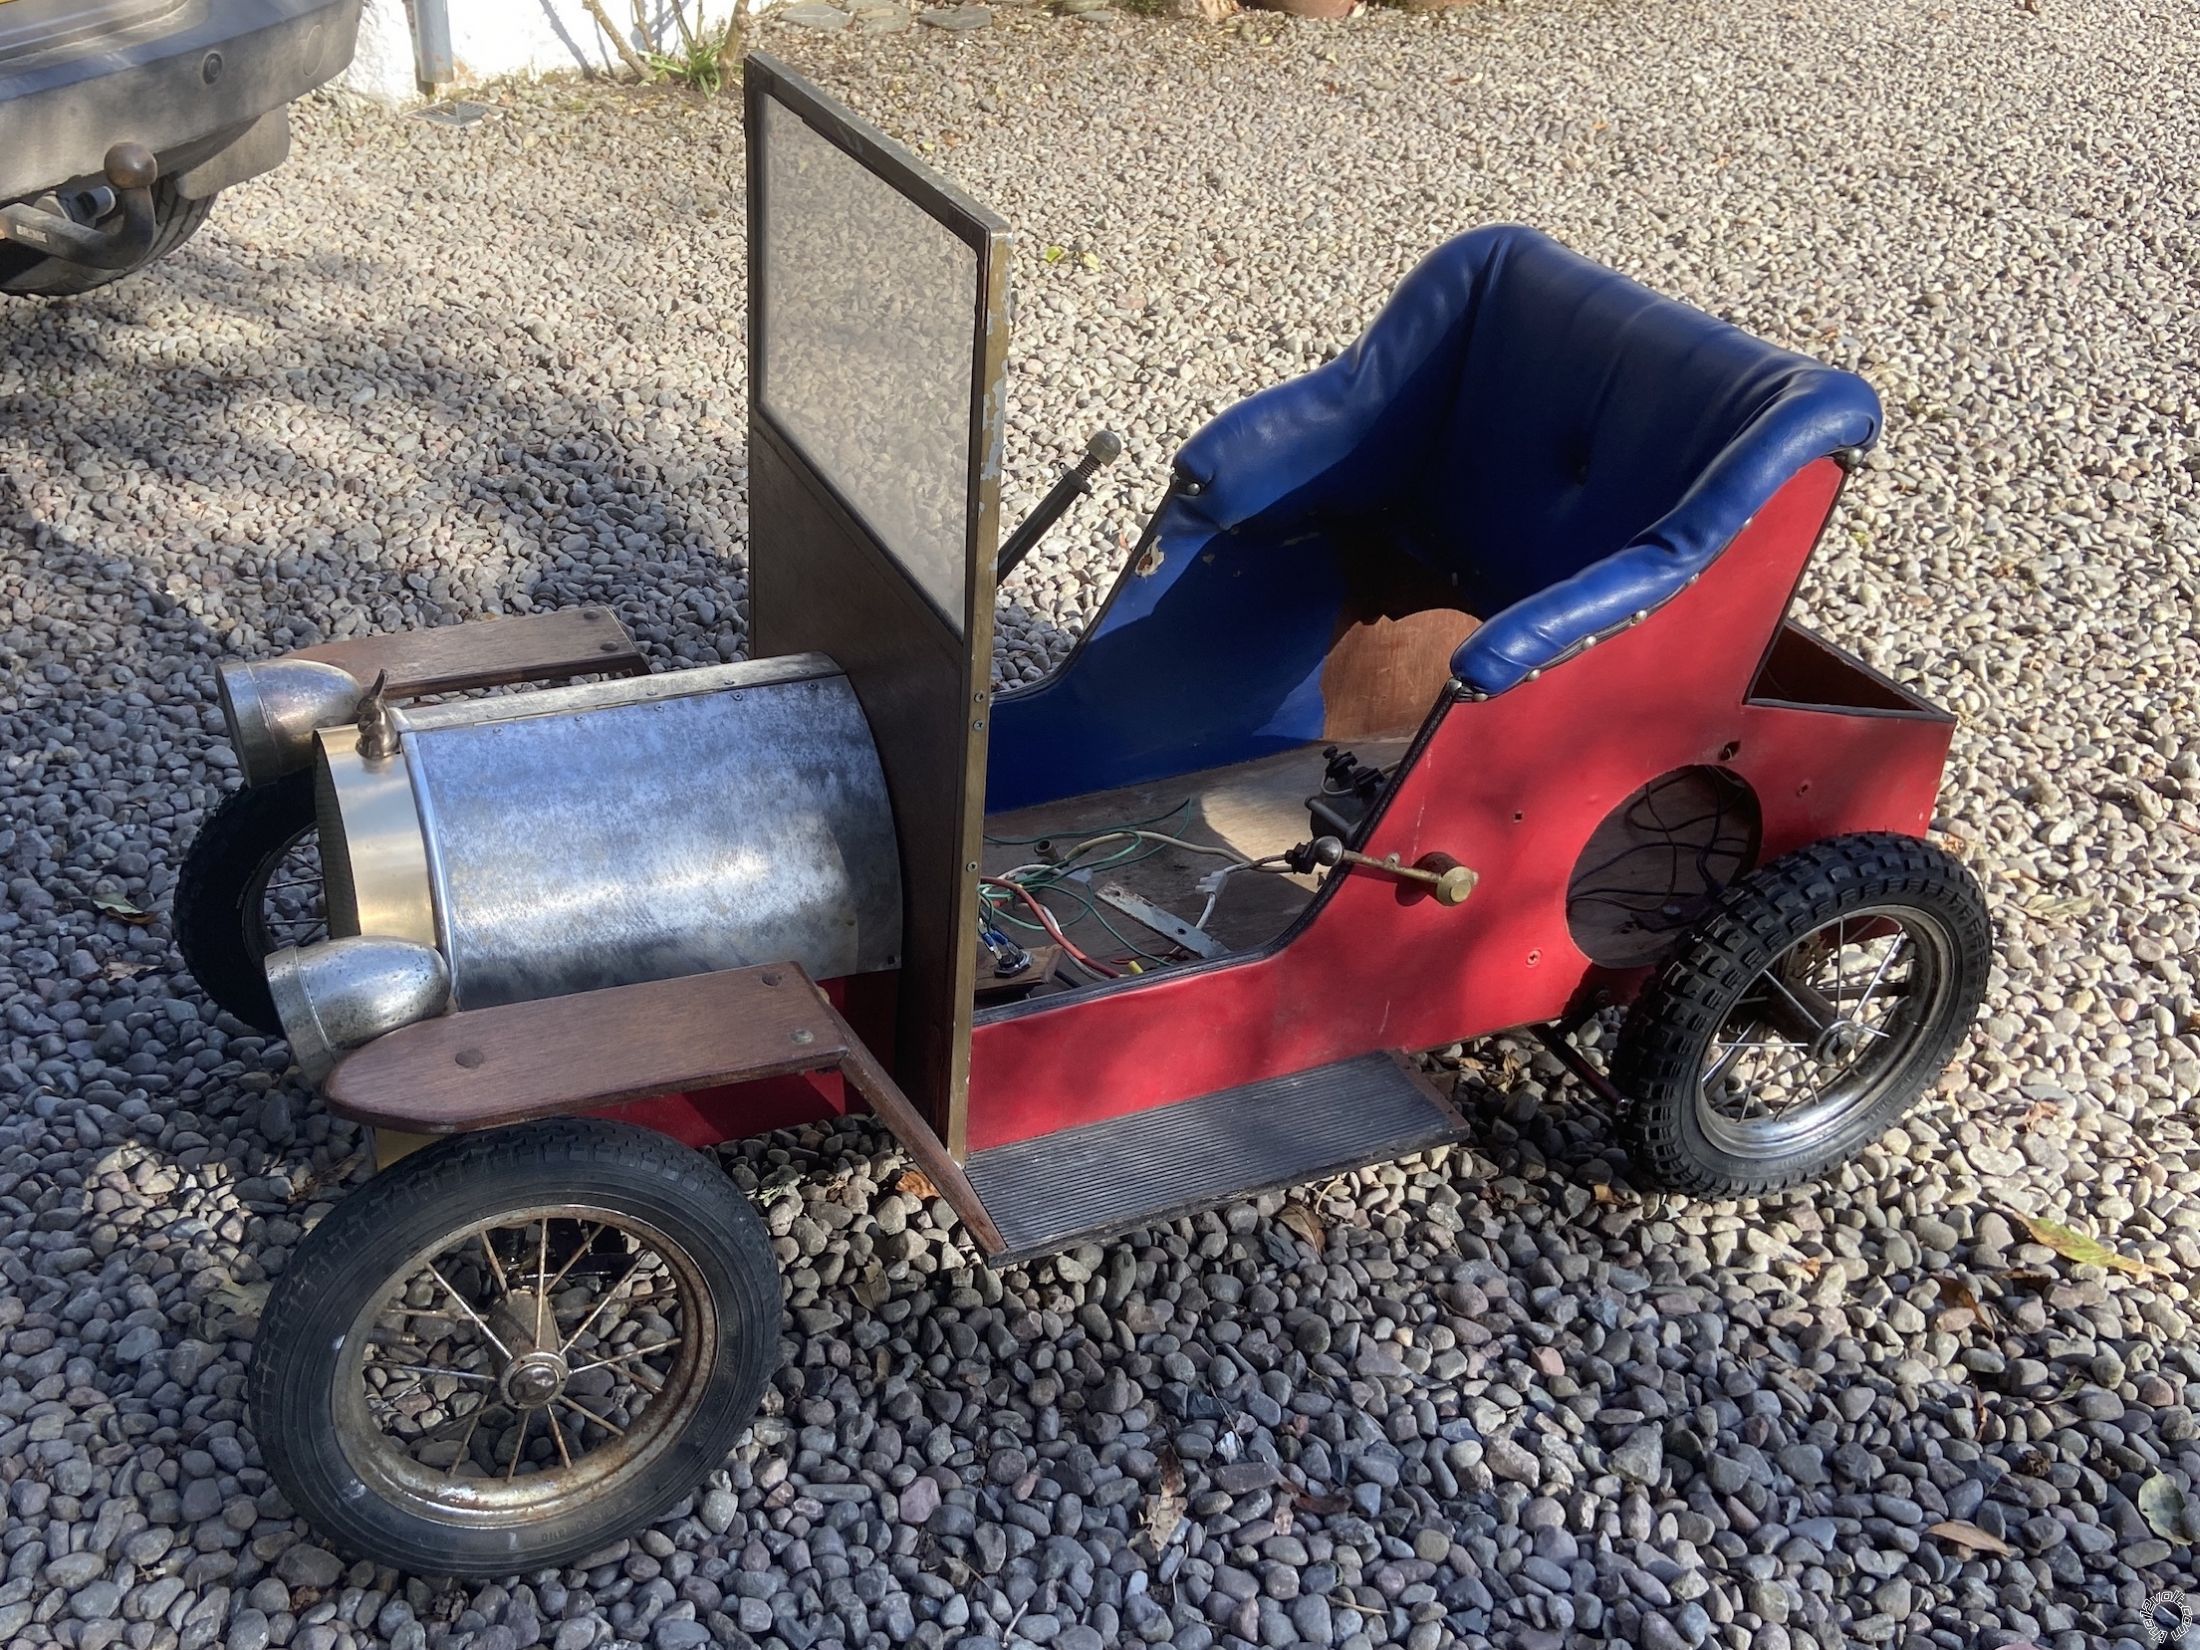
And here's a picture of what the whole car looks like at the moment ...
Making Sense Of Wiring In A Home Made Child’s Toy Car -- posted image.
i am an idiot 
Platinum - Posts: 13,667
Platinum spaceThis member consistently provides reliable informationspace
Joined: September 21, 2006
Location: Louisiana, United States
Posted: April 26, 2021 at 2:04 PM / IP Logged Link to Post Post Reply Quote i am an idiot
I have a few questions.
Do you have a multimeter?
The 2 terminals on top of the switch, is that a jumper connecting them together? Was that there initially?
How many connections on the forward/reverse switch?
Does that switch also control speed?
i am an idiot 
Platinum - Posts: 13,667
Platinum spaceThis member consistently provides reliable informationspace
Joined: September 21, 2006
Location: Louisiana, United States
Posted: April 26, 2021 at 2:13 PM / IP Logged Link to Post Post Reply Quote i am an idiot
From what I am thinking, do not attempt any of this till we verify with a meter.
The white wire and the terminal on left of forward/reverse switch is power input.
Terminal C is ground input to switch. I am thinking that Ring 1 was connected there.
The 2 terminals on top of switch go to the motor.
It will be very simple to confirm these connections with an ohm meter.
i am an idiot 
Platinum - Posts: 13,667
Platinum spaceThis member consistently provides reliable informationspace
Joined: September 21, 2006
Location: Louisiana, United States
Posted: April 26, 2021 at 2:18 PM / IP Logged Link to Post Post Reply Quote i am an idiot
Does the red wire go to the positive terminal of the battery?
The white wire with the homemade ring terminal should go to the other terminal on top of the solenoid.
wamphray 
Member - Posts: 10
Member spacespace
Joined: April 26, 2021
Location: United Kingdom
Posted: April 27, 2021 at 12:02 PM / IP Logged Link to Post Post Reply Quote wamphray
Thanks for the replies.
Yes. I have a multimeter although I don't really know how to use it. I treat it like a test bulb.
Yes .. There's a jumper at the top of the forward/reverse switch. It has always been there, although one side was not tightened down, as if something had been removed from it.
There are five connections on the Forward Reverse switch (including the two jumpers). One is not visible in my first photograph.
There is no speed control - just a button on the floor which is effectively and on/off switch. As long as it's pressed, the car moves.
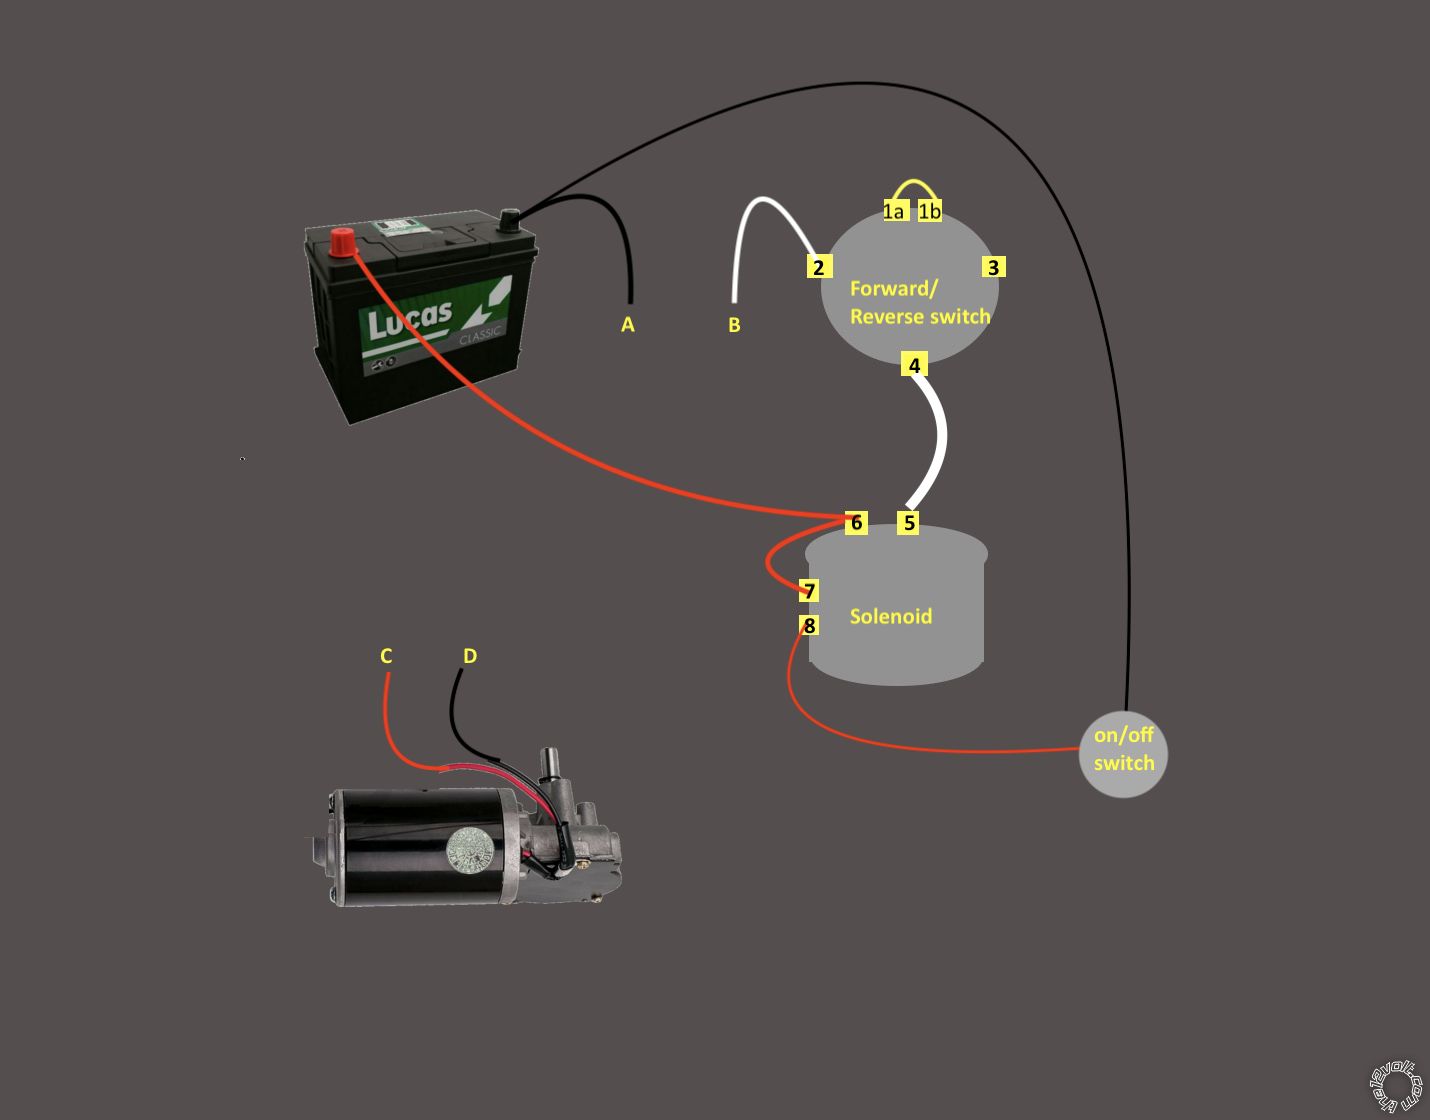
I've drawn up a wiring diagram of the wires as they are currently connected - I'm fairly certain they're connected as they were when the car worked with its previous motor.
I suppose my question is where do wires A,B,C & D go?
Making Sense Of Wiring In A Home Made Child’s Toy Car -- posted image.
i am an idiot 
Platinum - Posts: 13,667
Platinum spaceThis member consistently provides reliable informationspace
Joined: September 21, 2006
Location: Louisiana, United States
Posted: April 27, 2021 at 6:56 PM / IP Logged Link to Post Post Reply Quote i am an idiot
Remove jumper from 1a to 1b.
Set meter to the ohm setting. If it is not an auto ranging meter set it to 200 ohms.
Set forward / reverse switch to forward.
One meter lead on 1a, other meter lead to each other terminal and post the readings
To 1b
to 2
to 3
to 4
Then one lead to 1b and the other to each other and post those readings.
To 1a
to 2
to 3
to 4
one lead to 2 and the other lead to each other and post
To 1a
to 1b
to 3
to 4
One lead to 3 and other lead to each other
To 1a
to 1b
to 2
to 4
Switch to reverse and do the same.
wamphray 
Member - Posts: 10
Member spacespace
Joined: April 26, 2021
Location: United Kingdom
Posted: April 28, 2021 at 5:11 AM / IP Logged Link to Post Post Reply Quote wamphray
Thanks for writing out such clear instructions. Everything worked better when I changed the battery in the multimeter!
The forward/reverse switch has four positions (and rotates between them endlessly in either direction).
I followed your plan in each of the four positions. There were no readings in Positions 1 and 3.
In Position 2, there was a reading (of 1.2) when the meter was connected across terminals 1b and 2
In Position 4, there was a reading (of 1.4) when the meter was connected across terminals 1a and 3   
Does that point the way?
wamphray 
Member - Posts: 10
Member spacespace
Joined: April 26, 2021
Location: United Kingdom
Posted: April 28, 2021 at 5:15 AM / IP Logged Link to Post Post Reply Quote wamphray
By the way: I was talking nonsense when I said that one side of the jumper appeared to have been untightened (as if something had once been connected to it). I was getting my terminals mixed up. Both jumpers were tight (and the exposed end of the threads were uniformly corroded). I don't think there had ever been anything else connected to the jumper.
i am an idiot 
Platinum - Posts: 13,667
Platinum spaceThis member consistently provides reliable informationspace
Joined: September 21, 2006
Location: Louisiana, United States
Posted: April 28, 2021 at 7:56 PM / IP Logged Link to Post Post Reply Quote i am an idiot
I do not have enough data. Did you perform all 16 of the tests?
Page of 2

  Printable version Printable version Post ReplyPost New Topic
You cannot post new topics in this forum
You cannot reply to topics in this forum
You cannot delete your posts in this forum
You cannot edit your posts in this forum
You cannot create polls in this forum
You cannot vote in polls in this forum

  •  
Search the12volt.com
Follow the12volt.com Follow the12volt.com on Facebook
Friday, April 19, 2024 • Copyright © 1999-2024 the12volt.com, All Rights Reserved Privacy Policy & Use of Cookies
Disclaimer: *All information on this site ( the12volt.com ) is provided "as is" without any warranty of any kind, either expressed or implied, including but not limited to fitness for a particular use. Any user assumes the entire risk as to the accuracy and use of this information. Please verify all wire colors and diagrams before applying any information.

Secured by Sectigo
the12volt.com spacer
Support the12volt.com
Top
the12volt.com spacer