newbie, connector or solder?
Printed From: the12volt.com
Forum Name: General Discussion
Forum Discription: General Mobile Electronics Questions and Answers
URL: https://www.the12volt.com/installbay/forum_posts.asp?tid=137019
Printed Date: April 30, 2026 at 12:21 PM
Topic: newbie, connector or solder?
Posted By: nat28
Subject: newbie, connector or solder?
Date Posted: July 29, 2014 at 9:28 AM
Hi All,
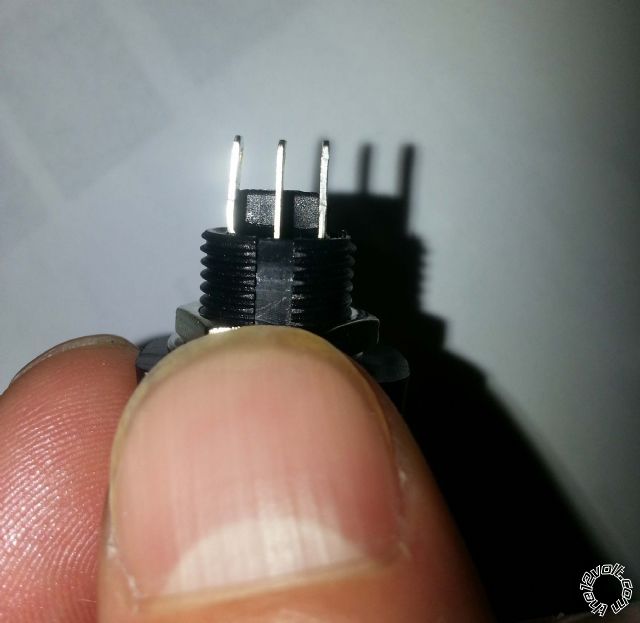
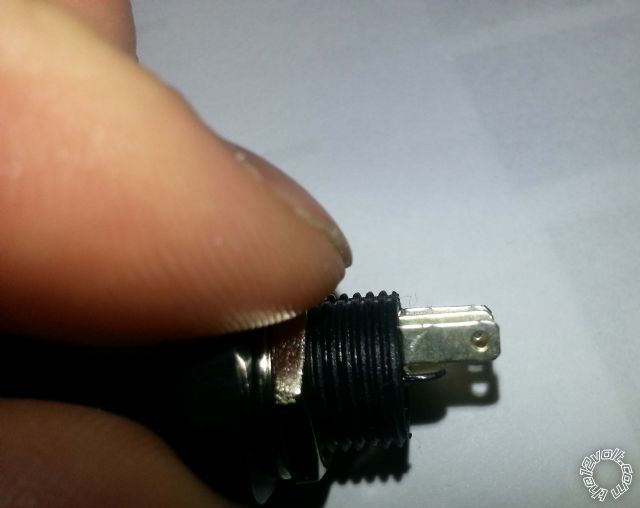
Thanks for your anticipated help. I'm new at vehicle wiring and will be installing several switches. Several of the switches I have purchased have tiny posts. I don't think there are female disconnects this small. I believe I will need to solder my leads to the posts. Could you confirm this? I've included several images of a rocker switch with such posts.
Thanks.
Replies:
Posted By: auto enhancers
Date Posted: July 29, 2014 at 11:33 AM
Solder will always give you the best connection
Posted By: lucasoil4u
Date Posted: July 29, 2014 at 12:05 PM
Solder then heatshrink.
Posted By: oldspark
Date Posted: July 29, 2014 at 12:24 PM
... if your soldering is good. Some switches are wrecked by excess heat.
They look like typical spade connectors - 4.8mm or 3.2mm etc.
Spades are normally quite reliable.
If a bad contact eventually occurs, a break & remake should fix it.
Alas as per a recent thread some GURUs like Howard essentially always solder whereas some like me have survived well with wire wrap and even alligator clips (eg - a "temp" connection to my rally car's washer bottle that I (re-)discovered 3 years later upon its retirement).
But maybe the difference is that I am doing for me (and want quick reconfiguration or replacement) whereas Howard and most others here do for other and need to ensure reliability. Plus they can solder, and they get paid for labor to reconfig & resolder.
Since you are "new" and presumably installing for yourself, might I suggest (reliable) crimps or soldered spades...? If reliability or bad (spade) connections proves to be an issue, THEN solder.
Of course if disassembly is not an issue - and your soldering does not wreck the switches - then solder. But I usually find it desirable to be able to separate vehicle (or other) switches from inter-wiring without having to desolder, hence the use of spades to the switch, else 0.1" headers if using non-spaded micro switches etc.
Posted By: tonanzith
Date Posted: July 29, 2014 at 12:40 PM
There ARE connectors for those terminals but soldering is always best.
-------------
Gary Sather
Posted By: oldspark
Date Posted: July 29, 2014 at 1:14 PM
I'd argue that. Like I said, it assumes soldering proficiency.
And how non-reliable are spade connectors to the switch (assuming spades are soldered to wires)?
And then, if you do solder but require easy maintenance, where do you place connectors and what is their impact on reliability?
Posted By: nat28
Date Posted: July 29, 2014 at 1:50 PM
Thanks!
-------------
2013 Subaru Outback Limited
2005 Toyota Sequoia
Posted By: nat28
Date Posted: July 29, 2014 at 1:52 PM
oldspark wrote:
... if your soldering is good. Some switches are wrecked by excess heat.
They look like typical spade connectors - 4.8mm or 3.2mm etc.
Spades are normally quite reliable.
If a bad contact eventually occurs, a break & remake should fix it.
Alas as per a recent thread some GURUs like Howard essentially always solder whereas some like me have survived well with wire wrap and even alligator clips (eg - a "temp" connection to my rally car's washer bottle that I (re-)discovered 3 years later upon its retirement).
But maybe the difference is that I am doing for me (and want quick reconfiguration or replacement) whereas Howard and most others here do for other and need to ensure reliability. Plus they can solder, and they get paid for labor to reconfig & resolder.
Since you are "new" and presumably installing for yourself, might I suggest (reliable) crimps or soldered spades...? If reliability or bad (spade) connections proves to be an issue, THEN solder.
Of course if disassembly is not an issue - and your soldering does not wreck the switches - then solder. But I usually find it desirable to be able to separate vehicle (or other) switches from inter-wiring without having to desolder, hence the use of spades to the switch, else 0.1" headers if using non-spaded micro switches etc.
Thanks for the help. A quick measurement shows the blades to be around 6 mm long and 2 mm wide. ------------- 2013 Subaru Outback Limited
2005 Toyota Sequoia
Posted By: burntkat
Date Posted: August 04, 2014 at 1:09 PM
For a newb with questionable soldering skills, probably wanting to minimize tooling costs, and to maximize serviceability- most definitely use solderless terminals. See my post immediately prior this one regarding proper crimping tools and techniques.
Also, invest in some heatshrink and cover the connector after assembly, to avoid any errant shorts.
-------------
"Always listen to experts. They'll tell you what can't be done, and why. Then do it. - Robert A. Heinlein"
Posted By: oldspark
Date Posted: August 04, 2014 at 5:22 PM
Agreed - especially re heatshrink tubing.
There are crimps for 2mm spades (terminals) tho I'm not sure if these are designated as 3.x mm (3.3mm?).
[ There are also 4.8mm and the all common 6.4mm aka 1/4", & 9mm etc. ]
I also recently wrote here that despite nearly 40 years of crimping it was only a few months ago I finally bought a proper ratchet crimping tool - and even that was a substitute for a refund as opposed to a fiscally acceptable desire.
But good crimps are essential. I'd strongly recommend a "proper" & good quality tool whether borrowed or invested.
Posted By: howie ll
Date Posted: August 05, 2014 at 2:04 AM
For ease of accessibility I would go for crimp connectors.
Pop into a local Radio Shack they will have the size, Width wise, either 1/4" (6mm) 4.8 or 3.2 also sold as speaker terminals.
I really only solder when I'm fitting a disconnect plug, molex etc. up line.
ALL of the answers above are correct !!
Having said that, please note that applying excess heat will damage the switch. Also the point about using a good quality crimper. (Not $5 from Walmart).
-------------
Amateurs assume, don't test and have problems; pros test first. I am not a free install service.
Read the installation manual, do a search here or online for your vehicle wiring before posting.
Posted By: nat28
Date Posted: August 05, 2014 at 6:54 AM
burntkat wrote:
For a newb with questionable soldering skills, probably wanting to minimize tooling costs, and to maximize serviceability- most definitely use solderless terminals. See my post immediately prior this one regarding proper crimping tools and techniques.
Also, invest in some heatshrink and cover the connector after assembly, to avoid any errant shorts.
Thanks for the input. I do have a good crimping tool, however, I like that ratcheting crimper that you indicated. ------------- 2013 Subaru Outback Limited
2005 Toyota Sequoia
Posted By: nat28
Date Posted: August 05, 2014 at 7:01 AM
oldspark wrote:
Agreed - especially re heatshrink tubing.
There are crimps for 2mm spades (terminals) tho I'm not sure if these are designated as 3.x mm (3.3mm?).
[ There are also 4.8mm and the all common 6.4mm aka 1/4", & 9mm etc. ]
I also recently wrote here that despite nearly 40 years of crimping it was only a few months ago I finally bought a proper ratchet crimping tool - and even that was a substitute for a refund as opposed to a fiscally acceptable desire.
But good crimps are essential. I'd strongly recommend a "proper" & good quality tool whether borrowed or invested.
Unfortunately, I have not been able to find spade terminals this small anywhere. ------------- 2013 Subaru Outback Limited
2005 Toyota Sequoia
Posted By: howie ll
Date Posted: August 05, 2014 at 7:39 AM
Radio Shack, Farnell, Mouser, RS Components in the UK/Europe etc. Google is your friend!
-------------
Amateurs assume, don't test and have problems; pros test first. I am not a free install service.
Read the installation manual, do a search here or online for your vehicle wiring before posting.
Posted By: Custom_Jim
Date Posted: August 05, 2014 at 11:16 AM
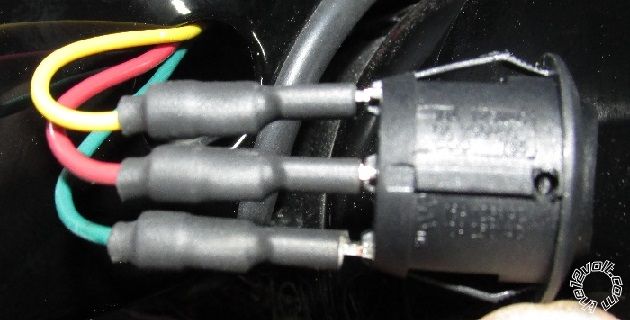
I just got done doing some switches like yours and opted to put connectors on them for easier replacement later if needed.
The connector size was a 0.205". They were really tight pushing onto the tabs of the switch but it was not due to the width of the connector but the terminal was made to go onto a thinner metal.
On mine I put some heat shrink over the connector.
https://www.flickr.com/photos/121766713@N04/14650236099/
 ------------- 1968 Chevy II Nova Garage Find 2012
1973 Nova Custom
1974 Spirit of America Nova
1973 Nova Pro-Street
Posted By: nat28
Date Posted: August 05, 2014 at 11:39 AM
Thanks for the image. After searching, I've been able to find .110" connectors and .187" connectors (as well as standard .250"). I guess .205" is another size to look for!
-------------
2013 Subaru Outback Limited
2005 Toyota Sequoia
Posted By: howie ll
Date Posted: August 05, 2014 at 11:42 AM
If you're using the standard LED three terminal rotary switch (as in Custom_Jim's photo the connectors are .187", 6mm (.250") will also fit just.
-------------
Amateurs assume, don't test and have problems; pros test first. I am not a free install service.
Read the installation manual, do a search here or online for your vehicle wiring before posting.
Posted By: Custom_Jim
Date Posted: August 05, 2014 at 11:51 AM
howie ll wrote:
If you're using the standard LED three terminal rotary switch (as in Custom_Jim's photo the connectors are .187", 6mm (.250") will also fit just.
Looking at my reply I DID use the 0.187 connectors and not the 0.205 ones. Boy it's hell getting old. ------------- 1968 Chevy II Nova Garage Find 2012
1973 Nova Custom
1974 Spirit of America Nova
1973 Nova Pro-Street
Posted By: burntkat
Date Posted: August 05, 2014 at 11:57 AM
nat28] wrote:
burntkat wrote:
For a newb with questionable soldering skills, probably wanting to minimize tooling costs, and to maximize serviceability- most definitely use solderless terminals. See my post immediately prior this one regarding proper crimping tools and techniques.
Also, invest in some heatshrink and cover the connector after assembly, to avoid any errant shorts.
Thanks for the input. I do have a good crimping tool, however, I like that ratcheting crimper that you indicated.
My pleasure.
For $30, I was very surprised at the quality of the tool and output from it. ------------- "Always listen to experts. They'll tell you what can't be done, and why. Then do it. - Robert A. Heinlein"
Posted By: burntkat
Date Posted: August 05, 2014 at 12:00 PM
Custom_Jim wrote:
I just got done doing some switches like yours and opted to put connectors on them for easier replacement later if needed.
The connector size was a 0.205". They were really tight pushing onto the tabs of the switch but it was not due to the width of the connector but the terminal was made to go onto a thinner metal.
On mine I put some heat shrink over the connector.
https://www.flickr.com/photos/121766713@N04/14650236099/
That's exactly what I would have done.
Protip: get a small flat-blade "tweaker" screwdriver and use it to spring open the sides of the connector's mating surface a bit. This greatly eases insertion.
(H/T Archer: "What, are we just done with the 'phrasing' thing now, or what?") ------------- "Always listen to experts. They'll tell you what can't be done, and why. Then do it. - Robert A. Heinlein"
Posted By: nat28
Date Posted: August 06, 2014 at 5:48 AM
Custom_Jim wrote:
howie ll wrote:
If you're using the standard LED three terminal rotary switch (as in Custom_Jim's photo the connectors are .187", 6mm (.250") will also fit just.
Looking at my reply I DID use the 0.187 connectors and not the 0.205 ones. Boy it's hell getting old.
I know what you mean! ------------- 2013 Subaru Outback Limited
2005 Toyota Sequoia
Posted By: howie ll
Date Posted: August 06, 2014 at 5:55 AM
I'm on steroids and anti bios this week cause of a COPD flare because of that I can at least use my crimpers!
And I've leapt out of bed the last 2 days instead of staggering because 40 years in this game does wonders for your joints.
I wish I could safely chomp on those steroids constantly.
-------------
Amateurs assume, don't test and have problems; pros test first. I am not a free install service.
Read the installation manual, do a search here or online for your vehicle wiring before posting.
Posted By: nat28
Date Posted: August 06, 2014 at 7:34 AM
I'm glad you're feeling better. Good luck.
-------------
2013 Subaru Outback Limited
2005 Toyota Sequoia
Posted By: howie ll
Date Posted: August 06, 2014 at 7:58 AM
Thanks, trouble is my hands are shaking an my to do list is sitting there! Drugs after effects but ta anyway  ------------- Amateurs assume, don't test and have problems; pros test first. I am not a free install service.
Read the installation manual, do a search here or online for your vehicle wiring before posting.
|