mdf glossy paint
Printed From: the12volt.com
Forum Name: Fiberglass, Fabrication, and Interiors
Forum Discription: Fiberglass Kick Panels, Subwoofer Enclosures, Plexiglas, Fabrics, Materials, Finishes, etc.
URL: https://www.the12volt.com/installbay/forum_posts.asp?tid=101953
Printed Date: March 28, 2026 at 4:56 PM
Topic: mdf glossy paint
Posted By: scobo_24
Subject: mdf glossy paint
Date Posted: February 06, 2008 at 5:40 PM
I am new here and must say that this site has been a huge learning tool for me with my projects so thanks all and great job so far. Now to the point, I was originally planning to fiberglass 2- 10s and 2- amps into my hatch (Scion tC). But due to my income and lack of time i dont think fiberglass is going to work for me. I am now planning the whole "box" out of mdf but only if i can achieve the same glossy paint look; I do not want the flat, dull color. I have searched and have came up empty besides this one post.
Originally posted by bellsracer: Start with a High Build Sealing Primer. These usually come in two types, paint on and spray on. I recommend using a roller and paint on type for this project (spray on works best on tiny projects and crazy designs projects) Sand that with 400 grit sandpaper to make it perfectly smooth. Then spray a few layers of paint (at least 3). Let that fully cure. Sand that down with 600 grit sandpaper and get that perfectly smooth. Then spray a few layers of clear over that. Asssuming you are using a spray can, you'll want at least 4 layers. Now the fun part, wet sanding. Since you used the sealing primer, the water should not affect your box at this point. Lightly MIST the area you are sanding with water and use a wet/dry sandpaper 1200 grit to remove any "orange skins" Then buff and polish for that "always wet" look. Does this actually work as stated or no? If not, can someone give me a bit of guidance? ------------- "It's not about how many times you fall down, but how quickly you get up."
Replies:
Posted By: scobo_24
Date Posted: February 07, 2008 at 3:36 PM
can someone atleast tell me what "High Build Sealing Primer" is?
can i get a link or a brand name to look for?
-------------
"It's not about how many times you fall down, but how quickly you get up."
Posted By: i am an idiot
Date Posted: February 07, 2008 at 5:08 PM
Posted By: scobo_24
Date Posted: February 07, 2008 at 6:45 PM
still doesnt help much, i have found those, but none of them can be used on mdf... is there something eles that i can achieve the same fill/sealant on wood? ------------- "It's not about how many times you fall down, but how quickly you get up."
Posted By: ya boy mike
Date Posted: February 07, 2008 at 10:04 PM
You should be able to just lay a thin layer of body filler on top of the MDF, sand and paint
-------------
It Hz
Posted By: bellsracer
Date Posted: February 09, 2008 at 12:02 AM
scobo_24 wrote:
I am new here and must say that this site has been a huge learning tool for me with my projects so thanks all and great job so far. Now to the point, I was originally planning to fiberglass 2- 10s and 2- amps into my hatch (Scion tC). But due to my income and lack of time i dont think fiberglass is going to work for me. I am now planning the whole "box" out of mdf but only if i can achieve the same glossy paint look; I do not want the flat, dull color. I have searched and have came up empty besides this one post.
Originally posted by bellsracer: ~snip~ Does this actually work as stated or no? If not, can someone give me a bit of guidance?
HEY! I'm being quoted! (ego trip) hehe.... Ok seriously, yes this does work... I use this all the time when I make art projects (in fact, it was my sculpture teacher that taught me about this) as well as work on vehicles. Since my significant other has been doing this for a while and he has an art degree too, he verified the idea and showed me an old project hiding in the wings where he used the sealing primer. Look into a reputable art supply store (not a craft store) for it. It is a bit pricey at around $30-50 for a gallon of the roll on, but it really works! Depending on which brand you get cure times will vary, but at the shop we own, we use Transtar Super Sand High Build Primer. It works with Acrylic, Urethane, and Enamel paints well when done with proper cure times and have the directions followed (based on ambient temperature and humidity) The only kickback is that if you are using urethane based paints over it, it is recommended to use another sealer over it to minimize humidity warping from the urethane. If you have any other questions, please do not hesitate to ask. ya boy mike wrote:
You should be able to just lay a thin layer of body filler on top of the MDF, sand and paint
Yes that is possible too, but more often than not, I (as well as my coworkers) find that body filler tends to be weaker in applications where it is just used solely as a super thin base for paint when skimmed over the sides of MDF. MDF (decent quality or better at least) for the most part is already sealed on the faces and just needs to be extra sealed along cut edges where the sealant from the factory didn't get to soak in. I'm not discrediting your idea. It is a valid one. I just have an alternative that I feel produces better results, so please do not take offence to this. I mean no disrespect. Ganbatte ne! ------------- Never send your ducks to eagle school.
The difference between ordinary and extraordinary is that little extra.
The 3Ls of life: Learn from the Past, Live for the Present, Look to the Future.
Posted By: ya boy mike
Date Posted: February 09, 2008 at 12:18 AM
No worries, none taken I was simply throwing another option out there Mike ------------- It Hz
Posted By: speakermakers
Date Posted: February 11, 2008 at 1:38 AM
I have a method that I call Ninja Painting. This is my geeky little way of pulling off a cool looking paint job in a pinch.
Get your hands on solvent based high build primer. This is the kind of primer that is made to be sprayed out of a gun. Go to your local auto body paint store and ask for old school primer that uses acetone or lacquer thinner as a reducer. You can either spray this on or if you live in CA like me you can legally paint it on with a brush. This stuff dries fast!
Sand with 3M medium sponge sander, then fine, then super fine (15 seconds each).
Then paint with your favorite blend of Duplicolor rattle can paint. This will dry semi flat.
Follow this by a light mist of rattle can clear (the type made for door jams) This is a very high build clear. After the light coat dries follow with two regular coats, allowing each coat to flash for 30 minuets.
At this point you will be amazed by the brilliant quality of your paint job. If you want perfection wait 24 hours then buff with rubbing compound and polish.
I regularly paint full blown jobs with professional grade paints and equipment. I can honestly say that some times this is just as easy and looks exactly the same for a fraction of the price and with no special equipment.
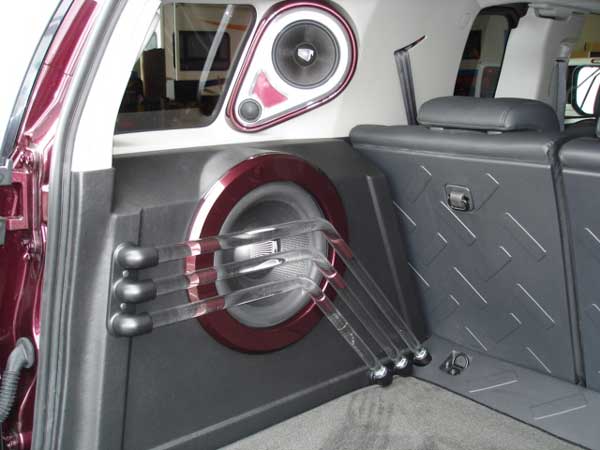
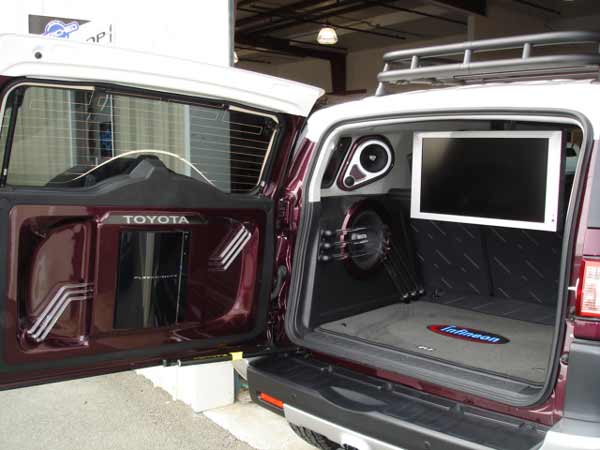
Half of what you see here is done this way and the other half was done at a very competent body shop. This truck was done for Infneon Raceway. 6 months later an intern there scratched the living hell out of the paint. When I brought it to the body shop to have it repaired (I did not have the time to do it myself) they could not tell what parts I had painted and what parts they had painted.
Like I said, Ninja!
Posted By: scobo_24
Date Posted: February 12, 2008 at 12:47 PM
so bellsracer, my last obsticle is how i am going to paint the amp rack. i want to do it the same was as you said but is it hard to sand/wet sand/or even primer in the corners of the rack. more or less my rack is going to be like a clothes box but only with no top and its going to hold my amp( and ofcourse made out of 1" MDF); and i see it being difficult to sand and wet sand the corners of the box because it is not flat.... any advice or hints on how to make it smooth and easier?
-------------
"It's not about how many times you fall down, but how quickly you get up."
Posted By: scobo_24
Date Posted: February 12, 2008 at 12:53 PM
sorry for the double post, but can you wet sand with a regular sander or no?
-------------
"It's not about how many times you fall down, but how quickly you get up."
Posted By: bellsracer
Date Posted: February 12, 2008 at 1:05 PM
I"m sorry, but I am having a hard time picturing what your amp rack looks (or is going to look) like. Mind sketching it or something so I can see what you mean? As for the wet sanding, I recommend hand sanding as much as possible. Yes it is a bit tedious, but that will give the best results. I have yet to come across anybody who machine wet sands and get a flawless surface (no waves, no lines, no marks) Ganbatte ne! ------------- Never send your ducks to eagle school.
The difference between ordinary and extraordinary is that little extra.
The 3Ls of life: Learn from the Past, Live for the Present, Look to the Future.
Posted By: scobo_24
Date Posted: February 12, 2008 at 9:48 PM
https://www.mp3car.com/vbulletin/attachments/fabrication/31953d1153550709-amp-rack-photos-installation-newbox006.jpg like the one in the picture above ------------- "It's not about how many times you fall down, but how quickly you get up."
Posted By: bellsracer
Date Posted: February 13, 2008 at 3:43 AM
Ah.... I see Don't worry about sanding the edges down unless you are looking to do roundover edging on it. As you go over the edge, the sanding will take care of it. If you have a steady enough movement, you can get by on a oscillating palm sander with no major worries. Just keep an eye out to not sand too much. Being that there is the valley corners to deal with, you'll also want to get some sanding blocks and work them in the valley edging. They'll also make it easy to work the areas under the amp racks and on the pedestals. Your key to making this work if you are using a power sander is to make sure that you use long strokes that criss-cross to povide cleaner more even coverage. Anything else we can assist you with? Ganbatte ne! ------------- Never send your ducks to eagle school.
The difference between ordinary and extraordinary is that little extra.
The 3Ls of life: Learn from the Past, Live for the Present, Look to the Future.
Posted By: scobo_24
Date Posted: February 13, 2008 at 8:37 AM
ok thanks you have been a huge help so far. My last request is could you give a more detailed write up from start to finish on how to do it so i can make sure i dont leave anything out. if you dont want to thats fine i just want to make sure that I do it right because im putting a lot of money into it (including system).
-------------
"It's not about how many times you fall down, but how quickly you get up."
Posted By: scobo_24
Date Posted: February 13, 2008 at 8:40 AM
or even a materials list, that would be great. I apologize for hagging you about it, but i really want it to look good. thanks again for everything and this is my last post till i finish the project. (I will post pics) ------------- "It's not about how many times you fall down, but how quickly you get up."
Posted By: bellsracer
Date Posted: February 15, 2008 at 1:53 AM
Basic Materials: MDF (5/8" minimum recommended)
Wood Glue
Wood Screws/Drywall Screws
High Build Primer/Sealer (Roll/Brush on style recommended)
Sealer (if high build primer does not have sealer in it and/or if the paint is urethane)
Paint
Clear Coat
Sandpaper (100g,220g,320g,400g,600g,1200wet,2000wet [need patience, but gives the always wet look])
Sanding blocks (Or various blocks of wood)
Silicone sealant Basic Instructions:
1) Plan out your system taking into account all aspects (wiring guides, mounts, other equipment, etc)
2) Cut your parts as close to fitting as possible, the closer the cut to exact size, the better and stronger the final product.
3) Assemble the parts with the screws between 3-6" apart and at corners. Use a coat of wood glue on the edges before screwing all parts together. Let the glue cure and dry.
4) Use the 100g to even out the edges to make it as clean as possible. If you have a slight gap, dab some glue into the crack and let that cure. The ideal edging will be one you can't feel.
5) Sand with the 220g on as much of the exposed area as possible.
6) Roll your primer on let that cure. repeat (3 coats)
7) Sand with 220g paper. essentially you are sanding to smooth it out and remove the brush strokes.
8) Sand with the 320g. You are looking to remove the marks from the 220g.
9) Same thing with the next step up in grit. repeat until you are at 400-600 depending on the paint)
10) Add sealer (if not premixed in).
11) Add color.
12) Add clear coat.
13) more sanding with the blocks.
14) wet sanding to 1200g
15) more clear coat.
16) sand new clear coats.
17) Yeah... HAVE FUN! ------------- Never send your ducks to eagle school.
The difference between ordinary and extraordinary is that little extra.
The 3Ls of life: Learn from the Past, Live for the Present, Look to the Future.
Posted By: scobo_24
Date Posted: February 15, 2008 at 12:10 PM
are all the steps after step 12 wet sanding? and the primer that you recommended me, does it contain the sealer as well so i dont have to buy it.....? ------------- "It's not about how many times you fall down, but how quickly you get up."
Posted By: scobo_24
Date Posted: February 15, 2008 at 1:56 PM
and what paint type do you recomend...? the acrylic paint seems to be to water-base for this type of project and no to urethane because i dont want to have to seal it again.... so is the enamel paint my only option? ------------- "It's not about how many times you fall down, but how quickly you get up."
Posted By: joyrydn
Date Posted: April 22, 2008 at 9:38 PM
waiting for pics, but sounds like it will turn out fine. don't get discouraged, we all started out at one point and i myself was intimidated to start a few projects of my own, but once i got started it all went smooth. you will do fine.
-------------
Make it Euro'n!!!
|