how to keep resin from sticking?
Printed From: the12volt.com
Forum Name: Fiberglass, Fabrication, and Interiors
Forum Discription: Fiberglass Kick Panels, Subwoofer Enclosures, Plexiglas, Fabrics, Materials, Finishes, etc.
URL: https://www.the12volt.com/installbay/forum_posts.asp?tid=107971
Printed Date: March 21, 2026 at 4:45 AM
Topic: how to keep resin from sticking?
Posted By: mkzilla
Subject: how to keep resin from sticking?
Date Posted: October 06, 2008 at 9:41 PM
I have heard that WD-40 or cooking spray will work to keep the resin off your gloves.
I tried using some lubricant stuff called liquid wrench, which seemed like it would work, but unfortunately it didn't help one bit.
Will WD-40 or cooking spray actually work or will it pretty much be the same as the Liquid Wrench stuff, because I am having a hard time with my first fiberglassing project (kick panels). As I was adding fiberglass mat, part of the mat would stick to my gloves and pull off of the kick panel I was making
Replies:
Posted By: emptypockets426
Date Posted: October 06, 2008 at 9:52 PM
Don't even bother with all that stuff. Cooking spray, WD-40, Liquid Wrench...it doesn't work. Try ripping smaller pieces of mat and try not to touch the resin all all with the hand you use to lay the mat. I know it seems almost impossible but you'll get the hang of it. The smaller the project....the harder its gonna be. Don't mix too much resin so you don't feel rushed. Rip the mat into small 2 inch pieces before you even start with the resin. Medium gloves fit me pretty good so I use medium latex and use large nitrile over the latex. If I get even the smallest dab of resin on the outter layer, I take those off and continue. Whatever you do, don't get frustrated and give up. Oh and post pics....I wanna see what you got so far. Hope it helped...
Posted By: mkzilla
Date Posted: October 07, 2008 at 1:51 PM
When I get a chance to I will post pics, I got work today and tomorrow so don't expect any til Thursday :) As of right now, I only have the back pieces of the kick panels, basically the pieces that were molded to around all the stuff in the kick panel areas of my car, as well as one of the 6.5" speaker rings (made of mdf) and one of the crossover mounts (also of mdf).
I want to show everything in each kick panel, and I'm pretty sure I can make it all fit without interfering with the clutch on the drivers side and all that good stuff. I plan to put the 6.5" the farthest back facing the B pillar of the passenger side, with the tweeter in closer to the front and as high as possible so it doesn't get muffled when someone sits down. Then I want to put the crossover below the tweeter, also near the front, facing out so it can be easily accessible should I feel the need to mess with the settings, as well as for a cosmetic look.
I used a roto-zip to cut the speaker rings and the crossover mounts, and used it to also cut into the mdf about 1/4" on the speaker ring and 1/2" on the crossover mount so that they sit flush on the kick panels.
By the way, the speakers I am going to put in the front are 6.5" Alpine Type-R components. In the rear deck i'm gonna put 6.5" coaxial Type-R speakers. I want to make a fiberglass rear deck with the speaker rings raised up and slightly facing forward rather than straight up, and wanted to mount the amp right in the middle in front of the 3rd brake light, but i'm still kinda iffy on the amp cause a) it will be visible and someone may want to just snatch it, and b) the sun and the amp might not get along very well...
...but thats another project for another time :P
So yeah, thats my life's story.
Posted By: rickcperry
Date Posted: October 11, 2008 at 10:42 PM
When I do fiberglass I keep a bottle of baby powder beside me. When I get resin on my gloves I wipe them off with a shop rag and then add baby powder. It helps to keep the mat from sticking to your gloves while you lay it up. Oh and also when you have to do any sanding, put the baby powder all over your arms and neck so that the fibers won't be as bad to wash off. Then after the shower, use hand lotion with Shea Butter to help control the itch!
Good Luck
-------------
Anything can be done with cash and relays!
Posted By: mkzilla
Date Posted: October 17, 2008 at 11:01 AM
Ok, well I was a little lazy and was trying to get my kick panels done, but right now im waiting for the primer to dry a little so I can add another coat. Anyways, here are the pics of what I got so far. 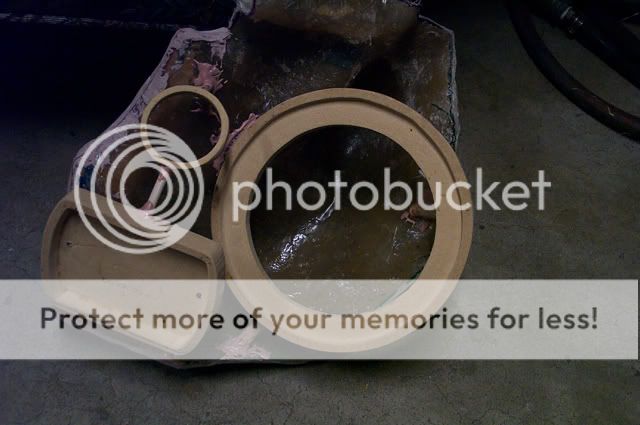 This is the skeleton of my kick panel with the rings (I had to use bondo to stick them cause the super glue wasn't working at all). 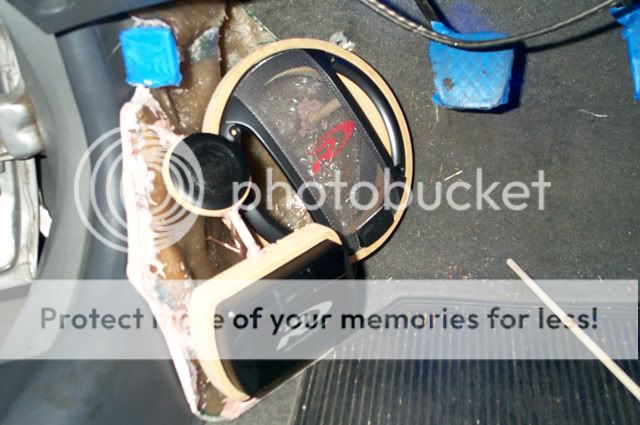 And this is the same picture without the flash...I think its a much better pic :) So yeah once I paint it I will post the finished product on here. This is after the first coat of primer on it. It still has a few dips and pinholes that the spraycan high build primer wasn't doing too good at filling, so I started spraying it on thick. This is after the fleece has been resined. 3M Super 77 spray did a horrible job of keeping the fleece on the 6.5" ring, I had to cut out the piece and redo it and used staples just to get it to stay... This is the same pod with the speakers fitted into them.  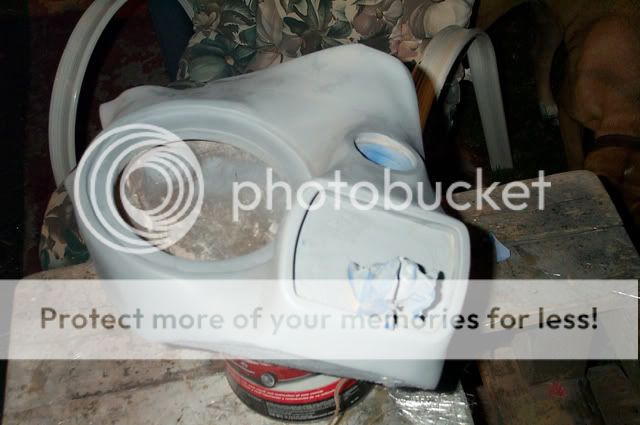 
Posted By: mkzilla
Date Posted: October 19, 2008 at 12:52 PM
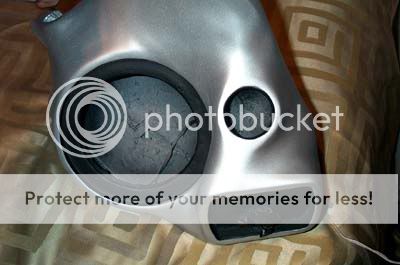
Here is the passenger side kick panel painted to match the metallic silver color of my civic.
_.jpg)
I painted the inner part of the rings a matte black since the inner part will slightly show through the speaker grill and the bottom of the crossover (which won't really be noticable since its so low and facing straight).
I wasn't really too concerned with the smooth finish on the inner part of the rings since, well they wont really show much anyway, just maybe the edges.
Right now I am clear coating the kick panel :)
Posted By: mkzilla
Date Posted: October 19, 2008 at 12:54 PM
The pictures never seem to work for me on these forums.
Posted By: joyrydn
Date Posted: October 25, 2008 at 9:51 PM
not bad at all my friend. how long did it take you total and costs?
-------------
Make it Euro'n!!!
Posted By: mkzilla
Date Posted: October 26, 2008 at 9:54 PM
I didnt really keep track of the cost but I would say roughly 150 for everything to build and paint the speakers, and took me around a month working on em between school and work.
Took me alot of time and money, but alot of it had to do with learning through mistakes, kinda learned what works and what doesnt work so well and those kinds of things, im ready for my next fiberglassing project, the rear deck of my car :)
|