finished product of removable glassed box
Printed From: the12volt.com
Forum Name: Fiberglass, Fabrication, and Interiors
Forum Discription: Fiberglass Kick Panels, Subwoofer Enclosures, Plexiglas, Fabrics, Materials, Finishes, etc.
URL: https://www.the12volt.com/installbay/forum_posts.asp?tid=112293
Printed Date: May 02, 2026 at 4:36 PM
Topic: finished product of removable glassed box
Posted By: grant2207
Subject: finished product of removable glassed box
Date Posted: March 12, 2009 at 12:09 AM
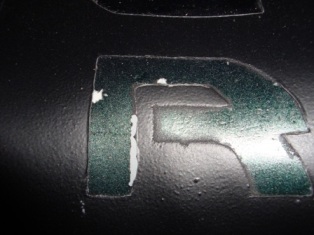
This is the final product of my fiber glass box i made for my 10" pioneer premiers... it took about three months (finished in Sept. '08) and about $80. Its flat black with green stripes to match my jeep. i also put my initials on it for a more personal touch, although i wish i hadnt because they didnt turn out so hot... the edges peeled a little and it looks kinda cheese close up there... but the design was cool i thought... all in all i think it turned out good for a first time glassing.. thanks to everyone who gave me some input on my other threads and started threads about makin these types of boxes... i couldnt have done it with out this site and your guidance... keep up the good work! 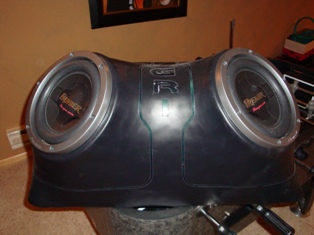

Replies:
Posted By: KPierson
Date Posted: March 12, 2009 at 8:36 AM
Looks pretty good - any pictures with the box inside the Jeep?
-------------
Kevin Pierson
Posted By: ca$ino
Date Posted: March 19, 2009 at 3:04 PM
That's fiberglass? maybe it's the paint, it looks like leather to me!
Btw, i'm not complaining, i'm actually complementing.. what did you use to do the lettering?
Nice job for first time man.. nice job!
-------------
Look twice, think thrice, 1 splice/ 1 slice!
This is a phrase i came up with and something i will now live by.
Posted By: grant2207
Date Posted: March 19, 2009 at 8:15 PM
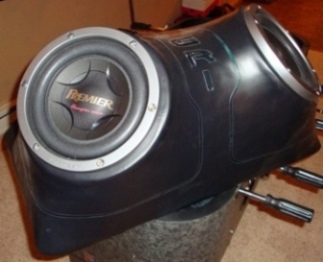
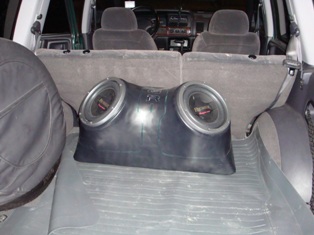
Thanks for the complements! Yeah, the flash from the camera exposes all the lumps were i didnt sand enough... it got that way cause I thought it would be ok to slop the resin on as thick as i could... that made sanding a pain in the ***... I did the letters by taking a really glossy notebook cover and laying blue painters tape over it in squares roughly the size of the letters. then i used a hobby knife to cut out the letter shapes i wanted (after taping a print out of the desired shape over the tape). The glossy notebook cover made it possible to peel off the tape without removing too much of the adhesive. it was a little bad for adhesive in the corners and there is one letter that has a pretty bad underspray spot, but its not noticable from a distance. the pealing of the green at the edge is much more noticable, cause you can see the grey primer. i should have put more green down but the can was really small and really expensive (i bought it from a auto body place that sold cans of touch up paint, i wanted the exact green of the outside of my jeep.) I only used 3 coats.... here are the photos you asked for kpierson. once again i had to use flash : ( cause it was dark... it looks bigger in person, for some reason the pictures have a tunnel effect that make it look tiny. my trucks really dirty, so that is why everything looks dusty. she wants a spring cleaning realy bad! and the marks on the back of the fold down seats are from the sub box bottom, i had it sitting with the seats down for a while and the sub box is actually very heavy and leaves carpet indents. i should have brushed those out... oh yeah, dont mind the mats, i know they are ugly but i only had them in there to defend against the wetness of my snowboarding stuff. 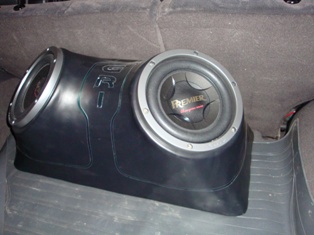 
Posted By: j.reed
Date Posted: March 20, 2009 at 9:20 AM
Looks very good. One tip for the paint next time. Use fine line tape to shape your graphics. You can get it at any auto parts store or paint shop. Its a flexible thin line tape usually blue in color. You can curve it really tight and it sticks awsome. Very similar to a pinstrip tape. Then use your auto masking tape off it to protect the area around the fine line tape. Doing this will allow you to get crisp lines with virtualy no underspray, Peals up very nice and very little cutting involved. Keep it up. very nice work. ------------- 
Posted By: grant2207
Date Posted: March 30, 2009 at 7:57 PM
j.reed wrote:
Looks very good. One tip for the paint next time. Use fine line tape to shape your graphics. You can get it at any auto parts store or paint shop. Its a flexible thin line tape usually blue in color. You can curve it really tight and it sticks awsome. Very similar to a pinstrip tape. Then use your auto masking tape off it to protect the area around the fine line tape. Doing this will allow you to get crisp lines with virtualy no underspray, Peals up very nice and very little cutting involved. Keep it up. very nice work.
Thanks! Yeah, i used some masking tape that i bought at a local auto body place. Just some normal light stick painters tape. It was the only place I could find tape thin enough to make stipes like these. that stuff worked great, only one spot came unstuck and that was probably my fault cause i set it and lifted it so many times... but thats on the back so it isnt visable. ------------- 4-6 1/2" Alpine S types; 2-10" Pioneer Premier Subs; Sony Head-Unit; Soundstorm 4 Band EQ; Crunch 1100 watt 2-channel amp, Pyramid Reno Series 800 watt 4-channel
Posted By: ca$ino
Date Posted: April 01, 2009 at 10:15 AM
All in all though, nice first time work... i'm in the middle of a couple first time glassing project! so look out!!   ------------- Look twice, think thrice, 1 splice/ 1 slice!
This is a phrase i came up with and something i will now live by.
Posted By: theforgottensol
Date Posted: April 05, 2009 at 3:35 PM
great job !!
Posted By: icearrow6
Date Posted: April 05, 2009 at 4:37 PM
Dayyyyuuuummmmm!! nice job.
Posted By: rxsilvia
Date Posted: May 06, 2009 at 2:40 AM
|
