Fiberglass Dash How To for my 83 Square B
Printed From: the12volt.com
Forum Name: Fiberglass, Fabrication, and Interiors
Forum Discription: Fiberglass Kick Panels, Subwoofer Enclosures, Plexiglas, Fabrics, Materials, Finishes, etc.
URL: https://www.the12volt.com/installbay/forum_posts.asp?tid=115287
Printed Date: May 01, 2026 at 9:05 AM
Topic: Fiberglass Dash How To for my 83 Square B
Posted By: deeg money
Subject: Fiberglass Dash How To for my 83 Square B
Date Posted: July 25, 2009 at 5:44 PM
Hey guys, I am about to start working on my new to me 1983 chevy c10 (square body). I plan on glassing the dash, doors, and box all from scratch with the idea's for I have come up with for the style I want. I like to keep things clean and simple. I think that looks the best. To much stuff going on looks like $h*t to me. Anyways this week I am trailering the truck to my property and putting it under the car port. I am guessing by wednesday or thursday I should havce picks of the inside right now and by the weekend I will start working on the dash. I plan on running all Alpine Type R speakers and subs along with Alpine head unit and amps. This truck when I get done will cost me around $10000 to finish up but my plan is to have a one of a kind show truck and be in a magazine. Thanks and let me know what kind of how to or any questions you have on glassing. Thanks guys DEEG Money ------------- Deeg money
"If you cant be good, be good at it"
Replies:
Posted By: biggidaman
Date Posted: July 26, 2009 at 9:33 PM
super man can't wait to see your progress!!
-------------
Biggi Kustumz home base operation since 1998. car audio should be fun not work!!!!
Posted By: deeg money
Date Posted: July 26, 2009 at 10:19 PM
I created this on paint on my computer in about 5 minutes. This is around what I want my dash to look like. My truck will be painted a gun metal color with a burnt orange base that shows thru. I want the interior to be the burnt orange, tan, and gun metal colors also. I like to keep things simple so if you would like to give any idea's please keep it simple and not crazy. anyways. The black cirle represents the steering column, the gray circles represent either ac vents or guages, and the dark gray oval represents the cd player. If you have any better Ideas of where to mount the cd player please let me know and I will consider it. I will not be putting a center console in cuz I want the bench seat in the truck for some odd reason. I will also be making custom door panels that remble the dash and I will attempt to create those on paint too. Thanks a lot ------------- Deeg money
"If you cant be good, be good at it"
Posted By: deeg money
Date Posted: August 02, 2009 at 9:25 PM
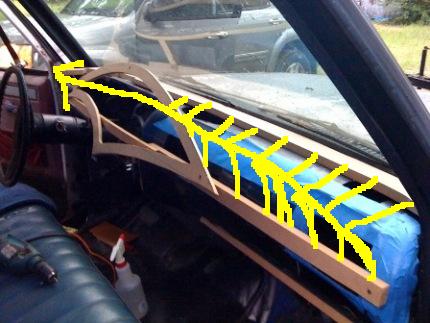
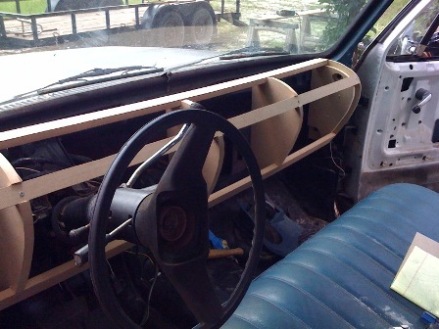
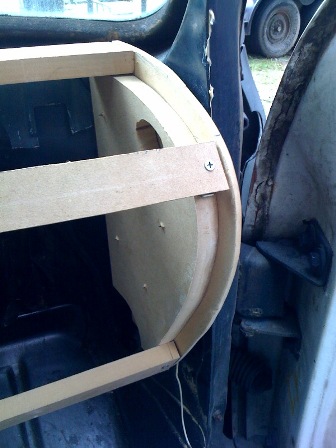
Here are a couple of pictures I took with my phone yesterday. I forgot to take some today and have got a lot farther on it today. In these pictures I am working on the frame for the dash and figuring out where I am going to stick all of the components like the ac strereo and all that good stuff to keep it as smooth as possible. As of right now I have rounded out the passenger side with a sheet of fiberglass that I made and just bent it around. I have also created the sides for the frame and wrapped the main dash piece in fleece to see how it look and I have a few pieces of the dash to frame to cut to make it all look flush. I will have more on here tomorrow hopefully. Oh and this is just a reminder that this is my first time creating a dash completely from scratch or actually building a full dash for that matter. Let me know what you think! ------------- Deeg money
"If you cant be good, be good at it"
Posted By: ianarian
Date Posted: August 03, 2009 at 6:08 AM
Sup Deeg, lookin good. I say you kick out a special mount for the deck, and even angle it toward you. Perhaps a array of gauges or something. Center console under the dash maybe? Are you going to contour using ribs from the board on top the dash to the board running across the dash. The guage cluster would look sick if you made it curve around the driver. Adding dimension will pay off big time later. Quick idea sketch.
 ------------- This is what I do for FUN!
Posted By: deeg money
Date Posted: August 03, 2009 at 6:21 AM
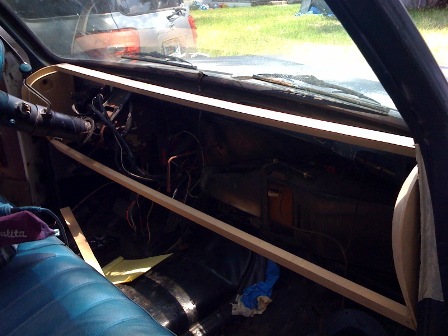
Hey, thanks for the ideas! I have got a lot farther as of right now. I created a piece of fiberglass to lay perfectly over the passenger side ribs of the frame so it's perfectly round. I think I might try and curve the gauge piece in the front of the driver. I am going to create a seperate piece on the driver side with all of the guages that can easily be mounted up and be painted. I plan on having all of the dash wrapped in a medium dark tan and just have the guage piece painted.
-------------
Deeg money
"If you cant be good, be good at it"
Posted By: biggidaman
Date Posted: August 03, 2009 at 10:37 PM
dude i'm diggin where you going with it. just make sure you think ahead of how your going to pull it out and re fasten it later when your don.e always think ahead with every pwic you lay in. if i were you i would have cut out all the old dash and started completly from scratch. but thats me. so far so good man keep it up. pictures pictures pictures!!!
-------------
Biggi Kustumz home base operation since 1998. car audio should be fun not work!!!!
Posted By: deeg money
Date Posted: August 04, 2009 at 11:59 AM
Right now I could easily still cut out the entire dash and I was really thinking about it but I dont really know where to start with it. If you could give me some tips on it I will probably do it. I havent got the the bottom of the dash yet but I have glassed the top part but I can easily cut the part up against the window right now. I am not really a big fan of how it mounts up against the window anyways. There is no time limit on how long it takes me do to having to get a new firewall put in and a ton of sheet metal work around rust spots in the truck so it will be a while before it goes anywhere. Oh and I do have it where it can be taken out very easily right now. I just bolted the piece of wood up so I could figure out where I wanted the braces to go. Thanks and let me know!
-------------
Deeg money
"If you cant be good, be good at it"
Posted By: biggidaman
Date Posted: August 04, 2009 at 11:30 PM
i use an air saw or body saw to cut out the older body cars and trucks dashes. i alwas mount from the sides and i never secure the dash anywhere by or near the windshield. when mine go's in it just lays right on the metal under the dash. and i secure it from the sides. if you go back to my forum you can easily see how i do that part. check it out and let me know if that helps you. peace ------------- Biggi Kustumz home base operation since 1998. car audio should be fun not work!!!!
Posted By: deeg money
Date Posted: August 05, 2009 at 11:02 AM
Well I decided to take biggi's advice and I cut out the metal dash that was in there. I will be taking pics as a go along. I will try and be as detailed as possible. The dash is still going to resemble the same model that I have in the previous pics but is much more secure and stable and I believe it is going to turn out much better. Thanks guys
-------------
Deeg money
"If you cant be good, be good at it"
Posted By: deeg money
Date Posted: August 05, 2009 at 5:39 PM
Here are the new photo's from today. I worked on it for around 5 hours total I'm guessing. Maybe six at most! I did cut out the old metal dash that the vinyl screw in dash sat on and bolted to. Anyways here they are.
So there is what I got done. Thanks to Florida being the wetest F'n place on earth right now I have to wake up at 6 in the morn to start working on it. Also thanks to the rain I cant work since I have my own landscaping business ------------- Deeg money
"If you cant be good, be good at it"
Posted By: biggidaman
Date Posted: August 05, 2009 at 7:51 PM
dude dude dude that looks so much better!!! as far as getting the shape of the windshield. try tracing the out side of the windshield with a peice of masking paper. then trace that onto a peice of 1/4 mdf. 1/4 will flex a bit and you can work with that alot better. try that and let mr know how that works for ya
-------------
Biggi Kustumz home base operation since 1998. car audio should be fun not work!!!!
Posted By: deeg money
Date Posted: August 05, 2009 at 8:04 PM
Ok I will be working on it Tom and I'll let ya know what I did for it. Oh by the way your dash and console are lookin pretty bad ass so far. I wish I could have my own customs shop. Be easy biggi
-------------
Deeg money
"If you cant be good, be good at it"
Posted By: deeg money
Date Posted: August 06, 2009 at 6:02 PM
here are some photo's from today. I will be posting more of what I got done today but Its time for a beer and My gf waitin on me. 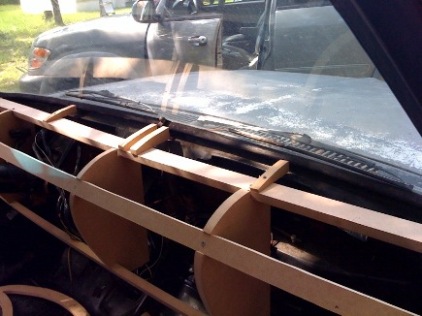
In the photo above I have built the shims that will get the 1/4 in mdf to contour to the windshield 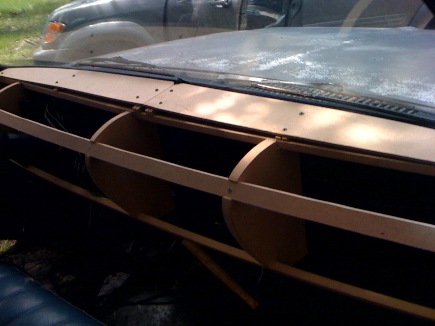
in this photo I have screwed in the 1/4 in mdf to the frame of the dash and it fits perfect. 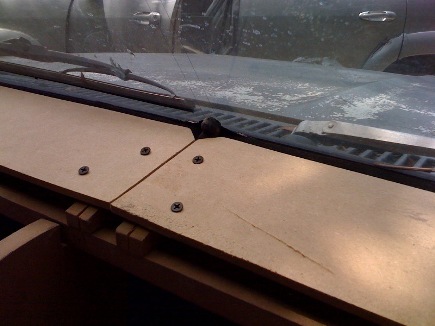
this photo I am just showing an up close of what it looks like. 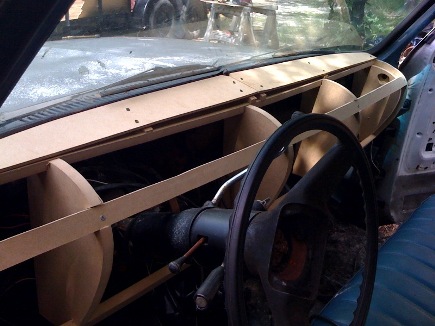
driver side view of what I have got done and how it looks. 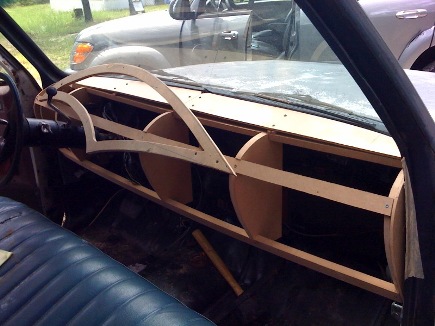
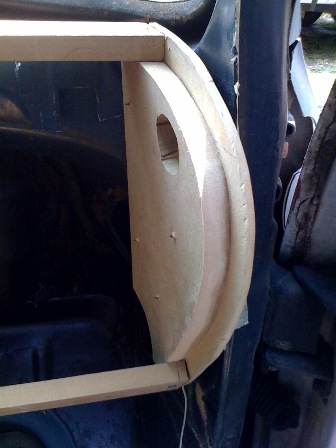
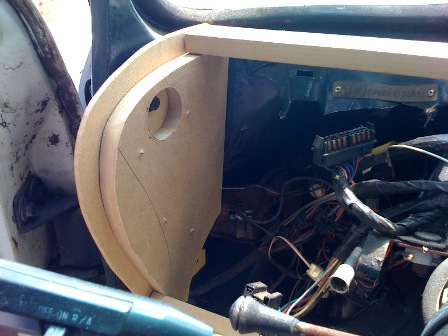
In this photo I have screwed in the main dash piece that will also have another piece on top of it that is 3/4 of and in smaller all the way around with the head unit, speedo, and fuel gauge fiberglassed in that will be painted the color of the truck. The rest of the dash will be vinyl. 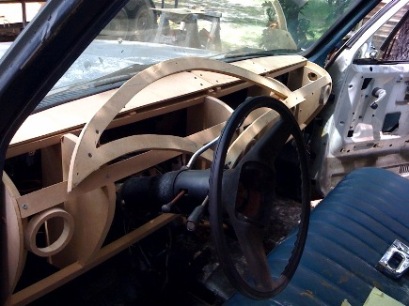
Driver side view with the dash piece and the ac vents brad nailed up. 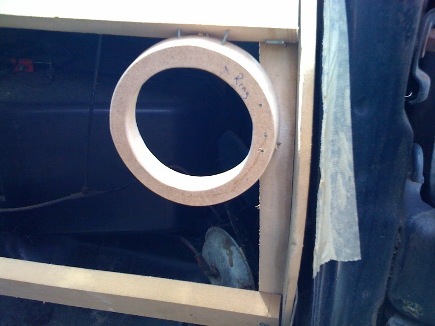
passenger side ac vent nailed up. ------------- Deeg money
"If you cant be good, be good at it"
Posted By: ianarian
Date Posted: August 06, 2009 at 8:52 PM
Hell ya deeg, lookin good mang, I been wondering where u been
-------------
This is what I do for FUN!
Posted By: biggidaman
Date Posted: August 06, 2009 at 9:11 PM
awsome man looking great. hey what part of florida you in? i seen in one of your post above you said something about the florida rain.
-------------
Biggi Kustumz home base operation since 1998. car audio should be fun not work!!!!
Posted By: whiterob
Date Posted: August 07, 2009 at 1:01 AM
Looks pretty good so far. It will be nice to see the progress. 
I've done a lot of fiberglass but never a dash yet. I would like to do one sometime but it seems like a lot of work to me. Maybe I'll get a chance to do one sometime.
Until then keep up the good work.
Posted By: deeg money
Date Posted: August 07, 2009 at 7:31 AM
This is my first dash too. Well atleast the entire dash from scratch. I have done a few center pieces in a tacoma I used to have. Seeing biggi's work just gave me tons of ideas on how to do mine and I just ran with it. The biggest thing I can say about buiding one is dont try to rush it, just take your time and dont be in a hurry. Also having a ton of power tools is a big help since a lot of times I cant screw things in but I can brad nail them into place with easy. I have got saws and sanders galore in my dads garage!! Biggi, I am from jacksonville, FL. Well actually more orange park but most people dont know of it but it is like a suburb of jax. Its all the 904 area code so its considered jax but not the duval area. Are you from FL?? If anyone on here is from jax or surrounding area I am happy to help out with any work you need help with. As long as its not a far drive!!! Anyways I dont know if I will be posting any more pics today cuz I actually have some work to do but I will be working on the truck for a few hours this morning and getting it ready for glassing. I still have to get a steering wheel puller cuz I dont have to have a big area around the steering column to be open or have to attach to the main dash so I am going to just make a small hole for it and put the steering wheel back on when Im done. Thanks guys! ------------- Deeg money
"If you cant be good, be good at it"
Posted By: biggidaman
Date Posted: August 07, 2009 at 7:32 PM
taking out the streering colum is best and the best look. but it's a lot of work so i normaly don't do it. but customer's don't realy know the difference. i'm from ocala. not that far from ya. i know where orange park is. the dash has yet to come back from paint. so i won't be putting any more pics up untill then. i hate waiting on other people. holla
-------------
Biggi Kustumz home base operation since 1998. car audio should be fun not work!!!!
Posted By: deeg money
Date Posted: August 09, 2009 at 8:02 PM
here are a few pics of the first time I glassed with the fleece. This is not even close to the finished product and I know that there are some spots that wont look right to you but trust me I know what Im going for and you will see it later on. Thanks 
Let me know what everyone thinks!! ------------- Deeg money
"If you cant be good, be good at it"
Posted By: i am an idiot
Date Posted: August 09, 2009 at 8:40 PM
Oh what it must feel like to have all that energy. Looks really nice. Keep us posted. ------------- Let's Go Brandon Brown. Congratulations on your first Xfinity Series Win. LGBFJB
Posted By: torquehead
Date Posted: August 12, 2009 at 7:08 PM
Very good Deeg Money. Good design and good work. Cant wait to see more progress pix....
Posted By: deeg money
Date Posted: August 12, 2009 at 7:46 PM
Hey guys I have some pics I need to put up but Some of them are really blurry from it being at night and taking photo's with my iphone.
-------------
Deeg money
"If you cant be good, be good at it"
Posted By: deeg money
Date Posted: August 12, 2009 at 8:22 PM
Ok I dont have a lot to do tonight since I have work in the a.m. and my GF is outta town so I decided to put some pics up for everyone to comment on. Here they are and I know one is bad blurry. 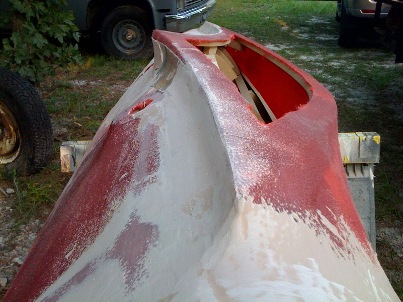
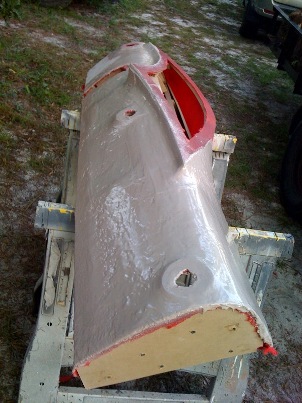
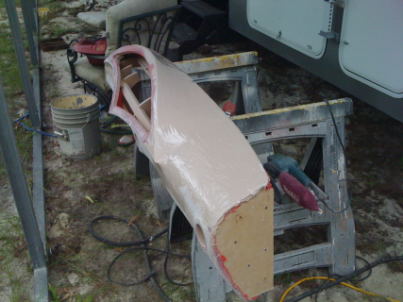
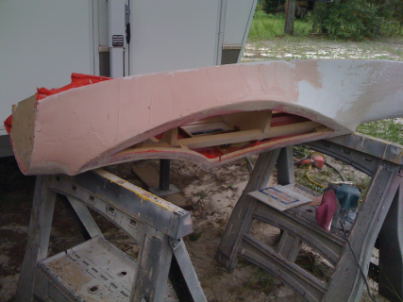
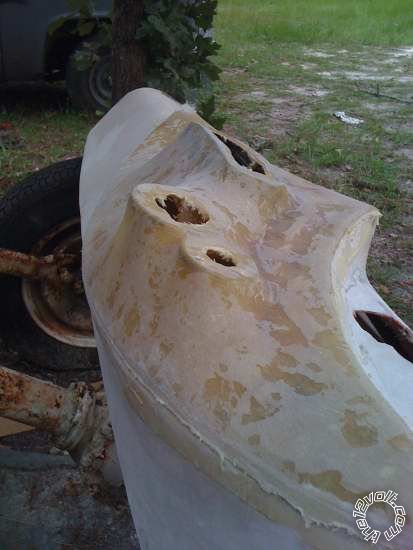
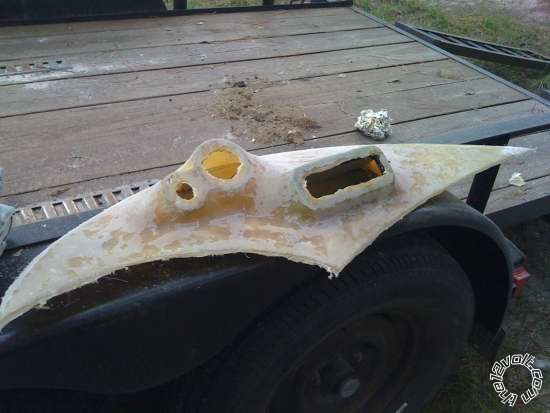
This is after I put the bondo over most of the dash. I am doing this with only the fleece being the only fiberglass laid down right now to smooth everything out before I put the last two layers of glass down. it was near impossible for my to creat a perfectly round fiberglass piece for the passengers dash side and a few other parts so I used bondo to round it out before I finish it up with a few more layers of glass. 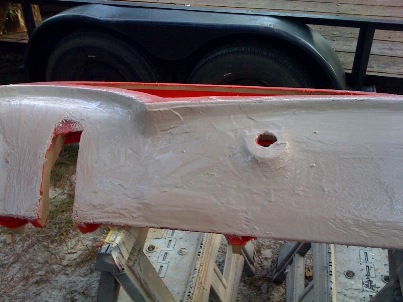
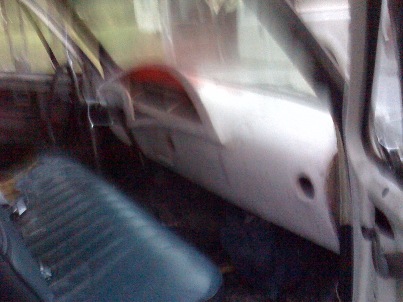
In the photo above I have placed it in the truck after being sanded from what you see above. I also used my rotozip to route out all of the ac vents and the ac mechanisim. I also routed out around the dash center piece and the steering column. So far it is looking great. I have had a few bumps but its coming together good and Im pretty excited about it. Hopefully I can work more on it tom after work and take more photo's for everyone before it gets dark. Thanks guys ------------- Deeg money
"If you cant be good, be good at it"
Posted By: deeg money
Date Posted: August 16, 2009 at 9:41 PM
Hey guys I have a ton of new photo's but For some reason it is saying that they are not allowed even tho I havent changed the way I save and upload the pics. I guess I will have to find a dif comp to use. Does anyone know how to change the picture type??? Thanks
-------------
Deeg money
"If you cant be good, be good at it"
Posted By: i am an idiot
Date Posted: August 17, 2009 at 6:48 PM
What format are the pictures? This site has a size limitation on the pictures posted here. 60K is the max size. How large are the files?
-------------
Let's Go Brandon Brown. Congratulations on your first Xfinity Series Win. LGBFJB
Posted By: deeg money
Date Posted: August 17, 2009 at 7:41 PM
I got it fixed. I kept emailing the photo's from my phone and when I saved them it would only let me save them as bitmap or something like that and wouldnt let me change it. Anyways here are some new photo's 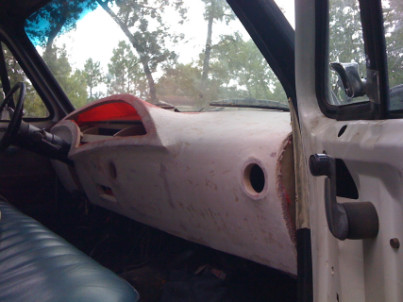
I was just putting it in to see how it fit and see what I needed to fix. 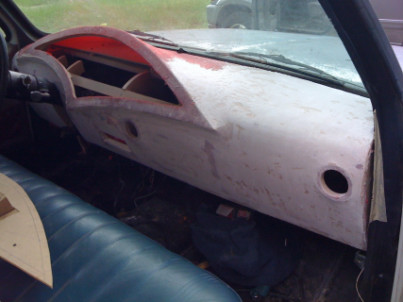
Here are a few.... I have to resize some other ones and will be putting them up soon!!! ------------- Deeg money
"If you cant be good, be good at it"
Posted By: deeg money
Date Posted: August 17, 2009 at 7:50 PM
Ok I did it real quick I figured out how to do it all in bulk. 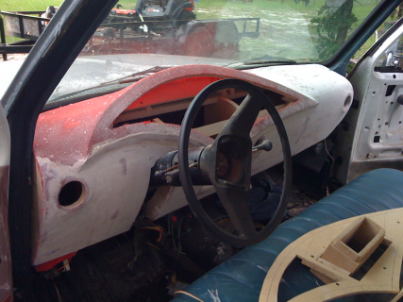
------------- Deeg money
"If you cant be good, be good at it"
Posted By: ianarian
Date Posted: August 17, 2009 at 8:29 PM
Movin right along... good look for that truck. At the ends of the dash, its always nice to make a form that sort of contours into the door panels. Little late for that... but good time to start thinking of how to do the door to blend into the dash a little.
-------------
This is what I do for FUN!
Posted By: deeg money
Date Posted: August 20, 2009 at 9:00 AM
Here is what I plan on having the door panels look like. This is just a sketch on paint of couse so get get my idea... 
The orange I plan on painting and the more tan color will be wrapped. I am planing on putting a 6.5 in the door and maybe a tweeter. But I have def thought about how I am going to flush the door with the dash. It shouldnt be a problem at all. The dash sides are pretty straight althought they do stick out towards the doors some but not to bad at all. I havent worked on the dash for a couple of days because I get in a rush and screw things up so I have learned to just take it easy and not work on it too much at one time. Let me know what you think of the doors though ------------- Deeg money
"If you cant be good, be good at it"
Posted By: deeg money
Date Posted: August 25, 2009 at 7:52 AM
Here are some new photo's. I am building the main dash piece that will house the headunit and my guages. I have also built a bottom piece since the bottom what a little crooked from cutting the mdf to get the dash from around the steering wheel. I have also decided that I am going to pull the steering wheel off and make a small hole in the dash for it. 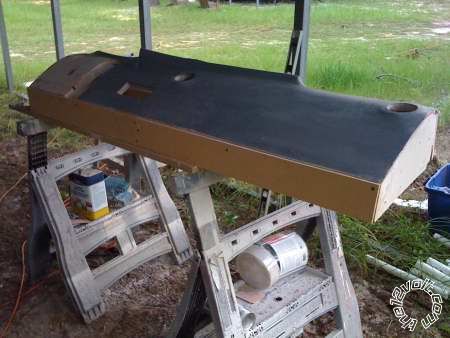
here is the 1/4 in mdf across the bottom. And no it is not ready for primer. I did that cuz my gf wanted to do it so I let her. 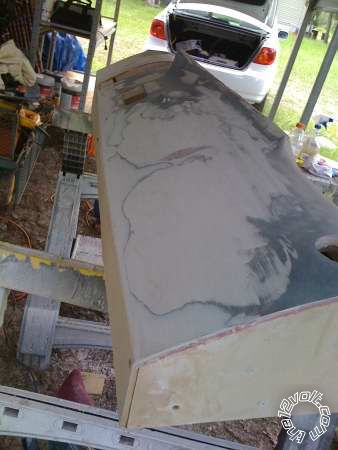
Here is another photo of the bottom piece with bondo on to make it flush with the rest of the dash. I also sanded most of the primer back down to do some touch up work. 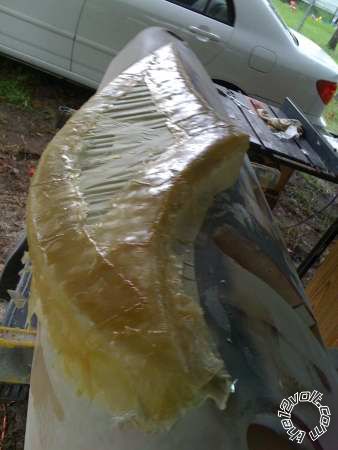
Here is the glassed piece that will house the HU and guages. I did used tin foil to lay it on. I pulled all of it off and then took the photo. 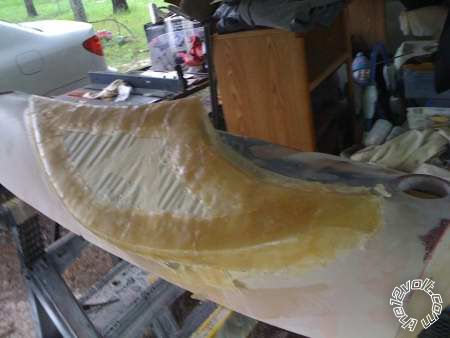
Another view of the glassed piece. this is 3 layers thick in glass and as of now it is 5 or 6 layers thick. 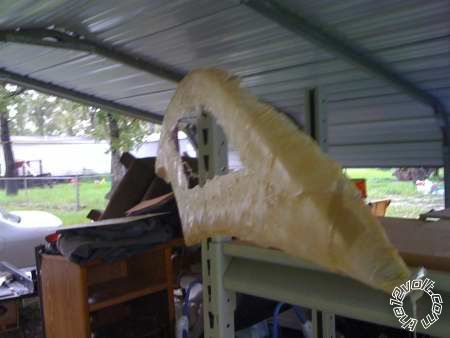
here it is hanging up just so you can get a better view of it. I will take more today if I go out to work on it. All in all it is coming together nicely I think. I have layed some flat fiberglass that is 4 or 5 layers thick to hold my ac vents in place since I used wood that was to thick to attach the vent too. I will take photo's of it so you can see what I am doing. ------------- Deeg money
"If you cant be good, be good at it"
Posted By: deeg money
Date Posted: August 25, 2009 at 1:04 PM
ok so I figured that when I got the steering wheel off that everything else like the shift lever and the blinkers and all that good stuff would be pretty easy to get off.... well I was wrong. Does anyone have a clue or guide me through getting the rest of this off before I take a sawzall to it out of anger and frustration??? It an 1983 chevy c10 with tilt steering. Also do you know if the whole steering column has to come out or can does it come apart somewhere in the middle. I have no clue about this but I want my dash to be one piece without another piece under the column that attaches. Thanks and please help me so I can finish this up!!
-------------
Deeg money
"If you cant be good, be good at it"
Posted By: deeg money
Date Posted: August 25, 2009 at 6:06 PM
ok so after around 4 hours of fooling around with the damn thing I got most of the tilt steering mechanism off. Unfortunately I also had to tear apart some of the dash around the column area so I could re fiberglass it. There were two pieces of wood that were glassed in that were to close to the column and could not fit around it. So I had to beat them out and it tore out the glass too. No biggie tho. Thank got I have until feb before I even have to worry about the truck moving. Anyways I dont need the how to on the steering wheel nonetheless. Thank anyways
-------------
Deeg money
"If you cant be good, be good at it"
Posted By: deeg money
Date Posted: August 31, 2009 at 6:20 PM
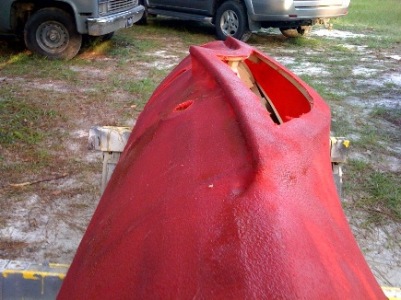
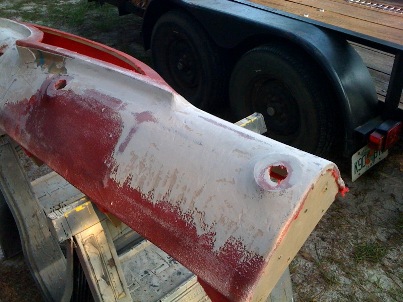
I havent really had a lot of time to work on the dash lately. I have also ran into a few problems from leaving the dash laying on the saw horses. The top of the dash that originally meshed perfect with the windshield seal has bent upward and doesnt sit right anymore. I have also bent the bottom ofthe dash from the same thing. The wieght of the dash slowly but surely bends the glass and wood from being left outside or in a not ac environment. Anyways I have just been doing touch up work from the things I am learning about doing a dash from the first time. The second time building one will be much easier from all the mistakes I made this time. Anyways here are a few photo's 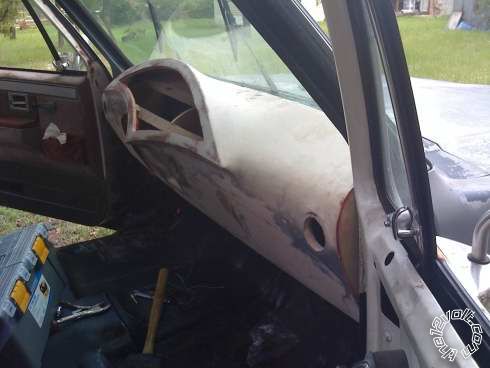

here is the dash piece that will house the fuel and speedo guage along with the headunit. I have cut as much of the wood off as possible to make it light and so it doenst come in contact withthe fleece. I have already wrapped it in fleece once to see how it woudl look. I have encountered a few spots where the wood hit and pushes up the fleece. Hopefully within the next few days I will glass it. Thanks ------------- Deeg money
"If you cant be good, be good at it"
Posted By: deeg money
Date Posted: September 01, 2009 at 7:17 PM
I know this is in the wrong forum but more people look at this forum of mine than any other one I would post. I am wondering if anyone knows anything about the Fi H.Q. subs. I was thinking about getting a few 18's from them but would like to know how they actually respong and get a few opinions about it. By the way I havent had time to work on the dash but hopefully tom it wont rain and I can glass the piece I have been working on. Oh and does anyone have a good way to get fiberglass to stick to plastic. I bought a dash kit from wally word for a buick since it had a nice rounded look and it was easier for me to buy a 12 kit than to make a perfect headunit holder. Thanks for the help in advance!! ------------- Deeg money
"If you cant be good, be good at it"
Posted By: deeg money
Date Posted: September 02, 2009 at 6:10 PM
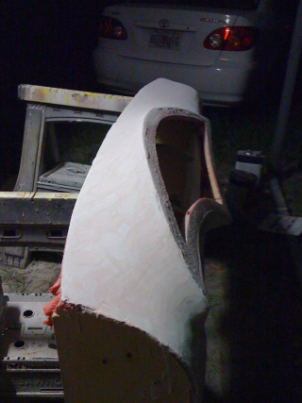
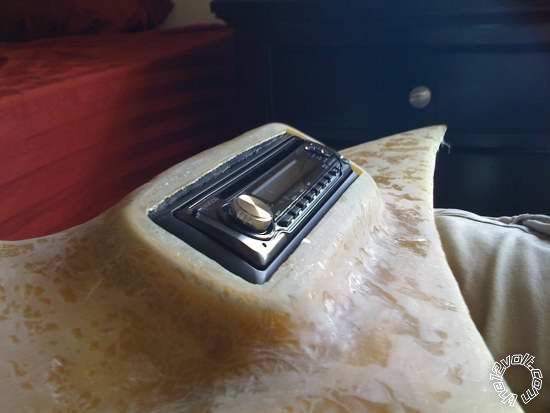
Here are some photo's of the guages and headunit glassed. 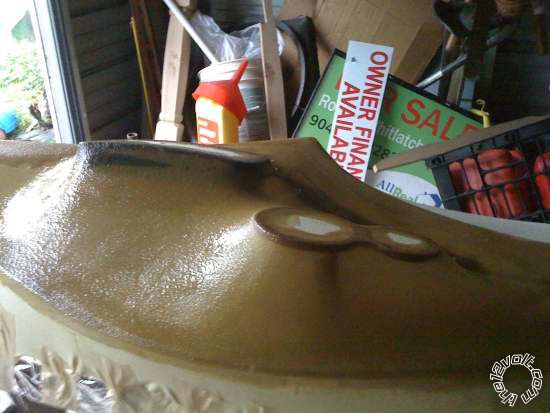
I went to jo ann's fabric today and found some really thin, very flexible, material similar to fleece. It worked great. Even though it is $14.99 a sq yd I am going to use it from now on. The fleece I used for the rest of the dash is pretty thick and I could barely get the resin to go through it. any ways here it is. 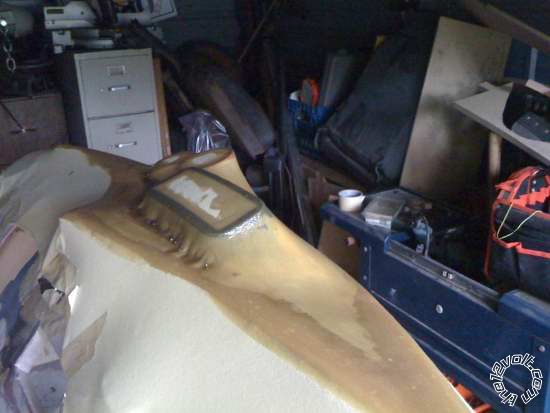
on this photo I could not get the material, We'll just call it fleece anyways, the fleece to contour right under the headunit, so I stapled it down to get it wher I can remold it with the next layer of glass. I put the rest of my resin that I had left over in the divets caused from the staple gun to help round it out. When its dry I am going to belt sand the staples down and then lay more glass over top to get the curves I want. .jpg)
Just another photo here. It was hard to get good pictures cuz Im using my phone and it was raining out so there was insufficient lighting. I'll have more up in the next few days. ------------- Deeg money
"If you cant be good, be good at it"
Posted By: deeg money
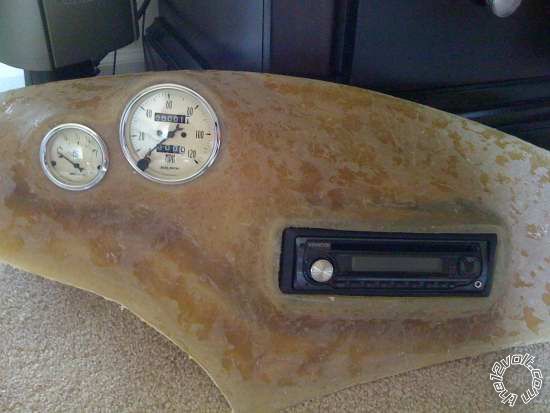
Date Posted: September 03, 2009 at 7:20 PM

Ok so I have layed two extra layers of glass and plan to lay one more before applying bondo. As you can see I have covered up the staples that I used to make the curves under the guages and headunit. It actually looks much better than I thought. hopefully tom I can lay the last layer and then start the bondo and sanding. I also have a ton of work that needs to be finished up on the rest of the dash. Hopefully in the next week I can get it almost finished. ------------- Deeg money
"If you cant be good, be good at it"
Posted By: ianarian
Date Posted: September 04, 2009 at 9:16 AM
Sup Deeg, been outta town for a while. No speakers in the dash huh? A couple of nice horns tweets in there assuming position might bring your sound to life. Are you gonna recess the gauges a little? Or fab a overhead visor above the deck?
-------------
This is what I do for FUN!
Posted By: deeg money
Date Posted: September 04, 2009 at 9:54 AM
The guages I have only stick out at most about an 1/8 of an inch so I wont recess them. They are classic looking guages with a crome ring around them that is curved. I think I posted pics of them somewhere on here. as for the headunit, you are way over my head talking about a an overhead visor for the deck. I have no clue what that means. Please explain in simpler terms!!!But is what I can tell you is that the headunit does recess into the piece I built. I have not cut them out all of the way since I still have to put one more layer of glass and some bondo. I used a headunit adapter to a buick so It would slide in and out with ease. Plus the aftermarket adapter has a nice rounded look to it. I drilled about 30 holes into the plastic to make sure the glass would hold to it. I will take some more pics today of the next layer of glass and bondo work. Hopefully today I will be able to cut the rings out all the way and show you what I am talking about! Thanks for posting a comment! Oh and if you are knowledgeable about where to put speakers in the dash at I might give it a shot. I have all the time in the world right now so I would def put some thought into it with the right idea. I have two pair of kenwood 6.5's for right now. Im not too worried about type of speakers yet I just need some music. but let me know where you think I should put them and I just might try it ------------- Deeg money
"If you cant be good, be good at it"
Posted By: deeg money
Date Posted: September 04, 2009 at 2:23 PM
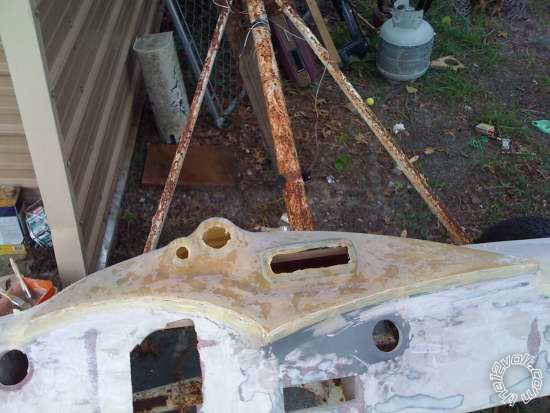
I glassed one more layer this morning around 11 went and mowed a yard and came back and sanded it down. I routed out the guages and headunit area and brought it home with me to take some photo's. now is all I really need to do is bondo and lots of sanding... for this piece atleast. I have a ton of work left on the rest of the dash! 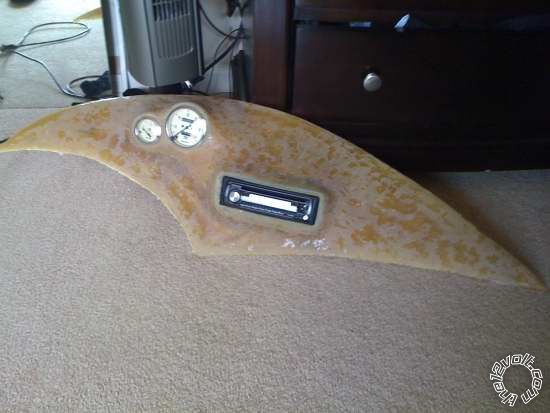

well here is what I got done today. I think its looking pretty good and Im pretty happy with how it is looking. ------------- Deeg money
"If you cant be good, be good at it"
Posted By: ianarian
Date Posted: September 04, 2009 at 3:38 PM
The visor, Im just brainstorming ideas that kind of throw a little attitude in the appearance. The recess factor can be fun to be creative with sometimes. Gives a "meant to be there" accent, for lack of a better term. Wish I had my pics to show. What kind of music you like most? Thinking 18's? I'll guess rap! I like rap mainly, now I can no longer give advice on the forum but Im workin on fibering in 8" or 10" loudspeakers for mids in my rear doors. I want to hear the vocals speaking out a 10" speaker. Opposed to screaming out a 6". 2 horns tweets, 2- 12" mids and 2 15's produced the best sound I ever heard. Not to mention 2 acoustic engineers that got rich off that system. Unique, simple, direct and catchy! Well within your progressing ability too. Thats all food for thought, but think big. Just want to throw that out again to ya!
-------------
This is what I do for FUN!
Posted By: deeg money
Date Posted: September 04, 2009 at 3:53 PM
Dude I didnt think you were actually talking about a visor!! I thought you were talking about something to go over the deck... brain fart on my part. Yea I do like the recess look and I might give it a shot on the guages. It would be pretty sweet if they were flush with it. Anyways Yea I do mainly listen to rap... But I also like a lot of other music. I just like rap for the bass it produces. I was looking at the dash and there isnt really anywhere to mesh in any speakers but I do havce plenty of time to decide what my doors will have in them and plus I can add anything I want to the headliner and A pillars. I am not very knowledgeable about where to put speakers or what kind to install. I usually just listen to a ton of bass with all of my other vehicles. I would really like for this one to be pretty amazing with the sq. I am planning on getting the Fi hq series 18's just to have them cuz I have never owned an 18 before and I think it woudl be pretty sweet and they are a great price too. Yea I do want four of them. I dont plan on listening to it full bore all of the time though mainly just to have them there cuz I can!! I would happily except any advice about speakers, what size, where to put them, and manufacture. But dont go telling to me buy some $600 components cuz I am not going to buy them... LOL. Thanks ------------- Deeg money
"If you cant be good, be good at it"
Posted By: icearrow6
Date Posted: September 04, 2009 at 5:08 PM
looks like its coming along nicely. I really wished u upgraded that kenwood though...
-------------
Posted By: deeg money
Date Posted: September 04, 2009 at 5:12 PM
HAHA yea it def isnt the last one I will have in there. I have so much to do to that truck its rediculous. I didnt feel like spending 3 and 4 hundred on a deck right now when the truck itself doesnt even run yet. When I get my 4 18's I will upgrade just about everything atleast audio wise! trust me Im not a big fan of kenwood but it was cheap and reliable... so I bought it... it was only $69.00 off of onlinecarstereo. lol but thanks for the post
-------------
Deeg money
"If you cant be good, be good at it"
Posted By: ianarian
Date Posted: September 05, 2009 at 10:10 AM
Your goin for show right? Judges fancy attention to detail, savy? You can fab a relay station. Since each 18 may need its own amp, set up a switch/relay config so you can toggle the use of each 18 individually via a switch. Then only play the amount of subs desired at any given time. Kapish? Wow, if I was your neighbor I'd be over all the time talkin your ear off. I wish I could physically help you. Tid be a riot!!
-------------
This is what I do for FUN!
Posted By: deeg money
Date Posted: September 05, 2009 at 10:24 AM
Thats a sweet Idea. I might have to put that in somewhere... I actually already know the perfect spot for it. On the lower part of my dash I am installing the ac unit, windshield wipers, and the headlight switch. I can just add it right now and it would be very easy to get too. Lol Yea I wish I had a buddy here that was into fabrication and stuff like I am... but thy're not. The only person interested in it is my girlfriend and I can tell she doesnt really care. lol I would like to put it in some shows when Im done. But that will probably be a while. Around a year Im guessing so thats not too bad. ------------- Deeg money
"If you cant be good, be good at it"
Posted By: deeg money
Date Posted: September 07, 2009 at 7:28 PM
Hey guys whats going on? I was wanting to get a few opions real quick. I can always paint the dash but I am kinda wanting to be a little different. I already know about ten or more cars in jax that have painted dashes that are all decked out. So I was thinking that instead of painting the dash I am going to wrap it in Black vinyl and the smaller piece that holds the guages I am going to wrap in an orange colored suede. My Grandma does custom upholstery on furniture and has been doing it for around 20 or more years and just so happens to be coming into town later this week. She has offered her services and said she would be happy to show me the ins and outs of upholstery so I think I am going to give it a shot. Plus if it doesnt turn out how I like I can always rip it off and do a little touch of work and paint it in the end. Anyways give your opinions freely just dont make them far fetched or pointless. Thanks guys
-------------
Deeg money
"If you cant be good, be good at it"
Posted By: deeg money
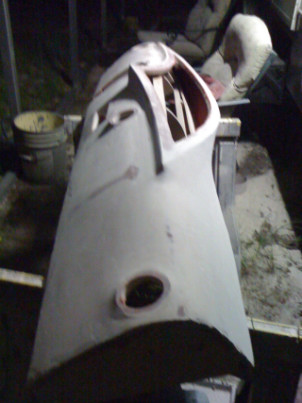
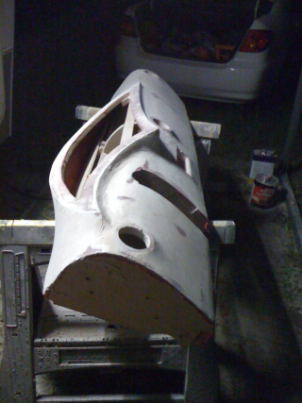
Date Posted: September 08, 2009 at 4:54 PM
here are some new photo's that are from today! I have built rings to house the ac vents properly and secure them into the dash. I have also glassed the massive hole I had created for the steering column to slide in and out of. Now I have to create the new hole so I can fit the steering column in for a nice custom look. I also have worked on the guage and headunit piece a little bit. But a little bondo on to smooth it out and now Anther coat to keep the smooting process going along! I also ordered the Vinyl and suede today? Hopefully I wont be a big waste of money. 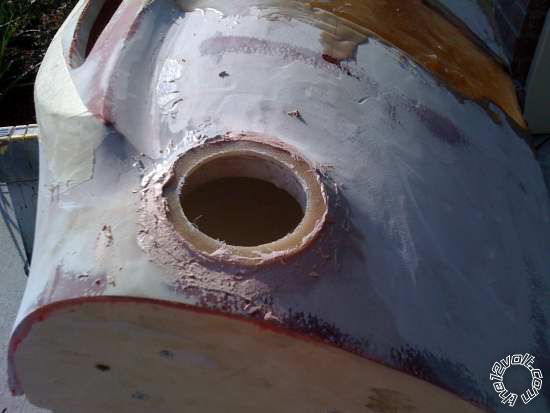
This one looks really bad. I put way to much hardner in and when I was trying to put it down a piece of fg mat got in it and was making it hard to deal with. To top it off it started to harden when I was still trying to put it on. 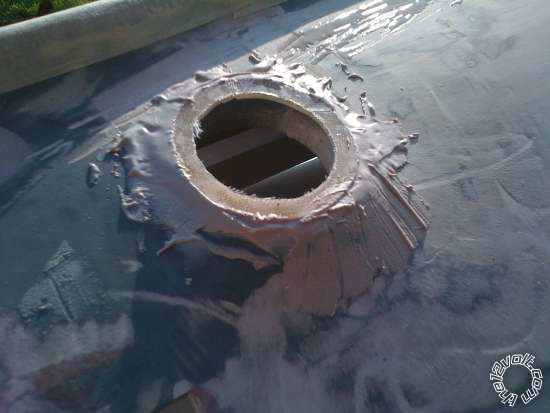
This is the middle ac vent. It went on nice and smooth and looks a ton better...Next! 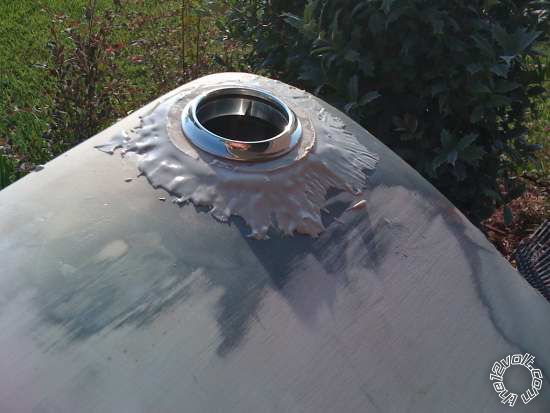
Starting to come together. Here is the last one. I just put the piece on and secured it. The AC vent is still in there waiting to be pulled out once bondo is hard. 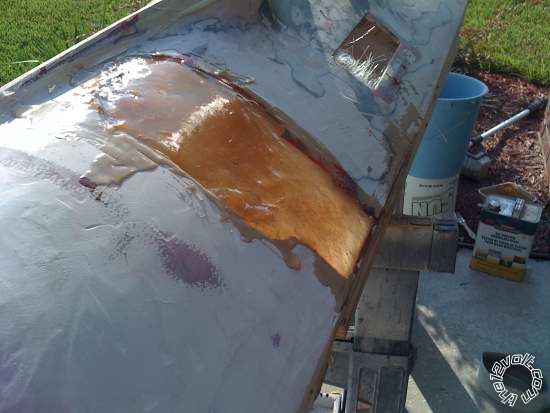
Here is the glassed piece I was talking about. To do this I put a bunch of masking tape on the out side of the box and then glassed it from the inside. When it was hard I flipped the box over and put a little more on to make it as even as possible with the rest. I am still contemplating laying another coat of glass across that half of the dash just to make sure it is sturdy. 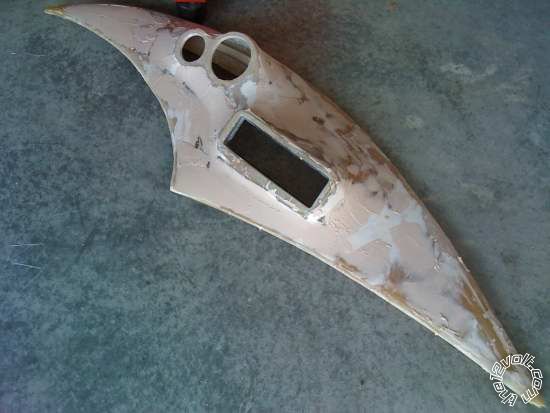
here is the guage piece with the second coat of bondo. I cant wait to hand sand this. Yippy!!! ------------- Deeg money
"If you cant be good, be good at it"
Posted By: ianarian
Date Posted: September 08, 2009 at 11:31 PM
Paint can look the best, everything has to be done perfectly to be worth it. However, Is that not the very last thing you'll do? Like after everything else is complete?
-------------
This is what I do for FUN!
Posted By: deeg money
Date Posted: September 09, 2009 at 9:52 AM
Well I think I am actually going to vinyl the main piece in some really nice black vinyl and the smaller guauge piece do in a turquoise color. I was going to do orange but I just saw an orange and white c dime driving down the street and another orange and white olds 442 so I decided to ditch the orange color. I havent really seen anyone with a turquoise and black vehicle and I know I can get turquoise suede and paint from. Plus I think it could have a great classic look with black turquoise and cream colors.
-------------
Deeg money
"If you cant be good, be good at it"
Posted By: ianarian
Date Posted: September 09, 2009 at 10:13 PM
sounds like a plan...keep up the updates!
-------------
This is what I do for FUN!
Posted By: deeg money
Date Posted: September 11, 2009 at 11:45 AM

here is part of the ac vent sitting in the ring I made. It now easily fits in and attaches from the back to lock tightly. 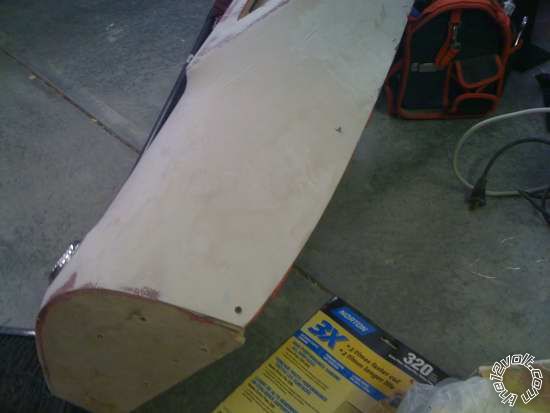
at the top of the dash where it meets at the windsheild broke loose from the wood I originally had in there and got warped from saw horses so I had to screw it down to the right angle again. I plan on grinding the heads of the screws off they will hold it down for good. 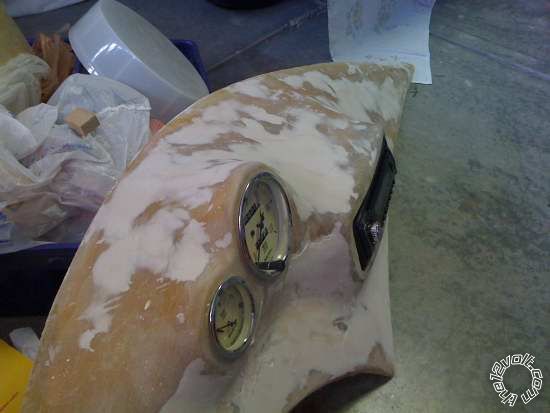
second coat of bondo on and sanded down pretty smooth with 120. You can see under the guages I have not finished sanding all the way. 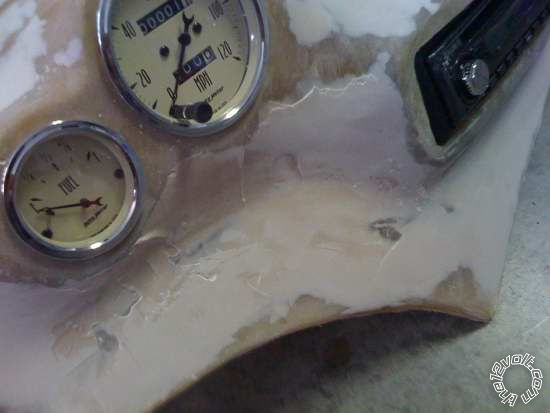
here is a close up of the part I still have to sand. I am using 120grit with some type of sander. I cant remember the name LOL. I will also be doing a lot of hand sanding on this piece to get it to have the curves I want. 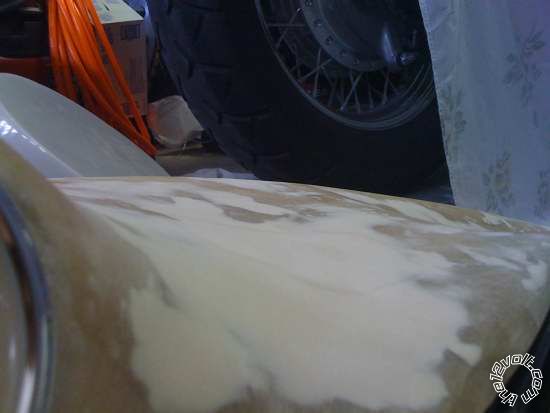
Look at how smooth its getting. This is a pic between the guages and headunit. hand sanded with 120... about time to go to 320 and on and on. Hopefully I will be working more on it today. I have to get the hole cut for steering column and a few other holes drilled for the lights, windsheild wipers and a few other things next to were the ac unit will be. ------------- Deeg money
"If you cant be good, be good at it"
Posted By: ianarian
Date Posted: September 12, 2009 at 7:11 PM
Nice, so I take it you decided to paint huh? What came apart on the corner there? The frame of the fiberglass?
-------------
This is what I do for FUN!
Posted By: ianarian
Date Posted: September 12, 2009 at 8:24 PM
ianarian wrote:
What came apart on the corner there? The frame of the fiberglass?
meaning: the wooden joint or the fiberglass from the frame
------------- This is what I do for FUN!
Posted By: deeg money
Date Posted: September 13, 2009 at 8:15 AM
The wood from the frame came apart. I built some small piece to get the 1/4 in MdF to contour to the dash and when I screwed it in I guess I split the wood and it finally broke. Next time I take the dash to the truck I am going to tighten it to the right spot with the screws and then grind the screws off. Then it won't be going anywhere.
-------------
Deeg money
"If you cant be good, be good at it"
Posted By: stevematt18
Date Posted: September 13, 2009 at 9:28 AM
what did you use to get those lines to be smooth.for your mdf. ie your sides your frame and your center curve line
Posted By: deeg money
Date Posted: September 15, 2009 at 9:10 PM
hey Stevematt18, Did you ever figure out a way to get the lines you were looking for? What kinda project are you work on or do you have in mind? Thanks and feel free to ask any questions about my build! ------------- Deeg money
"If you cant be good, be good at it"
Posted By: unixdude
Date Posted: October 26, 2009 at 3:38 PM
Just curious if there are any updates. Also, how are you planning on running the window defrost vents? Also wondering how you're going to control heat/ac and the blower and other standard controls?
Looking good.
Posted By: pcana11
Date Posted: December 07, 2009 at 8:38 PM
that looks real nice. very good job
-------------
Posted By: ca$ino
Date Posted: December 20, 2009 at 2:38 PM
Look good man!! I like I like!
What part of Florida you from?
Any updates?
-------------
Look twice, think thrice, 1 splice/ 1 slice!
This is a phrase i came up with and something i will now live by.
Posted By: tp1182
Date Posted: January 09, 2010 at 5:27 PM
did you ever finish this??
-------------
Education, like life is a continuous journey.....
Posted By: ianarian
Date Posted: January 16, 2010 at 10:37 PM
OVERHAULIN.....we need the A-team.
-------------
This is what I do for FUN!
Posted By: deeg money
Date Posted: March 06, 2010 at 11:11 AM
hey guys whats going on? Sorry it has absolutely been way to long since my last post! I busted up my knee and had to have knee surgery and so I couldnt work and didnt have the money to work on my project. Anyways I am going to start back up soon and be posting some pics. within the next couple of months I will be having a ton of welding and work done on my truck so I can put it back together and get the dash and doors finished up. Thanks
-------------
Deeg money
"If you cant be good, be good at it"
Posted By: Melted Fabric
Date Posted: March 08, 2010 at 3:39 PM
Get well and hope you progress with the project when back in full health.
-------------
I have not failed. I've just found 10,000 ways that won't work.
When you do not know what you are doing and what you are doing is the best -- that is inspiration.
Posted By: deeg money
Date Posted: March 09, 2010 at 7:01 AM
Thanks melted! Today in going to work on sanding it some more. I'll def be taking more pictures as it goes along. Hopefully within the next couple of days I'll have some decent ones to put on here.
-------------
Deeg money
"If you cant be good, be good at it"
Posted By: Melted Fabric
Date Posted: March 09, 2010 at 5:32 PM
Cool cant wait to see them
-------------
I have not failed. I've just found 10,000 ways that won't work.
When you do not know what you are doing and what you are doing is the best -- that is inspiration.
Posted By: deeg money
Date Posted: March 11, 2010 at 1:44 PM
well I have some pictures to post but Im going to wait until I get a little further to post them so I dont have people asking what the hell Im doing. But in the mean time I have a big problem. Yesterday I was laying down some glass for a piece I am making and it wont harden all the way. Usually I would just chunk it if something like this happened but Ive never had it not harden before. Its a pretty large and vital piece so I dont want to just ditch it so... Im wondering if anyone knows how to make it harden once the resin is already on the cloth and laid down? I was also thinking of just glassing the top and bottom of the unhardened piece to then it will be dry on each side. the piece is, I would say, 3/4 the way hardened but still sticky. Any ideas on what I should do. If you need me to post a pick of the piece let me know and I will if necessary! Thanks guys
-------------
Deeg money
"If you cant be good, be good at it"
Posted By: jayson33
Date Posted: March 19, 2010 at 2:10 AM
put a heat lamp on it. Will cure may take awhile.
-------------
My wife thinks bagging a truck means you kick it in the truck nuts
|