first try at fiberglass
Printed From: the12volt.com
Forum Name: Fiberglass, Fabrication, and Interiors
Forum Discription: Fiberglass Kick Panels, Subwoofer Enclosures, Plexiglas, Fabrics, Materials, Finishes, etc.
URL: https://www.the12volt.com/installbay/forum_posts.asp?tid=62555
Printed Date: May 01, 2026 at 12:23 PM
Topic: first try at fiberglass
Posted By: jlord16
Subject: first try at fiberglass
Date Posted: September 11, 2005 at 11:51 PM
Use less cataylst and you will have a longer working time with ur glass. Where u have missed spots, go back over them with glass. Then once ur happy with it, use a good body filler, bondo if ur in the USA and sand it down. recoat with ur body filler and re-sand untill your happy with the finish. The box will still turn out good, just reglass then fill and sand untill ur happy. Pic wuld help :)
-------------
Clarion DB36MP
Infinity Kappa Perfect 10"
Respone 800w Mono
ALPINE MRP-F250
*Custom fabrications*
Replies:
Posted By: jlord16
Date Posted: September 14, 2005 at 4:48 AM
Bush a coat of resin on the surface then apply the matting over it, use a brush to dab more resin onto the mat so it is completly coveRED / soaled in resin. Let it dry then repeat. Layer the matting over the speaker rings but only apply resin up to the exteral perimeter of the circle (ie where the fibreglass will meet the MDF speaker rings). If you want to glass over the speaker rings you can, but u will only need a few coats over the rings. Once its all dry you can use sicssors to cut the excess un glassed mat from the inside of the rings, and give it a good sand to ensure that the fibreglass dosnt protrude inot the speaker rings area (ie. were the actuall sub will be sittitng) Hope this has helped, any other questions, keep posting. Goodluck ------------- Clarion DB36MP
Infinity Kappa Perfect 10"
Respone 800w Mono
ALPINE MRP-F250
*Custom fabrications*
Posted By: jlord16
Date Posted: September 14, 2005 at 10:28 PM
How many layers have you put on so far? Put a little bit of glass on, and the n wait for like 30 seconds and apply the matting. Once this is dry it shuld be rock solid and held in place. You can apply more mat and glass while the previous coat is still tacky or you can wait till it totally dries. Always aplly glass then mat then more glass. The actuall glass is extremely weak without the matting to reinforce its structure. You can use silicon to seal the box, or you can apply 2 or 3 coats of glass and matting to the internal corners to make it all air tight. Im in Australia so i havnt used either of these products, but usually it dosnt matter what brand you use, usually they will all stick togethor. Pic wuld help me alot, good luck ------------- Clarion DB36MP
Infinity Kappa Perfect 10"
Respone 800w Mono
ALPINE MRP-F250
*Custom fabrications*
Posted By: brandon1120
Date Posted: September 14, 2005 at 11:17 PM
I am new at fiberglassing and this post and reply also. I was lookinbg at something someone had posted a while back. It is exactly what i am wanting to do with mine. Except with a 15 instead of a 12. He gave a some good pictures but didnt explain how he did it very well. I was wondering if someone could look at the pictures and give me a better description of how he did it. I can do all the way down to where he puts that black cloth on. How does he get the cloth to curve like that, and to stay curved while he is putting on the glass? If anyone has any pictures of how they went through the whole process i would greatly appreciate it.
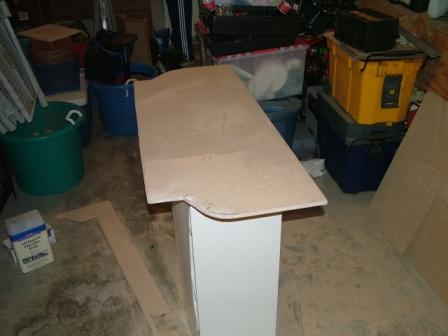
four pieces of 5/8" mdf, lots of cutting, and lots of glue, got us our ring:
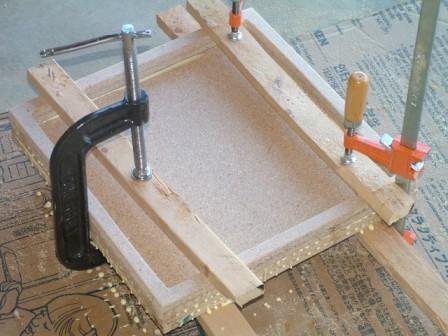
ring sanded, and mounted to the base with a 2x4 to support the stretching:
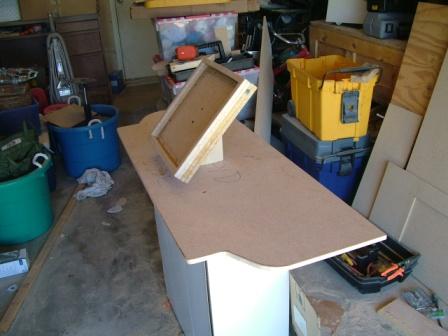
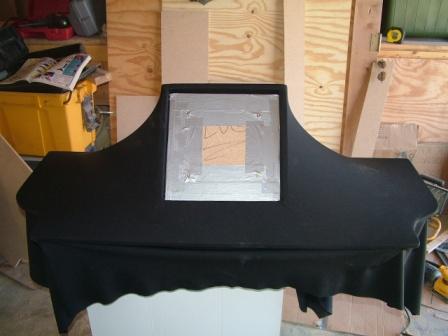
and all stretched and plugged:
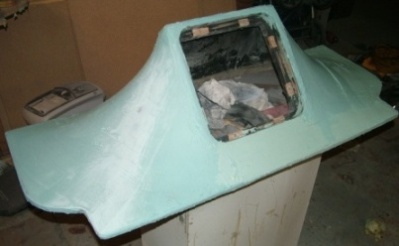
first layer of glass. over the next couple days of working on this when i could, i came to the conclusion that weave is bad, mat is the shiz:
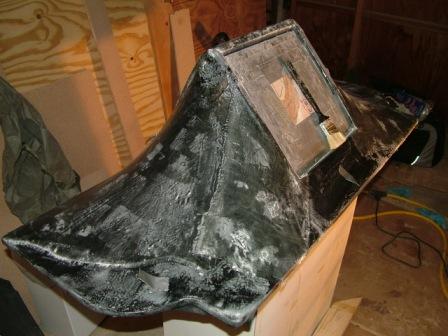
and after the 7th and final layer of glass:
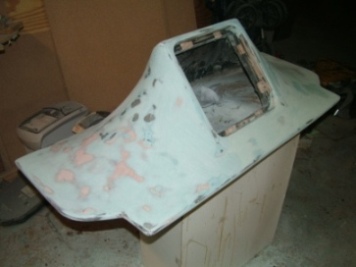
then the real fun begins....SANDING!!:
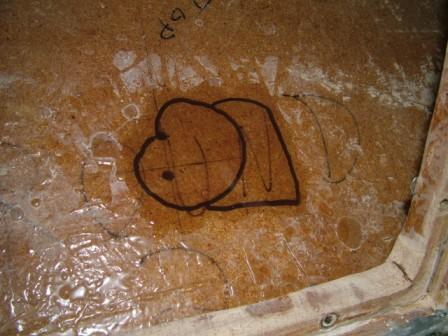
one of the many things that i learned on this project, is that i really don't like hurricane nuts. my friend ordered them from parts express because of how much better than t-nuts they claimed to be, i didn't find them to be all that. when doing a mock up with the sub, four of the hurricane nuts came out with the bolts half on them, so the only way to get them off the bolts, was to cut a hole in the bottom to get my hand up there to hold them. luckily i read in the forum how to repair such a F-up:
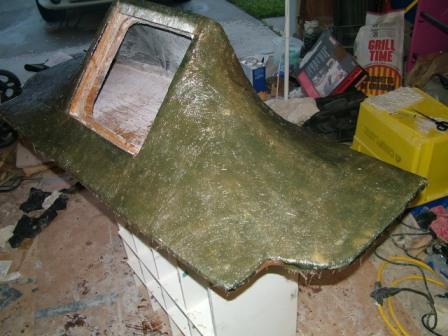
couldn't find any rage gold, not that we looked for days or anything, so went with the bondo premiere. not bad stuff:
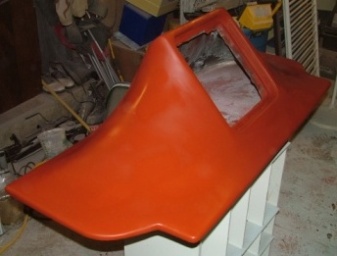
and after way more sanding:
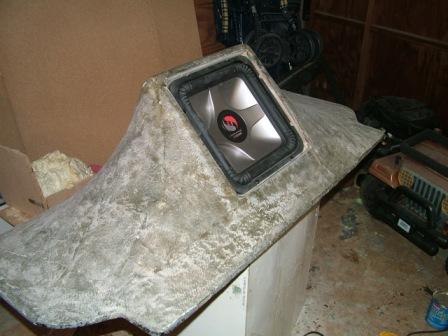
which brings us to the current state, fresh primer, waiting for wetsand and paint:
 ------------- Brandon Hamilton
Posted By: gus1
Date Posted: September 15, 2005 at 12:01 AM
Looks good! Is that the top for the box, or is that the total box? Looks a bit on the small side for them there square woofers..... last one I built was almost 2cu feet for the 8", just curious.
Gus
-------------
Wherever I go, that is where I end up......
Posted By: jlord16
Date Posted: September 15, 2005 at 12:23 AM
What you do is streath the cloth and staple gun/nail it in place becuase it is streatched it will hold its shape. You will have to expermient whit how much tension is needed, and some cornors or sides may need to be streached more or less according to the shape you wish to acheive. If you can usa a staple gun it wuld be better as staples are easy to remove. You want to staple the excess material under the MDF. In picture 4 you can see that the material has been stapled under the MDF and then allowed to hang. You shuld then do a coat of just plain fibreglass (without using the mat) to get the marterial to stay in one shape. The material will soak up the fibreglass resin and will dry fairly quickly. Do a coat of glass and mat, then trim the excess material with a knife. Do about 7 or 8 layers in total. When uve done this post again, i will try n get sum pic of the box im going to make this weekend.
-------------
Clarion DB36MP
Infinity Kappa Perfect 10"
Respone 800w Mono
ALPINE MRP-F250
*Custom fabrications*
Posted By: abovestock
Date Posted: September 15, 2005 at 1:57 AM
I just put my one of my four solo's back in my car, and dam I missed it. No other sub can compair in my book. If you have never had one in your your in for a surprise, you will need to learn to breath inbetween bass notes. The box looks awesome by the way, very nice job.
[quote]Looks good! Is that the top for the box, or is that the total box? Looks a bit on the small side for them there square woofers..... last one I built was almost 2cu feet for the 8", just curious.
If you put an eight inch solo in a 2 foot sealed box i'm sure it didn't last very long. I think the largest box an eight can fit into is .6 cu.
Posted By: jlord16
Date Posted: September 15, 2005 at 2:14 AM
I agree normally only 15" would need a 2 cubic foot sealed enclosure
-------------
Clarion DB36MP
Infinity Kappa Perfect 10"
Respone 800w Mono
ALPINE MRP-F250
*Custom fabrications*
Posted By: brandon1120
Date Posted: September 15, 2005 at 6:18 AM
Thanks for the reply. What is the best cloth to use?
-------------
Brandon Hamilton
Posted By: jlord16
Date Posted: September 15, 2005 at 7:00 AM
Fleece is the best sorta cloth to use. You dont want overly thick cloth but it cant be too thin either. Cotton shirts work well for small jobs, but for bigger enclosures some sorta fleece or cotton material about the same thickness of shirts is good. The only purpose of this is that if fibreglass was used it would be impossible to keep it in shape. The fleece is only there to provide a sturdy shape for the fibreglass to be moulded on. Any other questions dont hesitate.
-------------
Clarion DB36MP
Infinity Kappa Perfect 10"
Respone 800w Mono
ALPINE MRP-F250
*Custom fabrications*
Posted By: jlord16
Date Posted: September 16, 2005 at 9:19 PM
The staples dont have to be removed. They should be on the outside of the box anyway. The only thing they wuld do is make the out side look different. You should use body filler/bondo to smooth the exterior of the enclosure anyway so this shuld cover most of the staples. I sorts need pics to see whats acutally happening. Im just giving general advice atm
-------------
Clarion DB36MP
Infinity Kappa Perfect 10"
Respone 800w Mono
ALPINE MRP-F250
*Custom fabrications*
Posted By: jlord16
Date Posted: September 17, 2005 at 1:47 AM
Ok thats kool, im doing the sub rings atm for my fibreglass enclosure, not a problem at all
-------------
Clarion DB36MP
Infinity Kappa Perfect 10"
Respone 800w Mono
ALPINE MRP-F250
*Custom fabrications*
Posted By: jlord16
Date Posted: September 23, 2005 at 7:11 AM
looking good
-------------
Clarion DB36MP
Infinity Kappa Perfect 10"
Respone 800w Mono
ALPINE MRP-F250
*Custom fabrications*
Posted By: One_Dieu
Date Posted: September 26, 2005 at 12:15 PM
Burning Maverick Are you using cloth and mat in your build up? Or just cloth? ------------- Respect the Blood Line
Posted By: youngone
Date Posted: October 02, 2005 at 3:33 PM
looks good keep up the good work   ------------- Want to know some good equipment- JL,Adire Audio,Mcintosh,Brax,Helix,Eclipse,JBL,RE,Dimoand Audio,Zapco, pritty much anything DYhon,Forbidden recommend
On the12volt you give some info and you get in
Posted By: jlord16
Date Posted: October 03, 2005 at 1:46 AM
looking good ------------- Clarion DB36MP
Infinity Kappa Perfect 10"
Respone 800w Mono
ALPINE MRP-F250
*Custom fabrications*
Posted By: smurphalurph
Date Posted: October 12, 2005 at 11:33 PM
nice
-------------
When you do things right, people won't realize you've done anything at all.
Posted By: Sessland
Date Posted: February 17, 2006 at 7:23 PM
You should have instructions on the can on how much body filler to hardner you should use.
You should end up with a light pink color. Too red and it will cure too fast and leave you very little time to work with the product.
Posted By: blufab
Date Posted: February 17, 2006 at 7:24 PM
Just apply it with thin smooth layers. You do not want to cake it on. Take your time to to smooth it out as you will be rewarded w/ less & easy sanding
Posted By: HottAccord
Date Posted: February 18, 2006 at 1:10 AM
I couldn't have said it any better. Sometimes people glob it on..remember youre only covering holes and low spots. I hope you got some Rage Gold as filler.  ------------- Im a fiberglass whore!!
Posted By: jargonscott
Date Posted: March 27, 2006 at 1:53 PM
burningmaverick wrote:
ok i have heard people on here talken abotu using some type of a roller to help keep air bubbles out, what excataly is it and where can i find one to use.
Curious about this myself, my last fiberglassing experience I didn't really have much other than paint brushes, my glove covered hands and some patience :) I was looking the other day in Home Depot for something I could use but all I came up with were the fuzzy paint rollers - and I know that isn't going to work with that resin except maybe once. Do Bondo knives work, that sort of thing? A buddy of mine bought a dynamatt kit and it came with a little plastic roller he said, reccomended it to me, would it be something along those lines? ------------- The night's as hot as hell. It's a lousy room in a lousy part of a lousy town - I'm staring at a goddess...
Goldie. She says her name is Goldie.
Posted By: talljoe
Date Posted: March 27, 2006 at 2:11 PM
burningmaverick wrote:
ok i have heard people on here talken abotu using some type of a roller to help keep air bubbles out, what excataly is it and where can i find one to use.
They mean something like this (midway down page): https://www.tapplastics.com/shop/category.php?bid=15 There's also this handy article: https://www.alldeck.com/news_techtip_metalrollers.html
Posted By: torquehead
Date Posted: March 27, 2006 at 7:18 PM
The rollers are very good for doing sheet applications. This allows you to roll out, wet out, a layer of fiberglass before it is applied. It causes the resin to be pushed into the weave/mat for good saturation. Or, if already applied, the weave/mat can be rolled into a flatter, more uniform finish. Keep in mind, the weave/mat serve as an inner foundation if you will. Adding resin, when cured, results in a hardened uniform shaped product of choice. Some people simply add resin to weave/mat that is already stuck to a component. When adding resin this way, it causes us to glob it on by the masses - resulting in alot of added weight due to the resin(even though you sand it down- I know someone will remark about that part). Sometimes I do, sometimes I dont. But when possible, I lay weave/mat down on a large panel of glass. Guess-timate how much resin will be needed. Pour this resin/hardener combo in the center of the weave/mat. Use the roller to push the resin all around to every part of the FG-weave/mat until its fully saturated, as well as rolling the excess resin off of the FG-weave/mat. When, for example applying this to an interior part, apply pam/wax/non-stick to the panel. Lay the FG/resin on the part an let cure. When cured, cut the undesired FG from the required areas. Even though you may require multiple layers by doing this, by the time your finished you will have a very lightweight and very tough final product. Just go to your nearest boat repair facility, or call them, ask for what they may have. Ive found a few a long time back to not have anything, but they ordered one for me...at thier price, and just so happened to be that they had free shipping because they had an account with their supplier. As for these days with my larger turn-over of fabrications, I found a boating shop nearby that will add my order with thiers...as well as Epoxy/Polyester resins, mat/sheet/weave, whats even cooler is they order in bulk and get a cheaper price by adding your order to thiers (maybe this can happen after you get to know them on a personal level - sometimes ya just gotta open your mouth to see what kind of deal you can get). The rollers I use are constructed of aluminum. They are 2, 3, 5, and 7 inch widths. They employ roller bearings on both ends of the roller pin (nice feature - Must Keep It Clean!) Also, the roller pins have cuts about 1/32 - 1/16 of an inch deep, three cuts on the 3 inch roller, this helps the air to escape to these cut grooves as well as giving the excess resin somewhere to float into. On the non-handle end of the pin, the pin is knurled or rolled, this aids in corner pressure in tight places. These types, well, the 3 inch is $15. They last as long as you take care of them...I keep them in a metal can full of dedicated acetone. I also made a screened pallet, like a jeweler's cleaning machine, for my acetone can. When you want a roller or brush, just lift out the screen. When you lift the rollers, brushes, spikes, clamps, ect out of the acetone, you dont have to dip your whole hand down in chemicals. PM for more questions, hope this helped shed light on the subject.
Posted By: sprawl85
Date Posted: April 01, 2006 at 8:28 PM
what grit are you sanding with, and are you hand sanding? If so, how big is the piece are you working on? and how big is the sanding block you are using? That'll probably get us started on helpin ya out.
-------------
fiberglass reminds me of peanut brittle... but fiberglass tastes better!
|