My 3rd FG Sub Box start to finish
Printed From: the12volt.com
Forum Name: Fiberglass, Fabrication, and Interiors
Forum Discription: Fiberglass Kick Panels, Subwoofer Enclosures, Plexiglas, Fabrics, Materials, Finishes, etc.
URL: https://www.the12volt.com/installbay/forum_posts.asp?tid=68945
Printed Date: April 01, 2026 at 9:57 AM
Topic: My 3rd FG Sub Box start to finish
Posted By: lnbrgr78
Subject: My 3rd FG Sub Box start to finish
Date Posted: December 22, 2005 at 10:40 AM
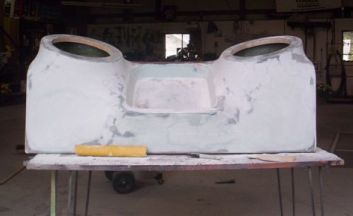
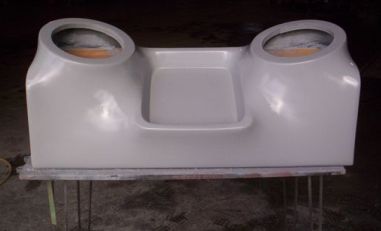
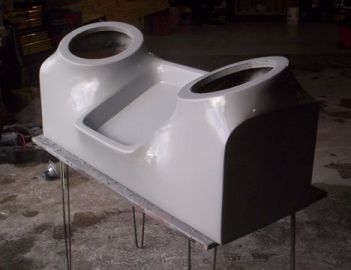
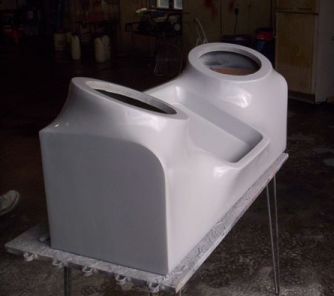
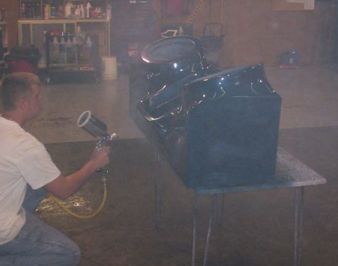
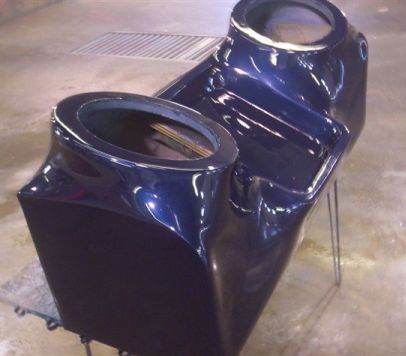
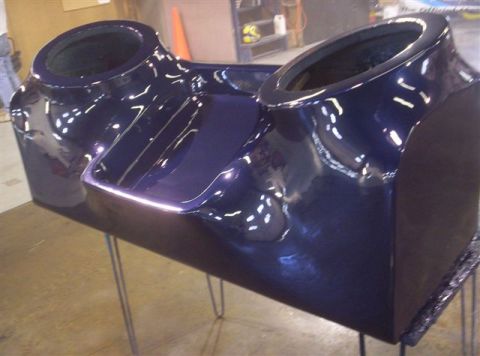
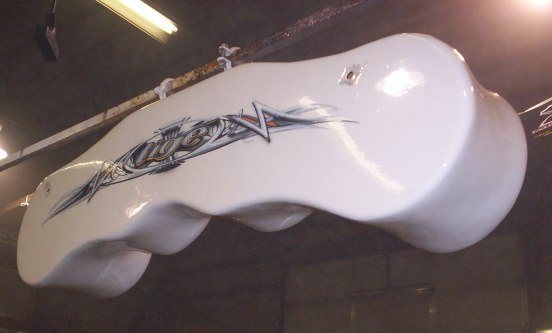
Hey guys, have a look at the pics of my latest enclosure. It's my 3rd. Let me know how I'm coming along. Still have a lot to learn! Sorry, didn't get any shots of the framework, but I did learn a little trick on this one. Since this box has a back and a bottom, once I applied several coats of resin to the fleece to get it nice & stiff, I sanded the fleece that wrapped around the bottom off, then I was able to unscrew & remove the bottom piece of wood. Since resin over fleece is a ton smoother than resin over fiberglass matte, I did all of my structural fiberglass matte work on the inside of the box. Saved me probably 3 days of sanding work on this one. Still hell for stout with 4 or 5 layers of glass on the inside. You have to be sure to glass the inside corner very well though where you sanded through the fleece to remove the bottom panel. Give it a try though, saves a lot of time!! Let me know what you think. Adam 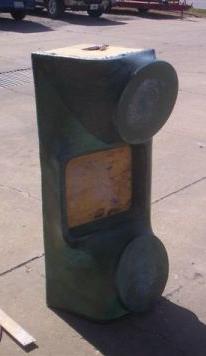


Replies:
Posted By: stumppy84
Date Posted: December 22, 2005 at 11:01 AM
Thats awsome good job!!!!
-------------
Stumpy
Posted By: darreng
Date Posted: December 22, 2005 at 11:06 AM
thats your third one?! i cant wait for my third one, mine look like shhh
Posted By: lnbrgr78
Date Posted: December 22, 2005 at 11:29 AM
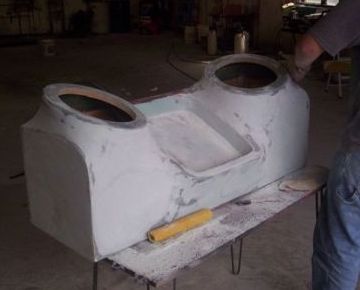
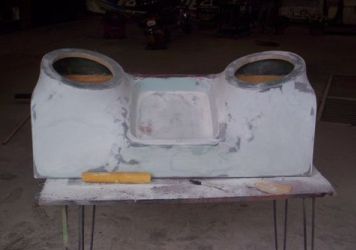
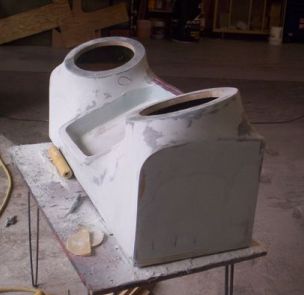
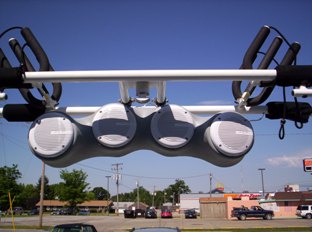
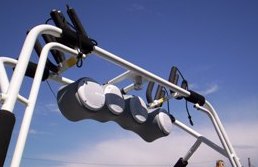
stummpy, thanks for the comp. darreng, just takes time & practice, sanding is the key, has to be smooth as glass before you paint or it'll look like sh*%. Here are pics of my second one, it was to house (4) 6 1/2" marine speakers to hang from the wake tower of a ski boat. turned out fair, the graphics on the back were done by a buddy of mine. The flaws you see on the back are where a bracket mounts & he mounted it before the paint was completely cured. Thankfully, the bracket covers it & you never see it! 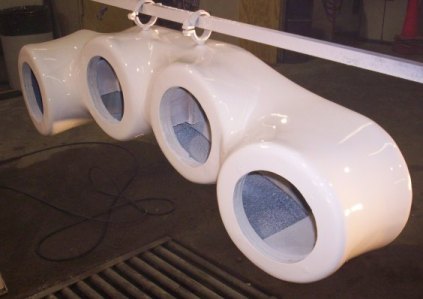
Here are a couple pics of the marine pod being test fit onto the boat after primer & before the paint.
Posted By: dragon51
Date Posted: December 22, 2005 at 8:12 PM
What no PPE's (Personal Protective Equipment) Let's get HIGH so HIGH :)
Posted By: jlord16
Date Posted: December 23, 2005 at 6:28 AM
looks good
-------------
Clarion DB36MP
Infinity Kappa Perfect 10"
Respone 800w Mono
ALPINE MRP-F250
*Custom fabrications*
Posted By: One_Dieu
Date Posted: December 23, 2005 at 2:24 PM
Wow the first one looks really hot. What color is that blue? It ------------- Respect the Blood Line
Posted By: lnbrgr78
Date Posted: December 23, 2005 at 5:24 PM
It's a dodge color, patriot blue metallic, but we had the local shop mix it as a single stage instead of base/clear since our customer was on a tight budget. Thanks a lot.
Posted By: ragoal12
Date Posted: December 23, 2005 at 9:28 PM
looks great!!!! your right if your project is smooth its going to look like shhh no matter how good of painter you r or how good of a painter the body man says he is!!! laying the glass on the inside was smart... many people do this but its not always possible you know... saves so much time.. great work man
-------------
S.O.B custsoms.. South Omaha, Nebraska
Posted By: hobobasher
Date Posted: December 26, 2005 at 8:33 AM
nice job man looks good. You are right tho it takes time. Im gonna be working on a fiberglass console for my truck ones the winter passes. Too cold to attempt fiberglass. Good job tho keep up the good work
Posted By: customcarchris
Date Posted: December 27, 2005 at 10:37 PM
And then you're dead. I would seriously think about getting a respirator when painting, you will be happy in 10 years.
Posted By: dabanger
Date Posted: December 29, 2005 at 5:42 PM
After you removed the fiberglass from the back piece of MDF, what did you use to secure it back in place after adding the mat to the inside? Did you just use screws and some bondo-glass? How much fiberglass resin and mat did you end up using for the truck box? Last question, how long did it take you to complete the box? You did a really good job on those enclsures by the way. They look sharp too. I'm planning on building a similar box for my '05 Tacoma, and putting 3 Kenwood amps, a ??? capacitor, 2 12" Kicker L7's, and a computer in the back. Along with that I want to redo my center console to relocate my deck and a the DVD-ROM drive below the A/C controls. Its going to tough and take a lot of time, but I know I can do it.
-------------
Learning to fiberglass.... Tips are appreciated
Posted By: Cougar.Modder
Date Posted: December 29, 2005 at 10:59 PM
Ya love that box. Was it for 12's or 15's? Looks nice anyhow. I think I am going to attempt my second box come spring time now. First one was ok, but the one side caved in for some reason and now instead of all 4 subs fitting perfectly only 3 would. Sucks.
Like yours though.
PEACE,
-------------
Alpine 7830 HU-4X100 W McIntosh -2X110 W McIntosh-MB Quart Q's Mid Tweets-4X10" Phoenix Gold Subs-Phoenix Gold EQ215ix-AC Epi-PG Line Driver-Phoenix Gold 1 Farad Cap -Clifford Avantguard 4-2 Ear Plugs
Posted By: g-twizzl
Date Posted: December 30, 2005 at 9:08 PM
Nice Ingrbr, the blue came out real nice. I made the mistake of using rattle can paint on my first box--basecoat was ok actually, the clear is what started to bubble. boo hoo, lots of sanding. Looks good now!
Posted By: g-twizzl
Date Posted: December 30, 2005 at 9:12 PM
Also, i didnot use fleece for the outer layer, i used a polyester carpet material-this stuff's thick 1/4". The carpet stretched pretty easily since there was no backing, i'll try and get pics posted.
Posted By: HottAccord
Date Posted: December 31, 2005 at 12:22 AM
Wow nice job, smoother than a baby's ass haha!  ------------- Im a fiberglass whore!!
Posted By: lnbrgr78
Date Posted: January 06, 2006 at 4:54 PM
dabanger wrote:
After you removed the fiberglass from the back piece of MDF, what did you use to secure it back in place after adding the mat to the inside? Did you just use screws and some bondo-glass? How much fiberglass resin and mat did you end up using for the truck box? Last question, how long did it take you to complete the box? You did a really good job on those enclsures by the way. They look sharp too. I'm planning on building a similar box for my '05 Tacoma, and putting 3 Kenwood amps, a ??? capacitor, 2 12" Kicker L7's, and a computer in the back. Along with that I want to redo my center console to relocate my deck and a the DVD-ROM drive below the A/C controls. Its going to tough and take a lot of time, but I know I can do it.
dabanger, when I put the bottom back on, I screwed it back to the sides, then once I cut the holes out for the subs, I put a couple layers of glass on all the seams. I think I ended up putting 3 layers of matte on the inside, along with 2 or 3 coats of resin on the outside of the fleece. Took me about a week and a half total to finish it up working evenings & weekends. Thanks for the comps. Cougar.Modder wrote:
Ya love that box. Was it for 12's or 15's? Looks nice anyhow. I think I am going to attempt my second box come spring time now. First one was ok, but the one side caved in for some reason and now instead of all 4 subs fitting perfectly only 3 would. Sucks.
Like yours though.
PEACE,
Cougar, this box was for (2) 12's. Sounded amazing too.. thanks for the comps..good luck.
|