How to Make a Fiberglass Enclosure
Printed From: the12volt.com
Forum Name: Fiberglass, Fabrication, and Interiors
Forum Discription: Fiberglass Kick Panels, Subwoofer Enclosures, Plexiglas, Fabrics, Materials, Finishes, etc.
URL: https://www.the12volt.com/installbay/forum_posts.asp?tid=74519
Printed Date: March 26, 2026 at 1:47 PM
Topic: How to Make a Fiberglass Enclosure
Posted By: Velocity Motors
Subject: How to Make a Fiberglass Enclosure
Date Posted: March 15, 2006 at 10:27 AM
Here's some simple steps and photo's on how to make a fiberglass enclosure/amp rack. The techniques outlined in this step by step is my own personal techniques and experiences so please feel free to modify the way it is done here. Hope this will help you in your enclosure fabrications and these techniques can be transferred to fabricate other fiberglass parts & projects....even vehicle body parts & home audio projects. Let's start from the trunk: 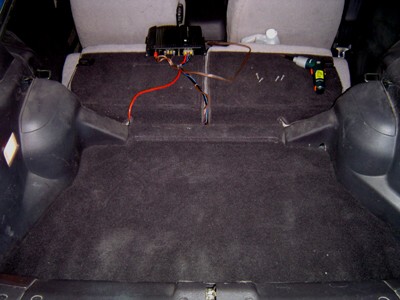
Here is the trunk of a 1992 Plymouth Laser Turbo ( or Mitsubishi Eclipse or Eagle Talon ). We start out with a clean trunk and an idea of what we want to do with the enclosure and the equipment that we're installing into the trunk. 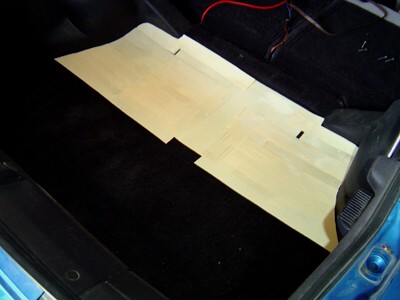
The next step is to draw out the base of the enclosure and use poster board paper cut into strips to contour the edges of the base. This will ensure a tight and accurate shape around the trunk edge. 
Next step is to mask the sides of the trunk to avoid fiberglass from sticking to areas that you don't want it to. **TIP: for large areas that doesn't require a mold you can lay down two layers of tin foil and some plastic to save time and masking tape ** 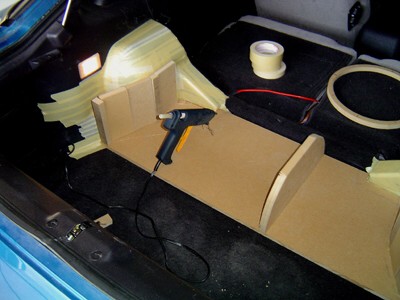
After you have cut the base out of MDF( Medium Density Fiberboard ) & masked the edges of the trunk you can start building the initial shape of the enclosure you designed. Using MDF I cut the peices that I needed to frame the inside of the enclosure and hot glued & super glued the peices in place. Using Cyanoacrylates (best known as Super/Krazy glues) bond in seconds through the evaporation process when in contact with air. 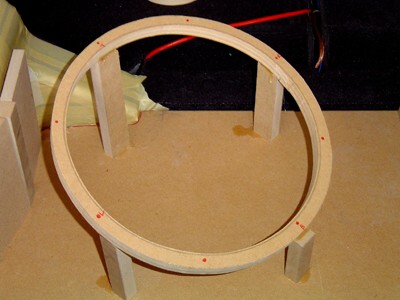
After you have cut the MDF trim ring you must mount the trim ring and suspend it in the position you want. I used strips of MDF and super glued them in place to hold the position. 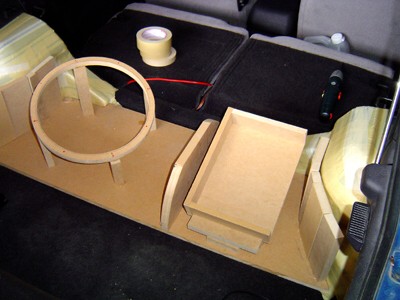
After you have framed the entire enclosure and glued all the peices in place securely, you are ready to wrap the project in fleece and start with the resin. 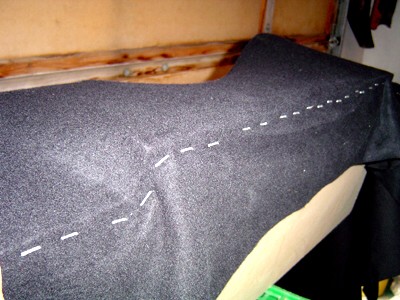
Using an pneumatic staple gun I used light weight fleece from my local fabric store and started to staple the fleece to the enclosure. ** TIP : Make sure you staple the fabric on the bottom of the project and not the side ( if possible ). This will save you time in the end because you won't have to cover your staple divits you create when you attach the fleece to the MDF. 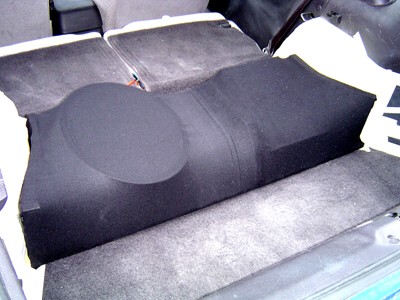
Here is the enclosure pre-resin state. Make sure that you attach the fleece on the top of the project with spray glue or staples. This will ensure that the fleece is attached to the frame. I used 3M Super 90 spray adhesive & you can get this at any Home Hardware store or Home Depot. 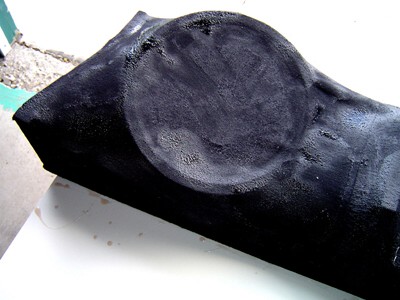
Here is the first coat of fiberglass resin that I used on the enclosure. Soak it down until the resin shines on the fleece , this will indicate that the resin is completely saturated with resin. Allow this to dry and next step will be the fiberglass matting and resin. 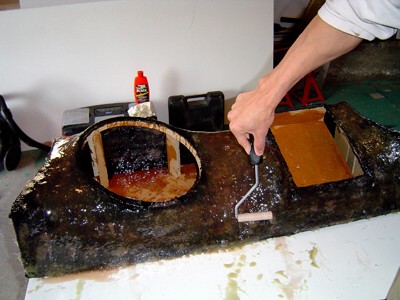
After you have the first 3-4 layers of fiberglass matting alow it to dry. I used a roller to smooth out the bubbles and also this allows me to sqeeze out all the extra resin that I used. I just applied more matting to soak up the resin that the roller sqeezed out. 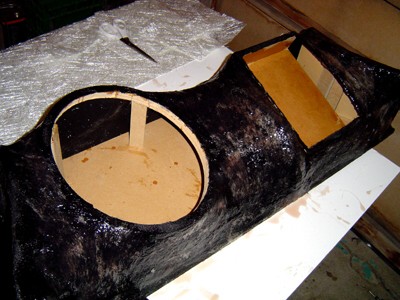
Here's the enclosure after the 2nd 4 layer coating. THere is 8 layers of matting on this enclsoure and now it's time to smooth out the fiberglass and continue to the final stages of the enclsoure. 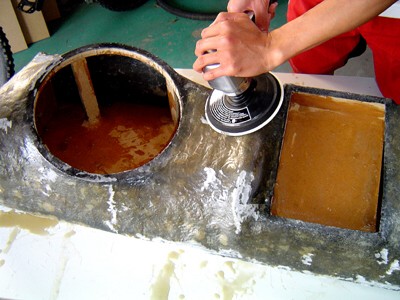
After doing a little sanding to get rid of the small pills of resin your ready to apply the first layer of filler/fiberglass resin. Note the smoothness of the fiberglass and the fact the we need little sanding here to go tot he next step. The entire project requires it to be sanded to 80 grit for the filler/fiberglass resin to adhere properly. 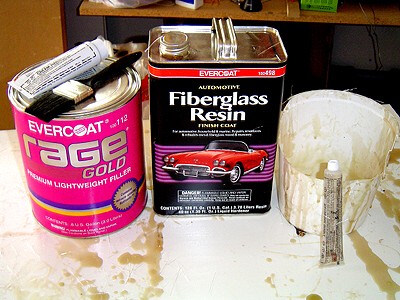
Next you will need some body filler ( Rage Gold is what we used ) and some fiberglass resin, mixing cup and hardener for both. 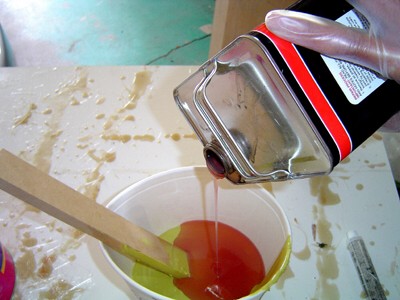
By mixing a batch of body filler and resin ( 5:1 ratio ) you create a thinned out mixture that you can paint onto the project. Add the appropriate hardener amounts for each of the resin and the body filler as normal 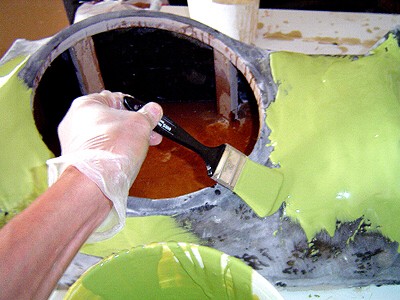
** TIP: this allows you to use this mixture to fill in dips and cracks without having you spread it on with a body filler knife. 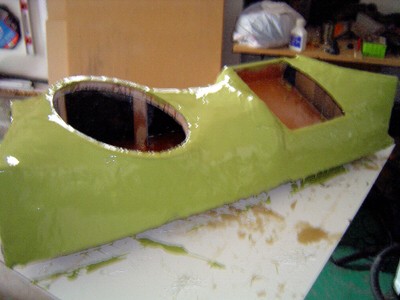
Here is the completed subenclosure with the mixture completely covering the project. Get it at the stage where the mixture is 75 % dry and use 36 - 50 grit sand paper on a soft sanding block and go to town and sand down the project before it totally dries. It will gum up your paper rather quickly but will take off lots of the semi dry mixture ( which is what you want ) because this is the excess stuff that is the high spots on the project. 
Next we covered the trunk with a thick plastic sheet and proceeded to make our enclsoure cover. 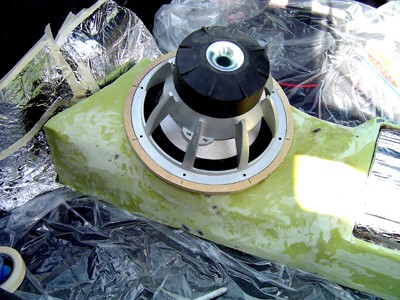
We placed the enclosure into the trunk and made another trim ring to fit on the outside of the subwoofer with a reverse mount on the sub for asthetics. 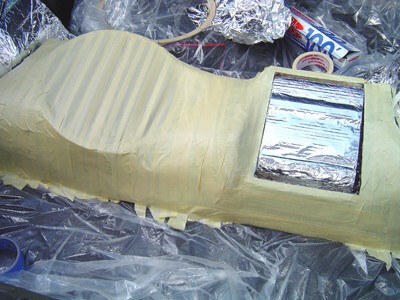
The enclosure was completely masked over and the amplifier was tin foiled to add protection incase of some resing getting through the first layer of tin foil. 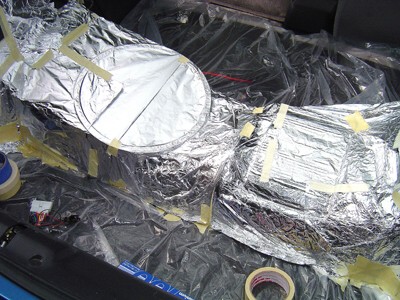
I used 2 layers of tin foil to cover the entire enclosure so that when I fiberglass over top, I will be able to remove a perfect mold of the enclosure. Use 2-3 layers of matting for the shape of the cover as this will be plenty strong enough for the cover peice. After you have the cover peice glassed and edges cut and sanded your ready to use the body filler/resin mixture again on the cover. 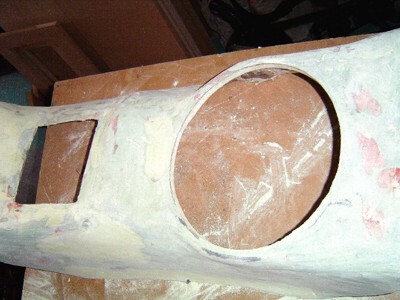
Get it at the stage where the mixture is 75 % dry and use 36 - 50 grit sand paper on a soft sanding block and go to town and sand down the project before it totally dries. It will gum up your paper rather quickly but will take off lots of the semi dry mixture ( which is what you want ) because this is the excess stuff that is the high spots on the project. Here is the cover after we removed it from the initial mold and used the same technique with the filler/fiberglass resin as before. In this stage we sanded it down to 240 grit and is now ready for some polyester filler to fill in small scratches and imperfections. 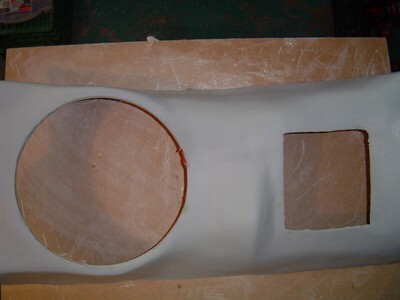
Here is the cover pre-paint ready to get a 400 grit sanding and then a 600 grit sanding. Paint is next and installation. 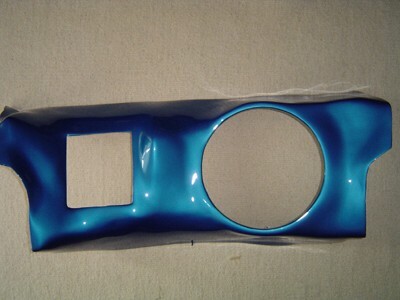
Here's the finished cover with paint and ready to install. The paint was matched to the exterior of the vehicle. 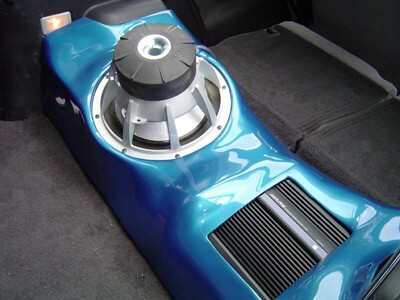
Finished & installed enclsoure and cover. 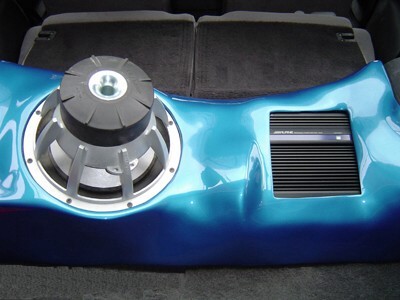
Another happy customer :D ------------- Jeff
Velocity Custom Home Theater
Mobile Audio/Video Specialist
Morden, Manitoba CANADA
Replies:
Posted By: candy&chrome
Date Posted: March 15, 2006 at 9:25 PM
i'm impressed...........it's nice to know that there is this kind of info, step by step. thank you. i just learned something new. ------------- canada's cold eh.
Posted By: laser4g63
Date Posted: March 16, 2006 at 1:32 AM
This is exactly what I have been looking for. Almost down to the same car, except mines AWD. Thanks for that awesome write up!
-------------
Craig
Posted By: Velocity Motors
Date Posted: March 16, 2006 at 9:52 PM
Thanks for the props guys. I'll be putting some more how-to's later in regards to some RS installations, headrest monitor's and some more fiberglass panel.
-------------
Jeff
Velocity Custom Home Theater
Mobile Audio/Video Specialist
Morden, Manitoba CANADA
Posted By: fezza_rs
Date Posted: March 17, 2006 at 11:27 AM
 great guide dude the beginners among us will get off to a good sart with this! -------------
Posted By: lukeyn
Date Posted: March 21, 2006 at 12:15 PM
"Here is the cover after we removed it from the initial mold and used the same technique with the filler/fiberglass resin as before"
Is the technique used in this step just painting the mix of body filler and resin ( 5:1 ratio ) or is it actually repeating the whole process again?
Sorry if this is a dumb question i just wanted to know completely before i start on this
Posted By: no0p
Date Posted: March 21, 2006 at 10:37 PM
that looks great, nice job!
-------------
reppin' clublexus!
Posted By: jlord16
Date Posted: March 22, 2006 at 6:30 AM
have you noticed a deteriation in the properties of the body filler once mixed with fibreglass resin, or has it been all good?? Do u think its possible to use that technique with any sort of body filler. Great walkthru, install looks absolutly awesome. lukeyn i beleive that velocity made a cover for the box using fg, meaning that once the bodyfiller was applied he made a fibreglass mould of the box and then painted it to make like a cover for the box
-------------
Clarion DB36MP
Infinity Kappa Perfect 10"
Respone 800w Mono
ALPINE MRP-F250
*Custom fabrications*
Posted By: Velocity Motors
Date Posted: March 22, 2006 at 8:40 AM
lukeyn wrote:
"Here is the cover after we removed it from the initial mold and used the same technique with the filler/fiberglass resin as before"
Is the technique used in this step just painting the mix of body filler and resin ( 5:1 ratio ) or is it actually repeating the whole process again?
Sorry if this is a dumb question i just wanted to know completely before i start on this
Not a dumb question at all Dude, all you need to do is mix the body filler and resin ( 5:1 ratio ) after you have the cover piece thick enough. We made the cover pice about 3 layers thick to allow it to be heavy enough not to create rattles and thin enough to be able to still be somewhat flexible. ------------- Jeff
Velocity Custom Home Theater
Mobile Audio/Video Specialist
Morden, Manitoba CANADA
Posted By: Velocity Motors
Date Posted: March 22, 2006 at 8:44 AM
jlord16 wrote:
have you noticed a deteriation in the properties of the body filler once mixed with fibreglass resin, or has it been all good?? Do u think its possible to use that technique with any sort of body filler. Great walkthru, install looks absolutly awesome.
The body filler's consistency is thinner but the characteristics of the end result is harder to sand in the dry stages. It doesn't sand down like chalk because there's fiberglass resin in there and makes a tacky feel but is absolutely dry. We did this installation about 2-3 years ago and the customer is still using the system and the cover had not shrunk one bit since we made it. ------------- Jeff
Velocity Custom Home Theater
Mobile Audio/Video Specialist
Morden, Manitoba CANADA
Posted By: Velocity Motors
Date Posted: March 22, 2006 at 8:49 AM
bobditts wrote:
I mix resin and bondo together all the time. Its great for coating the inside of boxes. We call it water mung. I havent tried the 5:1 ratio. We usually do 1:1. But again, that s for coating the inside of boxes.
Wow 1:1.... that would be mung water . You don't want that kind of consistency on any part of the enclsoure where you want to be able to sand to a smooth surface. I use a 5:1 because it give me a paintable consistency with the mixture, but if you want to play around with the ratio if you want it thicker, just use less resin or more body filler. Any type will do as long as you mix the hardeners with the mixture. ------------- Jeff
Velocity Custom Home Theater
Mobile Audio/Video Specialist
Morden, Manitoba CANADA
Posted By: lukeyn
Date Posted: March 22, 2006 at 1:54 PM
thanks for the help velocity motors...Im in the process of making a box right now for my wifes car... https://www.cardomain.com/ride/202827/3 heres on of my vinyl wrapping projects i did for my tiburon a while back...Tell me what you think of it...
Posted By: Velocity Motors
Date Posted: March 22, 2006 at 6:59 PM
lukeyn, Look great so far. Hope the how-to will help you with your installation and I will be working on a 2000 Tiburon this spring. The customer wants me to do a wrap around installation and remove the rear seats of the vehicle in place for stereo equipment. All MTX stuff with Pioneer HU & Audio Control processor with Street Wires for the interconnects. All of it will be fiberglassed and wrapped with vinyl on parts of the installation. I will be doing another how-to with this project and wrapping with vinyl as well on this forum.
-------------
Jeff
Velocity Custom Home Theater
Mobile Audio/Video Specialist
Morden, Manitoba CANADA
Posted By: lukeyn
Date Posted: March 24, 2006 at 8:55 AM
That sounds like an awesome setup....I dont really have that much money so i try to do everything myself, so I hope this fiberglass project turns out good. BTW How do you prevent the whole place from stinking up...We have an attached garage and my wife has been complaining about the smell lol.
Posted By: Velocity Motors
Date Posted: March 24, 2006 at 9:40 AM
Depending on the time of year, just open up the garage door and if you have a back door, open that up too to allow the fresh air to blow through the garage. Other than that, there's really nothing else you can do aside from plumbing in a air makeup unit into your garage, but this is normally out of the question. When I do stufff at home I just make sure that I have fans blowing in the work area to circulate the air and have the garage door open a bit.
-------------
Jeff
Velocity Custom Home Theater
Mobile Audio/Video Specialist
Morden, Manitoba CANADA
Posted By: tbone31
Date Posted: March 26, 2006 at 9:21 PM
hey this may be a dumb question but why did you make the cover? and also how did you attach it to the original box?
Posted By: pmendoza408
Date Posted: March 27, 2006 at 12:09 AM
dang nice jop really help me out. hey did you really need to make a cover or could you have just prepared the base and painted that? would the cover add to some rattling?
Posted By: dfiddy
Date Posted: March 27, 2006 at 12:33 AM
Good write up, this will help me out alot.
Posted By: lukeyn
Date Posted: March 27, 2006 at 7:34 AM
I think he made the cover so the amp wiring would be hiddin also making it appear flush into the box...Also if you notice the second ring around the subwoofer to give it that flush look, If he didnt make the covering, you would be able to see a wooden mdf ring..
Posted By: Velocity Motors
Date Posted: March 27, 2006 at 10:19 AM
tbone31 wrote:
hey this may be a dumb question but why did you make the cover? and also how did you attach it to the original box?
More or less what lukeyn said. I made the cover to cover up the wiring & also the amplifier the customer brought to us was an older Alpine unit & the mounting holes were on the outside of the heatsink so we didn't want the amp screws showing. ------------- Jeff
Velocity Custom Home Theater
Mobile Audio/Video Specialist
Morden, Manitoba CANADA
Posted By: xtremej
Date Posted: March 31, 2006 at 10:45 AM
Hey cool post. Extremely helpful.. . I have a question for ya as a shop what does something like this cost? I have donen some glass work but in my current building my landlord prohibits this as he is a sissy. I'm always curious on what a larger higher volume place would charge. Last time I did glass the materials were expensive. Again great post it has some awesome information, ever think about writing how to books? . I have a question for ya as a shop what does something like this cost? I have donen some glass work but in my current building my landlord prohibits this as he is a sissy. I'm always curious on what a larger higher volume place would charge. Last time I did glass the materials were expensive. Again great post it has some awesome information, ever think about writing how to books? Thanx again Jeff -------------
Posted By: Velocity Motors
Date Posted: March 31, 2006 at 10:55 AM
Hey Jer, the job cost the customer about $ 1200 with paint, supplies & labor. The customer brought me the equipment and the car ans I just did installed and fabricated the enclosure. This job took about 1 week to accomplish. The sanding took about 3 days of the week !! ------------- Jeff
Velocity Custom Home Theater
Mobile Audio/Video Specialist
Morden, Manitoba CANADA
Posted By: xtremej
Date Posted: March 31, 2006 at 11:28 AM
cool thats pretty close to what I was thinking. I was just curious, I've had couple of requests for glass work last night in fact client wanted 2 subs mounted in subarau firing into the back corners of the trunk. the enclosures were to hold 2 audiobahn competition subs and then flowing into an amp rack on each side. cool idea lots of work. I quoted him $1700 total, had to get out my defibrilator and bring him back. I don't think he realized how much work it is. Thanx for the info. -------------
Posted By: hakosuka
Date Posted: April 10, 2006 at 9:00 AM
hey, since you made the cover for the box do you really need to sand down the actual box? or does it make shaping the cover easier?
Posted By: Velocity Motors
Date Posted: April 13, 2006 at 8:43 AM
It makes the mold for the cover alot easier to make with less imperfections to work out later. Sanding it smooth reduces sanding time for the cover by more than 1/2 & also allows you to shape the enclosure more to what you want it to look like.
-------------
Jeff
Velocity Custom Home Theater
Mobile Audio/Video Specialist
Morden, Manitoba CANADA
Posted By: weedfan
Date Posted: April 14, 2006 at 5:59 AM
does the board have to b mdf?
Posted By: hellbilly007
Date Posted: April 16, 2006 at 1:04 PM
I'm still trying to figure out how to attach the cover without it rattling. As far as the rattling goes how could ya allow for some room for sound dampening if desired? I've been interested in building FG box with a cover, just haven't really pondered on how. By the way great thread, very informative.
-------------
Slowly but surely working towards something. Not sure what though.
Posted By: xxm3racingxx
Date Posted: April 23, 2006 at 6:03 PM
I see that the way you did it you used 1 sheet of fleece. but the enclosure doesnt fill up the whole trunk etc.. How could you make a cover for a trunk of a i.e Bmw m3 to the weather shield so you dont see anything oem. just fiberglass and the equipment?
Posted By: Velocity Motors
Date Posted: April 23, 2006 at 9:54 PM
weedfan wrote:
does the board have to b mdf?
We always use MDF for our enclosures but you can use anything that will be dense enough and also must withstand the sub's pressure. ------------- Jeff
Velocity Custom Home Theater
Mobile Audio/Video Specialist
Morden, Manitoba CANADA
Posted By: Velocity Motors
Date Posted: April 23, 2006 at 9:58 PM
hellbilly007 wrote:
I'm still trying to figure out how to attach the cover without it rattling. As far as the rattling goes how could ya allow for some room for sound dampening if desired? I've been interested in building FG box with a cover, just haven't really pondered on how. By the way great thread, very informative.
IF there are any rattles on the cover you can use a stick on foam ( kind of like sound deadening ) on the backside of the cover to add weight. ------------- Jeff
Velocity Custom Home Theater
Mobile Audio/Video Specialist
Morden, Manitoba CANADA
Posted By: Velocity Motors
Date Posted: April 23, 2006 at 10:07 PM
xxm3racingxx wrote:
I see that the way you did it you used 1 sheet of fleece. but the enclosure doesnt fill up the whole trunk etc.. How could you make a cover for a trunk of a i.e Bmw m3 to the weather shield so you dont see anything oem. just fiberglass and the equipment?
I will answer your post in the thread that you started. ------------- Jeff
Velocity Custom Home Theater
Mobile Audio/Video Specialist
Morden, Manitoba CANADA
Posted By: stevephy
Date Posted: April 27, 2006 at 9:27 AM
About the enclosure; once you sanded it down, did you do anything else to it? Primer, paint, or did you just leave it unfinished? StevePhy
Posted By: tebeatles
Date Posted: April 27, 2006 at 10:40 AM
I had a few questions about the cover. I think what you said to do is after you foil the original box you essentially paint on the 5:1 body filler/resin mix to the box and foil? I was wondering is it fairly easy to paint the 5:1 mix on the foil without ripping the foil? Also is it just one coat of the 5:1 mix? Or did you do multiple coats of the 5:1 mix then pull the cover off of the box? Did you sand the cover before you pulled it away from the original box or did you pull the cover off the box and then sand it? (Just want to know the eastiest way to sand the cover so it dosn't crack. Also seems like it would be easier to sand the cover before you pulled it away so you can put more force into it when you are sanding it) And did you reinforce the back of the cover after you pulled it away from the original box, with resin and fg mat. Seems like it would be a brittle piece it you didnt reinforce it and it would be hard to sand without cracking it. (Ive never done the 5:1 mix but theres nothing holding it together, such as the mat, I want to make a clean piece but dont want to crack it when I am sanding it) Just wanted to be goining in the right direction before I start. Thanks Chris  ------------- 93 Widebody
Posted By: mig 007
Date Posted: April 27, 2006 at 5:33 PM
Great write up, thx for taking the time to post it ;)
Posted By: samtucan11
Date Posted: April 27, 2006 at 11:51 PM
I am still trying to figure out, the best way to attach a fiberglass trim/insert panel? If you do not want it perminently attached how do you attach it? Lets say i want to make a fiberglass panel over some batteries that i need to get to, to charge, i would make an insert panel right. But how can i attach it? I cannot use screws, because screw heads would ruin the whole look, i cannot use an epoxy because that would be perment, anyone have any suggestions on how to attach a removable fiberglass insert panel? i really appreciate it
Posted By: tackbradley
Date Posted: May 15, 2006 at 8:37 PM
hello to everyone. cant wait to run into all of you at some point on this forum. great stuff here!!!
hey dude. why dont you try like a rabbitededge with some decorative latches? like the ones on a guitar case?!?! im a fan of accents and accessories on builds. or you could build everything and countersink the screw heads then wood filler then tape it all off and carefully glass around the hinges. sorry dude its all i got right now haha!
-------------
~Jason
(516) Drum Co.
Posted By: the rah
Date Posted: May 20, 2006 at 9:15 PM
dude! i tried that with the resin and body filler man!!!!!!!!!!!!!!!!!!!!!!!!!!!!!!!!!!!!!!! for me it was more work ,because once it dried it had like waves and dips in it. but yours came out awsome.good job ------------- rah2son
Posted By: nighthawk9877
Date Posted: June 01, 2006 at 1:14 PM
great read!
Posted By: mbaumann4
Date Posted: June 08, 2006 at 7:09 PM
Well im new to most of this and Im still pretty young but i know a few things about electronics, and enclosures.
I just am wondering about how much the equipment costed you to make this enclosure.You see i havent done any fiberglass work,yet but am verry anxious about starting.I would just like to know an approximate cost that it will cost me.
Thank you (and i love the original post and the pics)
Posted By: Velocity Motors
Date Posted: June 09, 2006 at 8:21 AM
stevephy wrote:
About the enclosure; once you sanded it down, did you do anything else to it? Primer, paint, or did you just leave it unfinished? StevePhy
Sorry for the late reply been hella busy of late. I sanded the enclosure down to about 220 grit and then did a black base primer and left it at that because you don't see it anyways so no paint or further finishing was needed. ------------- Jeff
Velocity Custom Home Theater
Mobile Audio/Video Specialist
Morden, Manitoba CANADA
Posted By: Velocity Motors
Date Posted: June 09, 2006 at 8:36 AM
tebeatles wrote:
I had a few questions about the cover. I think what you said to do is after you foil the original box you essentially paint on the 5:1 body filler/resin mix to the box and foil? I was wondering is it fairly easy to paint the 5:1 mix on the foil without ripping the foil? Also is it just one coat of the 5:1 mix? Or did you do multiple coats of the 5:1 mix then pull the cover off of the box? Did you sand the cover before you pulled it away from the original box or did you pull the cover off the box and then sand it? (Just want to know the eastiest way to sand the cover so it dosn't crack. Also seems like it would be easier to sand the cover before you pulled it away so you can put more force into it when you are sanding it) And did you reinforce the back of the cover after you pulled it away from the original box, with resin and fg mat. Seems like it would be a brittle piece it you didnt reinforce it and it would be hard to sand without cracking it. (Ive never done the 5:1 mix but theres nothing holding it together, such as the mat, I want to make a clean piece but dont want to crack it when I am sanding it) Just wanted to be goining in the right direction before I start. Thanks Chris
After I foil the original box, I used fiberglass matting to get the shape I wanted and after sanding down the fiberglass I used the 5:1 mixture body filler/resin to coat the cover for sanding. Depending on your mold you may have to use multiple layers of the filler/resin mixture. ------------- Jeff
Velocity Custom Home Theater
Mobile Audio/Video Specialist
Morden, Manitoba CANADA
Posted By: Velocity Motors
Date Posted: June 09, 2006 at 8:41 AM
samtucan11 wrote:
I am still trying to figure out, the best way to attach a fiberglass trim/insert panel? If you do not want it perminently attached how do you attach it? Lets say i want to make a fiberglass panel over some batteries that i need to get to, to charge, i would make an insert panel right. But how can i attach it? I cannot use screws, because screw heads would ruin the whole look, i cannot use an epoxy because that would be perment, anyone have any suggestions on how to attach a removable fiberglass insert panel? i really appreciate it
You have to build it so that you have tabs on the back so you can remove the cover peice. Just like home speaker cover's have the bullet connectors that press into a femail connector. You will do the same with the fiberglass cover. It's all in the design of what your trying to do. ------------- Jeff
Velocity Custom Home Theater
Mobile Audio/Video Specialist
Morden, Manitoba CANADA
Posted By: Velocity Motors
Date Posted: June 09, 2006 at 8:47 AM
the rah wrote:
dude! i tried that with the resin and body filler man!!!!!!!!!!!!!!!!!!!!!!!!!!!!!!!!!!!!!!! for me it was more work ,because once it dried it had like waves and dips in it. but yours came out awsome.good job
The key to makinf sure you don't have waves and dips is to make sure that you get to sanding the area before it dries. Get it at the stage where the mixture is 75 % dry and use 36- 50 grit sand paper on a soft sanding block and go to town and sand down the project before it totally dries. It will gum up your paper rather quickly but will take off lots of the mixture ( which is what you want ) because this is the excess stuff that is the high spots on the project. ------------- Jeff
Velocity Custom Home Theater
Mobile Audio/Video Specialist
Morden, Manitoba CANADA
Posted By: tackbradley
Date Posted: June 09, 2006 at 10:13 AM
hey Jeff, is wetsanding an option at this point? or will the water have an affect since its not completely dry? if wetsnading is an option, it will save your sandpaper a bit and not gum up so quickly. this is a great thread!!!
-------------
~Jason
(516) Drum Co.
Posted By: Velocity Motors
Date Posted: June 12, 2006 at 8:27 AM
Jason, wet sanding is not an option at this point because it's not smooth enough to start with a wet sanding grit paper. One way to recover your gummed up sand paper is to have two sanding blocks going at the same time but using them alternately and when ones is dry you can rub them together to remove the built up body filler.
-------------
Jeff
Velocity Custom Home Theater
Mobile Audio/Video Specialist
Morden, Manitoba CANADA
Posted By: xtremej
Date Posted: June 12, 2006 at 12:01 PM
Hey just an idea but sometimes I'll use screened sand paper, usually 80 grit, if it gums up give it a shot of compressed air to clean it out. I ordered mine throught the harware store, I've never really looked to see if it can be bought anywhere else. Hope it helps ya out.
-------------
Posted By: Velocity Motors
Date Posted: June 12, 2006 at 9:28 PM
xtremej wrote:
Hey just an idea but sometimes I'll use screened sand paper, usually 80 grit, if it gums up give it a shot of compressed air to clean it out. I ordered mine throught the harware store, I've never really looked to see if it can be bought anywhere else. Hope it helps ya out.
Is the screened sand paper available in a Hook It style ? ------------- Jeff
Velocity Custom Home Theater
Mobile Audio/Video Specialist
Morden, Manitoba CANADA
Posted By: xtremej
Date Posted: June 13, 2006 at 10:33 AM
I'm not sure the suff I got isn't, I have to pick up some stuff this weekend I'll take a look thru there catalogs.
-------------
Posted By: cortina
Date Posted: June 19, 2006 at 2:41 AM
I just made my fg enclosure today and i am planning to use a 5:1 mixture of stucco with wood white glue as a filler. What is Stucco? https://en.wikipedia.org/wiki/Stucco The white glue helps to make the mixture stronger when dry. This type of filler is easy to sand and quite strong and very cheap to buy. However my only concern is whether it is compatible with high power bass frequencies. The box is made using 8 layers of glass so i dont think that there will be much force exerted on the filler.
Posted By: Velocity Motors
Date Posted: June 27, 2006 at 1:31 PM
From what I can gather, the Stucco would eventually break off from the bass & also not sure about the primer adhering to the stucco ?
-------------
Jeff
Velocity Custom Home Theater
Mobile Audio/Video Specialist
Morden, Manitoba CANADA
Posted By: cortina
Date Posted: June 27, 2006 at 4:10 PM
yeah the primer sticks to the stucco. now the enclosure is finished and i used a 10:1 stucco : white glue mixture over 6 layers of matting. Had no problems after 3 weeks! The secret is the white wood glue which makes the mixture very strong. This is being used with an 800W subwoofer. I m not sure how long it will last considering that where i live reaches 40 degrees celsius almost daily now in summer which may result in expansion problems ???? or not?? and will there be expansion problems with any other types of fillers?
Posted By: tackbradley
Date Posted: July 03, 2006 at 1:48 PM
pictures?
-------------
~Jason
(516) Drum Co.
Posted By: frozenfoodman
Date Posted: July 15, 2006 at 10:41 PM
I 2nd those pics..
Posted By: judgedread
Date Posted: August 08, 2006 at 12:00 AM
great build, because of you im currently building one right now, i have my frame up now i just need to cover it in fleece, will post pics when finished.
Posted By: Velocity Motors
Date Posted: August 08, 2006 at 9:00 AM
judgedread, thanks and post any questions if you have. I'm working on another project right now and will post some of these pics when I have time. It involves a custom how-to for guage pods and redesigning a center dash section for a Saturn SC2.
-------------
Jeff
Velocity Custom Home Theater
Mobile Audio/Video Specialist
Morden, Manitoba CANADA
Posted By: oleagle
Date Posted: August 09, 2006 at 10:58 PM
folks you are some of thw kindest people around. i am very new to this the only way your tutorial will be any easier if you actually build it for us thanks for the insite. great patience
Posted By: Velocity Motors
Date Posted: August 10, 2006 at 8:25 AM
oleagle, your VERY welcome and thanks for the praise. If you need anything along the way on your project, please post.
-------------
Jeff
Velocity Custom Home Theater
Mobile Audio/Video Specialist
Morden, Manitoba CANADA
Posted By: stevenpezz_32
Date Posted: August 14, 2006 at 3:01 AM
mbaumann4 wrote:
Well im new to most of this and Im still pretty young but i know a few things about electronics, and enclosures.
I just am wondering about how much the equipment costed you to make this enclosure.You see i havent done any fiberglass work,yet but am verry anxious about starting.I would just like to know an approximate cost that it will cost me.
Thank you (and i love the original post and the pics)
I'm also New to Fiberglassing and cant wait to start my first piece and would like to know what exactly i need...Does anybody have a list of what i will need to get started. Thanks
Posted By: Velocity Motors
Date Posted: August 14, 2006 at 8:53 AM
Materials
* Fiberglass Resin & Hardener (MEKP)
* Fiberglass Cloth/Mat
* Fiberglass Roller
* Body Filler
* Fleece or Stretchy Fabric
* Acetone
* Cheap Brushes
* Latex Gloves
* Measuring Cup
* Aluminum Foil
* Masking Tape
* Mixing Sticks
* Mixing Bowl
* 1/4" MDF Board
* 1/4" Wooden Dowels
* Plastic Spreaders
* Sand Paper
Tools/Equipment
* Staple Gun
* Fiberglass Mask
* Hot Glue Gun
* Dremel or air reciprocating saw
* Sander or sanding block
This list may vary depending on what you are doing (sub box, making a mold, door panels). I prefer to use the matting for all my projects regardless of size and complexity. One note about the matting is that you should pull the matting apart when separating the matt because this allows the edges to matt together better when glassing opposed to using scissors and having a clean edge.
-------------
Jeff
Velocity Custom Home Theater
Mobile Audio/Video Specialist
Morden, Manitoba CANADA
Posted By: renee7363
Date Posted: August 14, 2006 at 4:51 PM
Anyone wanna come help a girl out and build a wheel well sub box for me? LOL! just kidding! I really appreciate the generous sharing of VERY valuable information. I am almost brave enough to try fiberglassing myself. I will take pic's while I am doing it so ya'all can keep me from making mistakes! right?! HUH?-- lol! ... more soon (as soon as I get my DVD on fiberglassing since no one will come help! <giggles> ) ------------- Renee B
Dancing Duck
Custom Services
Posted By: Velocity Motors
Date Posted: August 14, 2006 at 11:06 PM
Renee, if you have any questions I'm sure there will be plenty of help here on the forums. Just post your questions and there will be about a half dozen Knights in shining armor here to help you . Post your pics and hope to see you here more. ------------- Jeff
Velocity Custom Home Theater
Mobile Audio/Video Specialist
Morden, Manitoba CANADA
Posted By: srsoupy
Date Posted: August 15, 2006 at 2:03 PM
i see the costumer paid $1200 for the enclousure .is the sub and the amplifier included in the 1200? if not what is the price of the enclousure only? and if you hade to make speaker pods for that car how much would you ask? i'm just doing a research i really like to know thanks ------------- soupy
Posted By: skater472001
Date Posted: August 16, 2006 at 1:10 AM
i was woundering if you have done any glass boxes for a 1973 chevy truck
-------------
kevin
Posted By: Velocity Motors
Date Posted: August 16, 2006 at 8:22 PM
srsoupy wrote:
i see the costumer paid $1200 for the enclousure .is the sub and the amplifier included in the 1200?
if not what is the price of the enclousure only?
and if you hade to make speaker pods for that car how much would you ask?
i'm just doing a research i really like to know
thanks
The price was $ 1200 was just the enclosure finished in paint. To finifh in paint takes way longer than with vynil or carpet and on top of this you have to charge for paint supplies & labor for paint. Make sure you take this into consideration when estimating a job or wanting to purchase from a shop. ------------- Jeff
Velocity Custom Home Theater
Mobile Audio/Video Specialist
Morden, Manitoba CANADA
Posted By: goosie
Date Posted: August 21, 2006 at 8:08 PM
Wow... thanks for the tutorial :D
Im learning how to build speakerboxes and kind of want to learn how to fiberglass (but i wount try it untill im actualy good at MDF) but i was woundering when your planning out fiberglass if you still make the enclosure the same size you would with MDF? Also, how do you measure the space inside of the box with all the curves? Also is the box ported or sealed when you make it with fiberglass or does it matter? Something tells me its completely different than doing MDF but i'm just trying to learn as much as i can
Posted By: Velocity Motors
Date Posted: August 23, 2006 at 8:04 AM
goosie wrote:
Wow... thanks for the tutorial :D
Im learning how to build speakerboxes and kind of want to learn how to fiberglass (but i wount try it untill im actualy good at MDF) but i was woundering when your planning out fiberglass if you still make the enclosure the same size you would with MDF?
The size will change as long as the internal volume + speaker displacement is accounted for & stays the same. The exterior of the enclosure you can have any shape but keep the internal volume the same. goosie wrote:
Also, how do you measure the space inside of the box with all the curves?
Go to this post for internal volume : Sticky Packing peanut volume measurement goosie wrote:
Also is the box ported or sealed when you make it with fiberglass or does it matter? Something tells me its completely different than doing MDF but i'm just trying to learn as much as i can
YOu make the box whatever you want ( sealed or vented ) but you have to calculate the tuning frequency when venting an enclosure. Most if not all the custom boxes that I make are sealed. ------------- Jeff
Velocity Custom Home Theater
Mobile Audio/Video Specialist
Morden, Manitoba CANADA
Posted By: goosie
Date Posted: August 24, 2006 at 6:25 PM
Ok, cool. I decided to go ahead and do fiberglass instead of the "ugly boxes in the trunk" since it looks so much better. Im still learning about the different types of boxes and stuff. Does sealed sound better than vented? I mostly listen to rap music, so im curious if that will make a difference. Im asking because all the boxes i saw at best buy's music room were vented
Posted By: Velocity Motors
Date Posted: August 25, 2006 at 7:35 AM
Use this for a guide to help you choose a sub enclosure------------- Jeff
Velocity Custom Home Theater
Mobile Audio/Video Specialist
Morden, Manitoba CANADA
Posted By: soilman07
Date Posted: September 03, 2006 at 2:25 PM
Ok, Ive just read through this and found what ive seen very helpful. Im new to fiberglass and basically all car fabrications. Im 17 and own a 2003 mitsubishi eclipse GS all stock besides a In-dash dvd player with a flip out screen. The dvd player has A/V output for additional screens so I got to thinking maybe some enclosure for a small screen and some subs wouldnt be a bad idea for the trunk....then I kinda wanted to do the whole interior with small bits of fiberglass or repaint for a glossy look. Questions 1)My doors are made of a combination of the soft leather/pleather(like a dashboard) stuff and plastic pannels...the factory painted the plastic parts some black and some gunmetel. The gunmetal color has started to scratch off and the black is just bad on the eyes. My intentions would be to give the doors a glossy RED / silver look, would I be better off painting or making a mold and FG parts to cover or replace the plastic? 2)Painting, im sure you have all your FG work airbrushed but im on a budget and dont own or know someone with a airbrush.For small parts can you use spray/brush on car paints? I have a 1/2gallon of exact color paint that was given to me for touching up the outside(i was backed into and had some minor body work done). I see cans of car paint at every automotive store and was wondering if this is a applicable product for this sort of thing? ------------- mike.
Posted By: Velocity Motors
Date Posted: September 07, 2006 at 10:15 AM
1. Seeing as this is your first project, I would use the existing doors as a template and fiberglass over the OEM door. Trying to make your own door panel as your first project would be VERY difficult and time consuming.
2. Yes you can use spray balm but the finish just ins't as nice compared to the automotive grade paint from a booth. Just make sure that you use the proper paints and primers and it still should come out pretty good.
-------------
Jeff
Velocity Custom Home Theater
Mobile Audio/Video Specialist
Morden, Manitoba CANADA
Posted By: sps01
Date Posted: September 13, 2006 at 11:43 PM
I am new to this forum and would like to start my first fiberglass box, but I have a easy question that I would like if some one could help me out with. is resin the same as hardner or are they two diffrent things. thank you
-------------
live happy
Posted By: pmendoza408
Date Posted: September 14, 2006 at 1:09 AM
This gives glassing an new way to turn and to look at projects twice
Posted By: Velocity Motors
Date Posted: September 14, 2006 at 8:44 AM
sps01] wrote:
I am new to this forum and would like to start my first fiberglass box, but I have a easy question that I would like if some one could help me out with. is resin the same as hardner or are they two diffrent things. thank you
Resin is the part of the mixtures that is the smelly thick liquid. The hardener ( MEKP )is the chemical additive that will make a chemical reaction with the resin to start the hardening process. ------------- Jeff
Velocity Custom Home Theater
Mobile Audio/Video Specialist
Morden, Manitoba CANADA
Posted By: tackbradley
Date Posted: October 03, 2006 at 6:24 PM
hey quick question...is the bondo brand of FG ok to use to practice with? ive heard its frowned upon haha. but is it gonna be the same feel as other stuff? i think i remember hearing that there was a wax in it. thanks guys!!!
-------------
~Jason
(516) Drum Co.
Posted By: Velocity Motors
Date Posted: October 03, 2006 at 10:55 PM
Personally I don't use that brand, but I think it's a matter of opinion. If you have access to it and it's relatively cheap to purchase, I don't see there being a problem with it. As far as the wax runor, I think that's kinda like water in gasoline...... it happens, but not every place is doing that.
-------------
Jeff
Velocity Custom Home Theater
Mobile Audio/Video Specialist
Morden, Manitoba CANADA
Posted By: x-falkner-x
Date Posted: October 05, 2006 at 6:46 PM
Hi everyone As a newbie, Ive found the info giving in this forum extremly helpful. But i do have a couple of questions in which might sound stupid. Im hoping to build a box for 2x12'' visonik subs (700 max each) as well as an amp. I would like for it to be similiar to the one jeff built, with the exemption of two subs. But somethings are unclear to me. How big should my box be? As well im hoping to build an amp rack (for another one of my cars) out of fiberglass it is to be placed in front of my subwoofers. Ive made a mold out of wood. Can i just proceed to put fleece and add fiberglass, then take separate the wood from the mold? Sorry if this question might sound stupid but help and advice would be appreciated Thank you
Posted By: Velocity Motors
Date Posted: October 05, 2006 at 9:24 PM
Take this link and it should help you with the volume calculations for the enclosure. As far as the second question, you shouldn't need to remove any framing from the projects. Leave all the framing that you have to give the project structural strength as well as it would be an absolute bear to remove the framing after it's been resined. ------------- Jeff
Velocity Custom Home Theater
Mobile Audio/Video Specialist
Morden, Manitoba CANADA
Posted By: soilman07
Date Posted: October 08, 2006 at 7:49 PM
Ok, im currently working on my project, decided to make my box as similar as i can get to the one shown, picked a 12" speaker and a small amp to power it, everything is going fairly well however I have a few questions.... 1)How did you mount your speaker to the enclosure? If you made your holes in the first circular ring did you drill through the fiberglass? be very specific if you can. 2)Just checking but you ran your wires to your speaker and amp above the enclosure and then made a cover to hide the wires? I cant really tell by the pictures if you attempted to run the wires through the enclosure. ------------- mike.
Posted By: Velocity Motors
Date Posted: October 09, 2006 at 5:46 PM
1. I pre-drilled the mounting screw holes for the sub onto the actual enclosure and mounted the sub this way. Depending on how you made your cover peice to cover your amp and subwoofer, you can have the sub cutout covering your mounting screws or have it cutout the same size as your subwoofer. 2. I just ran the wires under the cover to the amplifier but if you didn't allow the thickness of the wires into your design what you can do is drill out two holes on either side of the terminals to pass through your wires. Make sure that the holes drilled is exactly the same if not a hair larger than the wire your passing through it. Before you place the sub back into the enclosure and run the wires, make sure that you use some silicone on the inside of the sub wire where it touches the sub surround to ensure a sealed enclosure. ------------- Jeff
Velocity Custom Home Theater
Mobile Audio/Video Specialist
Morden, Manitoba CANADA
Posted By: bennett29
Date Posted: October 20, 2006 at 6:50 AM
how much would something like this cost if you were to buy it.
Posted By: Velocity Motors
Date Posted: October 20, 2006 at 8:49 AM
It all depends on the area that your living in. Prices in my neck of the woods in comparison to California or New York will be significantly lower.
-------------
Jeff
Velocity Custom Home Theater
Mobile Audio/Video Specialist
Morden, Manitoba CANADA
Posted By: bennett29
Date Posted: October 23, 2006 at 6:49 AM
I wasnt expecting for it to sell for the same price as it would in different states such as california. I am from saginaw Michigan were the economy is horible. How much do you think it would go for in michigan
Posted By: huhjake
Date Posted: October 25, 2006 at 10:37 AM
ok this may sound dumb but I'm new to this. How did you resin over the tin foil? Wouldn't the bottom of the fiberglass mold form to every little crease and crinkle of the aluminum foil? Does the resin stick to the aluminum foil or do you remove it after the mold is made? Thanks, Jake
Posted By: bennett29
Date Posted: October 27, 2006 at 7:00 AM
When you mix the body filler with resin do you have to put hardner in with it or does the resin make the bodyfiller harden.
Posted By: Velocity Motors
Date Posted: October 27, 2006 at 7:19 PM
bennett29 wrote:
I wasnt expecting for it to sell for the same price as it would in different states such as california. I am from saginaw Michigan were the economy is horible. How much do you think it would go for in michigan
I wouldn't even know where to begin with a price for that part of the country. With the work and the cost of fiberglass materials going up you should at least pay $ 800-1100 for just the work and materials. ------------- Jeff
Velocity Custom Home Theater
Mobile Audio/Video Specialist
Morden, Manitoba CANADA
Posted By: Velocity Motors
Date Posted: October 27, 2006 at 7:29 PM
huhjake wrote:
ok this may sound dumb but I'm new to this. How did you resin over the tin foil? Wouldn't the bottom of the fiberglass mold form to every little crease and crinkle of the aluminum foil? Does the resin stick to the aluminum foil or do you remove it after the mold is made? Thanks, Jake
Yes, the fiberglass does form to the foil and depending on if you want to , you can remove the foil or if it's the bottom of the enclosure, you don't have to remove it, just leave it. You can use mold release as well to help inhibit the releasing process. ------------- Jeff
Velocity Custom Home Theater
Mobile Audio/Video Specialist
Morden, Manitoba CANADA
Posted By: Velocity Motors
Date Posted: October 27, 2006 at 7:31 PM
bennett29 wrote:
When you mix the body filler with resin do you have to put hardner in with it or does the resin make the bodyfiller harden.
You have to add both the MEKP and the cream hardener to your fix to properly cure the mixture. ------------- Jeff
Velocity Custom Home Theater
Mobile Audio/Video Specialist
Morden, Manitoba CANADA
Posted By: Velocity Motors
Date Posted: October 27, 2006 at 7:32 PM
bennett29 wrote:
When you mix the body filler with resin do you have to put hardner in with it or does the resin make the bodyfiller harden.
You have to add both the MEKP and the cream hardener to your fix to properly cure the mixture. ------------- Jeff
Velocity Custom Home Theater
Mobile Audio/Video Specialist
Morden, Manitoba CANADA
Posted By: mr79c10
Date Posted: November 19, 2006 at 6:34 AM
New Member here and looks like a great place
A BIG UPz!! on Velcity Motors for the info on enclosers.
Question, would that be strong enough to make door panels for an old Shoe box? 79 C10?
Thanks!
Posted By: aquaacura
Date Posted: November 20, 2006 at 4:41 PM
Wow, love the guide. Few questions, as I'm just getting started into this: 1) Approx. how much did it cost you to make a single enclosure such as this one? 2) Approx. how long did it take you? 3) When you say "layering", you're using fiberglass mat? seems like a ton of fiberglass cloth, just wondering if i misunderstood the fabric you were using. Only thing I can say to help the guide would be more specifics, ie. exact materials, not just "put the layer on". Can't wait to get started though, great guide.
Posted By: aquaacura
Date Posted: November 20, 2006 at 8:38 PM
K, questions 1 and 2 were answered(finally read entire thread). Few new questions though after reading your post at least 15 times: 1) Is the cover needed? Can the wires still be hidden without it? 2) Are all the layers needed? Can less layers be used to save cost but still look and sound decent? 3) If I have door panels covered in leather (Acura Cl), how exactly would I make a mold? I would like to eventually do my entire car in fiberglass...door panels, truck, dash, etc. Thank you so much, you must hate answering idiots like me. Fiberglassing looks tedious but it's obviously worth it. I want to get into it because I would rather spend 1000$ learning a skill and getting something than simply getting something.
Posted By: nutt
Date Posted: November 23, 2006 at 3:56 AM
For the sides of the box you built where you have it kind of curved with piece by piece did you just glue them together or would they have to be sealed with some form of silicone for it to be air tight?
Posted By: shrug53
Date Posted: January 01, 2007 at 12:20 PM
Hi, is there any chance you could go in to some more detail about the cover? The article just kind of skims over that and it is something I would really like to do.
Posted By: Velocity Motors
Date Posted: January 01, 2007 at 5:41 PM
mr79c10 wrote:
New Member here and looks like a great place
A BIG UPz!! on Velcity Motors for the info on enclosers.
Question, would that be strong enough to make door panels for an old Shoe box? 79 C10?
Thanks!
Yes, as long as you can make the enclosure walls thick enough so that it will not flex under pressure. ------------- Jeff
Velocity Custom Home Theater
Mobile Audio/Video Specialist
Morden, Manitoba CANADA
Posted By: Velocity Motors
Date Posted: January 01, 2007 at 5:45 PM
nutt] wrote:
For the sides of the box you built where you have it kind of curved with piece by piece did you just glue them together or would they have to be sealed with some form of silicone for it to be air tight?
I glued the cuved peices down first and then I fiberglassed them together and sealed them to the base. This made the walls stronger and also air tight. ------------- Jeff
Velocity Custom Home Theater
Mobile Audio/Video Specialist
Morden, Manitoba CANADA
Posted By: Velocity Motors
Date Posted: January 01, 2007 at 5:49 PM
shrug53 wrote:
Hi, is there any chance you could go in to some more detail about the cover? The article just kind of skims over that and it is something I would really like to do.
What would you like to know more about ? ------------- Jeff
Velocity Custom Home Theater
Mobile Audio/Video Specialist
Morden, Manitoba CANADA
Posted By: shrug53
Date Posted: January 01, 2007 at 9:58 PM
Well you got the foil down and I am a little unclear after that. Perhaps I did not read it well enough. Did you just layer strips directly on top of the foil?
I would like to mount my amp like yours so that just the body is showing and this looks like the best way. I had originally planned to have a dropped shelf for it and then slide it in from underneath.
Does the cover sit snugly or are you using some velcro or something?
This is going to be my first big project since getting out of Mobile Dynamics earlier this year and I pulled the back seat out of my 65 Chrysler to do it. It will be kind of a resume piece so it has to look super sharp. The guys who painted my car already said they would paint the box for me at no extra charge (I traded them a website for my paint job).
Posted By: shrug53
Date Posted: January 03, 2007 at 11:32 AM
Couple of questions.
You call the second part a mold. Does that mean you glass the inside of it and then dump the mold, or do you glass the outside of it and dump the stuff from inside like the foil?
Also how do you run the speaker wire in to the box so it looks the best. I can not see that angle in the photos.
Any additional tips and/or photos would be helpful. I have converted your article in to a nice pdf document for myself and enlarged the photos for clarity. I plan on adding it to my personal reference library.
You rock VM!
Posted By: nutt
Date Posted: January 10, 2007 at 11:25 PM
I know you have probably been asked this question alot but how do you determine the volume for a fib'ed box and i have know idea with all the fancy lingo to be honest is there just a way where you can build the chamber to about the same dimensions as a regular box.... -width of chamber, then the height of the circular ring, or something.. ------------- Just a rookie out to learn some more
Posted By: kmgraphix
Date Posted: January 16, 2007 at 8:37 PM
Hi, I am new to this site as you can see and I am loving the amount of detail that the membere here post....
But anyways, just a quick couple of questions about the encloseure that you built,
1. What is the reason for the cover that you built, can you paint on the original enclosure or do you heed to make the cover to put over the box in order to paint, from what I am thinking , it seems like the reason for it is for less sanding and preo time... But dont know for sure.
2. Did you put fiberglass on the sides of the enclosre and on the bottom????
3. Is there any need for some wood screws for the braces or is wood glue and super glue addaquate????
4. What is the general cost on just the fiberglass materials... Minus paint, mdf, etc. just like resins and mat and other needs for fiberglassing only, plus roughly how much resin and matt did you end up using for this project, im assuming alot by the looks of it....
5. Is there any internet websites on where I can purchase all of this, I've read that home depot has some stuff, never looked, but from what I read it was elmers brand, is that any good???? I know of autobodydepot.com, which is a great site for paint and abrasive needs,but never came accros fibergalss stuff, maybe i wasnt looking hard enough... But thanks alot!!!!
Thanks alot for your time and this forum has helped my mind out greatly!!!!!
Posted By: nutt
Date Posted: February 12, 2007 at 1:13 AM
After taping off and wrapping in aluminium foil does the cover that you create come off easily? ------------- Just a rookie out to learn some more
Posted By: firebirddrvr
Date Posted: February 13, 2007 at 6:53 PM
i was just curious...about how long did it take you to complete this?? i would love to do a custom enclosure in my 96 firebird with four subs and three amps. i dont need it really loud so im sticking with my sony 12 inch subs ...but i would like to make it look like thousands were put in. i love the steps and how it shows pics! i definately want to get into this thank you
Posted By: runyanzoo
Date Posted: February 14, 2007 at 9:38 PM
I was wondering how the top peice stays on the box, and also how did you place the secone ring on the foil before you fiberglassed again. The description is very good and want to try it on my 2000 gmc jimmy with 2 subs.
Posted By: Velocity Motors
Date Posted: February 15, 2007 at 9:39 PM
nutt]< wrote:
>I know you have probably been asked this question alot but how do you determine the volume for a fib'ed box and i have know idea with all the fancy lingo to be honest is there just a way where you can build the chamber to about the same dimensions as a regular box....-width of chamber, then the height of the circular ring, or something..
Use this link for volume calculations. ------------- Jeff
Velocity Custom Home Theater
Mobile Audio/Video Specialist
Morden, Manitoba CANADA
Posted By: Velocity Motors
Date Posted: February 15, 2007 at 9:46 PM
kmgraphix wrote:
Hi, I am new to this site as you can see and I am loving the amount of detail that the membere here post....
But anyways, just a quick couple of questions about the encloseure that you built,
1. What is the reason for the cover that you built, can you paint on the original enclosure or do you heed to make the cover to put over the box in order to paint, from what I am thinking , it seems like the reason for it is for less sanding and preo time... But dont know for sure.
I did this because I wanted a flush look for the amplifier and the subwoofer. I couldn't flush the amplifier because the mounting holes were wider than the face of the amp. By making a cover peice I was able to cover the screws and flush the amplifier face.
kmgraphix wrote:
2. Did you put fiberglass on the sides of the enclosre and on the bottom????
Just on the side. The bottom was made of MDF and did not require fiberglassing.
kmgraphix wrote:
3. Is there any need for some wood screws for the braces or is wood glue and super glue addaquate????
Super glue was adequate as the frame would add the support required.
kmgraphix wrote:
4. What is the general cost on just the fiberglass materials... Minus paint, mdf, etc. just like resins and mat and other needs for fiberglassing only, plus roughly how much resin and matt did you end up using for this project, im assuming alot by the looks of it....
THe cost was about $ 75-100 depending on where you get the materials or what kind of deals you get from a supplier.
kmgraphix wrote:
5. Is there any internet websites on where I can purchase all of this, I've read that home depot has some stuff, never looked, but from what I read it was elmers brand, is that any good???? I know of autobodydepot.com, which is a great site for paint and abrasive needs,but never came accros fibergalss stuff, maybe i wasnt looking hard enough... But thanks alot!!!!
There are alot of places online that you can get this stuff, but try your local marine shop or even Wal-Mart. ------------- Jeff
Velocity Custom Home Theater
Mobile Audio/Video Specialist
Morden, Manitoba CANADA
Posted By: Velocity Motors
Date Posted: February 15, 2007 at 9:47 PM
nutt]< wrote:
>After taping off and wrapping in aluminium foil does the cover that you create come off easily?
yes it comes off with ease. It's a little snug because it's friction fitted, but should come off without prying. ------------- Jeff
Velocity Custom Home Theater
Mobile Audio/Video Specialist
Morden, Manitoba CANADA
Posted By: Velocity Motors
Date Posted: February 15, 2007 at 9:56 PM
firebirddrvr wrote:
i was just curious...about how long did it take you to complete this?? i would love to do a custom enclosure in my 96 firebird with four subs and three amps. i dont need it really loud so im sticking with my sony 12 inch subs ...but i would like to make it look like thousands were put in. i love the steps and how it shows pics! i definately want to get into this thank you
This job took about 1 week to accomplish. The sanding took about 3 days of the week !! ------------- Jeff
Velocity Custom Home Theater
Mobile Audio/Video Specialist
Morden, Manitoba CANADA
Posted By: Velocity Motors
Date Posted: February 15, 2007 at 10:02 PM
runyanzoo wrote:
I was wondering how the top peice stays on the box, and also how did you place the secone ring on the foil before you fiberglassed again. The description is very good and want to try it on my 2000 gmc jimmy with 2 subs.
The cover peice is friction fitted. The part that I didn't put on there was that I used 1/4" sticky foam tape to reduce vibration and also added to the fittment of the cover. As far as the second ring, the enclosure was flat and I just rested the ring on the enclosure and it did not move. If your going to be designing a vertical enclosure I suggest spray glue to hold the ring into place. ------------- Jeff
Velocity Custom Home Theater
Mobile Audio/Video Specialist
Morden, Manitoba CANADA
Posted By: kmgraphix
Date Posted: February 18, 2007 at 3:59 AM
Thanks alot for your help! It truly helped me out and gave me a great picture of the processl. Thx angain!!
Posted By: Velocity Motors
Date Posted: February 18, 2007 at 9:58 AM
Not a problem... glad to be of help.
-------------
Jeff
Velocity Custom Home Theater
Mobile Audio/Video Specialist
Morden, Manitoba CANADA
Posted By: makeitpound18
Date Posted: February 18, 2007 at 11:30 PM
Very good tutorial step by step i like it this post was very helpful i might do some fiberglassing for an amp rack this summer , at the custom shop i used to work at i used to fiberglass:).
Posted By: tackbradley
Date Posted: March 02, 2007 at 1:47 AM
yeaaaaa im still not clear on the cover. couldnt you just do the initial box what the flush trim ring and...well not really sure about the amp. just seemslike not needed extra work...but thats why im asking you questions haha!!!
~Jason
(516) Drum Co.
-------------
~Jason
(516) Drum Co.
Posted By: silentblackhat
Date Posted: March 09, 2007 at 11:29 PM
the initial box was basically the structure of the whole setup and the cover was done to make it look nice. If you just left the initial box the way it was, the amp wouldnt look flush to the whole setup and you would see the wires and the mounting screws.....this is from what i understand
Posted By: gkits
Date Posted: March 16, 2007 at 1:54 AM
I'm new to fibreglass and this forum. I'm searching for information related to fibreglass and this is a pretty good guide I found. However, I am more interested in making bumpers for my car, instead of an enclosure for speakers. Can the guide you posted above be applicable to make bumpers?! Could anyone gimme a reference where I can get a detailed guide on fibreglass/polyurethane for creating bumpers/skirts, etc? Thank You,
Posted By: Velocity Motors
Date Posted: March 16, 2007 at 9:03 AM
If your wanting to make bumpers from scratch your going to have to make molds, but if your wanting to modify existing bumper then you can apply the same techniques as I've listed and change some things around. The technique for building a frame for the new part of the bumper will stay the same, the only thing that will be different is the merging of the urethane bumper to the fiberglass addition. You will most likely need to rivet the seam and also add metal strapping to reinforce the seam. Does this make sense ?
-------------
Jeff
Velocity Custom Home Theater
Mobile Audio/Video Specialist
Morden, Manitoba CANADA
Posted By: gkits
Date Posted: March 16, 2007 at 11:41 PM
Thanks for the reply. I want to make a bumper from scratch. Do you have any guide that can help me with it? I am absolutely new to this, and I have no idea how to build moulds and how to work with fibreglass/urethane. I've heard that urethane is MUCH better than fibreglass. Could please help me out on this? It'd also be nice if you could list the essential materials for front/rear bumpers and side skirts for a car?! Thank You
Posted By: Velocity Motors
Date Posted: March 17, 2007 at 8:32 AM
Urethane has to be injection molded so your best option here is fiberglass. To make a fibeglass bumper the most important thing is to have the parts of the bumper that connect to the vehicle exactly as OEM. All other parts can be changed without having problems as far as fitment goes. Make a mold of the original bumper's top and sides ( where it connects at the wheel wells ) and this will be the foundation of the new bumper. From this point on you can use wood as your framing and contruct a skeleton of what you want the bumper to look like. Take the technique of fleecing from this post and apply it to the bumper.
-------------
Jeff
Velocity Custom Home Theater
Mobile Audio/Video Specialist
Morden, Manitoba CANADA
Posted By: gkits
Date Posted: March 18, 2007 at 7:12 AM
I have no woodworking skills. What about foam?! It'd be best if you could provide me some links. I've been fishing around the net but can't find enough fibreglass information, to help me get in-depth knowledge to build something. ------------- Gordon
Posted By: bankzzz
Date Posted: March 19, 2007 at 12:49 PM
The tutorial is awesome!! But i was wondering if i can apply the same techniques to the interior parts? And can i get a list of materials required for making the fibreglass enclosures and Where did you get them? Thanks
Posted By: Velocity Motors
Date Posted: March 19, 2007 at 2:40 PM
Fiberglass shopping list------------- Jeff
Velocity Custom Home Theater
Mobile Audio/Video Specialist
Morden, Manitoba CANADA
Posted By: 99 2envy
Date Posted: March 19, 2007 at 7:55 PM
Velocity Motors nice box/amp rack. I have a few questions for you.
1.) What is the benfeit of brushing on the bondon vs. applying it with out the resin?
2.) I notice you brushed the whol box instead of doing sections, do you find it easier this way? Are you able to sand the whol box before it hardens?
Nice job once again
Posted By: swhuffman96
Date Posted: March 22, 2007 at 2:06 PM
Hi Jeff!! Thanks SO much for the step by step. Its better than any I've seen. I have never done this and am in the prelim stages of research on how to do this. I have a couple of Qs 1. You had the skeleton wrapped in fabric very tightly and stapled on the bottom right, then you took it out of the car and soaked the fabric in resin only?? Then, you used fiberglass matting and resin to build up the outside, correct?? You also did this on top of the foil for the cover, right? What is the procedure for this?? Do you put down some fiber matting just any old way and then brush on the resin soaking the mat, then rolling out the excess liquid and bubbles then doing this over and over until you have 4 layers. Then do you let it dry and/or sand or do you start with the 2nd 4 layers immediately. Keep on keeping on with your very professional work!! Thanks steve
Posted By: Velocity Motors
Date Posted: March 22, 2007 at 9:59 PM
99 2envy wrote:
Velocity Motors nice box/amp rack. I have a few questions for you.
1.) What is the benfeit of brushing on the bondon vs. applying it with out the resin?
2.) I notice you brushed the whol box instead of doing sections, do you find it easier this way? Are you able to sand the whol box before it hardens?
Nice job once again
1. Brushing it on allows the wet bondo to smooth out more after application as well as it give you a smoother dried surface than bondo alone. As well if you have dips in your project, a semi-liquid will fill the dips evenly.
2. I did the whole box because it was a small enough enclosure and I did have enough time before the bondo/resin hardened. I used a low grit sand paper to take down the mixture which really speed up the time for sanding. You don't have to sand it smooth in the first stage, just sand down the high spots and work down these spots later with a finer grit.
The main goal after the first layer of bondo/resin is to even out the high spots and low spots. By using a low grit sand paper and going over the entire project will allow you to even out where is needed later and reduce the sanding time in half or more. ------------- Jeff
Velocity Custom Home Theater
Mobile Audio/Video Specialist
Morden, Manitoba CANADA
Posted By: Velocity Motors
Date Posted: March 22, 2007 at 10:04 PM
swhuffman96 wrote:
Hi Jeff!! Thanks SO much for the step by step. Its better than any I've seen.
I have never done this and am in the prelim stages of research on how to do this. I have a couple of Qs
1. You had the skeleton wrapped in fabric very tightly and stapled on the bottom right, then you took it out of the car and soaked the fabric in resin only?? Then, you used fiberglass matting and resin to build up the outside, correct?? You also did this on top of the foil for the cover, right?
What is the procedure for this?? Do you put down some fiber matting just any old way and then brush on the resin soaking the mat, then rolling out the excess liquid and bubbles then doing this over and over until you have 4 layers. Then do you let it dry and/or sand or do you start with the 2nd 4 layers immediately.
Keep on keeping on with your very professional work!!
Thanks
steve
You hit the nail on the head there Steve. The main part of this is to make sure that you roll out the air bubbles with a roller and if time and temperature & humidty permits, you can do up to 4-5 layers at a time ( depending on the oz. weight of the matting your using of course ). ------------- Jeff
Velocity Custom Home Theater
Mobile Audio/Video Specialist
Morden, Manitoba CANADA
Posted By: tackbradley
Date Posted: March 25, 2007 at 3:00 PM
im a little curious on foam as well. i have a towncar and i want to eliminate all the trim down the sides that carry through to the bumbers. but if i pull all the trim, adding to the bumpers will just make them bigger. any advice on what to do? like perhaps cut the bumpers or just yank them completely and go from scratch? you said by starting from scratch to make a mold of where the bumbpers meet the wheel well...ok what do i do in my case haha?
by the way Jeff, thanks for all your help to everyone. i was able to build my first sub box with minimal problems( at least i learned from my mistakes!!!) thanks to you and this site!!! i cant wait to do more!!!
-------------
~Jason
(516) Drum Co.
Posted By: abovestock
Date Posted: April 07, 2007 at 10:36 AM
Very nice and clean. I like your technique of thinning the resin down and painting it on. That will save hours of sanding time. Can't wait to see what you do next.
-------------
Why do you ask if I ate paint chips when I was younger?
Posted By: nhoj_yelbom
Date Posted: April 11, 2007 at 2:09 PM
great tutorial
Posted By: Velocity Motors
Date Posted: April 12, 2007 at 8:48 AM
Can you take some pics of what your trying to do ad post them here or email to me directly ?
tackbradley wrote:
im a little curious on foam as well. i have a towncar and i want to eliminate all the trim down the sides that carry through to the bumbers. but if i pull all the trim, adding to the bumpers will just make them bigger. any advice on what to do? like perhaps cut the bumpers or just yank them completely and go from scratch? you said by starting from scratch to make a mold of where the bumbpers meet the wheel well...ok what do i do in my case haha?
by the way Jeff, thanks for all your help to everyone. i was able to build my first sub box with minimal problems( at least i learned from my mistakes!!!) thanks to you and this site!!! i cant wait to do more!!!
------------- Jeff
Velocity Custom Home Theater
Mobile Audio/Video Specialist
Morden, Manitoba CANADA
Posted By: trae08
Date Posted: April 12, 2007 at 9:35 PM
thx
-------------
Posted By: kustomizedtib
Date Posted: April 17, 2007 at 10:50 PM
I would like to make a full trunk(hatch)/backseat enclosure for my 2000 Tiburon... I've fiberglassed before, including basic sub boxes, a TV in my steeringwheel and pass. air bag ETC ETC... 1) How do I get the enclosure to go around the sides of the car perfectly, Do I take a mold of the side of the carpet, all the way around the hatch? If so, then I would not be able to remove it because of the way the interior comes outward 2) IF you can't remove your enclosure and must build it inside the car, How do you get a sealed box for subs if the whole trunk is going to be fiberglassed with TV's speakers and amps, how do you get the box underneath for the sub to seal to the rest of the FG without looking bad?
Posted By: greggk
Date Posted: April 28, 2007 at 8:17 AM
yes i know i am a rookie,but, i have a few questions. i have installed a few car stereos before but they were the easy prefab types where it is really a no brainer... and i just bought a new chrysler 300c and i need some info.. a) how do i know how much space to give a sub in a custom built fiberglass enclosure? b) is there going to be a difference if i angle sub up ,down, front, back etc? c) how do you run the wiring into the box? becasue in your writeup it doesnt show that. d) what is the approximate cost ratio between building a fg box to a prefab box? as i said before please excuse the newbie questions. thanx Greggk
Posted By: Velocity Motors
Date Posted: April 28, 2007 at 8:47 PM
kustomizedtib wrote:
I would like to make a full trunk(hatch)/backseat enclosure for my 2000 Tiburon... I've fiberglassed before, including basic sub boxes, a TV in my steeringwheel and pass. air bag ETC ETC...
1) How do I get the enclosure to go around the sides of the car perfectly, Do I take a mold of the side of the carpet, all the way around the hatch?
If so, then I would not be able to remove it because of the way the interior comes outward
What I've done in the past is build a frame up about 1/2-1 " away from the edge of the hatch area. Fiberglass the entire enclosure and when it has enough layers and realatively smoooth ( 180 grit ) then you can lay in tin foil over the hatch lip and connect it about 3" into the enclosure. Fiberglass this " bridge " layer all the way around the enclosure and do this several times ( about 3 layers ). This will give you the peice to fill in the gap and remove the foil and glass this permanently to the enclosure. Smooth out and use body filler to shape and hide the seam of glass.
kustomizedtib wrote:
2) IF you can't remove your enclosure and must build it inside the car, How do you get a sealed box for subs if the whole trunk is going to be fiberglassed with TV's speakers and amps, how do you get the box underneath for the sub to seal to the rest of the FG without looking bad?
Read response to above question. The above method will still allow you to remove the enclosure as long as the design of the enclosure accounts for a narrower side design and doesn't tuck into the corners of the trunk. ------------- Jeff
Velocity Custom Home Theater
Mobile Audio/Video Specialist
Morden, Manitoba CANADA
Posted By: Velocity Motors
Date Posted: April 28, 2007 at 8:57 PM
greggk wrote:
yes i know i am a rookie,but, i have a few questions. i have installed a few car stereos before but they were the easy prefab types where it is really a no brainer... and i just bought a new chrysler 300c and i need some info..
a) how do i know how much space to give a sub in a custom built fiberglass enclosure?
Each sub manufacturer has their own optimum volume for their enclosures. Use this link to help you with volume in a custom enclosure
greggk wrote:
b) is there going to be a difference if i angle sub up ,down, front, back etc?
Yes and no. It will depend on the vehicle, the enclsoure and also how many subs.
greggk wrote:
c) how do you run the wiring into the box? becasue in your writeup it doesnt show that.
I ended up drilling two holes through the subwoofer basket and slipped in (2) 8 gauge wires for the (+) & (-) wires and ran these inside the enclosuer and through to the amp.
greggk wrote:
d) what is the approximate cost ratio between building a fg box to a prefab box?
as i said before please excuse the newbie questions. thanx Greggk
A custom box is going to be more for obvious labor reasons. Cost will depend on where you go to and what part of the world your in. Prefabbed boxes are not going to sound as good as custom built ones but cost for one will be significantly less as well. ------------- Jeff
Velocity Custom Home Theater
Mobile Audio/Video Specialist
Morden, Manitoba CANADA
Posted By: ridiculouscivic
Date Posted: April 29, 2007 at 7:27 PM
How did you secure the box to the car?
-------------
Posted By: my_shed
Date Posted: May 08, 2007 at 3:01 AM
Hey there, first post for me.
I live in the UK and don't have access to the type of body filler that was used in this build. Can anyone tell me whether there is any difference between that body filler and any others, or is it ok to use pretty much any filler as long as it isn't fibre reinforced?
Thanks, great thread so far, really informative. ------------- In the beginning there was God. Then he got bored and made Dave. Thus I am here.
Posted By: gr85z
Date Posted: May 10, 2007 at 10:15 AM
Great write up. I am going to starting a project car and this just the ideas spinning in the head for what I want to do. Reading through the whole article and seeing what people were asking and all I found this company that has some how and whats on resin and fabrics and some good calculators for estimating resin needed for materail etc... Hope people find it helpful. www.fibreglast.com ------------- It is better to know a little about a lot the a lot about little.
Posted By: jujupr
Date Posted: May 10, 2007 at 7:52 PM
when u mix the resin with the bodyfiller do u mix the resin with the harder / then mix the body filler by it self / then mix both to gethere??
Posted By: br1anbae
Date Posted: May 11, 2007 at 3:17 AM
couple questions 1. every picture i saw of a custom build never showed what happens to the dowels that hold up the subwoofer rings? can you keep it in there or take it out? 2. since the sides of the box is only help up by mdf and glue gun.. doesnt it easy tip over when the fleece is pushing on it from all sideS? can u take it out after the resin is set in or is the resin/fleece bonding to the mdf?
Posted By: br1anbae
Date Posted: May 11, 2007 at 3:42 AM
sorry for a double post. when drilling into the mdf should i predill it? or would it be better to drill it straight on.
Posted By: hookedontronics
Date Posted: May 31, 2007 at 9:48 PM
nice
-------------
If you can't be good, be good at it!
Posted By: drjeco
Date Posted: June 30, 2007 at 5:54 PM
Hey, i was wondering how exactly you mannaged to use the 3M hi-strenghth 90 adhisive to attach the material to the wood, is the material strechy so u could glue it from the middle out? or was it a slow process from one side to the other with staples included? im just afraid of not having enough and being stuck. PS what material did you use? ive heard it been called fish fabric, is this correct?
-------------
thanks, JC
Newbs to fiberglass like myself, REJOICE! see https://chris.pfharlock.com/glass/
and KNOW your plight is understood and doctored!
Posted By: boarder2k7
Date Posted: July 11, 2007 at 1:26 AM
samtucan11 wrote:
I am still trying to figure out, the best way to attach a fiberglass trim/insert panel? If you do not want it perminently attached how do you attach it? Lets say i want to make a fiberglass panel over some batteries that i need to get to, to charge, i would make an insert panel right. But how can i attach it? I cannot use screws, because screw heads would ruin the whole look, i cannot use an epoxy because that would be perment, anyone have any suggestions on how to attach a removable fiberglass insert panel? i really appreciate it
<TABLE cellSpacing=0 cellPadding=0 width="100%" align=center>
<TR>
<TD class=bold></TD></TR></TABLE>
I saw this and thought one thing.... Magnets.
You could easially use a couple rare-earth type magnets one layer deep in the resin to make a nice invisible way to hold down a cover over something like a battery. I would be careful when using magnets near electronics though, check to make sure that it will be safe for them.
When using magnets, make sure to buy an extra one. This can be used to lift up the cover. If you install all the magnets say, north pole up, then you can use a magnet attached to a handle south pole down, to pull open the cover from its magnets. For this to work well, you would have to use a smaller magnet in the box (non opening point) than on the lid and in the handle. This way you make sure that your handle can always pull the lid off easially. I would also recommend coating the handle with felt or some other non-abrasive cloth so you dont scratch your nice new fiberglass!
B
Posted By: hessdawg
Date Posted: July 28, 2007 at 1:17 AM
nice ------------- hessdawg out
Posted By: Tripnbeats
Date Posted: August 02, 2007 at 12:56 PM
dudes where do I get the resin from? please help id like a 5gallon bucket.
Posted By: shurgold
Date Posted: August 03, 2007 at 6:57 PM
If i dont want to make a cover for it when i get to the dry and sanded bodyfiller/resin mixture phase do i add more fiberglass or do i start painting it from there?? does the cover add and structural strength if its just for aestaethics(cant spell lol) couldnt i skip that part... basically i want to make an enclosure similar to the one in your DIY tutorial but my subwoofer (audiobahn aw1208Q) weighs like 40 pounds lol and i want to make sure im not driving and one day hear a tump in my car and find my subwoofer rolling around in the trunk. im mounting my kicker kx600.1 right next to it but it has a cover on top of it so all the holes and wiring will be hidden by the amp cover. so i dont think i need the cover but i want it to be nice like the one in ur tutorial!! LMK Jon BTW the tutorial is pretty sick for people like me...good with hands but never tried FG ------------- Man who walk through turnstile sideways going to Bangkok
Posted By: Velocity Motors
Date Posted: February 13, 2008 at 12:57 PM
Tripnbeats wrote:
dudes where do I get the resin from? please help id like a 5gallon bucket.
Any Home Depot or marine shop would have this for you. ------------- Jeff
Velocity Custom Home Theater
Mobile Audio/Video Specialist
Morden, Manitoba CANADA
Posted By: spoolingv8
Date Posted: March 02, 2008 at 2:07 PM
Looks great. How much do you charge the customer when doing that kind of setup?
Posted By: Velocity Motors
Date Posted: March 02, 2008 at 9:40 PM
spoolingv8 wrote:
Looks great. How much do you charge the customer when doing that kind of setup?
The job cost the customer about $ 1200 with paint, supplies & labor. The customer brought me the equipment and the car and I just did installed and fabricated the enclosure. This job took about 1 week to accomplish. The sanding took about 3 days of the week !! ------------- Jeff
Velocity Custom Home Theater
Mobile Audio/Video Specialist
Morden, Manitoba CANADA
Posted By: sstecker
Date Posted: March 05, 2008 at 8:33 AM
Velocity Motors wrote:
spoolingv8 wrote:
Looks great. How much do you charge the customer when doing that kind of setup?
The job cost the customer about $ 1200 with paint, supplies & labor. The customer brought me the equipment and the car and I just did installed and fabricated the enclosure. This job took about 1 week to accomplish. The sanding took about 3 days of the week !!
im constructing a fiberglass w/foam core front splitter/diffuser for a time trials track car. can the 5:1 filler/resin withstand the flexing for the application?
thanks
shawn
Posted By: Velocity Motors
Date Posted: March 05, 2008 at 8:55 AM
That filler is more for finishing than it is structural. If your wanting to add structure but want to make it look smooth, use short strand fiberglass filler instead of regular body filler. The SSF filler is heavy but adds alot of structural strength to any part.
-------------
Jeff
Velocity Custom Home Theater
Mobile Audio/Video Specialist
Morden, Manitoba CANADA
Posted By: sstecker
Date Posted: March 05, 2008 at 9:11 AM
Velocity Motors wrote:
That filler is more for finishing than it is structural. If your wanting to add structure but want to make it look smooth, use short strand fiberglass filler instead of regular body filler. The SSF filler is heavy but adds alot of structural strength to any part.
thanks - much appreciated. im looking for the fiberglass foam core to provide all the strength and the the 5;1 to smooth the finish. but worried the 5:1 may crack/flake from the flexing?
Posted By: whitmx270
Date Posted: March 15, 2008 at 12:54 PM
Thank you so much I have put this off for so long and now since reading this i can go in the right direction.
Posted By: Velocity Motors
Date Posted: March 15, 2008 at 6:49 PM
No problemo.
-------------
Jeff
Velocity Custom Home Theater
Mobile Audio/Video Specialist
Morden, Manitoba CANADA
Posted By: cade1114
Date Posted: March 18, 2008 at 12:50 AM
I am new to fiberglass and was curious what kind of paint you used for fiberglass, or does it matter
Posted By: Velocity Motors
Date Posted: April 03, 2008 at 8:12 PM
cade1114 wrote:
I am new to fiberglass and was curious what kind of paint you used for fiberglass, or does it matter
We just use standard automotive paint ( PPG, DuPont, RM, etc ) ------------- Jeff
Velocity Custom Home Theater
Mobile Audio/Video Specialist
Morden, Manitoba CANADA
Posted By: shockwavezx9
Date Posted: April 05, 2008 at 10:22 PM
hey man just a few quick questons, i am learning how to do this fiber glass deal. how much do you think it actually cost if you were building your own box? i also noticed that inside the box was wet as well? where did you make the port to send out the wires? is it pretty easy to make a dual bass fiberglass set up if so do i need to put a wall in between? thanks alot man
Posted By: Velocity Motors
Date Posted: April 06, 2008 at 1:25 PM
shockwavezx9 wrote:
hey man just a few quick questons, i am learning how to do this fiber glass deal. how much do you think it actually cost if you were building your own box?
That all depends on how much the materials cost in your neck of the woods. Resin and matting varies from place to place and could be 20-40 % more or less than what I can get it for considering I purchase it in bulk qty's.
shockwavezx9 wrote:
i also noticed that inside the box was wet as well? where did you make the port to send out the wires?
The wires were tucked under the cover and ran into the amplifier. You don't see the wires from the pictures.
shockwavezx9 wrote:
is it pretty easy to make a dual bass fiberglass set up if so do i need to put a wall in between? thanks alot man
Having the enclosure separated is up to the installer. Sometimes it's easier to separate them and you only have to worry about the volume of one box at a time. Personally I would build a dual enclosure set up if your going to use two subwoofers because this adds strength to the enclosure by having the divider as a brace. ------------- Jeff
Velocity Custom Home Theater
Mobile Audio/Video Specialist
Morden, Manitoba CANADA
Posted By: new saxo guy
Date Posted: April 25, 2008 at 1:21 PM
hey im new to all dis,
does this have 2 be made up in the car or can it be made in a garrage?
reli good walkthrough btw, thanks.
Posted By: Velocity Motors
Date Posted: April 25, 2008 at 5:06 PM
The modl has to be made in the vehicle but once the mold is strong enough to be removed from the vehicle after the fleece is fiberglassed, you can remove the enclosure from the vehicle and work on it outside of the vehicle.
-------------
Jeff
Velocity Custom Home Theater
Mobile Audio/Video Specialist
Morden, Manitoba CANADA
Posted By: new saxo guy
Date Posted: April 26, 2008 at 2:12 PM
thanks very much!
gna start working on it now! haha
Posted By: rudy1980
Date Posted: April 28, 2008 at 12:05 AM
any thoughts on using ABS plastic to get the correct shape instead of mdf strips?
Posted By: new saxo guy
Date Posted: April 28, 2008 at 7:09 AM
also, jw how did u make the ring for the sub?
thanks
Posted By: Velocity Motors
Date Posted: April 28, 2008 at 2:06 PM
rudy1980 wrote:
any thoughts on using ABS plastic to get the correct shape instead of mdf strips?
The only thing is the cost. MDF costs pennies in comparison to ABS of the same thickness. ------------- Jeff
Velocity Custom Home Theater
Mobile Audio/Video Specialist
Morden, Manitoba CANADA
Posted By: Velocity Motors
Date Posted: April 28, 2008 at 2:09 PM
new saxo guy wrote:
also, jw how did u make the ring for the sub?
thanks
I used a circle jig. You can make your own or buy one from a specialty shop. ------------- Jeff
Velocity Custom Home Theater
Mobile Audio/Video Specialist
Morden, Manitoba CANADA
Posted By: radical1
Date Posted: April 28, 2008 at 10:12 PM
Alright, just like everyone else I got some Q's too.
1. What kind of fiberglass mat did you use (weight), and where in MB would I be able to pick up that specific kind?
2. How many meters/yards of mat did you use for that specific build? (approx.)
3. When applying the fiberglass mat did you soak it in resin first, or was there enough on the fleece to adequately dampen the fiberglass?
4. In a little more detail, how did you go about cutting out the fleece for the sub? Did you wait till the resin had hardened a bit, or did you cut it immediately after the resin was applied?
5. When doing your final sanding you talked about polyester filler. Is this exactly what you would ask for at the hardware store or does it go by another name? Do you coat the entire enclosure with this filler and how much is needed?
Thanks Jeff, and keep up the slick jobs! Also, thank-you very much for being so generous as to take the time to answer all these questions online!!!
Posted By: xTimx
Date Posted: May 07, 2008 at 12:58 PM
i have a couple of questions
A: the way i'm gonna do the enclosures, is the back is gonna be fiberglass and the front will be MDF. how do i mount the taught fleece to the back of the fiberglass???? can i still staple it?
B: i'm scared to mount the enclosers and the amp rack in the hatch area..aka drilling a screw and possibly hitting the gas take or something else vital. any tips or tricks i can do?? how do you guys mount these things????
i'm almost tempted to use REALLY heavy duty velcro or something lol
-------------
xTimx
Posted By: pogothemonk3y
Date Posted: June 10, 2008 at 8:25 PM
Quick question: Is there any heating issues involved with the amp with this enclosure?
Posted By: Velocity Motors
Date Posted: June 10, 2008 at 9:23 PM
xTimx] wrote:
i have a couple of questions
A: the way i'm gonna do the enclosures, is the back is gonna be fiberglass and the front will be MDF. how do i mount the taught fleece to the back of the fiberglass???? can i still staple it?
Use hot glue. Staples will not always work on the fiberglass.
xTimx] wrote:
: i'm scared to mount the enclosers and the amp rack in the hatch area..aka drilling a screw and possibly hitting the gas take or something else vital. any tips or tricks i can do?? how do you guys mount these things????
Look under the vehicle and see where the gas tank is located. Most of the time it's either behind the axles or infron t of the axles. Take precautions necessary if the gas tank is under the enclosure and use shallow screws or use bolts attached to an "L" bracket that can extend to either side of the enclosure where it can bypass the gas tank.
------------- Jeff
Velocity Custom Home Theater
Mobile Audio/Video Specialist
Morden, Manitoba CANADA
Posted By: Velocity Motors
Date Posted: June 10, 2008 at 9:54 PM
pogothemonk3y wrote:
Quick question: Is there any heating issues involved with the amp with this enclosure?
None, the heatsink is on the top. If you have an amplifier that has fans builtin, you have to account for an intake and exhaust so you don't overheat the amplifier. ------------- Jeff
Velocity Custom Home Theater
Mobile Audio/Video Specialist
Morden, Manitoba CANADA
Posted By: radical1
Date Posted: June 22, 2008 at 10:46 PM
Alright, just like everyone else I got some Q's too.
1. What kind of fiberglass mat did you use (weight), and where in MB would I be able to pick up that specific kind?
2. How many meters/yards of mat did you use for that specific build? (approx.)
3. When applying the fiberglass mat did you soak it in resin first, or was there enough on the fleece to adequately dampen the fiberglass?
4. In a little more detail, how did you go about cutting out the fleece for the sub? Did you wait till the resin had hardened a bit, or did you cut it immediately after the resin was applied?
Posted By: bobl
Date Posted: June 25, 2008 at 8:49 PM
thats so much work...rather just go with a fiberglass sub company that offers lifetime warranty called Bassforms.
|