Noob Fiberglass Dash And Center Console
Printed From: the12volt.comForum Name: Fiberglass, Fabrication, and Interiors
Forum Discription: Fiberglass Kick Panels, Subwoofer Enclosures, Plexiglas, Fabrics, Materials, Finishes, etc.
URL: https://www.the12volt.com/installbay/forum_posts.asp?tid=82564
Printed Date: May 14, 2026 at 10:57 AM
Topic: Noob Fiberglass Dash And Center Console
Posted By: brbman2002
Subject: Noob Fiberglass Dash And Center Console
Date Posted: September 06, 2006 at 9:47 PM
Replies:
Posted By: bellsracer
Date Posted: September 07, 2006 at 12:01 AM
We recommend that you start with a small project first to give you a good handling of how the glass will work. Something that doesn't involve use of the interior of the car. For your frame rings, give them an 1/8" rabbet cut and staple the fleece to the rabbet cut. Trim the excess fleece off with a razor blade as close to the staples as possible. then use duraglass to fill in the area.
A good start would be to make a 12 x 12 x 5 inch FG panel so you can figure out what works for you and what doesn't
The red is the rabbet cut (1/8" in and 1/4" deep)
The black is the uncovered area of the trim ring.
The bottom has a little green area. That area will be your duraglass that will smooth the top of the trim ring with the fiberglass.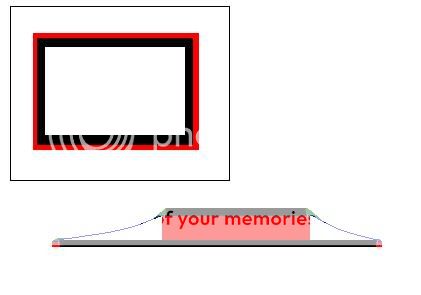
https://i3.photobucket.com/albums/y69/DonsArtNGames/panel2.jpg
use this link for a lerger version.
This project will get you most of the basics for making a good quality console and even speaker rings too. So now when you get to work on your dash, you'll know what to expect from your work
Good luck with your project.
-------------
Never send your ducks to eagle school.
The difference between ordinary and extraordinary is that little extra.
The 3Ls of life: Learn from the Past, Live for the Present, Look to the Future.
Posted By: brbman2002
Date Posted: September 07, 2006 at 1:45 PM

Posted By: bellsracer
Date Posted: September 08, 2006 at 4:29 PM
brbman2002 wrote:
Thanks for the post i will do that first so i see what to expect. Also Can u list all the materials to make the project and good places to find them. Thanks again!
Materials:
Wood (Wood Store, Some automotive shops, Home Depot & Lowes )
. (may not be able to find 1/4" at HD or Lowes)
. (Do NOT get particle board [too porous], must be MDF)
3/4" MDF 12" x 12" (base Board)
3/4" MDF 8" x 6" (Trim Ring)
1/4" MDF 8 1/4" x 6 1/4" (Back of the monitor mount)
3/4" MDF 1" x 3" / 4-6 pieces (Braces for the monitor mount)
Fleece (Fabric store) 1 yard (Recommend getting light solid color fleece, doesn't matter what color)
Carpenter's Wood Glue
7/8" or 1" brad nails (nailing braces to base)
3/8" staples (staples backboard to trim ring)
3/16" (recommended) or 1/4" staples (any hardware store) (Staple Fleece to trim ring and to base)
1 quart F/G Resin with hardener (since this is your first time, Wal-Mart's Bondo brand is a good start)
1 quart Duraglass with hardener (NOT Kittyhair) (fills in the cut area along edges of fleece) (Automotive shops)
1 quart Bondo with hardener (for smoothing the project out)
Primer
Paint
Sandpaper:
60 or 80 Grit
100 - 120 Grit
200 - 220 Grit
300 - 320 grit
400 Grit
600 Grit
Instructions to follow
-------------
Never send your ducks to eagle school.
The difference between ordinary and extraordinary is that little extra.
The 3Ls of life: Learn from the Past, Live for the Present, Look to the Future.
Posted By: bellsracer
Date Posted: September 08, 2006 at 7:13 PM
Tools:
Router (preferably Table Router)
. Bits:
. 1/4" Flush Trim
. 3/8" or 1/2" Roundover
. 3/4" Rabbet Cut (Best to use a Rabbet Bit Set with interchangable bearings, but not required)
. 1/8" Rabbet Cut (Best to use a Rabbet Bit Set with interchangable bearings, but not required)
Drill with 1/4" Bit and 1/8" bit (recommend drill press)
Staple Gun
Brad Nail Gun
Pencil
1 1/2" brush
Putty Card between 2 - 3" wide
Razor or Olfa Knife(preferred)
Take the trim ring board and put a rabbet cut that is 3/4" in and 1/4" deep into what will be the top of your trim ring.
Using the drill, indent into the 1/4" lip of the ring board by pushing the side of the bit into the lip and then drill down.
Then use the router with the 1/4" flush trim in place (with the bearing set to ride the 1/4" of the board and rout from the hole to around the ring. Take the 120 grit and sand out the little pimple on the inside of the ring left from the drilling point. With the router equipped with the roundover bit, roundover the top inside edge of the ring. This will create a solid 1/2" x 1/2" ring that is 8" x 6". This sounds excessive, but it is this same technique that will allow you to make oddly shaped rings (such as a teardrop ring, or a figure 8 ring, or an oval etc) For square rings in the future, you can just staple and glue 1/2" by 1/2" strips, but now your skills can do anything.
Next, lay a THIN coat of wood glue to the back side of the ring. Apply the 1/4" backboard to it and staple with the 3/8" staples. The staples are more of a tacking. As the glue dries, it will shrink pulling the wood tighter and harden to be harder than the wood itself. Use the router with the flush trim bit in place and rout the backboard to be flush with the ring. Last is to set the router with the 1/8" rabbet cut bit and rout an 1/8" in by 1/4" deep cut into the top outside edge of the trim ring. Now the monitor mount is complete.
Next is to take the 3/4" 1 x3 strips and apply a thin coat of glue to one side of them. Place them to the backside of the monitor mount Once in place, staple with 3/8" staples from the inside of the ring.
___________________________________
| | |_____| | |
|_ | |_|
| |
| |
| |
|_ _ |
| | _____ | |
| | | | | |
--------------------------------------------------------------
Your monitor mount is now on 3" braces.
Next take your base board and put a 1/8" in 1/4" deep rabbet cut all around the top edge of the board.
Take your Monitor assembly and place it on the base board (no glue, no nails/staples)
Trace around all the legs onto the base board.
Remove the assembly and drill into the base board with the 1/8" bit at each end of the leg marks:
__________________________________________
| |
| |
| |
| | * | |* *| | * | |
| | * | | * | |
| |
| |
| |
| |
| | * | | * | |
| | * | |* *| | * | |
| |
| |
| |
|_________________________________________|
On the backside of the base board, draw lines between the two holes for each leg. These will be your guide marks for your 7/8" or 1" brad nails.
Place a thin coat of glue on the bottom of the legs of your monitor assembly.
Place the assembly on the base board and match up your pencil marks.
Flip everything over making sure that the assembly remains in place on the base board.
Nail along your lines that you made on the back side. 2 on each line is fine.
Clamp and let the glue fully set (2-4 hours based on humidity and temperature)
Now you are ready for the fleece. Spread the whole piece over the top of the assembly and staple the fleece to the base board only for now using the 3/16" or 1/4" staples. Staple the fleece to the 1/4" side of the rabbet cut. Keep the fabric taut but not too tight. The fiberglass resin will shrink slightly as it cures to tighten it. Then staple the fleece to the 1/8" side of the rabbet cut in the top of the ring. Make sure the staples hold on to the whole edge of the fleece. (end to end) Then trim the fleece off from the inside of the top ring and from the outside of the base. Try to trim the fleece as close as possible to the staples to save on grinding/sanding later.
For this next step, wear clothes you don't mind ruining and latex/nitrile gloves. Put a protective barrier of some sort over your work table (black garbage bags or painter's plastic)
Have your project sitting up on some scrap 2by4 blocks so that it isn't touching the table. Your project is ready for resin. Mix the resin in a disposable quart size cup according to the directions on the back of the can. Use the brush to apply the resin to the fleece on the project. If you mixed it properly, you'll have about 10-12 minutes of time to apply the resin. Don't hold back while spreading the resin. The more you put, the stronger the project will be in the end. (This may also SLIGHTLY distort the base board, don't worry about it, use it to help gauge how much the resin will shrink and distort on future projects. There are ways to prevent it, but for now, do not worry about it.) Look for light spots and air bubbles. Those areas need more resin. Stop spreading the resin when it begins to become blobs, or gel. You'll know when that happens. Trust us. If you get blobs on your project (most likely you will), don't worry about it. You can just grind it off later. Let it cure for at least 1 hour. During this time, you can soak your brush in acetone to clean off the resin and preserve the brush for another use later.
Sand the project with the 60-80 grit to remove lumps, large spikes, blobs, and the wax that comes to the surface while curing. Blow the dust off the project. Prep a little batch of duraglass for use. (about the size of your palm and 1/2" to 3/4" thick blob) Mix with hardener according to directions. When you get it to a consistant color throughout the blob, it is ready. Use the putty card to get it on the areas where you stapled to. Don't worry about making it look nice for now. You'll only get a few minutes to be able to spread it. Once you get all of it covered (or when the glass gels) stop working it and get the card's working edge covered with what remaining duraglass you have left on your mixing board. We just jab it into the remaining blob on the mixing board. then put it aside for now. grab a SHARP razor blade (or olfa if you have it) and trim away your large chunks of excess material that made it on. Don't worry too much about making it look clean. Just get it so you don't have to deal with a lot of sanding later. If you didn't get all of the staple areas covered at this time, sand with 80 grit along the areas where your next batch will overlap with the current duraglass. By this time you'll be able to clean off your putty card too by breaking off the chunks of duraglass that hardened over the card. Blow off the dust and repeat until it is done.
Now you are ready for bondo, the smoothing material for the surface of the project. Mix a batch big enough to put a skim coat (thin coat) of bondo over the surface of the project. Bondo works like duraglass, but instead of building form, it is used to smooth out the roughness in the project. Once fully coated you are ready for sanding.
Start with 80 grit and hit all of the project as evenly as possible. Then 120 until the sanding is even all over. If you are using the 2 part primer, now is the time to do it. If your primer comes from a spray can, wait until you get to 400 grit, then spray the primer. Hit it again with 80 and 120. Then get the 220 grit and sand again. By this time, your sanding will be to sand out any of the scratches left behind by the previous sandpaper. once all of the 80 and 120 grit sanding dips and gashes are gone move to 320 and remove traces of the 220. Same with the 400 and 600. Expect to put at LEAST an hour (since it is your first time) to get this sanding job right. Any imperfections you leave in at this point will show up in the paint. After 600, you are ready to paint.
From here, the paint job will depend on your painting skills and creativity.
This project gives you most of the skills needed to produce quality projects for later on. Some of the steps can be done other ways, but this will give you many of the techniques needed to make most things in the future.
Good luck.
PS. We request that you take pictures and post them up for us.
-------------
Never send your ducks to eagle school.
The difference between ordinary and extraordinary is that little extra.
The 3Ls of life: Learn from the Past, Live for the Present, Look to the Future.
Posted By: cubinbob
Date Posted: September 10, 2006 at 10:04 PM
Posted By: brbman2002
Date Posted: September 11, 2006 at 12:00 PM
Posted By: Melted Fabric
Date Posted: September 15, 2006 at 11:33 AM
-------------
I have not failed. I've just found 10,000 ways that won't work.
When you do not know what you are doing and what you are doing is the best -- that is inspiration.
Posted By: bellsracer
Date Posted: September 15, 2006 at 7:16 PM
Thanks. It's the owner's project that he gives to new people to see if they can do custom work as they say they can. They don't have to follow the instructions I gave here. We just give them the materials and ask them to make the panel that meets the dimensions. It's a good way to test the potential for someone wanting to join and claiming they can do it with the best.
Another project have is to make a wedge speaker box with rounded edges and side panel inserts. Again a project that will need most of the skills neccessary to build almost any type of box. (except Aperiodic)
We don't turn away people who can't complete the project properly or anything. We help them build up some of the skills and go from there.
-------------
Never send your ducks to eagle school.
The difference between ordinary and extraordinary is that little extra.
The 3Ls of life: Learn from the Past, Live for the Present, Look to the Future.
Posted By: Melted Fabric
Date Posted: September 19, 2006 at 10:32 AM
bellsracer wrote:
Thanks. It's the owner's project that he gives to new people to see if they can do custom work as they say they can. They don't have to follow the instructions I gave here. We just give them the materials and ask them to make the panel that meets the dimensions. It's a good way to test the potential for someone wanting to join and claiming they can do it with the best.
Another project have is to make a wedge speaker box with rounded edges and side panel inserts. Again a project that will need most of the skills neccessary to build almost any type of box. (except Aperiodic)
We don't turn away people who can't complete the project properly or anything. We help them build up some of the skills and go from there.
That is a way better method than some MECP test, to prove if someone knows their stuff.
Hehe, I have that "evil grin" feeling right now. I think I will make my own set of projects to qualify someone to work along side me.
-------------
I have not failed. I've just found 10,000 ways that won't work.
When you do not know what you are doing and what you are doing is the best -- that is inspiration.
Posted By: bellsracer
Date Posted: September 19, 2006 at 2:16 PM
We don't think of it as a test so much as measuring how good the person really is. That way there is no surprises when it comes to fabrication. ^-^
lol... Don't be too evil. The last thing you want is to have a reputation of being a snob.
Good Luck!
-------------
Never send your ducks to eagle school.
The difference between ordinary and extraordinary is that little extra.
The 3Ls of life: Learn from the Past, Live for the Present, Look to the Future.
Posted By: Melted Fabric
Date Posted: September 20, 2006 at 10:04 AM
Yea, it would not really be a you passed or you failed, like you guys do it, I want to gage where they are. Out of say 12 friends who are into doing custom stuff, only one person I know out of the 12 levels with me if not sometimes surpassing me in creativity and solutions.
-------------
I have not failed. I've just found 10,000 ways that won't work.
When you do not know what you are doing and what you are doing is the best -- that is inspiration.