planing a center console
Printed From: the12volt.com
Forum Name: Fiberglass, Fabrication, and Interiors
Forum Discription: Fiberglass Kick Panels, Subwoofer Enclosures, Plexiglas, Fabrics, Materials, Finishes, etc.
URL: https://www.the12volt.com/installbay/forum_posts.asp?tid=85905
Printed Date: May 14, 2026 at 3:33 PM
Topic: planing a center console
Posted By: pstanton
Subject: planing a center console
Date Posted: November 20, 2006 at 5:49 AM
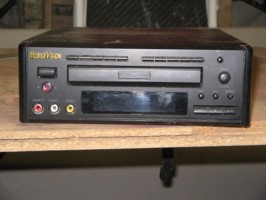
hi all firt post here . I am planing on building a center console to have some storage in it i plan on puting a dvd a vhs player a game qube. i know a game qube is so out dated but the kids like it so thats why. i am planing to build it out of mdf some metal and fiberglass i was wondering if the fiberglass bondes to steel easily. i am installing it in a pontiac montana. i was wondering if anyone could give me some imput on how to do this
thanks
patrick
Replies:
Posted By: maglin
Date Posted: November 20, 2006 at 9:44 AM
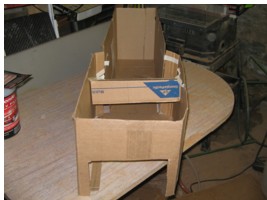
build it outta cardboard first. gives you an idea of dimensions and how to cut the MDF. the cube, having to have two faces revealed (top for buttons and cds, front for controllers) will have to be mounted on the back edge of the device.
if you're getting a vacuum loader dvd/cd player for your car, you can mount it at any angle, elsewise it'll have to be flat. as for vhs, i've never tried playing one at an angle. it'll be the first car i've ever seen with a vhs deck tho thats for sure.
i ASSUME you're goin from the dashboard back past the front seats, and filling in that entire area wit this said device... *shrugs* and pictures would help. not sure why you want to use steel, but yeah, glass will stick to it. they use glass in auto body repair. it has to stick to nekkid metal.
Posted By: maliboom
Date Posted: November 20, 2006 at 3:51 PM
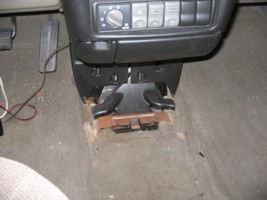
Post pictures of the area you want to use and how much room your willing to give up. What screens are you using and are they in the console or headrests.
Posted By: pstanton
Date Posted: November 20, 2006 at 9:15 PM
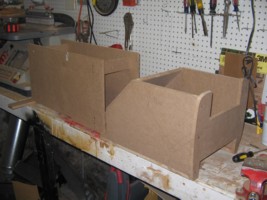
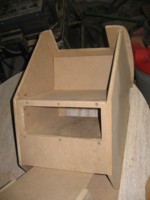
thanks for the card board idea maglin that worked like a charm. i did take some pic but they are too large to post here so i need to figure out how to shrink them then i will be posting them very soon. so far i got the a rough frame together out of mdf. as for the vhs i decided not to put it in the dvd player is like a regular one not the vacume type and that and the vhs player was just too big for me so i scraped that idea. as for the steel i want the top of the console that is between the seets to have a arch to it and i figured that was the best way to get the arch i wanted. well i am going to try to shrink these pics.later
patrick
Posted By: pstanton
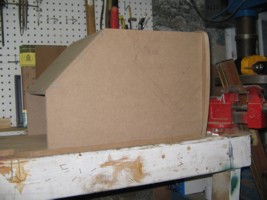
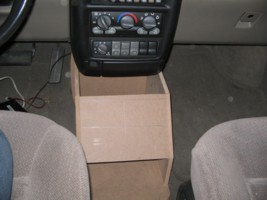
Date Posted: November 20, 2006 at 9:48 PM
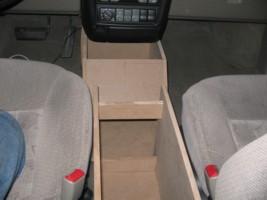
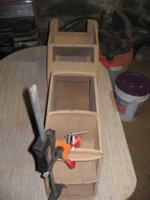
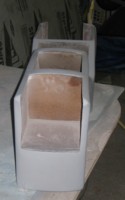
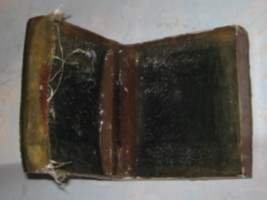
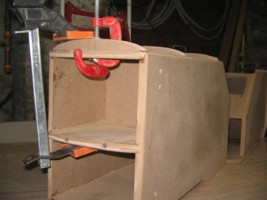
here is the pic of the cardboard pattern it looks kind of shotty but it was tight to get it in under the dash and in between the seats so it sort of took a beating
Posted By: pstanton
Date Posted: November 20, 2006 at 10:00 PM
Posted By: pstanton
Date Posted: November 20, 2006 at 10:00 PM
Posted By: pstanton
Date Posted: November 20, 2006 at 10:03 PM
oh no i dont know how that posted two times. sorry for that
Posted By: pstanton
Date Posted: November 20, 2006 at 10:26 PM
as for the screen there is one in the over head console so i won't need to install one in here . i an also going to put a inverter in to run the cube.
Posted By: maglin
Date Posted: November 20, 2006 at 11:16 PM
hehe. looks like cardboard wins the cookie. lol. glad to be of help.
Posted By: maglin
Date Posted: November 20, 2006 at 11:16 PM
hehe. looks like cardboard wins the cookie. lol. glad to be of help.
Posted By: pstanton
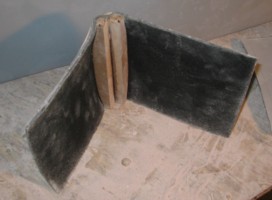
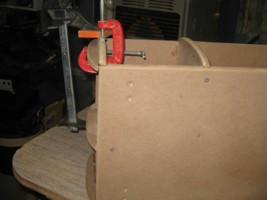
Date Posted: November 21, 2006 at 7:16 PM
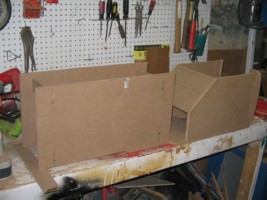
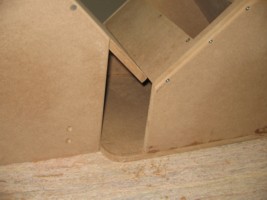
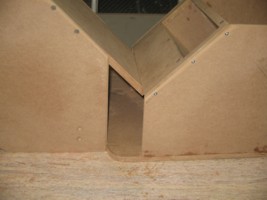
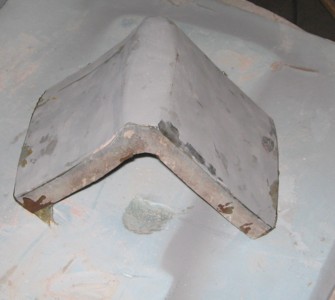
ok in this pic i made these arc peices for the top and back this is where i was going to use thin sheet steel to get this slight arc on top. what i was wondering was if i just put fleece over it instead of the steel whould the fleece sink down in between the arched peices of wood. i whant to try to keep it as straight as possible
Posted By: maglin
Date Posted: November 22, 2006 at 12:05 AM
no no. stretch grill cloth over it, staple it down. glass over that. i'd never suggest using metal over mdf.
Posted By: bballguy162006
Date Posted: November 22, 2006 at 2:48 PM
Or mabye you could use chicken wire as the base or something similar that is sturdy and would not allow the fiberglass to sag
Posted By: suburban boy
Date Posted: November 24, 2006 at 6:17 PM
I tried mixing metal and fiberglass and it wasnt a good combo wouldnt recommend it.....Goodluck ------------- Suburban boy
Posted By: maliboom
Date Posted: November 25, 2006 at 3:51 PM
Use grill cloth and staples or hot glue to stick it to the wood and stetch the fabric to the shape you want. glass and reinforce it. You can always fix small areas with body filler later. I have never personally had good luck with chicken wire or other metals with fiberglassing. If you want to keep the arc in the design use panel board, it is thin and bends well as well can be screwed in with regular screws.
Posted By: pstanton
Date Posted: December 01, 2006 at 12:17 AM
Posted By: pstanton
Date Posted: December 01, 2006 at 5:39 AM
i was having trouble when mixing my resin after a few i was mixing a few batches one after another in the same tub i think that might be a no no . the second batch seemed like it had some gel in it it was like a thick gel can anyone tell me if this has ever happened or how to solve this delema thanks for all the imput this far
Posted By: bballguy162006
Date Posted: December 01, 2006 at 10:15 AM
did that happen as soon as you poured the resin in, or was it after a while? If it was after a little bit, it was most likely because the resin mixture was starting to set. A way that you can fix this is to reduce the amount of MECP that you use. That will give you more time to work with it before it starts to harden. Or you could always work in a colder room i guess... But I would go with the first option :-)
Posted By: pstanton
Date Posted: December 02, 2006 at 1:36 AM
it was with my second and third batch that i mixed it happened a few minutes later i think it was just from the batch before there was probally a litttle left over from that batch i was mixing it right after i was done using a batch that was i could keep working and didnt make too much where it was geting hard before i used it all
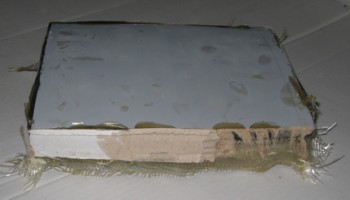
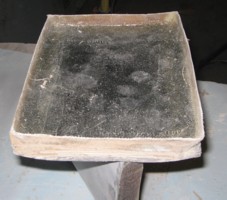
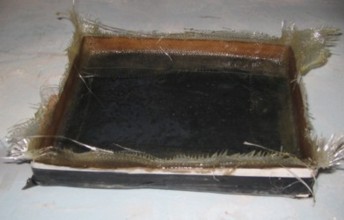
Posted By: pstanton
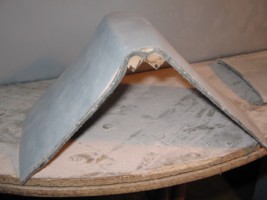
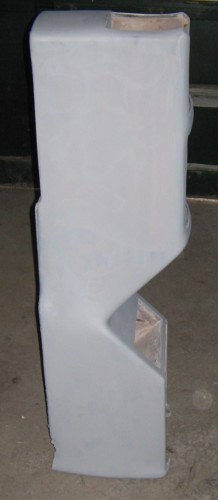
Date Posted: December 03, 2006 at 11:47 PM
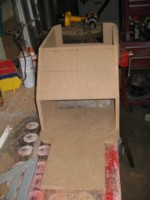
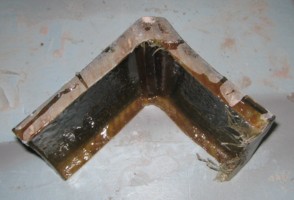
ok here are a few more pictures i have these are when i streched the fleece on
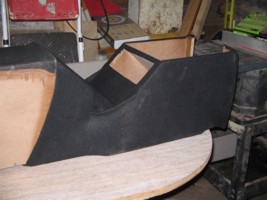

what do u think so far. it seems like it going ok for a first time job?
In the back part i fighure i would resin and glass it all in. Then i will cut my doors in after it is finished. That way i will have two doors that i can use to make to coverthat will be the at the some contour as the holes so how does it look so far
Posted By: wattslok187
Date Posted: December 04, 2006 at 7:12 PM
Looks like very good wood work. It looks good and is starting to take shape. ------------- 1996 DGGM Impala SS
Cali-SS And ISSCA member # 1680
Alpine 7995, AudioControl EQS, Memphis amps, Crossfire subs, Infinity Highs
Posted By: pstanton
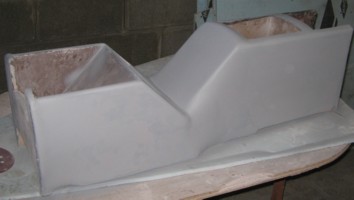
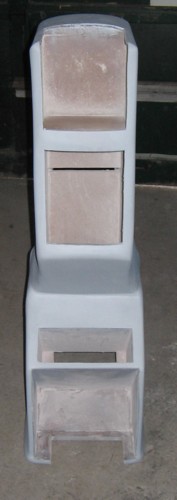
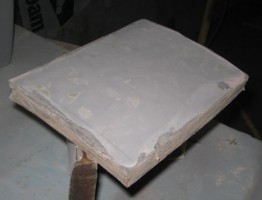
Date Posted: December 05, 2006 at 2:38 AM
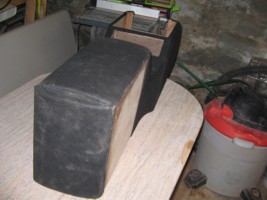
ilost a few pictures of the first coat of resin and after the mat. but here is one with thats its taking shape now 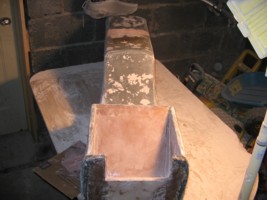
i had some diffrent views but lost them too. i will post some more tomorrow.
Posted By: realitycheck
Date Posted: December 05, 2006 at 12:20 PM
Mr stanton it looks pretty good. Especially for your first project. Looks like you got the fleece good and tight, thats good. As for the question you had about your resin geling. The reason it was geling was because your first batch was starting to dry in the bottom while you mixed your second batch. This is what I do on all my glass projects go to walmart, or lowes, home depot. One of those stores they all have small plastic paint buckets, they're like 40 cents a piece or something. I get like three of them, then I mix my first batch, after im done with that bucket, if the resin is starting to harden while im using it or if it runs out or w/e. I just sit that bucket to the side and let it start drying, then start with a fresh bucket, and mix my next batch. Once your all the way through however many you have your first buckets should be drying. I usually kind of squeeze the bucket a little and the resin should start cracking once its dry enough, it will all pop out then you have a clean fresh bucket to start with again.
-------------
Learning the trade one fiberglass creation at a time!
Posted By: pstanton
Date Posted: December 05, 2006 at 8:36 PM
thanks reality that was what i thought but wasnt sure. That was real informative and just a great way to put it. a perfect explination.
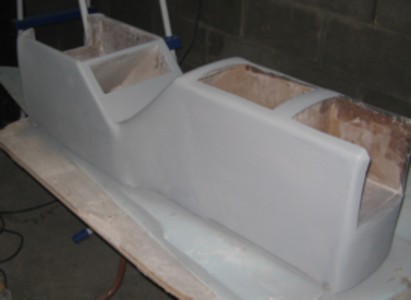
Posted By: pstanton
Date Posted: December 05, 2006 at 9:16 PM
Posted By: pstanton
Date Posted: December 05, 2006 at 9:16 PM
Posted By: memphis9
Date Posted: December 06, 2006 at 9:34 AM
Nice job. The console is looking good. Keep us posted on the progress of the console. Keep up the good work.
-------------
G-Boys Customz
Northville, MI
Posted By: realitycheck
Date Posted: December 07, 2006 at 10:54 AM
Looks very good stanton I like the build of the doors cool idea. I thought of something you may have already thought of, but you could line those drawers with felt and it would look awesome.
-------------
Learning the trade one fiberglass creation at a time!
|