Boo, hiss

Yay

Fiberboard floor laid (minus cover for spare tire well) and trunk masked and waxed for fiberglass


The whole thing was a sticky mess, partly from the tape and wax, partly from the resin not having cured fully because the car was outside in the cold all night.
I mananged to pry it out though, and solved the sticky resin problem by brushing on an extra coat with a bit more catalyst to make sure it cured right through and made a nice shell of resin on the outside.
After that dried, I reinforced the sides with an extra layer of matte (the mold is made of 2 layers) because they were a bit too bendy, and went for lunch.
I then noticed some spots still hadn't cured so I busted out the resin again.
After that was good and hard, I masked off the outline of where I wanted to cut (loosely following some felt tip marker lines that showed through the fiberglass*) and trimmed it with a little sawzall type dealy.
It fits like a glove, it's not trouble to fit in the trunk and it's just tight enough to not wiggle and jiggle and make noise, and it looks nearly flush, I am very satisfied with the results. The 3/8" fiberboard bottom and back make it plenty strong, especially since it's supported by the sides of the trunk.
*Cool Tip that I found out by accident:
If you draw a pattern for cutting etc. on the masking tape after you've waxed it, the fiberglass soaked with resin will also soak up the ink, so when the part is pulled, your pattern should still be visible through the fiberglass.
Keep up the good work and keep posting.
Thanks guys
Okey dokey, I'm all done with the box building part, now I just have to level the surface and get it painted, which I'll do when the weather gets nicer and I can work outside.
Here's the past few days' work.


That's with the 'looped fleece' stretched over the mold and the rings, to form the shape of the box. That got soaked with resin and I let it harden. After that, two more layers of mat.
Then I trimmed off the excess fleece and glass:

Test fitted:


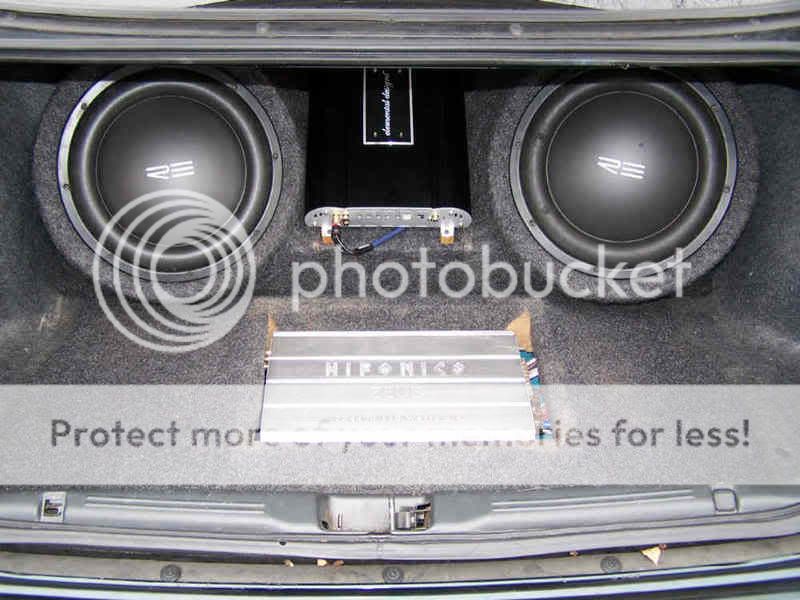
And mounted the subs:

The amp is sitting on top of the spare tire, which is still accessable with no trouble. I kinda broke the left side of the floor which was pretty flimsy, so I'm not quite done under the carpet yet, but it's "complete" enough for now.
I've ordered two 12" blue cold cathodes to provide the lighting, and the next project is getting the subs to work...got some wiring crap or something to fix, blah. They're both pretty beat looking so I'm looking for some replacements - still W010s though
It looks OK but not sure about how it's going to sound. Have you figured out what the volume is?
looks good. is it thick enough? I did the same thing just need to clean it up some. Its an old pic
^ ^ ^ I prefer the looks of your enclosure since it is more proportioned(I think that is the word to describe it). Was that your first one?
I'm kinda curious why it's longer on the passenger side as opposed to the driver's side? Was this part of the overall plan (possibly due to car contours), or just incidental from the measuring process?
Otherwise, it's looking good. Can't wait to see the end result
-------------
G. Rick (aka; Tha "R")
**Peter North is my idol***
MECP-Certified 1st Class Installer
Probably larger on the passeneger side because of the gas tank tube. I have the same issue in my Santa Fe, but it's nowhere near as pronounced. Just a theory...
-------------
"the universe has a way of balancing itself"
Trunk is deeper on the passenger side, the subs are actually centered..ish.
nice work man.. great pix also... im new with fg and it heps a lot!