first fiberglass project.
Printed From: the12volt.com
Forum Name: Fiberglass, Fabrication, and Interiors
Forum Discription: Fiberglass Kick Panels, Subwoofer Enclosures, Plexiglas, Fabrics, Materials, Finishes, etc.
URL: https://www.the12volt.com/installbay/forum_posts.asp?tid=91570
Printed Date: March 27, 2026 at 2:33 PM
Topic: first fiberglass project.
Posted By: gms81
Subject: first fiberglass project.
Date Posted: March 11, 2007 at 9:23 PM
I have started this box for my 2006 dodge ram. So far I have made the the bottom shell and did a second layer of glass. I plan on doing one more layer in sub area even though it is pretty stiff already. After that I plan on placing it back in the truck and tracing my cut out line on it and figuring the placement of my sub ring and amp rack which will go on the right (its pretty obvious where it will go). I am building this mostly because there are no boxed to fit my boston 10" g5 sub for this truck in this particular location, and of course because it will look badass. I am really planning as I go here and will update as I go.
I have to resize the pictures, I will get them up in a little while.
Replies:
Posted By: gms81
Date Posted: March 11, 2007 at 9:44 PM
Posted By: Velocity Motors
Date Posted: March 11, 2007 at 10:35 PM
Nice work so far, just make sure that when you set your sub ring into the enclosure that you account for the cone excursion and that it is set lower than the sides of the subwoofer ( have it recessed ) and this will ensure that the sub cone will not hit the bottom of the seat.
-------------
Jeff
Velocity Custom Home Theater
Mobile Audio/Video Specialist
Morden, Manitoba CANADA
Posted By: gms81
Date Posted: March 13, 2007 at 7:35 PM
I did two layers everywhere except the hole where the sub will go, I did three here. I went to cut out my speaker rings with my router and the bit was jammed and the stupid thing cut an oval...pos craftsman. It accidentally flew out of my hands and landed about 15 feet away from me and cracked into about 10 pieces. A new bosch router is on the way with the edge/circle guide. I cant wait to start fleecing!!
Posted By: playr747
Date Posted: March 15, 2007 at 8:29 AM
Great start, keep it going. I like porter cable routers myself but I guess it is different for each person. Bosch is great I wish I could afford all their tools.. 
Posted By: gms81
Date Posted: March 15, 2007 at 8:01 PM
About a year ago I purchased their 18v tool kit (drill, sawzall, jigsaw, flashligh, skilsaw and 2 batteries). I have used everything a lot and now I am sold on bosch. The new router will be here tomorrow, I cant wait!
Posted By: j0zee
Date Posted: March 18, 2007 at 4:18 PM
Great work Looks Really good
just an idea raise the seat 2 reasons 1. It allows the people in the back to have sooo much more leg room and 2. you can fit ""bigger subs"". I did it in a buddies 05 dodge ram made the risers in the back out a couple blocks of steel total tooik me about 30 min to make the blocks!
all in all looks good so far
Posted By: 99 2envy
Date Posted: March 19, 2007 at 8:21 PM
You can un-bolt the arms of the woofer for more depth room. It doesnt take away from the structure in any way at all. It will alow you more room for the excursion of the woofer because they through. Great woofer also. What amp are you running on it? Do you plan on adding a passive radiator? I think you would enjoy the output ...
Posted By: gms81
Date Posted: March 20, 2007 at 4:55 PM
Yea, those arms are getting in the way. I am not adding a radiator, dont see any need for it. When I had this woofer in the old rigged box that leaked air and was totally the wrong size the sub really hit good. I am running it off a kenwood excelon kac-x522. It is right around 500w rms bridged. I am having some difficulty getting everything set up, the sub doesnt sit as low as I anticipated and the amp can be put into the 3/4" mdf amp rack I made because its too tall. I played around with it a for a few minutes yesterday after I got my sub ring made. I will mess around with it some more when I get a chance adn take some pics so maybe I can get some opinions of what will look the best.
Posted By: gms81
Date Posted: March 28, 2007 at 8:59 PM
Went a bit farther tonight, not sure how this is going to go. If things dont look right soon I am going to cut the amp out of the equation completely and just put it back under the seat. I left my staple gun at work so I will get to that either tomorrow or thursday.
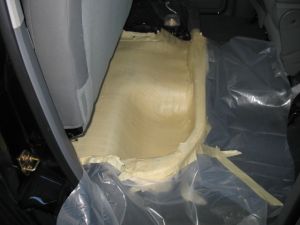
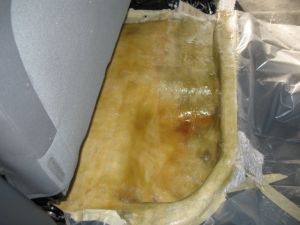
You can see that the 1/4" ply is not cut to the shape of the front of the fiberglass, I am either going to just fg that area and sand it out and bondo it or will recut the bottom piece. I left my jigsaw at work as well so I didnt have the means to cut it properly and while I am sure I will regret it later I will likely just put in the extra work. [IMG]https://i45.photobucket.com/albums/f78/Speakle/Zoeandmaddy003.jpg[/IMG] I finally got the fleece set and resined (is that a word?). I am thinking I probably will have to tweek the amp area, make it square instead of leaving that curved area in the front. I am not sure yet, I will se how it looks after I get the fleece cut out and the amp temporarily set.
[IMG]https://i45.photobucket.com/albums/f78/Speakle/fiberglassbox008.jpg[/IMG]
|