1996 lexus ls400 aftermarket dvd/gps/cd
Printed From: the12volt.comForum Name: Car Audio
Forum Discription: Car Stereos, Amplifiers, Crossovers, Processors, Speakers, Subwoofers, etc.
URL: https://www.the12volt.com/installbay/forum_posts.asp?tid=109698
Printed Date: December 15, 2025 at 4:25 PM
Topic: 1996 lexus ls400 aftermarket dvd/gps/cd
Posted By: cnewman402
Subject: 1996 lexus ls400 aftermarket dvd/gps/cd
Date Posted: December 12, 2008 at 9:22 PM
Hi 12volt community:
My name is Chris and I'm installing an aftermarket DVD/GPS/CD single din unit into my 1996 Lexus LS400.
After reading much info on the procedure, including the wiring diagram I decided to give it a shot. The procedure called for a factory amp bypass, which included identifying what wire was what going into the amp, then intercepting the wire and rewiring up to the head unit directly.
I purchased the wiring diagram for my car from Toyota and ID'd all the wires and reran them as I should directly to the unit. I also could not access power from the amp so I ran the power for the deck directly from the car battery through the firewall and into my deck. (I think this is incorrect and might be part of the issue idk?)
The head unit turned on and worked properly, but the sound is horrible. What I'm trying to do now is seek information on how to correct the issue. I am not car stereo savy. I am a computer nerd, not a stereo tech.
If it helps I can offer below links to the wiring diagram for my car. So I understand it could also be a power issue because my speakers were going through the amp originally.
Here is the information I have:
The new deck is a 4 Ohm deck
The factory speakers are 1 Ohm or 2 Ohm
All bass is distorted, and treble is cloudy
Overall sound is crackling
This is the 1996 Lexus LS400 wiring diagram for the non-nakamichi system:https://www.mediafire.com/file/n2ygzzmzf53/lf1rap96.pdf
I'm not sure if this diagram is out there anywhere, I could not find it.
Any help would be great, because this project has been on going for about 3 days now and I'm ready to finish it up. I think my largest problem with doing this install is I'm a stereo noob, and don't know much about car stereos.
One more note I'm trying to do this on a low budget now since I have spent so much money this holiday season.
I'm glad I found the community and hope someone can help, thank you in advance.
-Chris
Replies:
Posted By: fiberglasslvr
Date Posted: December 13, 2008 at 6:10 PM
well there are a couple of things that are causing your issue
1- doing the amp bypass is the right thing to do if you are going to switch out the speakers as well. here is the reason your system sounds like crap.
2- the factory amplifier has all the crossovers for the system built in so that your cabin speakers only recive highs and mids and your sub gets all the bass, so by removing the amp you are now sending full range signals into all your speakers. and that is what is causing all the distorsion and lack of clarity
3- now to correct this problem there are a couple of solutions 1) you can replace all the speakers and then your golden but if that is not an option then here is what you will have to do.
4- you will have to do a factory amp intergration wich means using the factory amp. you will have to reinstall the factory amp as it was. then the rest is done from the factory head unit harness. take the factory wire and connect them as so.
batt- blue / YELLOW
ignition - gray
ground - brown
power antenna - BLACK/ red
amp turn on - pink/blue
front left+ black
front left- white
front right+ white
front right- red
rear left+ red
rear left- green
rear right+ yellow
rear right- green
and this will use the factory amp and keep the speakers crossed over and keep your sub running as its supposed to
hope this helps
good luck
-------------
in process of changing everything
Posted By: cnewman402
Date Posted: December 13, 2008 at 8:16 PM
Heres a log of what I did....
Hello Community:
Recently I bought a CD/DVD/GPS Radio for my car. I thought it would be a simple task, go grab an install kit, and a harness.... nope. I searched everywhere for solutions and read thread after thread trying to figure out what to do!
After 2 days of research and analysis I have came to what I think is a proper way of installing an aftermarket radio into a 1996 Ls 400. I have a lot of information here so lets start....
First off my original specs:
1996 LS400
Original Lexus Deck (Tape Player) Made by Pioneer Electronics.
Lexus Amplifier (Located under passenger seat)
7 speakers total
-Sub
-All four doors
-2 tweeters in Front doors
The way the speakers run in the 96 are similar to the other generations. The tweeter comes off of the front door speakers. The speakers in the door are Pioneer 2 Ohm speakers, which should sound fine in any aftermarket deck.
In order to remove your old deck:
[*]Start by prying on the backside of the shifting panel to loosen the two back clips (near the cup holder, spring it secure).
[*]Lift on the rear of the panel to release the two mid clips near the mid of the panel.
[*]Place the car in Low gear(1) and apply E-Brake.
[*]Pull the panel with ashtray towards you (back) in order to free the top clips.
[*]Disconnect the clips and remove (Hey clean while your in there! :p)
[*]Remove the vents/clock/temp gauge by inserting a thin pry tool at the
[*]lower edge and pulling out one side then the other.
[*]Disconnect connectors and remove vent and controls.
[*]Remove two exposed screws from top of AC control bracket.
[*]Remove two exposed screws from below car stereo. (not the small ones the ones the same mm size)
[*]Pull car stereo and AC control forward.
[*]Disconnect all connectors from AC control and car stereo along with antenna.
GOOD GOOD... now you got the stereo out, congrats with the easy part!
Now install your deck into its install kit. I used one from Metra model #99-8153. This is a single din install kit. You will actually install your A/C unit into this kit. It works well and replaces the entire factory bracket and fits snug into place for a secure holding.
Power the new deck:
In order to get power into your new deck you will want to splice into the factory plug near the deck. I supplied from plug R 3C upfront. If you observe the plugs you will see one of the gray plugs that has 14 pin slots but only 10 to 12 wires used ( plugs normally are labeled with factory imprint). This plug has a Lavender wire with a Yellow stripe. It is pin No. 1 and this can be your hot wire. You may use Pin No. 14 which is Brown for your ground(Ground 2) from the same plug.
More Information about this Procedure:
Unfortunately you can not use your SUB anymore after this. I have read ways to, but I feel they are a waste because this procedure by-passes the amp so it is pre-amp, honestly how many watts is your deck.
Your going to use wiring diagrams in order to run wires directly from your deck to the speaker wiring junction where the amp is located and connect hardwire them before they enter the amp. This is easier then running all new wires I feel, and takes advantage of the already installed factory wire.
The wiring diagram is listed at the bottom of this post. It is called If1rap96.pdf (You need a pdf reader to view it. Adobe is free but bloatware I suggest Foxit PDF reader its fast, free, and has less ware on your processor.
In order to access your amp....
If its under the seat go to passenger rear door and look down, you will see a plastic molding at the edge of the seat (Move the seat all the way forward up right) The molding has two squares on it, remove these with a pry tool and remove the two Phillips screws. Now the amp wiring is exposed.
CONGRATS.
1996 Lexus LS400 Amplifire Wiring Information
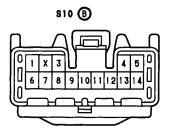
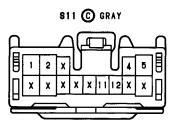
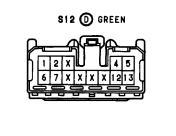
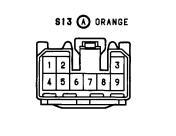
What you see here is 4 plugs pictured below


These are the four plugs pictured from left to right when you expose the amp plugs.
Connector Plugs Descriptions:
S10 B: White
S11 C: Gray
S12 D: Green
S13 A: Orange
Connector Pin Assignments:
Warning: These pins are my interpretation of the diagram. Please view and double check all information.

Pins:
1- BROWN / Black - Ground
2- N/A
3- White - Front Right +
4- Red - Rear Left +
5- Yellow Rear Right -
6- Pink/Blue Amp +
7- Black - Beep
8- Red- Front Right -
9- White front Left -
10- Black Front Left +
11- Shielded - Signal Ground 1 (goes to CD/Radio Player)
12- BROWN / Red Signal Ground 2 (goes to CD/Radio Player)
13- Green Rear Left -
14- Green Rear Right

Pins:
1- Light GREEN/ Black Woofer + (WOOFER POSITIVE)
2- Light Green / Red Woofer (WOOFER NEGATIVE)
3- N/A
4- BROWN / Yellow Signal Ground 4 (to Disc changer)
5- BROWN / White Ground2 (to disc changer)
6- N/A
7- N/A
8- N/A
9- N/A
10- N/A
11- Light Green CAP+ (to disc changer)
12- Violet CAP (to disc changer)
13- N/A
14- N/A

1- Light Green Front Right + (RIGHT FRONT SPEAKER)
2- Pink Front Left + (LEFT FRONT SPEAKER)
3- N/A
4- Red Rear Right + (Rear Door)(RIGHT REAR DOOR SPEAKER)
5- Black RL+ to Telephone (Rear Door)(LEFT REAR DOOR SPEAKER)
6- Light Blue? Front Right (RIGHT FRONT SPEAKER)
7- Violet Front Left (LEFT FRONT SPEAKER)
8- N/A
9- N/A
10- N/A
11- N/A
12- White Rear Right (Rear Door)(RIGHT REAR DOOR)
13- Yellow Right Left Negative (Rear Door) (LEFT REAR DOOR)

Pins:
1- Brown Ground 4 (to CD Player)
2- Lavender / YELLOW +B1 (to CD changer) Radio No. 1 fuse 20A
3- Shielded Signal Ground 3 (to CD Player)
4- Brown Ground 5 (to CD Player)
5- Lavender / YELLOW B2 (to CD player)
6- Gray ACC1 Radio No. 2 fuse (7.5A)
7- Light Blue Mute (to CD Player)
8- White HAP - (to CD Player)
9- Black HAP + (to CD Player)
In order to run the deck preamp your going to splice into sets of wires on this amp. warning this is a long task be prepared. I bought some small suitable gauge wire from the store and went to work measuring the length I need and a little more for room to work with. The main wires you want to focus on are listed in order below.
The main plug you work with is the GREEN plug S12-D.
(You will notice positive and negative are vertically flush)
Left Front
Positive: Pink/Pin 2
Negative: Violet/Pin 7
Right Front
Positive: Light GREEN/ Pin 1
Negative: Light Blue/Pin 6
Left Rear
Positive: BLACK/ Pin 5
Negative: Yellow/Pin 13
Right Rear
Positive: RED / Pin 4
Negative: WHITE/ Pin 12
These are your speakers you will need to hardwire directly to your new unit. Remember to work around your seat position rail when installing the wires. I did not go beneath carpet for my install but, I had minimal wire appearance. I went directly from my amp location, underneath my seat rail, to the mid-console, to the din.
Note: The door speakers in this Lexus factory are also 3 holed speakers, inside of a custom speaker din designed by Lexus. Be sure to check measurements before ordering speakers. Max size should be 5.25". Max depth I would guess 3 to 4.5" tops.
Wiring Diagrams (pdf format)-
Wiring Diagrams-
Radio/CD Changer/Amp: https://www.mediafire.com/file/n2ygzzmzf53/lf1rap96.pdf
Antenna: https://www.mediafire.com/file/zn3jmijmujm/antenna.pdf
Telephone (If needed): https://www.mediafire.com/file/21hoo1hlyha/telephone.pdf
Hello Community:
Recently I bought a CD/DVD/GPS Radio for my car. I thought it would be a simple task, go grab an install kit, and a harness.... nope. I searched everywhere for solutions and read thread after thread trying to figure out what to do!
After 2 days of research and analysis I have came to what I think is a proper way of installing an aftermarket radio into a 1996 Ls 400. I have a lot of information here so lets start....
First off my original specs:
1996 LS400
Original Lexus Deck (Tape Player) Made by Pioneer Electronics.
Lexus Amplifier (Located under passenger seat)
7 speakers total
-Sub
-All four doors
-2 tweeters in Front doors
The way the speakers run in the 96 are similar to the other generations. The tweeter comes off of the front door speakers. The speakers in the door are Pioneer 2 Ohm speakers, which should sound fine in any aftermarket deck.
In order to remove your old deck:
[*]Start by prying on the backside of the shifting panel to loosen the two back clips (near the cup holder, spring it secure).
[*]Lift on the rear of the panel to release the two mid clips near the mid of the panel.
[*]Place the car in Low gear(1) and apply E-Brake.
[*]Pull the panel with ashtray towards you (back) in order to free the top clips.
[*]Disconnect the clips and remove (Hey clean while your in there! :p)
[*]Remove the vents/clock/temp gauge by inserting a thin pry tool at the
[*]lower edge and pulling out one side then the other.
[*]Disconnect connectors and remove vent and controls.
[*]Remove two exposed screws from top of AC control bracket.
[*]Remove two exposed screws from below car stereo. (not the small ones the ones the same mm size)
[*]Pull car stereo and AC control forward.
[*]Disconnect all connectors from AC control and car stereo along with antenna.
GOOD GOOD... now you got the stereo out, congrats with the easy part!
Now install your deck into its install kit. I used one from Metra model #99-8153. This is a single din install kit. You will actually install your A/C unit into this kit. It works well and replaces the entire factory bracket and fits snug into place for a secure holding.
Power the new deck:
In order to get power into your new deck you will want to splice into the factory plug near the deck. I supplied from plug R 3C upfront. If you observe the plugs you will see one of the gray plugs that has 14 pin slots but only 10 to 12 wires used ( plugs normally are labeled with factory imprint). This plug has a Lavender wire with a Yellow stripe. It is pin No. 1 and this can be your hot wire. You may use Pin No. 14 which is Brown for your ground(Ground 2) from the same plug.
More Information about this Procedure:
Unfortunately you can not use your SUB anymore after this. I have read ways to, but I feel they are a waste because this procedure by-passes the amp so it is pre-amp, honestly how many watts is your deck.
Your going to use wiring diagrams in order to run wires directly from your deck to the speaker wiring junction where the amp is located and connect hardwire them before they enter the amp. This is easier then running all new wires I feel, and takes advantage of the already installed factory wire.
The wiring diagram is listed at the bottom of this post. It is called If1rap96.pdf (You need a pdf reader to view it. Adobe is free but bloatware I suggest Foxit PDF reader its fast, free, and has less ware on your processor.
In order to access your amp....
If its under the seat go to passenger rear door and look down, you will see a plastic molding at the edge of the seat (Move the seat all the way forward up right) The molding has two squares on it, remove these with a pry tool and remove the two Phillips screws. Now the amp wiring is exposed.
CONGRATS.
1996 Lexus LS400 Amplifire Wiring Information
What you see here is 4 plugs pictured below


These are the four plugs pictured from left to right when you expose the amp plugs.
Connector Plugs Descriptions:
S10 B: White
S11 C: Gray
S12 D: Green
S13 A: Orange
Connector Pin Assignments:
Warning: These pins are my interpretation of the diagram. Please view and double check all information.

Pins:
1- BROWN / Black - Ground
2- N/A
3- White - Front Right +
4- Red - Rear Left +
5- Yellow Rear Right -
6- Pink/Blue Amp +
7- Black - Beep
8- Red- Front Right -
9- White front Left -
10- Black Front Left +
11- Shielded - Signal Ground 1 (goes to CD/Radio Player)
12- BROWN / Red Signal Ground 2 (goes to CD/Radio Player)
13- Green Rear Left -
14- Green Rear Right

Pins:
1- Light GREEN/ Black Woofer + (WOOFER POSITIVE)
2- Light Green / Red Woofer (WOOFER NEGATIVE)
3- N/A
4- BROWN / Yellow Signal Ground 4 (to Disc changer)
5- BROWN / White Ground2 (to disc changer)
6- N/A
7- N/A
8- N/A
9- N/A
10- N/A
11- Light Green CAP+ (to disc changer)
12- Violet CAP (to disc changer)
13- N/A
14- N/A

1- Light Green Front Right + (RIGHT FRONT SPEAKER)
2- Pink Front Left + (LEFT FRONT SPEAKER)
3- N/A
4- Red Rear Right + (Rear Door)(RIGHT REAR DOOR SPEAKER)
5- Black RL+ to Telephone (Rear Door)(LEFT REAR DOOR SPEAKER)
6- Light Blue? Front Right (RIGHT FRONT SPEAKER)
7- Violet Front Left (LEFT FRONT SPEAKER)
8- N/A
9- N/A
10- N/A
11- N/A
12- White Rear Right (Rear Door)(RIGHT REAR DOOR)
13- Yellow Right Left Negative (Rear Door) (LEFT REAR DOOR)

Pins:
1- Brown Ground 4 (to CD Player)
2- Lavender / YELLOW +B1 (to CD changer) Radio No. 1 fuse 20A
3- Shielded Signal Ground 3 (to CD Player)
4- Brown Ground 5 (to CD Player)
5- Lavender / YELLOW B2 (to CD player)
6- Gray ACC1 Radio No. 2 fuse (7.5A)
7- Light Blue Mute (to CD Player)
8- White HAP - (to CD Player)
9- Black HAP + (to CD Player)
In order to run the deck preamp your going to splice into sets of wires on this amp. warning this is a long task be prepared. I bought some small suitable gauge wire from the store and went to work measuring the length I need and a little more for room to work with. The main wires you want to focus on are listed in order below.
The main plug you work with is the GREEN plug S12-D.
(You will notice positive and negative are vertically flush)
Left Front
Positive: Pink/Pin 2
Negative: Violet/Pin 7
Right Front
Positive: Light GREEN/ Pin 1
Negative: Light Blue/Pin 6
Left Rear
Positive: BLACK/ Pin 5
Negative: Yellow/Pin 13
Right Rear
Positive: RED / Pin 4
Negative: WHITE/ Pin 12
These are your speakers you will need to hardwire directly to your new unit. Remember to work around your seat position rail when installing the wires. I did not go beneath carpet for my install but, I had minimal wire appearance. I went directly from my amp location, underneath my seat rail, to the mid-console, to the din.
Note: The door speakers in this Lexus factory are also 3 holed speakers, inside of a custom speaker din designed by Lexus. Be sure to check measurements before ordering speakers. Max size should be 5.25". Max depth I would guess 3 to 4.5" tops.
Wiring Diagrams (pdf format)-
Wiring Diagrams-
Radio/CD Changer/Amp: https://www.mediafire.com/file/n2ygzzmzf53/lf1rap96.pdf
Antenna: https://www.mediafire.com/file/zn3jmijmujm/antenna.pdf
Telephone (If needed): https://www.mediafire.com/file/21hoo1hlyha/telephone.pdf