how dave braces a sealed enclosure
Printed From: the12volt.com
Forum Name: Car Audio
Forum Discription: Car Stereos, Amplifiers, Crossovers, Processors, Speakers, Subwoofers, etc.
URL: https://www.the12volt.com/installbay/forum_posts.asp?tid=116469
Printed Date: May 01, 2026 at 6:50 AM
Topic: how dave braces a sealed enclosure
Posted By: haemphyst
Subject: how dave braces a sealed enclosure
Date Posted: September 21, 2009 at 4:31 PM
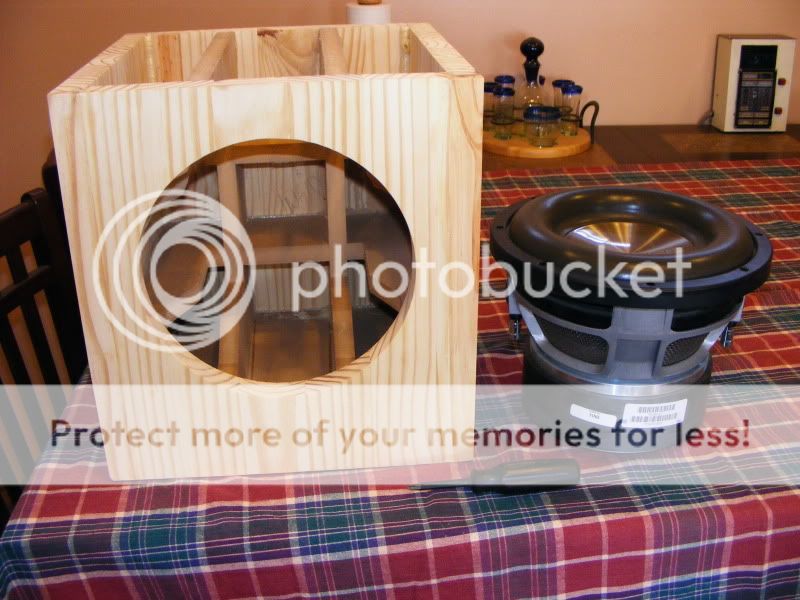
That's the new enclosure for the recently, freely acquired Eclipse Ti 10" woofer. For those of you that have ever wondered about what haemphyst is thinking when he refers to "bracing of the enclosure", this is what's in mind! Is this too much? Not hardly! It's juuuuust right! 
That's 1" pine plank for the outside walls, with all 3/4 inch MDF inside for the bracing... No ring here, thank you! ------------- It all reminds me of something that Molière once said to Guy de Maupassant at a café in Vienna: "That's nice. You should write it down."
Replies:
Posted By: blackcivichatch
Date Posted: September 21, 2009 at 4:46 PM
Haha. Love it. Why Pine plank? ive never used anything other than mdf... Jus wonderin.
-------------
UNLABELED Custom Car Club President
Posted By: haemphyst
Date Posted: September 21, 2009 at 4:57 PM
"Because oak was too expensive", or "'cuz it's pretty..." LOL
Actually, I like it's sound. Softer woods such as pine tend to have a faster damping response than higher density "man-mades". Also, with the very solid brace to wall interface I have made, the differences in material density further damp any cabinet resonances.
-------------
It all reminds me of something that Molière once said to Guy de Maupassant at a café in Vienna: "That's nice. You should write it down."
Posted By: DYohn
Date Posted: September 21, 2009 at 6:01 PM
Nice looking little thing Dave. Seal those seams.  ------------- Support the12volt.com
Posted By: stevdart
Date Posted: September 21, 2009 at 9:27 PM
I see only one pic. Did your camera broke? You might experience some slight expansion / contraction in those pine panels, so as DYohn said, silicone the seams. I would think that plywood would be more stable than plank. And oh, is that box going to be finished off with a plexi top, lit up inside?  ------------- Build the box so that it performs well in the worst case scenario and, in return, it will reward you at all times.
Posted By: aznboi3644
Date Posted: September 22, 2009 at 3:12 AM
I was thinking of building something like this...but with all 2x4s.
-------------
Custom Enclosure Design
Posted By: ianarian
Date Posted: September 22, 2009 at 4:21 AM
nice box haem. Throw a couple rocks in there if you really want to boom.  ------------- This is what I do for FUN!
Posted By: tommy...
Date Posted: September 22, 2009 at 5:20 AM
ianarian wrote:
nice box haem. Throw a couple rocks in there if you really want to boom.
River rocks...right...? BoxRox(tm) did not endorse nor assumes any responsibility for the content of this post ------------- M.E.C.P & First-Class
Go slow and drink lots of water...Procrastinators' Unite...Tomorrow!
Posted By: KPierson
Date Posted: September 22, 2009 at 6:10 AM
Nice looking box. What are you going to use to seal it up?
-------------
Kevin Pierson
Posted By: haemphyst
Date Posted: September 22, 2009 at 7:55 AM
Well... One, the rocks are already being hand picked from my back yard. Sorry RoxBox® fans, I ain't got no river near me, y'all jus' gunna hafta be happy with this, fer now. I am allowing the dogs to run around on the pile of candidates, each of them being thoroughly saturated with "doggie releases", for that "little extra".
Two. The Gorilla Glue, which I have always used to construct my boxes, has never once let me down as far as a seal is concerned. Careful application along the seal edges will always ensure an occlusive bead once the adhesive expands and cures. IF there is any need to apply a sealant after then I will reach in there and apply something latex based - that'll be plenty - but I am expecting to need nothing... I've been good to go in the past!
Three. No plex, no lights. :)
aznboi3644 wrote:
I was thinking of building something like this...but with all 2x4s.
Got a bag of 'em... all left-overs from TV disassembly. What's your address, they're in the mail today! LOL ------------- It all reminds me of something that Molière once said to Guy de Maupassant at a café in Vienna: "That's nice. You should write it down."
Posted By: ragsports
Date Posted: September 22, 2009 at 1:42 PM
Do you just use gorilla glue to construct your boxes? Do you use any brads or screws as well? I usually use a combination of gorilla glue as well as brads, Clamp the box together for a few hours while the glue is curing, and i always have a very solid box. Also if you take wet rag and dampen the glue joints the glue will bond much stronger, and will expand more.
Posted By: haemphyst
Date Posted: September 22, 2009 at 2:44 PM
ragsports wrote:
Do you just use gorilla glue to construct your boxes? Do you use any brads or screws as well?
Gorialla Glue and nothing else.
ragsports wrote:
I usually use a combination of gorilla glue as well as brads, Clamp the box together for a few hours while the glue is curing, and i always have a very solid box.
By the time you clamp or weight heavily (as you're suppoed to do anyway) the gorilla glue won't even notice the "help" from a few brads. Screws are handy for clamping, but once cured, the ENTIRE strength comes from the glue, and the screws are superfluous.
ragsports wrote:
Also if you take wet rag and dampen the glue joints the glue will bond much stronger, and will expand more.
TOO MUCH expansion will cause the joint to be weaker. You get faster cure, yes, but at the expense of strength. 99+% of the time, the moisture in the air and the residual moisture in the wood is plenty. Try it one time without spritzing, I think you'll find the joint is stronger. ------------- It all reminds me of something that Molière once said to Guy de Maupassant at a café in Vienna: "That's nice. You should write it down."
Posted By: DYohn
Date Posted: September 22, 2009 at 3:01 PM
Dave still says to seal those seams, Dave. ------------- Support the12volt.com
Posted By: emilime75
Date Posted: September 26, 2009 at 7:58 PM
Yay...my 1st post. This is actiually very much how I build my boxes as well. I've also been known to incorporate the bracing to support the back end(magnet) of some heavy woofers. A few points I will dare make, first of your work is good but there are some things I would do different. 1. Solid pine like that moves, a lot. It will expand and contract and eventually your joints will break free. Sticking with plywood or plain old MDF would be a much better choice, especially when the enclosure will live in the trunk of a car. If you really like the look of wood, use a real wood veneer after construction to make it look pretty. 2. Gorilla glue is great stuff, and if you brad nail it AND CLAMP it together while it's brewing, you should have nice strong joints...however, what someone else stated about wetting the wood before applying Gorilla glue is true. It does not require much water, just barely damp, and it will cure stronger, not necessarily faster. This is how Gorilla glue works, as it is a reaction that occurs with moisture and this is true for pretty much all Polyurethane glues. You can read about this on Gorilla's website. 3. You're right on about not needing any additional sealers after using Gorilla glue, as it expands naturally as it cures it does a good job of filling up any small cavities that might exist and will usually not require any sealents for the corners... but, we're back to that solid pine issue again, and this could be a cause for concern. 4. This is the last one, I promise. When bracing your enclosures, you should try and place those braces in somewhat random places in order to avoid breaking up the panels into even dimensioned proportions. Doing that will eliminate the possibility of additional resonances building up inside the box and the possibility of it sounding bad. Again, you obviously do good work, and I don't mean to be a know-it-all, but I have many years behind me as a wood worker/carpenter/speaker builder and a general audio enthusiast.
Posted By: haemphyst
Date Posted: September 27, 2009 at 12:38 AM
emilime75 wrote:
Yay...my 1st post. This is actiually very much how I build my boxes as well. I've also been known to incorporate the bracing to support the back end(magnet) of some heavy woofers. A few points I will dare make, first of your work is good but there are some things I would do different.
I don't have any problem with suggestions. Also, they are good suggestions/comments...
emilime75 wrote:
1. Solid pine like that moves, a lot. It will expand and contract and eventually your joints will break free. Sticking with plywood or plain old MDF would be a much better choice, especially when the enclosure will live in the trunk of a car. If you really like the look of wood, use a real wood veneer after construction to make it look pretty.
True, but not as much as you think, though. While "a lot" is completely subjective, first of all, but there are also some fairly hard and fast numbers that apply to pine. Called the coefficient of expansion, this particular number for Douglass fir (the most commonly available version of pine plank or lumber) is between 2.1 and 2.8 per degree F, depending on where you find your numbers. That means that the difference of my particular panels (about 13 inches square), when measured at 0 degrees F, to 130 degrees F, would figure like this: .000028 X 13 X 130 = 0.04732 inches. Five one-hundredths of one inch is the expansion of any individual panel in my enclosure. Granted, in a MUCH larger enclosure, panel size and expansion can absolutely come into play, but in my case, THERMAL expansion is a non-issue. Moisture expansion, in Bakersfield California, where a muggy day is between 12% and 14% RH, I'm also of a mind to believe that humidity will never be an issue in this case, either. I was unable to find hard numbers regarding expansion of pine vs. humidity.
emilime75 wrote:
2. Gorilla glue is great stuff, and if you brad nail it AND CLAMP it together while it's brewing, you should have nice strong joints...however, what someone else stated about wetting the wood before applying Gorilla glue is true. It does not require much water, just barely damp, and it will cure stronger, not necessarily faster. This is how Gorilla glue works, as it is a reaction that occurs with moisture and this is true for pretty much all Polyurethane glues. You can read about this on Gorilla's website.
I do clamp. The brads (by the time the urethane cures) have added so little to the joint that they become non-effective, literally, and were they to be remove after the cure, the joint will be absolutely no weaker, but leave me with nail holes to fill. More work and no benefit, so no brads for me. As far as the dampening of the substrates? Never done it, never will. There is invariably enough moisture in the wood, even if kiln-dried to around (a typical) 9% or less, for proper curing of the adhesive. Adding moisture only reduces my working time, while adding nothing to the end product. In my experience, the glue foams significantly more when additional moisture is brought to the party, which to me means there is less adhesive left in the joint, which translates to a weaker joint. This may or may not be the actual case, and whether it is or not, the glue-to-wood interface is FAR stronger than the wood itself, so this should be nothing I have to worry about either.
emilime75 wrote:
3. You're right on about not needing any additional sealers after using Gorilla glue, as it expands naturally as it cures it does a good job of filling up any small cavities that might exist and will usually not require any sealents for the corners... but, we're back to that solid pine issue again, and this could be a cause for concern.
One of the things I love about Gorilla Glue, and have loved, since the first time I ever used it... One step cure all... Strong joint, and sealed as well!
emilime75 wrote:
4. This is the last one, I promise. When bracing your enclosures, you should try and place those braces in somewhat random places in order to avoid breaking up the panels into even dimensioned proportions. Doing that will eliminate the possibility of additional resonances building up inside the box and the possibility of it sounding bad.
In a larger box, you are absolutely correct. In a 12 inch cube (internal dimensions), there is no way for ANY standing wave to occur at the frequencies I am running. This particular enclosure is destined for 100Hz (wavelength? 11.3 feet!) and below, at a 48dB slope. When building a full-range system, I will always brace and even build the enclosure itself, using the Golden Ratio (.6 to 1 to 1.6) to prevent or at a minimum, minimize standing waves.
emilime75 wrote:
Again, you obviously do good work, and I don't mean to be a know-it-all, but I have many years behind me as a wood worker/carpenter/speaker builder and a general audio enthusiast.
Thank you. I too have many years of cabinet building. Been into woodworking and cabinet building since high-school, some 20+ years ago, a wood shop in my garage, welding, electrician with the Navy from 86 to 92, and "The Critical Ear" for more years than I can remember. Currently the sub in my car is an iso-loaded 10" stuffed transmission line. Been an experimenter/builder since I can remember. Yep, I've done all that stuff for a while, too! ------------- It all reminds me of something that Molière once said to Guy de Maupassant at a café in Vienna: "That's nice. You should write it down."
Posted By: whiterob
Date Posted: September 27, 2009 at 12:26 PM
Nice enclosure...
I have seen a lot of different materials used for making an enclosure but this is the first I have seen using pine plank. It looks good though. You just forgot one thing, how does it sound?
I am curious to what you used to run the speaker wire through the enclosure. Did you simply drill a small hole and sneak the wires through it or did you use another method?
Posted By: haemphyst
Date Posted: September 27, 2009 at 5:52 PM
At the time of those pictures, there was no hole. I have since put a terminal cup with two sets of 5-way binding posts on the bottom. (sorry, no photos...) I went with two pair of posts so I can use the enclosure in a 4-ohm stereo mode, 2-ohm mono or 8-ohm mono wiring configurations.
As of yet, I still haven't connected it... I know, I'm a slacker. It's all proper volumes for the woofer, and I've used this same enclosure for the same woofer before. I expect it'll sound about the same as it did... :) ------------- It all reminds me of something that Molière once said to Guy de Maupassant at a café in Vienna: "That's nice. You should write it down."
Posted By: boardinbum
Date Posted: September 28, 2009 at 5:19 AM
Very nice work haemphyst! I sure do love the looks of that Eclipse Ti... How does it handle the low notes in that arrangement? I've never had the pleasure of auditioning one.
I have one more question - When you say you're using Gorilla Glue, are you using the regular polyurethane glue or the newer pva?
I've recently started using their pva, and it's been great. Just like TB2 but slightly higher viscosity, which I like.
|