HT speakers finished w/ pics
Printed From: the12volt.com
Forum Name: Car Audio
Forum Discription: Car Stereos, Amplifiers, Crossovers, Processors, Speakers, Subwoofers, etc.
URL: https://www.the12volt.com/installbay/forum_posts.asp?tid=77298
Printed Date: February 21, 2026 at 8:21 AM
Topic: HT speakers finished w/ pics
Posted By: stevdart
Subject: HT speakers finished w/ pics
Date Posted: May 04, 2006 at 10:20 PM
Some of you will remember I asked in this thread a couple months back if I should align drivers down the center of the enclosure, and there were quite a few great responses from the resident pros. I'm happy to say that the main speakers project is complete and I'm anxious to show off my twin babies. This was my original concept drawing that prompted the question: 
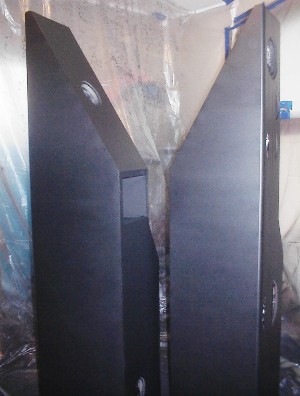
So here are a couple pics of the finished product. Stand together and say "cheese".... 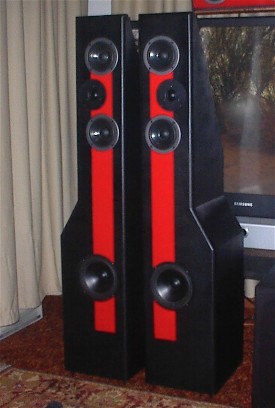
Separated at birth...and trying to make a run for it. 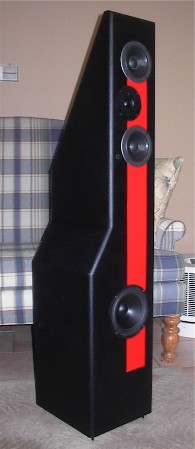
Then promptly put to work. Hey, don't we have child labor laws? 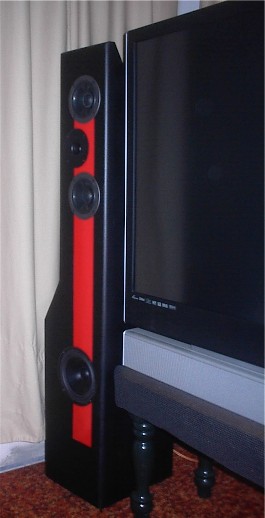
------------- Build the box so that it performs well in the worst case scenario and, in return, it will reward you at all times.
Replies:
Posted By: dwarren
Date Posted: May 04, 2006 at 11:09 PM
Those look fantastic steve! Job well done, now how do they sound?? By the way that's a hell of a tv you got there as well. -------------
Posted By: Steven Kephart
Date Posted: May 04, 2006 at 11:11 PM
Looks awesome Steve! What speakers/kit did you use? How do they sound? I think I would have gone with a darker color on the racing stripe personally as you usually don't want the speakers to attract your attention when watching a movie.
Posted By: stevdart
Date Posted: May 04, 2006 at 11:51 PM
It's high gloss red on textured black, and the red is red, no doubt. That was my wife's request and I was able to put a lot of time and some money we don't really have into these for that very reason. Solved the SAF factor ;) But now it's really toned down compared to the full-face red behemoths these are replacing! Thanks for the comments, guys. These are so new I haven't had much time to do listening tests, but my first impression was that the mid range seemed a bit loud. But listening to several types of music through these eventually gave me the impression that they were performing fairly flat as I don't have any EQ correction applied at the preamp. Notably, the guitar work of Stevie Ray Vaughan leaves me breathless after I listen to it through these. I only have a Onkyo HT receiver (75 watts/ channel) and a Philips DVD player for equipment, so I'm holding out from getting too critical until such a time that I can give them some truly clean power. Both woofers are vented to the rear and work as I wanted them to. I can put the reciever on "large" and play the music source in "direct" mode (giving these speakers the full signal) and there is no flapping out of control with the 6.5" midbass...with very near sub level output. Otherwise these are crossed to a sub at 80 Hz. But these are in their virgin day so I'll be doing as much testing as I have ability to do, such as listening to sweeps. I did watch a show tonight, "CSI", and you notice now that some of the best sound and video programming for 5.1 and hi def is seen in these regular broadcast shows. So my impression for what these were truly built for, HT mains, is that they worked very well. I've got a real nice soundstage now. Steven, these are all Vifa drivers. The 6.5s are what I am calling mid-bass; they are the WJ-00 series. The mids were some 4.5s that I bought for a song from PartsExpress, made by Vifa as OEM for Infinity from what I could gather. I tried them in the center channel and liked the sound so I bought four more knowing I would do this upgrade one day, and I wanted the mids to be the same. The tweeter is Vifa D27TG-05. Now here's the part nobody will see unless I show them. Accessible crossover. 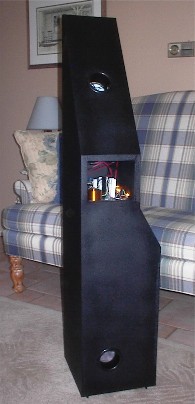
The center channel gets the next makeover. 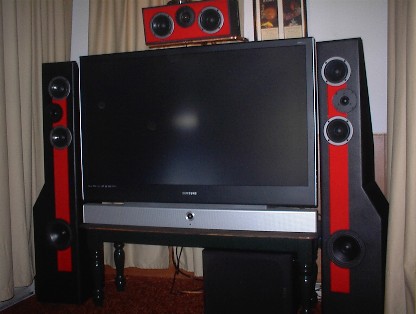
------------- Build the box so that it performs well in the worst case scenario and, in return, it will reward you at all times.
Posted By: DYohn
Date Posted: May 05, 2006 at 10:28 AM
Excellent work Steve. ------------- Support the12volt.com
Posted By: kirktcashalini
Date Posted: May 05, 2006 at 11:24 AM
WOW those look real nice. and a perfect setup to go with your TV and stand, Everything looks wonderful together, and I am sure it sounds as great as it looks.
and how much to those beasts weigh? I'm sure youve weighed one  ------------- 99 Blazer LT. Yellow Top. Big 3. Infinity Kappa Speakers All Around. Jensen CD/DVD flip out. 2 Infinity Kappa Perfect 12DVQs powered by a Alpine PDX600.1 (in one custom box, building a FG box)
Posted By: stevdart
Date Posted: May 05, 2006 at 4:12 PM
The TV stand is the bench to the kitchen table...I haven't found or built one yet. Probably will go with a simple Shaker style made with pine or MDF and painted black. I need it a bit higher so the sub will sit upright under it. I did weigh one of those speakers just before it was done, without the 3 lb crossover, on the bath scales and it came in at about 40 lbs. Not sure if I trust that as the scales are vintage '60's, but I wouldn't put them at any more than 60 lbs if I were to guess, maybe more if I consider the lbs of paint they have sprayed on them. Not much weight involved in the drivers, although the mids have bucking magnets. But there's no big hefty sub involved with these, which adds a lot of weight to a speaker. I made the speakers at 50" and they stand 51" on the spikes. My work and family members don't give me much time to listen to them, but with the sneak sessions I've had so far they sound first class. I'm working on an angle (there's always angles with the wife factor ;) to upgrade the amplifier and CD player and have an amp in mind thanks to DYohn's recommendation (thanks DYohn). So far though, I can't find anything to complain about. If you're using paint as the finish, heed this: no matter how smooth and perfect you think you've filled and sanded, there will be bad spots showing after you get a couple coats of paint on it. Be prepared to sacrifice these first coats to show you the flaws so that you can prep it some more. ------------- Build the box so that it performs well in the worst case scenario and, in return, it will reward you at all times.
Posted By: xtremej
Date Posted: May 05, 2006 at 4:26 PM
Those look sweet ! I'll bet that brings a whole new meaning to "just watching tv". I am sure they sound as good as they look. T.V.'s not bad either  -------------
Posted By: Steven Kephart
Date Posted: May 06, 2006 at 2:57 AM
stevdart wrote:
The TV stand is the bench to the kitchen table...I haven't found or built one yet. Probably will go with a simple Shaker style made with pine or MDF and painted black. I need it a bit higher so the sub will sit upright under it.
If you want to stick with DIY, there is an interesting rack system called the Flexi Rack (or Flexy Rack other times) that seems to be popular. A quick Google search under both those names will bring up quite a few projects people have done, some including the build process. Here's one great example: https://members.cox.net/~tonyptx/homeaudio/flexyrack/ I know what you are thinking, those are for equipment, not the TV. However I still think it would be a good option if you used a thicker threaded rod for stability. The advantage is that you could also build shelves for your stereo equipment as well. stevdart wrote:
If you're using paint as the finish, heed this: no matter how smooth and perfect you think you've filled and sanded, there will be bad spots showing after you get a couple coats of paint on it. Be prepared to sacrifice these first coats to show you the flaws so that you can prep it some more.
One suggestion I recommend to people is to run their hand over the surface before painting. This is because you can feel those imperfections that aren't visible to the naked eye. Also a light mist of black spray paint over your primer will show the low spots and high spots as you sand at the 220 grit level.
Posted By: forbidden
Date Posted: May 06, 2006 at 3:09 AM
Yup, I agree, nice work Steve. Those Vifa drivers should sound awesome. Tell me more about the crossover as well. No doubt about the sacraficial first coat as well, we sacrificed 2 fully stretched vinyl layers just to check our curves and lineup to the door panels we are doing right now. Jeff and I have posted some pics of our work in the Rides forum if you want to see what we have been up to. Keep up the good work, I like the colors and the pics.
-------------
Top Secret, I can tell you but then my wife will kill me.
Posted By: stevdart
Date Posted: May 06, 2006 at 5:19 AM
Using the hand to touch is ultra important. If your fingertips feel it, it will be seen. Good suggestions, Steven, and I like that flexible rack system. Thanks, Rob. I made the crossover mounting area to allow the circuit board to be easily pulled out. This speaker has top and bottom vented enclosures and a middle transition area that gives it the overall height and form. So into this middle area I put the crossover board and kept the back open for easy access. The board is made from the the hard fiberboard found on clipboards. I did the wiring through the enclosure to allow enough play so that the board can be lifted up and pulled out enough to unhook the speaker wires. Then it can be pulled out completely away from the cabinet and over to the workbench. 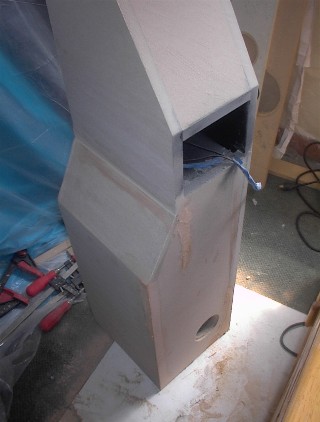
The crossover cubby is completely sealed off from the rest of the cabinet. And then the inside of it was painted black before the final assembly. 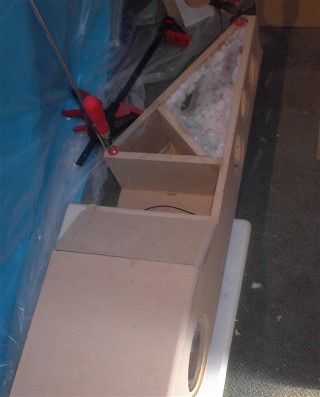

I labelled the crossover boards for the speaker connections and used bullet connectors, which are also used for the crossover-to-amp speaker wire hookup. There's a 1/4" lip on the back of that cabinet that keeps the crossover board from sliding out. Pictured above are the two completed 3-way crossovers. I used Jantzen 18 ga. coils, Dayton poly caps and teflon siver-coated 16 ga. connecting wire....nice to solder. To save some expense on this crossover layout, I do have a couple of n.p. electrolytic caps in place that are paralleled with poly caps. Those can be upgraded in the future. And resistors can be traded out if I want to experiment with the padding. ------------- Build the box so that it performs well in the worst case scenario and, in return, it will reward you at all times.
Posted By: Aruman
Date Posted: May 06, 2006 at 7:54 AM
Wauw Stevdart, did you do all all the works? painting and everything? wauw, Stevdart your are a genius they are very sweet. i wish i can do something like that one day.
-------------
Shaking The Neighborhood
Posted By: stevdart
Date Posted: May 06, 2006 at 8:20 AM
You can, Aruman! You're hanging out at the right place. This forum is basically where I learned most of what I know, or got tips to links, products, etc. I did this project from scratch, from concept to the finished product. I even made a safe work enclosure within the laundry / utility room (thanks to my wife for allowing it), with filtered air and a constant fan exhaust. The fan came off the bottom of an old discarded table hockey game (you've seen them), and the filtered air is courtesy of Mr. Hoover pictured here. Kept all the MDF dust out of the house and makes a great place for painting so you're not subject to the dust and pollen of painting outside. 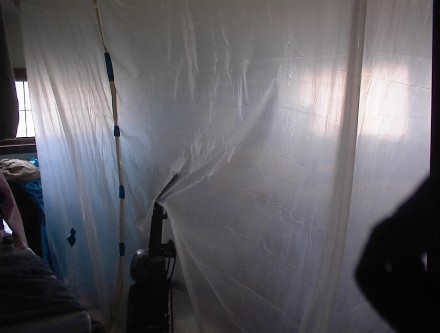
------------- Build the box so that it performs well in the worst case scenario and, in return, it will reward you at all times.
Posted By: haemphyst
Date Posted: May 06, 2006 at 9:06 AM
Are we compensating? 
Seriously, man! Those look incredible! Beautiful work! GREAT driver choices as well! With components like those they have to sound good as well! Enjoy those, I know the effort involved in designing, building and setting up big systems like that!
AWESOME job!
GO, BAKERSFIELD CONDORS! (Sorry, we are tied with Fresno 3 games each in the Kelley Cup, and we BEAT 'em last night on their OWN ice... something no other team has done all season! I'm a little excited!) ------------- It all reminds me of something that Molière once said to Guy de Maupassant at a café in Vienna: "That's nice. You should write it down."
Posted By: zhalverson
Date Posted: May 06, 2006 at 11:02 AM
Hey looks really good. Out of curiousity what did this project end up costing you? Materials and all?
Posted By: stevdart
Date Posted: May 06, 2006 at 12:37 PM
Thanks, haemphyst. You know how much of my accumulated knowledge and inspiration can be directly attributed to you. And I appreciate it! zhalverson, that's something I purposely didn't keep tabs on for one reason: if or when my better half gets into regret mode and starts harping on expenditures (not that she ever will ;), I couldn't lie about the total cost if I don't know it! Nickel and dime your way through...that's the way to do it. But if I were to to a quick guesstimate...for each one of these two speakers I think I have about $250 in materials. And that includes the mids which were bought so cheap they were nearly free. I used ten coats of red gloss and 6 or 7 coats of the more expensive textured black, which amounted to about $30 per speaker. Stuff adds up. If I consider associated tools I added to do them and the cost of the rest of the HT sound system it would get to a point I'd rather not think about. But still, it costs considerably less than what you could buy commercially when comparing to something of equal quality. You just have to love the "overcoming the challenge" part of building it. And the best part is that there is no other set of speakers in the world like them. P.S. to the earlier post, I did an official weigh-in. 51 lbs. ------------- Build the box so that it performs well in the worst case scenario and, in return, it will reward you at all times.
Posted By: zhalverson
Date Posted: May 06, 2006 at 1:06 PM
Ok. Didn't want to put you on the spot or anything just curious. I'm a big fan of doing things yourself and building your own towers is definately taking it to the next level. Way to go. I think I'll stick to car audio for now but someday maybe when college is over and I have a nice place of my own I would like to give something like this a try. I guess I will know where to go for help. Gotta love the12volt.com!
Posted By: kirktcashalini
Date Posted: May 06, 2006 at 3:53 PM
51 pounds a piece is not as much as i would have guessed lol. Again, awesome job.
-------------
99 Blazer LT. Yellow Top. Big 3. Infinity Kappa Speakers All Around. Jensen CD/DVD flip out. 2 Infinity Kappa Perfect 12DVQs powered by a Alpine PDX600.1 (in one custom box, building a FG box)
Posted By: stevdart
Date Posted: May 06, 2006 at 4:58 PM
They probably look more imposing because of the camera angle I used, which was at about viewing height of 38 - 40"..and the weirdness of two-dimensional pics on the internet. If you break it down, the largest woofers in these are the same size as the front component mids in your car, at 6.5". The net enclosure spaces are 5.8 liters (0.2 ft^3) for the top mids (combined) and 22 liters (0.78 ft^3) for the bottom woofer. In between, the speaker narrows from 10.5" to 7.5" at 12" deep. Those dimensions include the use of 3/4" MDF. The very top of this speaker is barely over an inch deep. 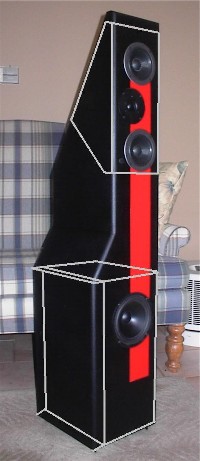
But you can almost play these without a sub, the vented midbass woofers reach so deep. I experimented with them today and dropped the active crossover on the receiver down to 60 Hz. I'll be doing some experimenting between that and 80 Hz. The Fb of the 6.5 woofer enclosure is built at 70 Hz. Fb of the mids is 135 Hz. The midbass and mids cross over at 500 Hz. ------------- Build the box so that it performs well in the worst case scenario and, in return, it will reward you at all times.
Posted By: kfr01
Date Posted: May 11, 2006 at 11:30 PM
I hope I don't tick Dyohn off too badly by resurrecting a post burried on page 4, but I just saw this thread from my lurking chair and had to comment. :-)
Stevdart - they look fantastic. Really, they look amazing. So often DIY efforts look like just that - DIY efforts. Your effort, on the other hand, looks commercial. Well done.
I especially like the accessible crossover compartment and the odd shaped midrange chamber. Good for sonics and practical, too!
I still have unfinished crossover boxes hidden behind my speakers from my 2641 project. A built in and easily accessible compartment for the XO would have been perfect; well, there's always next time.
I love the way they look in your listening room / HT.
What preamp / amp combo are you thinking of upgrading to?
Cheers!
Karl
-------------
New Project: 2003 Pathfinder
Posted By: stevdart
Date Posted: May 12, 2006 at 8:13 AM
Karl, thanks for the kudos from someone I have learned so much from. I've got a PM for you.
-------------
Build the box so that it performs well in the worst case scenario and, in return, it will reward you at all times.
Posted By: jt824
Date Posted: May 12, 2006 at 8:14 AM
very nice
Posted By: stevdart
Date Posted: May 12, 2006 at 8:35 AM
Oh heck, since this thread is up again I'll add a couple pics of the construction. Paint stages: 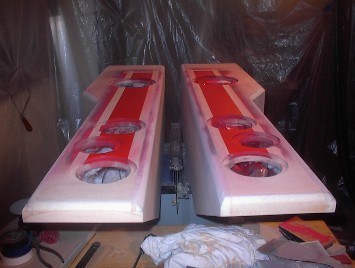

------------- Build the box so that it performs well in the worst case scenario and, in return, it will reward you at all times.
Posted By: Aruman
Date Posted: May 12, 2006 at 1:48 PM
wauw very nice stevdart, does they sound very hard?
-------------
Shaking The Neighborhood
|