1999 Toyota Avalon, Alpine with OEM amp?
Printed From: the12volt.com
Forum Name: Car Audio
Forum Discription: Car Stereos, Amplifiers, Crossovers, Processors, Speakers, Subwoofers, etc.
URL: https://www.the12volt.com/installbay/forum_posts.asp?tid=85985
Printed Date: May 11, 2026 at 11:47 PM
Topic: 1999 Toyota Avalon, Alpine with OEM amp?
Posted By: jbeletti
Subject: 1999 Toyota Avalon, Alpine with OEM amp?
Date Posted: November 21, 2006 at 3:12 PM
I am removing a Toyota 16810 head-unit from a 1999 Avalon. I am replacing it with an Alpine CD Receiver (CDA-9857).
I have no need for high-power audio and plan to use the OEM speakers unless they prove bad.
I understand this car (6 speakers) has an amplifier behind the glove-box. At first, I planned to hack the OEM HU harness but upon reflection, the audio leads are actually OEM amplifier inputs. So I'll have to grab the speaker leads after the amplifier.
So I was thinking, couldn't I just use the pre-amp outputs of the Alpine to feed the OEM amp? Of if they are too low, is there a way to attenuate the speaker output leads from the HU to match the OEM amp's input requirements?
Anyone have any thoughts on this one?
Thanks,
Jim
Replies:
Posted By: master5
Date Posted: November 22, 2006 at 2:58 AM
There is a harness available for the amplified Toyotas. However if your Deck does not incorporate front and rear preamp(rca) outputs you will need to use 2 "Y" adaptors and lose fader control. regardless do not hack the factory harness. If you choose to bypass the amp grab your speaker wires at the amp. Hacking the harness at the dash will serve no purpose. -------------
Posted By: jbeletti
Date Posted: November 22, 2006 at 9:07 AM
master5,
Thanks for the reply. New HU will have 3 pairs of pre-amp outputs.
The harness that you mention, is this a harness that will allow me to interface the new HU with the OEM amp or is it more of an amplifier bypass harness? Who makes and sells the harness?
If the harness is just an amp bypass, then I'll skip it and wire the speaker outputs of the new HU to the speakers by pulling them off the OEM amp output.
In terms of hacking the OEM harness, I probably only need power leads and such. I may end up just ordering a connector to mate with it. I found the 17-7061 harness connector on Metra's website and will be ordering it through the12volt.com's link. $5 (+s/h) and no hack - make sense :)
Jim
Posted By: jbeletti
Date Posted: November 22, 2006 at 11:02 AM
Update:
At the Installation Products website, I found the Y-harnesses and much more. I ended up ordering a Soundgate XR4 to do level conversion and interface with the OEM amp/speakers. I'll try this first. If the levels don't work out, I'll return the XR4 and bypass the amp.
Jim
Posted By: master5
Date Posted: November 22, 2006 at 3:18 PM
If your vehicle only has one harness at the dash you need the METRA harness # 70-8112 if you wish to incorporate the factory amp. This has all the powers and RCA's which plug directly into the Alpines front and rear preouts all on the one plug. Remember if you use the factory amp to hook up the remote or you will get no sound. It typically sounds pretty good this way has the factory amp should have more power then the tiny one built in the deck..regardless of it's rating. If there are 2 plugs at the dash you will use the 70 (not 17)-7061. If you wish to bypass the amp you will use this harness as well. What you do is look around inside the dash area (most likely towards the passanger side and you will eventually get to the factory amp bypass harness which you can unplug from the extension harness and the 70-7061 harnesses will plug right in. The harness might be clipped in so you may have to tug on it or cut the tie..I don't remember but I know it will reach to the deck area. Really an easy car to do, my father has the same car. -------------
Posted By: master5
Date Posted: November 22, 2006 at 3:22 PM
BTW you should not need that soundgate piece. It is a good unit but I would spend the 90 dollars on something else. Your particular vehicle will not require it if you interface with the amp or not.
-------------
Posted By: jbeletti
Date Posted: November 22, 2006 at 9:10 PM
master5,
Once again, your help is much appreciated. My bad on the Metra item number above. What I ordered was 70-1761.
I don't know how many wires I have behind the OEM HU and Installation Products shipped my order already. I may pull the dash trim/bezel of this weekend and pull the HU to see what I'm dealing with. If need be, I'll order the 70-8112 cable and return the XR4They shipped my order already.
Fabricated a bracket today to mount the Sure Power battery isolator to the firewall. Baby steps...
Jim
email
My CarPC Site
Posted By: jbeletti
Date Posted: November 22, 2006 at 9:11 PM
master5,
Once again, your help is much appreciated. My bad on the Metra item number above. What I ordered was 70-1761.
I don't know how many wires I have behind the OEM HU and Installation Products shipped my order already. I may pull the dash trim/bezel of this weekend and pull the HU to see what I'm dealing with. If need be, I'll order the 70-8112 cable and return the XR4They shipped my order already.
Fabricated a bracket today to mount the Sure Power battery isolator to the firewall. Baby steps...
Jim
email
My CarPC Site
Posted By: master5
Date Posted: November 22, 2006 at 9:53 PM
Cool beans. So I guess you are adding a 2nd battery. Mind if I ask why? BTW I don't know where you live but all the chains like bestbuy, circuit city etc. should stock all the metra harnesses for that vehicle, toyos are common so no real need to order any unless there is a discount. Expect to pay a bit under 20 bucks retail for either harness but if you have an in with a wholesaler they can be had for under 3 dollars. Yes, I would pull the deck asap and post what you find. I can then easily guide you to the part needed, but I am 99.9% sure what I posted earlier is correct. -------------
Posted By: jbeletti
Date Posted: November 22, 2006 at 10:10 PM
master5,
I plan to power the Alpine HU from the Toyota power system. I am installing an AGM battery in a battery box in the trunk. This separate DC system will power the CarPC, LCD, USB Hub, Mobile Router with AirCard, IP Camera (maybe the Sirius tuner - undecided).
The reason for the separate system is so I never compromise the starting battery system. I did just that in my Dodge RAM (dual starting batts) and I think I did irreparable harm to the batts. I never want to be in a situation where I can't start the car due to a dead starting battery.
I have BBs and CCs nearby (Chicago area) and a pretty good stereo install shop so I may be able to find the Metra cable (70-8112) if needed. Thanks for that tip.
I'll circle back here after I pull the OEM HU.
Gobble Gobble...
Jim
Posted By: master5
Date Posted: November 22, 2006 at 11:05 PM
Ah ok, I guess with all those accessories if you were using them often without the vehicle running a 2nd battery properly isolated will definatly help prevent getting stranded from a dead battery. However if the vehicle is running and it did harm to the batteries you might have a weak charging system. The only real way to harm battery(s) is to continually run them down (aka deep cycling) or just getting worn out from age. Remember , once the vehicle is running the load is on tha alternator to run everything as WELL as charging the battery so adding another one will actually place more load on the charging system. If you are damaging them by running them down may I suggest using deep cycle battery, aka "yellow tops". A bit more money but designed to be deep cycled so they last alot longer. If there is a chance you are exceeding the current demands of the stock charging system a high output alternator is the solution. However none of the components you mentioned really seem to be very high current...even combined. But all in all, you are using an isolater which is the correct way to add a batt. so it can't really do any harm to have the extra starting current (remember the batteries MAIN purpose is to start the vehicle, after that the charging system really takes on all the work, otherwise your vehicle would never start...right? Gobble as well but don't eat too much..ah what the heck stuff your face, I know I am. -------------
Posted By: jbeletti
Date Posted: November 22, 2006 at 11:17 PM
master5,
Good points about the DC power system. I forgot to add that I leave the Mobile Router/AirCard and IP Camera on 24/7. This allows me to be my own mobile WiFi HotSpot. We use WiFi all summer long in our RV (signal from the truck). So the truck is the HotSpot and when we are in the truck, we have constant access to email, Web, weather etc. (with the CarPC). The IP camera uploads images to my website and the video stream is public accessible.
I did have Dodge load test my 2 starting batts and test the charging system. While the batts aren't low enough to fail the test, they run down below 11 volts overnight with easily. With none of my gear on, the batts still dip below 11.6 over night.
When they get worse (this winter), if I can't get Dodge to warranty replace them, I'll take your advice and get the largest Yellow Tops I can fit in the OEM locations.
Jim
Posted By: master5
Date Posted: November 22, 2006 at 11:47 PM
Ok I understand better what you are doing..very cool BTW. Anyhow, if the batts are dropping below 12v (theoretically a "perfect" battery should be 12.66 volts) there is a problem. Most likely the batteries have been deep cycled too often...according to MECP it is stated that everytime you deep cycle a standard lead-acid battery it's life expetency is reduced by up to 50%. So you can see that it doesn't take too many deep cycles to destroy a standard battery..add to that natural wear with age. Now if you experience this voltage loss with good batteries and everything is off you could possibly have a current draw problem. If you don't know how to do a current draw test you will need someone to do it. 7 to 10 milliamps is the norm...up to 20milliamps is safe. After that expect dead batteries in the morning, regardless of what type. Even something as small as a relay sticking will draw 150ma overnight...more then enough to kill it. With what you stated about leaving all that equipment on 24/7 you really have no choice but to use deep cycles IMO because they are going to be drained often and in the long run it will save you money and headaches. This is a primary reason they are used in boats, RV's etc. You are basically giving the batteries the same use as those mentioned and they are designed for that kind of use for longer life. I would recomend to wire the isolator in a way that they will both be charged via the alternator..but when the key is off only 1 battery gets used. This way you have the safty margin of at least one charged battery at all times to start the vehicle. If you don't know how to set up the isolator to operate in this fashion post a pic and some info on it and I will help you out if possible. -------------
Posted By: jbeletti
Date Posted: November 24, 2006 at 10:22 PM
Got the isolator installed and mostly wired in. Also pulled the OEM HU.
ISOLATOR
I've wired the isolator per Sure Power's directions. Both batteries are charged by the alternator and both batteries are always isolated from each other.
Battery 1 output feeds the Toyota starting battery. No non-stock loads will be added to this battery circuit.
Battery 2 output feeds the sealed AGM battery in a secured battery box in the trunk. This feed has not been run yet. I will be installing a 100 amp circuit breaker at each end of this feed like I did in my Dodge RAM.
At the output of battery 2 in the trunk, before the power distribution fuse block, I'll add a 60 amp solenoid to be used to switch off all battery 2 loads from a small dash mounted switch.
OEM HEAD UNIT
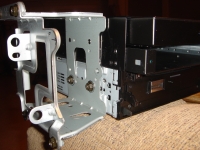
Glad I ordered a set of trim hook tools. I had to use 2 at a time to pull the dash bezel off at 8 points. A climate control module was connected to the left side of the HU. After I pulled the HU, I reinstalled the climate control module. On that module, another module of some sort is snapped onto the back of the bracket. It's a Denso branded item with a single multi-pin plug connected to it. I left it installed.
There were 2 white Molex connectors plugged into the HU and there was one open port on the unit. Probably the CD changer port.
I've posted images of the back of the OEM HU and the Molex plugs on the car wiring harness at a link below. From those images, can you determine what Metra cable I will need in order to easily interface with the factory amp?
I also added a Panavise InDash bracket and a ProClip cellular mounting pad to hang my cell phone from. I've used this setup in 2 other vehicles and it works well for me.
Link to image gallery
At the gallery, follow this path: Main Menu:Avalon:Inside
Thanks,
Jim
Posted By: master5
Date Posted: November 24, 2006 at 10:43 PM
Ok according to those images the vehicle is utilizing a non amplified harness..which you will use the 70-7061 toyo harness. Now if you are 100% sure the vehicle has a factory amp you can probably get away running it high level..in other words connect the speaker wires of the aftermarket deck directly to the metra harnesses, connect both blues (one is power antenna remote, one will turn on the factory amp if it has one). Now if you don't have a power antenna or factory amp you can still connect the blue wires, it won't hurt anything. Yeah I know those dash clips can be a little tight..especially when "virgin". As far as the other plugs ,modules, denso thing etc that is all HVAC controls, nothing to be concerned about as long as you don't forget to plug everything back in when done. Your New headunit will bolt right onto the factory brackets and reassemble as reverse. If your new head unit is single din you can use a metra univeral pocket kit to fill the space..about 19-20 bucks tops. As you stated in your original post if you need to drop the input level you can use a 4 channel converter to do this. But I would bypass the amp if that's the case but it's up to you. You have one on order regardless..a bit pricey but it will work. As far as the isolator it looks like you have everything in order...done safely and reliably. -------------
Posted By: master5
Date Posted: November 24, 2006 at 10:54 PM
One other thing. Although I doubt this will be an issue if the speaker level input is too hot (if there is actually a factory amp) you have another option as well. Instead of using a converter or hacking the harness you can do this... Hack up a set of RCA's and splice the ends onto the metra harness speaker wires. This will give you a line level input without hacking the car. Now keep in mind there is no way to predict if there is enough voltage to give you enough volume but it is very worth a try. Your only risk is an RCA cable that you cut. Put the center wire of the coax to the positives (solid colors) and the shield (copper braid) to the negatives (striped), The metra harness will be color coded to match the alpine exactly so it's a no brainer. If done this way you will not use the speaker wires from the deck..insualte those off and plug in the RCA's connect the remotes and check the sound. However I still have some doubt if theres a factory amp. Perhaps it was an option and not all have them. I will look at the images again and see if i notice an amp on the deck. Keep in touch with the progress and best of luck. -------------
Posted By: master5
Date Posted: November 24, 2006 at 11:00 PM
yeah it looks to me like a large heat sink is on the back of the deck..this would identify it has an internal amp in most cases. One way to check for sure is this....when you get the metra harness take a small battery like a 9v or D and touch the positive and negative to a pair of speaker wires for a second and see if you hear a popping noise, if you do there is no external factory amp. when you do this make sure the yellow wire from the metra harness is insulated...it is constant power and could blow a fuse if it touches anything..or use the harness that has the rear speakers on it to test, that is the one without the yellow wire. -------------
Posted By: jbeletti
Date Posted: November 24, 2006 at 11:47 PM
master5,
I think you are right - that this OEM HU has the amp built-in. I Googled "86120-AA030" - the part number on the back of the unit. Lots of eBay ads. One of them mentioned that this unit has a built-in amp.
If it does, I'll use the Metra cable I have on order and I'll return the LOC.
I'll probe the speakers at the Molex tomorrow with a 1.5 volt cell to know for sure. All the speaker wires on the Molex' matched the wiring chart. I think the ground wire may be brown instead of black as in the chart. I quick check with my DMM and I'll know.
Thanks,
Jim
Posted By: master5
Date Posted: November 24, 2006 at 11:57 PM
ok cool. yeah I thinks it's brown as well because I know for a fact one of the factory colors for a speaker wire is black on toyotas and i don't recall seeing 2 blacks wires. But I guess not having an external amp is good news..less money..less work...less chance for problems..and more or less what you were looking for. The alpine will sound great as long as the speakers are not shot. Anyhow you just need to find a pair of speaker wires to do the check..you don't need power or ground..I believe the factory colors are as follows.....pink and purple light green and blue red and white black and yellow this is off the top of my head but i am about 99% sure. Once you get the metra harness it is standard color code to the alpine so it's very simple to hook up electrically. -------------
Posted By: jbeletti
Date Posted: November 29, 2006 at 9:42 AM
master5,
Just wanted to give a small update.
The gear continues to arrive. Received the Alpine HU, the Carnetix PSU and some stuff from Installation Products. The LCD just shipped - hope to have it by the weekend.
Anyway, the Metra harness arrived but the LOC was backordered. Using the harness, I was able to confirm that there cannot be an OEM amp inline with the speakers. Nice crackle from them using the 1.5 volt cell test. And I was able to cancel the backorder on the LOC. Perfect!
When the LCD arrives, I'll have my work cut out for me. I will need to stack the LCD on top of the Alpine HU, then fit the OEM brackets to them. Not looking forward to that. I see some fabrication in my future :)
Jim
Posted By: master5
Date Posted: November 29, 2006 at 8:02 PM
ok cool, some good news, at least the deck install is straight forward. Anyhow I enjoy fab so if you have any questions or need ideas just post a description or better yet pictures and I will offer any suggerstions. Best of Luck.
-------------
Posted By: jbeletti
Date Posted: November 30, 2006 at 11:19 PM
I received the Xenarc 700IDT LCD today. Below are two images (front and side views) of the LCD sitting on top of the HU.
Some initial thoughts:
- To mount the LCD so that when closed, the nose of it is about flush with the HU, the LCD case will be mounted farther into dash (need to check clearance)
- The LCD is very heavy (appears to be counter-weighted at the rear). May need to reinforce the OEM HU brackets or fab new ones and suport with straps from behind
- In order to retain the Alpine HU bezel and the Xenarc LCD nose/bezel, the LCD will need to be spaced up off the top of the HU by about 1/4". Maybe screw appropriate thickness of thin plates or washers to bottom of LCD case (pretty safe to bolt onto the bottom of LCD as case is pretty empty
- Due to LCD case being slid back so far to align fronts, it appears that I will not be able to use either of the sleeves that came with the HU and LCD as they are not close to lining up front to back - way offset
- Looks like I will need to fab something to strap the 2 units together on the sides. Thin plates perhaps. Drilled, then screwed into the equipment slides - preferably into existing holes but not the ones that match up (if at all) with the Toyota radio brackets
Am I on track with my thoughts above?
Thanks,
Jim
 
Posted By: master5
Date Posted: December 01, 2006 at 12:13 AM
Ok..toyos use whats called an "iso-mount" method..which basically means it bolts to the factory brackets and the "sleeves" are not used. Once the units are bolted to the brackets..and then bloted to the dash..trust me..it will be rock solid..even it the units combined are heavier then the stock deck. The tricky part will be lining everything up perfectly as there are many factors..as you are noticing already. what I do (and I do these type installs alot) is modify the factory brackets by re-drilling the holes which position the units as even and flush as possible..and not interfere with the dash bezel once reinstalled (you might have this issue if you space the lcd up to much). The alpine should have exsiting holes that line up perfectly on the bracket so you will most likely be drilling for the perfect placement of the LCD..it may take some trial and error..basically install it all...snap the dash back on..check for fit..and repeat until it's right. No real shortcuts but with patience you will get it. In the worst case you may need to trim/cut/file some of the plastic dash bezel if the monitor hits but that is not difficult, once again just requires patience. -------------
Posted By: jbeletti
Date Posted: December 01, 2006 at 9:15 PM
master5,
Spent a little time on this project tonight. As you said, the Alpine did end out bolting right up to the Toyo brackets. Once I stacked the LCD on top, I found that I was going to have to trim the top and side of the dash bezel.
Trimmed with a utility knife (don't have a Dremel), filed smooth. It fits and the trimming I did looks okay too.
In order to allow the LCD to extend, tilt up, back and to the left, I ended up having to pull the casing out of the dash a bit. I will not be able to have the HU and LCD cases flush at the front. With the HU faceplate on, the LCD, when closed, sticks out about a half inch farther than the HU faceplate. Acceptable.
The HU sits a bit low and will not allow for the use of the snap on bezel that came with it. I'd have to cut off the entire bottom and right side to use it. I plan to skip it.
In order to allow for the HU faceplate to open downward to insert a CD without the rotation of the faceplate interfering with the bottom of the dash bezel opening, I will have to lengthen the screw holes in the factory brackets to raise the HU up about 1/16" or so.
None of the holes in the LCD case line up with the factory brackets so as you stated, I will be carefully measuring and drilling holes to mount the LCD.
Tomorrow, I plan to verify all the leads in the factory harness, then solder the Metra harnesses to the Alpine HU harness, then do a trial and see if I can get the thing to play. Then I'll pull the HU out and start working on pulling a crazy amount of wiring from the truck to the dash for the CarPC.
Thanks again,
Jim
Posted By: master5
Date Posted: December 01, 2006 at 9:34 PM
Sounds like progress..good. Most of the times with iso mounting the trim rings are not used..thats normal. However..if you are not happy with any gaps I have used thin foam to surround the circumference of the front edge of the deck..the stuff that tapes on. It comes with some speakers but you could probably find something similar at home depot or place like that. Once you put the dash on over it..it looks professional and hides any gaps well. It's less work then making a trim ring fit. option 2 is to mount the deck back further and put the trim ring on from behind..this looks the best but would not be easy with the double stack as you are already having a tight fit. option 3 is to space the head unit out as well..equal to the face of the LCD with the face of the alpine deck. This may or may not allow the use of the trim so if you decide to try it this way... test "line" them up before you drill. If you won't be happy with the look it is not worth the effort. option 4 is to leave it as is..if it looks acceptable to you..then it works. Continued good luck. -------------
Posted By: geepherder
Date Posted: December 02, 2006 at 6:21 AM
Yes, as master5 says, you can bring the deck forward so it's even with the screen, and maybe use the trim ring. You'll just have to redrill the factory mounting brackets. Try a test fit first to make sure it'll work out to your liking.
-------------
My ex once told me I have a perfect face for radio.
Posted By: jbeletti
Date Posted: December 03, 2006 at 12:55 AM
Got the HU and LCD installed (dash bezel loosely applied for now). I decided to leave the HU flush with the rest of the dash and allow the LCD to stick out another half inch or so. See clickable pics below.
Just wanted to tell everyone (especially to master5) thanks for the ideas and encouragement.
As you all stated, it took a lot of measuring, cutting, drilling, trial fitting, then Dremeling (bought the cordless model today), soldering and heatshrinking but I got'er done.
I also wired in the Motorola Bluetooth handsfree kit. I wired in the speaker that came with the kit and connected to audio mute/interrupt line to the Alpine HU. No time to try the BT kit out yet but so far, I noticed it does not appear to light up or anything. Gotta read the manual next.
While I now have tunes, the HU isn't quite done. The Alpine Siruis tuner is on back order so no satellite radio yet. The iPod cable is plugged in - now to test it out. The CarPC audio will come into the HU via an AI-Net to RCAs adapter that loops through the Sirius tuner that I don't have - so that will have to wait.
Next steps: - Design/Fab/Install slide-out shelf in trunk under package tray for CarPC gear
- Run 4 ga from battery isolator to trunk (with 100 amp breakers at each end)
- Install battery box in trunk and run short 4 ga ground
- Install antennas (cellular, GPS and Sirius)
- Pull a gajillion interconnects from the trunk to the dash and console
- Connectorization-fest / testing / fun!
Thanks again everyone - great forum. Appreciate how you Pros take time to help the noobs.
Jim
(click image)

(click image)
Posted By: master5
Date Posted: December 03, 2006 at 2:02 AM
Lookin good. I can see what a tight fit that massive LCD is but you got it in..patience pays off. you got a bunch of connections and wire runs yet but it really should be downhil from here. I will be off line for a few days since I am moving from sunny South florida to freezing NY. I figure 2 -4 days min. before I am settled in and have my PC and internet set up. Looking forward to seeing the progress, until then hope all goes smooth. I'll check back once I am set up. have a good wire fest -------------
Posted By: geepherder
Date Posted: December 03, 2006 at 5:31 PM
Looks good.
-------------
My ex once told me I have a perfect face for radio.
Posted By: jbeletti
Date Posted: December 03, 2006 at 9:37 PM
Thanks guys. The Moto BT is not working. Next time I pull the HU/LCD, I'll troubleshoot the the BT. It was pretty straight forward to wire up so I am surprised it appears to be dead.
It's 16 degrees here. Too cold to do any wiring for now. Maybe it'll warm up next weekend.
Jim
Posted By: jbeletti
Date Posted: December 10, 2006 at 3:47 PM
Update (10-Dec):
Got the Moto Bluetooth HF working:
Pulled out the brain, unplugged then reseated the harness - viola! Man, this Moto BT unit works very well and sounds great. Phone connects when the car is started. HU audio is interrupted when I make a call or when I am receiving a call. No more missed calls due to music being too loud.
Got the Sirius tuner installed and working (AI-Net):
Wrapped tuner in thin carpet and installed in dash behind and below HU. Temporarily put the antenna on the roof at the edge of the windshield.
Got the Sirius iPod interfaced (KCE-422i) and working:
HU had a dedicated port for the iPod. Used the Alpine interface cable.
Pulled interconnects (driver side):
Shielded stereo audio pair from trunk for CarPC output to the Aux in (via KCI-121B cable) at the Sirius tuner behind the HU in the dash. Multi-cable for LCD (VGA, audio, video x2 and USB) from trunk to the LCD in dash. And 2 USB extensions (15' passive) from trunk to the center armrest/console area (for trackpad/mouse and flash drive).
Pulled power and power switch cabling (passenger side):
4 gauge red power cable from trunk into cabin and out firewall via existing harness boot to 100 amp breaker to Batt 2 terminal on Sure Power battery isolator. 3 pairs of 14 gauge wire to be used for power switching and LCD panel power from the trunk to the dash behind HU.
Next steps:
- Fab/install equipment sliding shelf
- Install antennas (GPS, Cellular and relocate Sirius)
- Install components (CarPC, PSU, Router/Access Point and breaker panel/power distribution)
- Wire it all up and test it
Jim
Posted By: master5
Date Posted: December 11, 2006 at 2:15 PM
excellent, don't forget to post some more pics when finished. Good Luck. -------------
Posted By: jbeletti
Date Posted: December 11, 2006 at 4:04 PM
master5,
Will do.
Yesterday, I fabricated the equipment shelf from 3/4" MDF, 16" full-extension drawer glides and 4" L brackets.
The L brackets will be used to mount the shelf to the underside of the package shelf in the trunk. Due to uneven surfaces (mold stampings etc), I am expecting the bracket mounting under the pacjage shelf to be a bear. Lots of measuring and careful drilling I suspect. I plan to use some #8 short sheet metal screws (2 per bracket x 4 brackets) to fasten the brackets to the package shelf. In the area of contact, there seems to be a shallow hollow space so I'm hoping my plan is solid.
Worst case, I'll screw a piece of MDF (24"x16") to the package shelf, then screw the brackets to the MDF.
Jim
Posted By: jbeletti
Date Posted: December 16, 2006 at 9:08 PM
Update (16-Dec):
Fabricated and installed equipment shelf:
Using 3/4" MDF, 16" full extension, ball bearing style drawer glides, 4" L brackets and a lot of nuts, bolts and washers, I fabricated a pull-out shelf for the CarPC. I used #12 self-tapping screws to attach the L brackets to the underside of the package shelf. In the process of making a catch that will keep the shelf locked closed.
Installed GPS (Garmin 18) and Cellular antennas on the trunk lid:
The GPS antenna is a magnetic mount and the Cellular antenna is a no-hole trunk lid mount.
Next steps:
- Relocate Sirius Antenna to the trunk lid and pull wire to tuner in dash
- Install components (CarPC, PSU, Router/Access Point, battery & box and breaker panel/power distribution)
- Wire it all up and test it
Jim
Posted By: jbeletti
Date Posted: December 16, 2006 at 9:27 PM
Posted By: master5
Date Posted: December 19, 2006 at 1:39 PM
Nice to see you are still making progress. I recently relocated up to NY due to an illness with my father and am working in the industry up here now. This time of year is hectic as it is so you can imagine I am stressing. But will check back time to time..once the season is gone I will be here more often. Take care. -------------
Posted By: jbeletti
Date Posted: December 30, 2006 at 7:21 PM
Just wanted to say thanks to everyone who came to my aid on this install. Since the project is now outside of the scope of the thread title, I have moved my project progress to a new thread over at MP3Car.com
Thanks again - especially to master5.
Jim
|


