custom diy, box, deafening, pics
Printed From: the12volt.com
Forum Name: Car Audio
Forum Discription: Car Stereos, Amplifiers, Crossovers, Processors, Speakers, Subwoofers, etc.
URL: https://www.the12volt.com/installbay/forum_posts.asp?tid=95280
Printed Date: April 18, 2026 at 2:17 PM
Topic: custom diy, box, deafening, pics
Posted By: stealthfade
Subject: custom diy, box, deafening, pics
Date Posted: July 02, 2007 at 1:12 PM
Hey guys, I am new here. However, I have been on the forum for quite some time, just reading and learning, but never posting.
Nonetheless, my friend and I have been installing a sound system in my car. We opted for a simple custom job, and considering this, I thought that I would share the progress here, and look for opinions and any input. Feedback would be most helpful. By the way, sorry for the low quality pictures (only 1.3 MP), I was using a camera phone because I lost my digital camera.
After installing a new head unit, I purchased two 12 subwoofers and we got to work.
We opted for a standard MDF wood enclosure (a sealed box, by the way), but because we wanted a custom design (but nothing too fancy, of course), and to save money, we decided to build one ourselves.
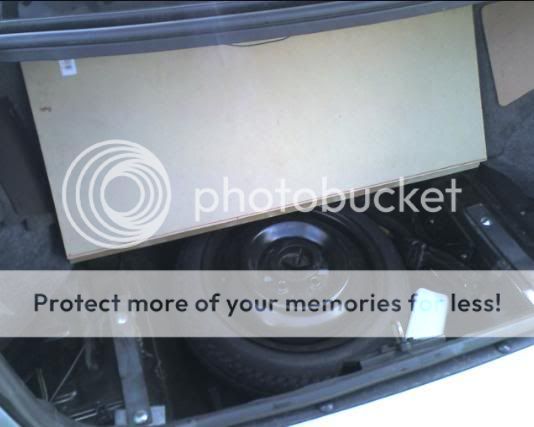
For 20 dollars, I purchased a 4x8 sheet of ¾ MDF board from Lowes. Before constructing the enclosure, we first had to design a new floorboard for the trunk of my car. The previous floorboard was a thin, saggy cardboard cutout that sat on top of the spare tire. This looked tacky and it would not suffice.
After measuring the necessary floor space, we cut out a large chunk of the MDF sheet and created a new floorboard. However, I wanted to retain the ability to reach my spare tire easily (one of my friends must first disconnect and remove his box before he can remove his spare tire, and I did not want the same difficulty). So I came up with a simple idea (I dont know if anyone else has thought of this) that would allow me to keep the enclosure secured, while being able to remove my spare tire - a door for the spare tire.
We cut the floorboard in half, and reconnected them with four small hinges two on each side. The hinges only cost a few bucks at Wal-Mart. This ended up working perfectly.

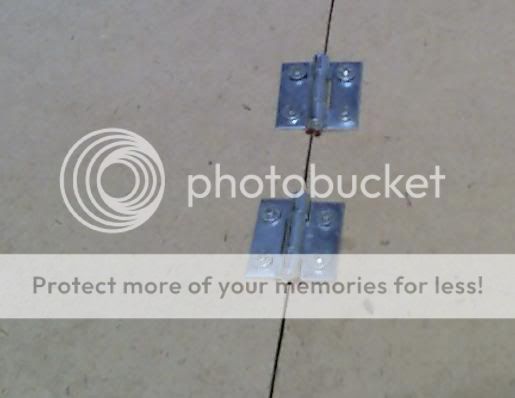
It is important to note that it was unnecessary to cut the length of the door over the entire tire well, so we just cut it over the majority of the tire. If necessary, the tire will easily come out at an angle.
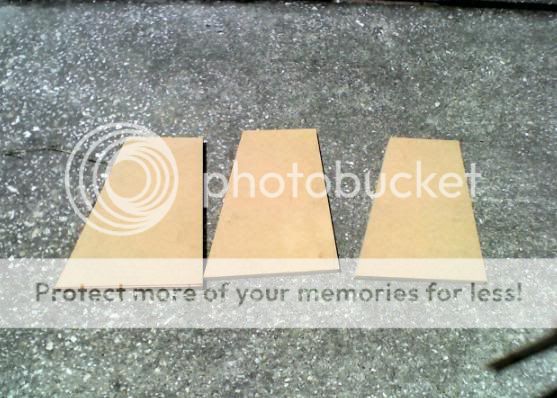
Next, we started designing the subwoofer enclosure. We wanted the front side angled, so we just ran off a quick sketch and got to work. After measuring, we cut off three larger sections of the MDF board for the enclosure: front, back, top. The width of the box was decided by the shortest measured width inside the trunk (remember, it has to fit back there).

We then cut off three smaller sections and shaped them to the angle we wanted. Two of these would be used for the sides of the enclosure, while the third piece would be used to divide the enclosure into two chambers.
By the way, the floorboard would also serve as the bottom of the box. Our design called for everything to be screwed and mounted together. It will all be one piece.
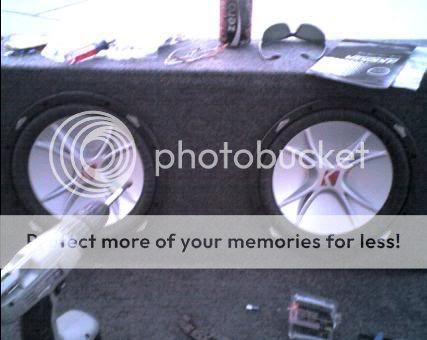
We took the board that would serve as the front of the box, and we measured and traced out the area we needed to serve as the holes where we would mount the subs. A jigsaw served this purpose nicely. Pretty simple, just be careful not to make mistakes.

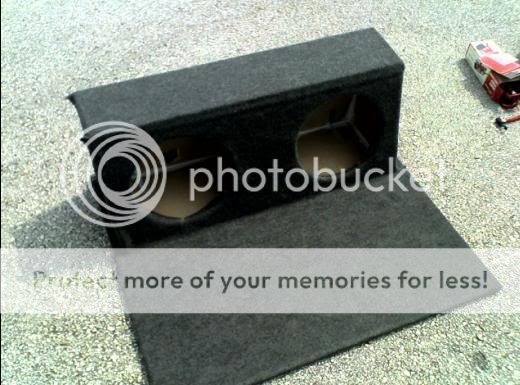
After this, I ran on down to Radio Shack and bought a speaker port for 5 dollars. After cutting out a small hole with a jigsaw, we mounted and sealed it to the back of the box.
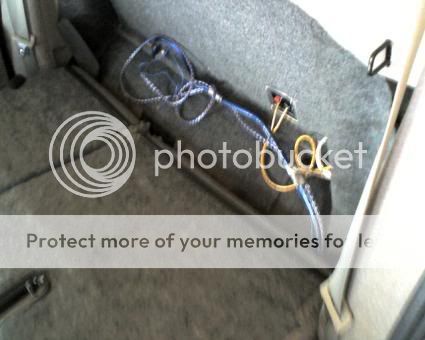
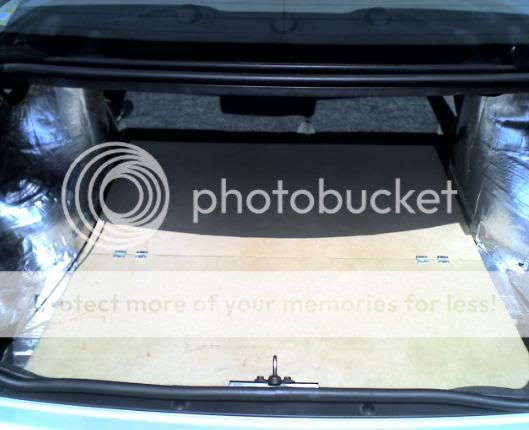
I also recently installed my sound deafening material throughout my trunk. Dynomat, although excellent, is too expensive for my budget, so I opted for an alternative. After looking up some reviews about B-Quiet Extreme, I ordered 50 square feet of it. I found a 10% discount code online, and after shipping, it cost me about 86 dollars. Not to shabby, but lets hope it keeps the rattle down a little.
Before installing, I gutted the carpeting out of my trunk and vacuumed it clean. Then I used denatured alcohol (around six dollars at Lowes) and a microfiber cloth (Wal-Mart) to clean out my trunk completely. This will prepare a clean surface (so the adhesive will stick better) for the material before I line it.
After a few days, I finished lining the inside of my trunk with the B-Quiet Extreme, and I think it turned out rather well. Lets just hope it works like it is suppose to.
https://i204.photobucket.com/albums/bb56/Stealthfade/11.jpg
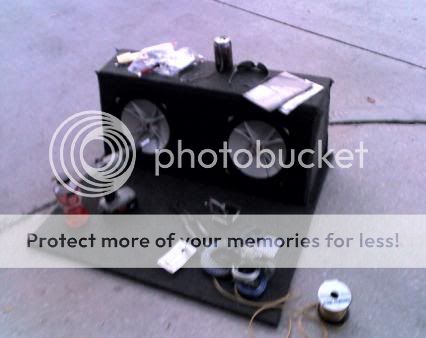
After this I got back to working on the enclosure. All we had left to do was to screw and seal the boards together, and mount it to the floorboard. The sealant was pretty cheap (Wal-Mart).
Note that we had to mount the box several inches from the end of the floorboard to keep it away from the slope of the seats (the back wall/seats is not a perfect vertical line). After the box was finished, we mounted it to the floorboard and set it in my trunk. Note that this picture was taken before we screwed the top piece on.
https://i204.photobucket.com/albums/bb56/Stealthfade/16.jpg
https://i204.photobucket.com/albums/bb56/Stealthfade/5.jpg
Now I am waiting to order my amp, and then I need to get creative to incorporate it into my current design. After this, we will carpet the project, and install the subwoofers, and Streetglow lighting. We still have a lot of work to do, but this is where I am stopping to post.
If you have any opinions, comments, ideas, or any other feedback, please feel free to drop a line. I need ideas for my amp, maybe something with Plexiglas?
Replies:
Posted By: stealthfade
Date Posted: July 02, 2007 at 1:28 PM
Apparently the last three pictures did not display correctly. So here, lets hope this works.
11 - 
16 - 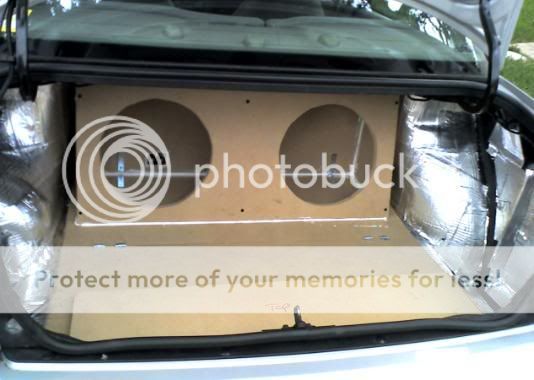
5 - 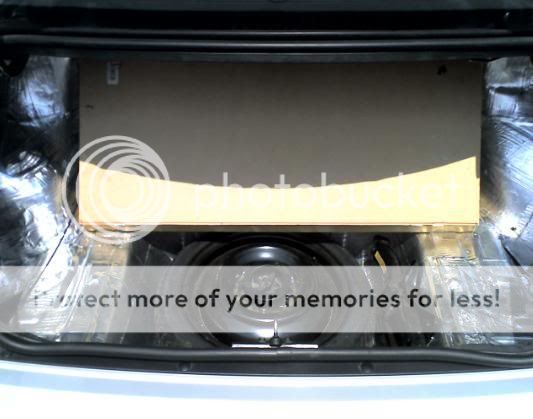
Posted By: Alpine Guy
Date Posted: July 02, 2007 at 1:55 PM
I like that install very much, it's nice, clean, and very practical! To finish it off very nicely I would look into getting an upholstery shop carpet the trunk for you and make it all look like it was supposed to be there from the factory. Personally if I were you I would pick up a really small sized amp for the subs so you can hide it out of site, like under the front seat so you can keep that truck very clean looking.
-------------
2003 Chevy Avalanche,Eclipse CD7000,Morel Elate 5,Adire Extremis,Alpine PDX-4.150, 15" TC-3000, 2 Alpine PDX-1.1000, 470Amp HO Alt.
Posted By: stevdart
Date Posted: July 02, 2007 at 8:10 PM
Good idea with the hinges / spare tire. I would have advised to make the box outside of the vehicle and then slide it into place onto the new floorboard. Finishing, carpeting will be a major headache when you are sideways/ upsidedown in the trunk. You said you went to RShack and picked up a "port". By that I guess you meant a terminal cup? Commonly, instead of using that weak point of plastic, the wires are fed through a drilled hole and sealed with wood putty or caulk. Since that box isn't coming out of the car, it doesn't matter how the wires look coming out the back of it. A brace from front to back, top to bottom at the very center of the box would have been a good idea. ------------- Build the box so that it performs well in the worst case scenario and, in return, it will reward you at all times.
Posted By: haemphyst
Date Posted: July 02, 2007 at 8:35 PM
I'm most impressed with the effort spent installing all the damping...
I gave up, long before that; although now, with all of my latest efforts being expended, I'll most likely be putting that last box of Dynamat Extreme in my trunk... (either that, or I'll be cutting myself to ribbons again putting it in the doors which need it pretty badly as well)
Looks good! I hope it's getting better gear than Audiobling! (That DOESN'T include Sony, BTW)
One little suggestion from me, if you'd care to hear it... Get rid of those little cheesy hinges you picked up, and run down to your local hardware sore, and buy a "piano hinge" - they'll be around 8 to 10 dollars, depending on length. You'll be glad you did, it'll keep the middle part from sagging, which it will do, just from aging, and it'll be perfectly aligned the whole width... I've found it is worth the extra money in the long run.
-------------
It all reminds me of something that Molière once said to Guy de Maupassant at a café in Vienna: "That's nice. You should write it down."
Posted By: stevdart
Date Posted: July 02, 2007 at 8:54 PM
Oops...I looked again and see that you used a center brace. My bad!
-------------
Build the box so that it performs well in the worst case scenario and, in return, it will reward you at all times.
Posted By: hamzter
Date Posted: July 03, 2007 at 8:46 AM
Piano hinge is a great idea if you can swing it.
for the sub enclosure, get a couple of cans of fiberglass resin or you could buy some rubber undercoating and then treat the inside of your sub box.
it will seal the porousness of the MDF
otherwise good work.
-------------
Mark "Hamzter" Cinense
1991 Infiniti G20 w/JDM SR20DE
Eclipse CD8445
MTX Thunder 684
Polk DB6750
Polk DB6500
Optima Red Top in the Trunk
Posted By: stealthfade
Date Posted: July 03, 2007 at 11:06 AM
Is the piano hinge angled? Because the front of my box is at an angle to the floorboard. It is not a 'square'. However, it would be difficult to put another hinge on it as now the box is complete. Yes, it does have a center brace, and the entire frame is screwed in from the bottom as well. But I think the box is sturdy enough, my friend actually sat on it and it holds his weight, and the subs are not as heavy as that. Secondly, the box is actually removable, when necessary. In fact, I pulled it out and carpeted it already. I don't have a picture of the carpeted project yet, but here is a picture to show that it is removable. 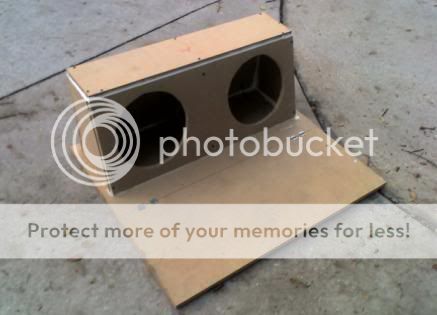 I cant get any pictures of the carpeted project yet as my car is in the shop. Funny story - It was a rainy day and i missed a curve and drifted into a curb with my wheels turned, so i flew up on over the curb and went driving on a sidewalk. So I went and changed my tire, and opened my trunk, and the first thing i said to myself was "boy am i glad i built a door for my spare tire". Too bad i damaged my engine cradle/subframe and sway bar as well. Ugh.
Posted By: hamzter
Date Posted: July 03, 2007 at 11:19 AM
right on...
I see that you have some type of caulking going on. I that holds it together well enough.
are there enough screws? I use wood glue and air brads to build my boxes and then fiberglass the inside.
-------------
Mark "Hamzter" Cinense
1991 Infiniti G20 w/JDM SR20DE
Eclipse CD8445
MTX Thunder 684
Polk DB6750
Polk DB6500
Optima Red Top in the Trunk
Posted By: haemphyst
Date Posted: July 03, 2007 at 11:31 AM
The piano hinge would go in EXACTLY the same place and orientation as the hinges you have there presently, just full width.
Stronger, and better looking... more durable, as well. More screws holding it in place the full width makes sure they are aligned perfectly... You'll understand what I'm talking about when you see one.
-------------
It all reminds me of something that Molière once said to Guy de Maupassant at a café in Vienna: "That's nice. You should write it down."
Posted By: hamzter
Date Posted: July 03, 2007 at 11:35 AM
oh, and what are you using for the deadening material?
-------------
Mark "Hamzter" Cinense
1991 Infiniti G20 w/JDM SR20DE
Eclipse CD8445
MTX Thunder 684
Polk DB6750
Polk DB6500
Optima Red Top in the Trunk
Posted By: hustlin247
Date Posted: July 03, 2007 at 2:42 PM
Very nice. I did the same thing in my wife's Saturn SL2. Well, I used a premade box and attached it onto a similar board/door configuration. We built it at a custom cabinet shop my friend worked at and used piano hinges. As has been previously mentioned those would probably be a nice improvement. Do you still have the carpet that you pulled out? I stapled the original carpet over the board and door. It happened to match the premade boxes carpeting. What is that dampening material? Doesn't look like dynamat. ------------- '94 Ford Explorer / Kenwood KVT-815DVD / RF Power T1682C 6x8 (all doors) / RF Power T10001 / 12" Kicker L5 (x4) / Optima Yellow Top Battery
Posted By: stealthfade
Date Posted: July 03, 2007 at 6:29 PM
The write-up on the dampening material is all in my original post. It was B-Quiet Extreme. Cheap stuff.
Yes, I still have my original side carpeting. Haven't had a chance to put it back in yet, as my car is still in the shop.
It will be similar to the carpet I bought for the box, but the box carpet is a lot thicker.
I will look into these piano hinges since everyone is so fond of them.
Posted By: stealthfade
Date Posted: July 03, 2007 at 6:33 PM
hamzter wrote:
right on...
I see that you have some type of caulking going on. I that holds it together well enough.
are there enough screws? I use wood glue and air brads to build my boxes and then fiberglass the inside.
I think I used somewhere around 30 screws on the thing. And then I caulked it to seal the air in. It holds the weight of a man, so its strong. Can you define air brads for me?
Posted By: tdsteele
Date Posted: July 03, 2007 at 9:00 PM
Air brads, he just talking about using like an air nail gun and the small size nails, like finishing nails, that go in them. Using an air nailer just makes putting the box together a little easier than say trying to hold two pieces of wood together with one hand and using the other to screw in a screw. I usually use the nailer to hold it together then drive in some screws. But glued properly and good joints, a person could just use the nail gun. Just different ways of doing things.
Posted By: KarTuneMan
Date Posted: July 04, 2007 at 7:22 PM
 A small pic of a piano hinge. -------------
Posted By: hamzter
Date Posted: July 04, 2007 at 7:40 PM
tdsteele wrote:
...But glued properly and good joints, a person could just use the nail gun. Just different ways of doing things.
and since I resin the inside and do a couple layers of fiberglass, the box is water tight and strong.
you probably can crank out a couple of boxes to my one, but my box is pretty strong too. ------------- Mark "Hamzter" Cinense
1991 Infiniti G20 w/JDM SR20DE
Eclipse CD8445
MTX Thunder 684
Polk DB6750
Polk DB6500
Optima Red Top in the Trunk
Posted By: stealthfade
Date Posted: July 08, 2007 at 9:52 AM
Got my car back finally, but apparently there is still some more damage that needs to be fixed tomorrow.
Carpeted
Went on down to Home Depot and picked up a 6x8 roll of carpet, which is more than enough as the MDF board I bought only a 4x8 sheet. Laying it on top of the box, we cut the ends off and started gluing it down. We used "Stuck Up" for the adhesive, which worked really well.
The sides need to be fixed, but it ended up pretty good. I also need to add some carpet to the inside of my trunk as a little of the deafening still shows, which looks really tacky. In addition, I will be carpeting the underside of the box as it has been rubbing on the deafening and wearing it down. But here are the pictures of what it looks like so far.

Posted By: tdsteele
Date Posted: July 08, 2007 at 10:49 AM
Nice and clean....I like it so far..
Posted By: kirktcashalini
Date Posted: July 08, 2007 at 7:40 PM
yeah man, lookin good.
-------------
99 Blazer LT. Yellow Top. Big 3. Infinity Kappa Speakers All Around. Jensen CD/DVD flip out. 2 Infinity Kappa Perfect 12DVQs powered by a Alpine PDX600.1 (in one custom box, building a FG box)
Posted By: stealthfade
Date Posted: August 14, 2007 at 5:10 PM
Posted By: aznboi3644
Date Posted: August 14, 2007 at 7:10 PM
looks clean...nice work
|