2010 Nissan Altima PTS Remote Start Pictorial
Printed From: the12volt.com
Forum Name: Car Security and Convenience - Alarm/Remote Start Pictorials
Forum Discription: Installer submitted Alarm, Keyless Entry, and Remote Start Pictorials from our Car Security and Convenience forum.
URL: https://www.the12volt.com/installbay/forum_posts.asp?tid=129706
Printed Date: May 23, 2026 at 10:48 PM
Topic: 2010 Nissan Altima PTS Remote Start Pictorial
Posted By: metz35
Subject: 2010 Nissan Altima PTS Remote Start Pictorial
Date Posted: December 15, 2011 at 2:37 PM
Replies:
Posted By: offroadzj
Date Posted: December 15, 2011 at 3:31 PM
This is awesome! Should help me a lot when it comes time to do mine next week. That last picture; where in the car is that? It looks like under the hood?
-------------
Kenny
Owner / Technician
KKD Garage LLC
Albany, NY 12205
Posted By: metz35
Date Posted: December 15, 2011 at 3:42 PM
yes its the fuse box under the hood
Posted By: howie ll
Date Posted: December 15, 2011 at 3:51 PM
To the mods, could this be posted to hot topics? Worth while.
-------------
Amateurs assume, don't test and have problems; pros test first. I am not a free install service.
Read the installation manual, do a search here or online for your vehicle wiring before posting.
Posted By: metz35
Date Posted: December 15, 2011 at 4:39 PM
im a better do-er than teacher howie, id thought id give a tutorial a whirl.. glad you like it!
if members like this one. id do others.
Posted By: tedmond
Date Posted: December 15, 2011 at 5:04 PM
i wrote a tutorial as well, but i find when DIY individuals see pictures, they expect full on wording/descriptions. I've written one, but my next one is going to be short and simple like yours.
btw very useful post, i might take one on to try soon. What bypass did you use?
-------------
Ted
2nd Year Tier 1 Medical School
Still installing as a hobby...pays for groceries
Compustar Expert
Posted By: metz35
Date Posted: December 15, 2011 at 5:24 PM
Blade AL , 6200 compustar :)
Posted By: tedmond
Date Posted: December 15, 2011 at 7:42 PM
just pulled up the diagram and looks like most connections are at the bcm.
average install time for the pts?
-------------
Ted
2nd Year Tier 1 Medical School
Still installing as a hobby...pays for groceries
Compustar Expert
Posted By: metz35
Date Posted: December 15, 2011 at 7:58 PM
1st time I did it was about 3.5 hours
Today when I took the pictures for the tutorial it took 90 minutes with prewire pictures and install.
Posted By: offroadzj
Date Posted: December 15, 2011 at 9:03 PM
For the negative ignition / start wires. Did you use the 4 pin connector with the negative ignition outputs? If so, did you use a diode or are they safe to use without a diode? I picked up the Fortin Evo-All for the one I'm doing and it says to use diodes with the negative ignition / start wires.
Also, the Evo-All talks about having to connect a neutral safety setup but doesn't specify as being only for manual trans. Is it possible for it to start in gear with an automatic? Did you connect anything with the N.S.S??
-------------
Kenny
Owner / Technician
KKD Garage LLC
Albany, NY 12205
Posted By: metz35
Date Posted: December 16, 2011 at 4:37 AM
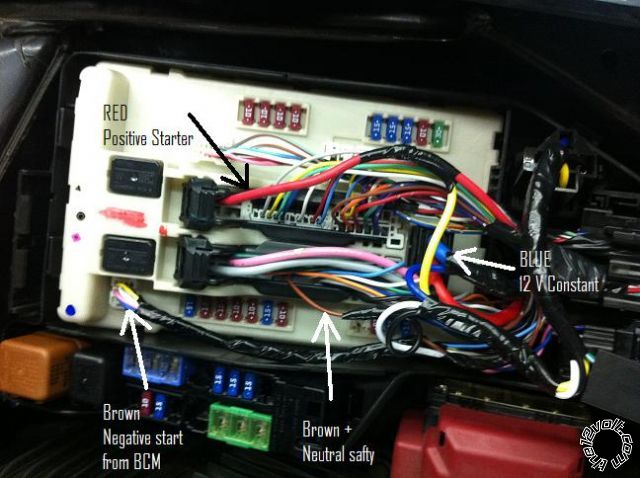
The neutral safety is a must for all Nissan pts and intellikey. It is the last picture. There is a relay hooked up it is kinda hard to see in the picture. I diode isolated every negative output. Negative ignition, negative starter, arm, disarm, lock, unlock, and trunk release. There is also a diode on the neutral safety relay . I use compustar and there reasoning behind the diodes is that , internally in the remote start there are alot of common negatives. There just protecting the BCM.
Posted By: offroadzj
Date Posted: December 16, 2011 at 6:06 AM
Sounds good. Thanks for the info!!! This post should help make this starter 100x easier. I was starting to wonder if I had made the right choice in taking on the task since I don't have anything backing me (I do all my starters on the side for some extra pocket money). But you have helped boost my confidence. Thanks again!!!
-------------
Kenny
Owner / Technician
KKD Garage LLC
Albany, NY 12205
Posted By: tedmond
Date Posted: December 16, 2011 at 6:46 AM
the EVO will help you save tons of time. nice piece to use for nissan/infinity pts
-------------
Ted
2nd Year Tier 1 Medical School
Still installing as a hobby...pays for groceries
Compustar Expert
Posted By: offroadzj
Date Posted: December 16, 2011 at 7:25 AM
it sounded like the best option. And looking over it, the instructions it includes are pretty well detailed as well.
-------------
Kenny
Owner / Technician
KKD Garage LLC
Albany, NY 12205
Posted By: tedmond
Date Posted: December 16, 2011 at 11:42 AM
as mentioned in another thread, if you need a wire diagram with pics, i can send you a fortin wireguide tech sheet.
-------------
Ted
2nd Year Tier 1 Medical School
Still installing as a hobby...pays for groceries
Compustar Expert
Posted By: jim hunter
Date Posted: December 16, 2011 at 6:15 PM
very nice tutorial, you are to be commended for showing this, makes the install look a lot easier than it actually is lol
seriously great job man
Posted By: metz35
Date Posted: December 17, 2011 at 11:20 AM
Much appreciated. This tutorial is good for 08 and up Altima and 09 and up maxima. I'll try to do another pts tutorial on an Acura , Kia/Hyundai , or Toyota which ever I get first. But I work across the street from a Nissan so I always get them.
Posted By: howie ll
Date Posted: December 17, 2011 at 11:25 AM
Did you realise that most manual Euro Nissans (UK built) have a NSS (gear lever in neutral sensor)in the engine management from about 1998?
Are the US equivalents, Sentra and Alt the same? Check with your Nissan shop.
-------------
Amateurs assume, don't test and have problems; pros test first. I am not a free install service.
Read the installation manual, do a search here or online for your vehicle wiring before posting.
Posted By: howie ll
Date Posted: December 17, 2011 at 11:28 AM
Actually, I meant manual transmissions for obvious reasons, come to think of it if I had the pinouts and possibly colours for all engine and body managements I could do the bloody wiring in minutes, no more poking around in the engine bay.
-------------
Amateurs assume, don't test and have problems; pros test first. I am not a free install service.
Read the installation manual, do a search here or online for your vehicle wiring before posting.
Posted By: offroadzj
Date Posted: December 18, 2011 at 5:48 PM
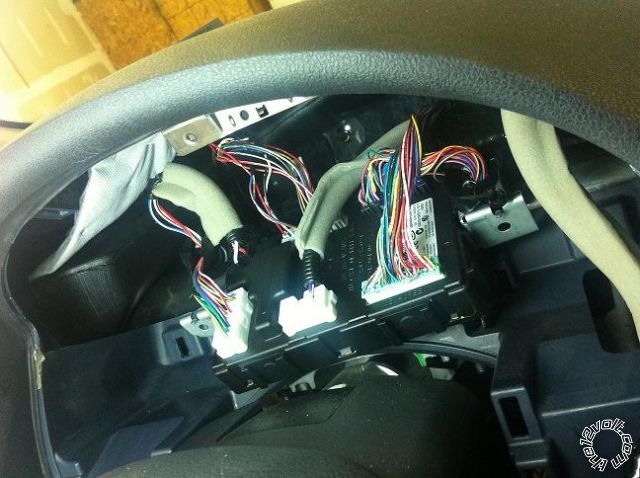
Metz: the only difference I'd make to the next tutorial is just to maybe give a quick label on the picture with the location of the component in the picture (ie the fusebox in the last picture). That way its easy to know exactly what you are looking at. The first few were fine b/c you showed the "zoomed out" view of the BCM behind the instrument cluster. But either way... keep them coming!
-------------
Kenny
Owner / Technician
KKD Garage LLC
Albany, NY 12205
Posted By: offroadzj
Date Posted: December 19, 2011 at 2:35 PM
Looks like I'll be doing my 2010 Altima this evening. Went to Fortin's website for a last check for updated install manual on the EVO-All and they actually had a simplified install manual up. Gave them a call and it works with the hardware / firmware version bypass I have so I got everything prepped and we'll see what happens. I'll post up my findings. The only thing that is weird is that this new manual doesn't say anything about a parking light wire so I'm not 100% sure what I'm going to have to do there... possibly just a hardwire connection between the starter and the car.
-------------
Kenny
Owner / Technician
KKD Garage LLC
Albany, NY 12205
Posted By: metz35
Date Posted: December 19, 2011 at 4:54 PM
Parking lights are in the kick. Or you can use the parking light wiring diagram and do it at bcm.
Posted By: metz35
Date Posted: December 19, 2011 at 5:03 PM
Posted By: offroadzj
Date Posted: December 19, 2011 at 6:35 PM
I just went to the underdash fuse box for the lights. Then everything else was at the BCM. There was a 12v constant wire (about 12awg) that the EVO directions seemed to believe it was fine... and after a bunch of testing, it seemed to be fine. With everything through data, I can't imagine the amperage draw being much at all through the 12v input.
Everything seemed to work perfectly from the new EVO-ALL manual. It used the can high / low, and the RX/TX at the key insertion piece right on the knee bolster. It then used the brake 12v constant and switched input (for starting). Also checked for ability to start in all gears and it would only start in Park and Neutral... so no issues there either.
Everything went really smooth and it was possibly one of the easier cars I've done. Even the tach signal through the bypass was good.
Here is a link to the EVO-ALL manual... it made things way too easy.. lol:
EVO-ALL Nissan/Ininity Simplified Installaion Manual
The only thing that didn't work, but I didn't really mess around with much was the trunk release (through the bypass). My customer didn't really care about the trunk release so I didn't bother digging into it. ------------- Kenny
Owner / Technician
KKD Garage LLC
Albany, NY 12205
Posted By: id sean
Date Posted: December 20, 2011 at 7:44 PM
I always push my customers towards the EVO-CAN or EVO-ALL since Fortin released there firmware version 4.0 for Nissan/Infiniti PTS . With the new firmware, you do not have to run any relays under the hood and most of the other connections are generally easier as well. Fortin claims it saves about an hour and a half on the install although that really depends on the installer. It certainly does save time and headaches though.
-------------
Sean McAuliffe
Sales Rep.
Installation Distributors
Posted By: metz35
Date Posted: December 20, 2011 at 9:00 PM
If its a manual you still have to run a starter wire to under the hood with EVO CAN
Posted By: id sean
Date Posted: December 20, 2011 at 9:38 PM
I had not run into that before but it looks like you are right.
Anyway for anyone who is interested here is a link to the guide. This type of install works for the EVO-CAN and the EVO-ALL. They do have different guides though.
https://ifar.ca/download/3834/preview.html
-------------
Sean McAuliffe
Sales Rep.
Installation Distributors
Posted By: offroadzj
Date Posted: December 20, 2011 at 9:45 PM
I think that is the same as the one I posted above. It was definitely a great resource!
-------------
Kenny
Owner / Technician
KKD Garage LLC
Albany, NY 12205
Posted By: tedmond
Date Posted: December 29, 2011 at 8:32 PM
i took on a 2010 Nissan Juke today PTS and Smart key. took me 5h to do a full alarm/start. Unit installed was a viper 5902 and xpresskits DBALL all which came from the customer.
the DBALL isnt that great of a piece, instead i used an EVO series bypass and it worked out well.
-------------
Ted
2nd Year Tier 1 Medical School
Still installing as a hobby...pays for groceries
Compustar Expert
Posted By: howie ll
Date Posted: December 30, 2011 at 2:02 AM
I did a UK equivalent to Onstar with a screen in one of those recently, once you stop worrying about how everything comes apart it's quite easy!
-------------
Amateurs assume, don't test and have problems; pros test first. I am not a free install service.
Read the installation manual, do a search here or online for your vehicle wiring before posting.
Posted By: metz35
Date Posted: December 30, 2011 at 2:00 PM
tedmond wrote:
i took on a 2010 Nissan Juke today PTS and Smart key. took me 5h to do a full alarm/start. Unit installed was a viper 5902 and xpresskits DBALL all which came from the customer.
the DBALL isnt that great of a piece, instead i used an EVO series bypass and it worked out well.
5 hours , did you vacuum and clean the windows too? j/k
Posted By: howie ll
Date Posted: December 30, 2011 at 4:16 PM
Be fair, it will probably take Ted 2 hours on the next one.
I did 24 trackers on a fleet of light vans some years ago, the first took 40 minutes, by the time I got to number 10, I had it down to 7 minutes each.
-------------
Amateurs assume, don't test and have problems; pros test first. I am not a free install service.
Read the installation manual, do a search here or online for your vehicle wiring before posting.
Posted By: tedmond
Date Posted: December 30, 2011 at 11:02 PM
the actual install was only 2.5 hours, the rest was trouble shooting the damn DBALL. got fed up and switch for a fortin evo-all and my headache was gone.
-------------
Ted
2nd Year Tier 1 Medical School
Still installing as a hobby...pays for groceries
Compustar Expert
Posted By: tbird2340
Date Posted: May 26, 2012 at 10:19 PM
I need to get an ignition wire that sends 12V.. I seen the one you mentioned was a negative ignition.. Do you know an ign wire that sends 12V?
Also, if that wire is at the BCM that is behind the instrument cluster.. Would you be able to tell me how to get access to it?
Thanks so much.
Posted By: howie ll
Date Posted: May 27, 2012 at 1:44 AM
Without having worked on one I can tell you that question is fitting 101.
Drop the steering column, you may have to remove the upper cowl, probably 4 screws underneath (out of 6, the other two hold the lower column cowling.
Cowl will have either two upper or four, 2 up and 2 down. Remove and "jerk" the cowl out.
Actual gauge panel will have either three or four holding screws.
You should pick up a (+) ignition either at the aforementioned box or rear of the gauge panel, or engine bay fuse box.
Generically all oriental instrument panels are much the same, be it Toyota, Honda etc.
-------------
Amateurs assume, don't test and have problems; pros test first. I am not a free install service.
Read the installation manual, do a search here or online for your vehicle wiring before posting.
Posted By: tbird2340
Date Posted: November 15, 2012 at 7:40 PM
So I'd love to put a RS into my 08 Altima.. I was going to use the ADS-BLADE AL bypass but see others suggest using the Fortin EVO-ALL.. Is that the preferred path for ease of install? The Fortin?
I've done about 30 or so installs but this one makes me crazy nervous..
Posted By: kreg357
Date Posted: November 16, 2012 at 4:20 AM
Some things have changed since this was originally posted.
Compare the two install guides, ADS Blade AL(DL) NI5 (https://www.idatalink.com/ support/get-install-guide/ guide_id/9630 ) to the EVO-ALL( https://ifar.ca/download/4211/preview.html ). There are some differences but the iDatalink Blade firmware has been updated with a simpler install wiring procedure. No relays under the hood or ignition wires going to the BCM any more. ------------- Soldering is fun!
Posted By: magnamagus
Date Posted: February 06, 2014 at 2:21 AM
Question:
1. How did you get the tamper proof screws holding the BCM module out?
-------------
Erick
Posted By: kreg357
Date Posted: February 06, 2014 at 3:05 AM
They do make a special dealer tool for that ( for serious money  ). ------------- Soldering is fun!
Posted By: magnamagus
Date Posted: February 06, 2014 at 3:46 AM
I was asking about the Altima BCM tool because I am doing an install with another very similar tedious vehicle, its older brother the Maxima 2010 - exact same install except for a few differences. I had a couple questions on the 2010 altima/Maxima/G37.... I'm sure this is relevant to this install as well. I am installing the following below:
Alarm: VIPER 5706 -- DATA TO DATA -- REMOTE START + Security
DBALL2 BYPASS INSTALL GUIDE:Â https://www.xpresskit.com/ VehicleCompatibility.aspx? p=null&year=2010&make= Infiniti&model=G37 %28Smart Key%29&ps=1 &s=0&c=0
I am confused with the WIRE TO WIRE connections FROM THE STANDARD VIPER MAIN HARNESS & REMOTE START HARNESS to the vehicle using a Dball2 bypass -- very much like a fortin install by the way.
1. In regards to the "Stater Interrupt", is it necessary? Are the (H5)Starter INPUT and (H4) Starter OUTPUT, really necessary OR is this handle by DBALL2 through through it's Starter 1 and Ignition 1 connections???
---H3/4 Violet (+) STARTER OUTPUT (car side)
---H3/5 Green (+) STARTER INPUT (key side)
2. The 2010 Nissan Maxima has TWO starters and Ignitions: (-) Starters 1 and (-)Starter 2, and, (+)Ignitions 1 and (-) Ignition 2. Now, the Dball2 Install Guide, says to connect ONLY the remote start Ignition Input(+) [to Dball2 ignition status input & output wires] and remote start - Starter 1 (+) output [to Brake Wire (+)]? Is this correct? And, does the Dball2 handle the Ignition & Starting sequence entirely through these two wires?
3. Do I need to connect the 10 gauge "H3/6 Red fused ignition 1 input" to a 12v constant source, in order to use the "H3/1 Pink ignition input/output wire" which is supposed to be connected to the 24 gauge Dball2 "ignition status input/output wires"??
4. I will connect the remote start's heavy 10 gauge "H3/1`Pink Ignition Input/Output" wire TO the DBALL2 24 gauge "Ignition Status Input" and "Ignition status output" wire per the Dball2 install manual in the following manner.
I will military splice two wires from the DBALL2, these are 24 gauge Ignition output(PURPLE / brown) to the Ignition Input (PURPLE / green) as indicated in the install diagram. Then, I will military splice the 24 gauge ignition input (PURPLE / green) to the 10 gauge "H3/1 Pink Ignition input/out" wire from the 5706 remote start. Are these connections correct? This seems odd connecting a 24 gauge wire (dball2) to a 10 gauge wire (remote start)?
5. After the above connections are made to the heavy 10 gauge "H3/1`Pink Ignition Input/Output", does this PINK H3/1 wire need to be connected anywhere else or is that the final connection i.e. Remote start to Dball2?
Again, thank you for your assistance... Greatly appreciated...
-------------
Erick
Posted By: lucasoil4u
Date Posted: February 18, 2014 at 9:53 AM
There is ignition (+) at te ODB2 Port. I always use the Idatalink modules and you dont have anything go to the bcm at all. Its like 1 hour install.
Posted By: tbird2340
Date Posted: February 18, 2014 at 1:40 PM
Looking at the idatalink guide it says you do need to go to the BCM for arm/disarm..
How are you getting away without doing that?
Thanks
CanH M24 White 16 pin 006 Blue (DATA) OBDII connector ~
CanL M24 White 16 pin 014 Pink (DATA) OBDII connector ~
Immobilizer clock M40 White 12 pin 002 GREEN/ Orange (DATA) Keyport ~
Immobilizer data M40 White 12 pin 003 Orange (DATA) Keyport ~
Keysense M40 White 12 pin 011 Yellow (-) Keyport ~
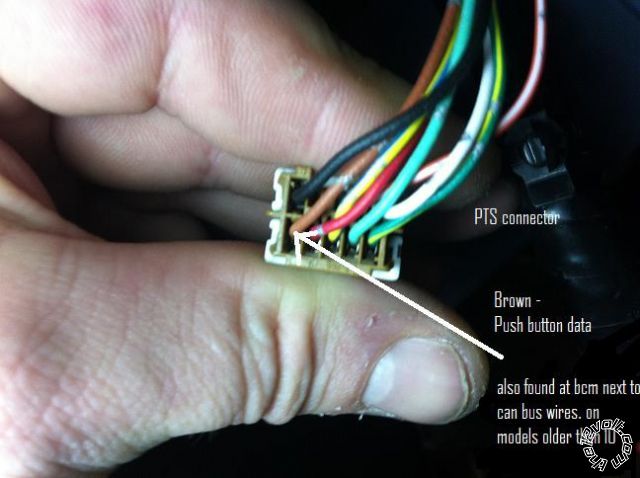
PTS M38 Brown 08 pin 004 Brown (-) Push button ~
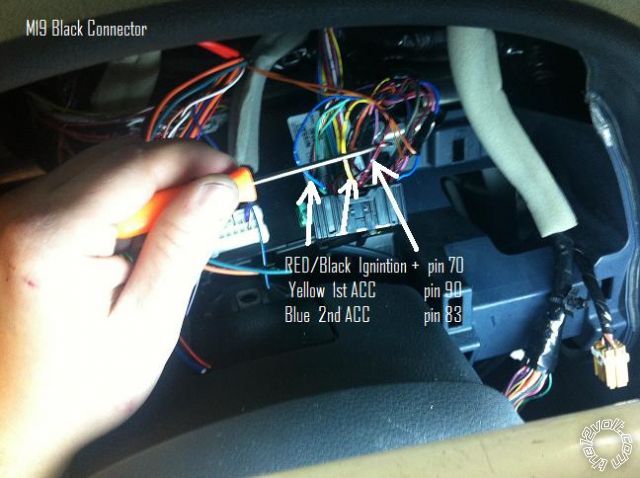
Ignition M24 White 16 pin 008 Green (+) OBDII connector ~
Brake E38 White 04 pin 002 RED / Green (+) Brake switch ~
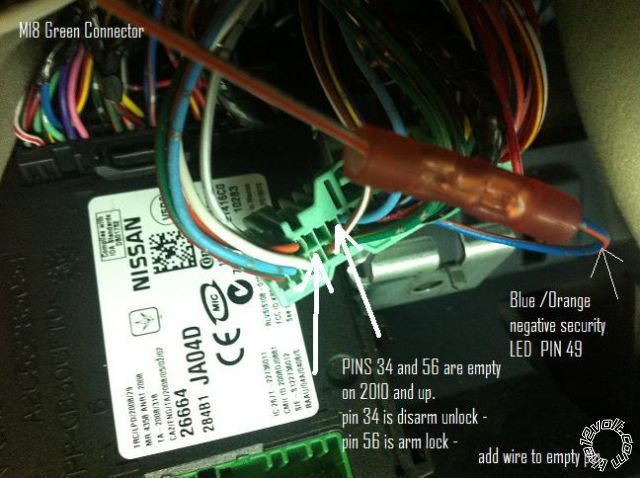
Lock/Arm M18 Green 40 pin 056 Empty (-) BCM, behind cluster ~
Unlock/Disarm M18 Green 40 pin 034 Empty (-) BCM, behind cluster ~
Posted By: Satkunas
Date Posted: February 18, 2014 at 1:59 PM
Fortin now has T-Harnesses available for Nissan and Infiniti which help for a much faster installation than with the ADS or Xpresskit modules.
https://ifar.ca/en/products/t-harness_cables/thar-nis1/
The EVO-ALL can also do stand-alone remote-stater and alarm-system so no RS/A module is required. If you need extended range you can simply plug any RF-Kit directly into the module.
Posted By: buddyle2002
Date Posted: October 28, 2014 at 8:58 PM
Just want to update if anyone else needs this lock and unlock connection wires color.
Lock === Gray
Unlock == Green
On 2011 Nissan Altima Sedan 2.5S - At kick panel.
|