2013 Rav4 Remote Start with Keyless Entry Pictorial
Printed From: the12volt.com
Forum Name: Car Security and Convenience - Alarm/Remote Start Pictorials
Forum Discription: Installer submitted Alarm, Keyless Entry, and Remote Start Pictorials from our Car Security and Convenience forum.
URL: https://www.the12volt.com/installbay/forum_posts.asp?tid=134111
Printed Date: May 23, 2026 at 9:39 PM
Topic: 2013 Rav4 Remote Start with Keyless Entry Pictorial
Posted By: kreg357
Subject: 2013 Rav4 Remote Start with Keyless Entry Pictorial
Date Posted: April 27, 2013 at 8:36 PM
This is a DIY remote start with keyless entry Pictorial on the new 2013 Toyota RAV4. This vehicle was an
XLE model. It did not have Push To Start or a Factory Alarm system. It did have the new Toyota "H" key.
Currently, there are no bypass modules available for the "H" key from the big 3 manufactures.  A Key- A Key-
In-The-Box is the only solution. All are working on a solution, so if you can wait, it might be worth it,
especially if the module from iDatalink is anything like the TL5 firmware for the previous "G" key vehicles.
U.S. market vehicles come with two keys which have the Remote Keyless Entry buttons in the key-head.
If you ask some U.S. dealers for a plain Valet key, they will give you a blank stare. However, Canadian
market vehicles do come with a plain valet key. Below is a picture of the key with the part number. Expect
to pay $50 for the key and another $50 for cut & program ( dealer scan tool only ).

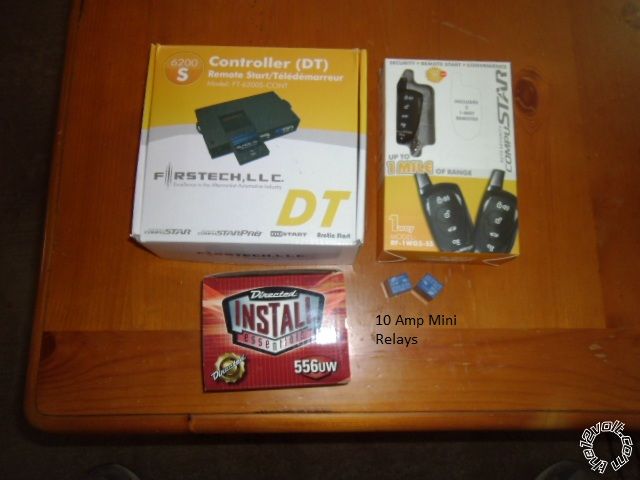
Here are the parts used for this install :
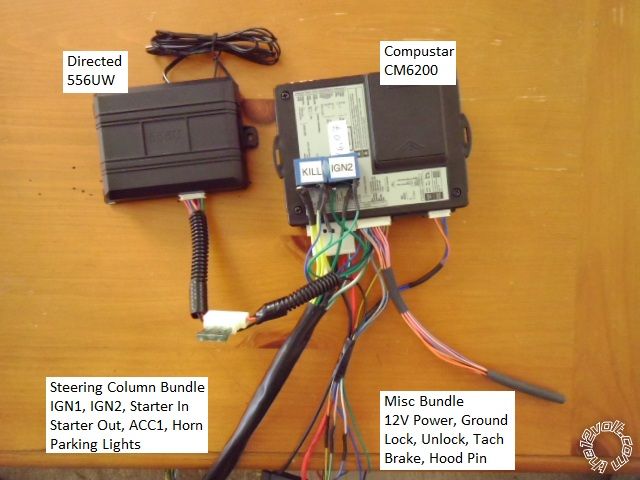
Be forewarned that this vehicle has very thin gauge ignition wires. While you can still use the
remote starters' standard thick 30 Amp wires, I chose to cut these output wires and solder on
similar color 18 gauge wires. The CM6200's two power input wires were joined together and
fused down to 15 Amps. The 556UW was set to Mode 2 ( 60 windings ) and the antenna loop was
wrapped 4 times around the ignition switch cylinder. Below is the bench prepped system :
Disassembly :
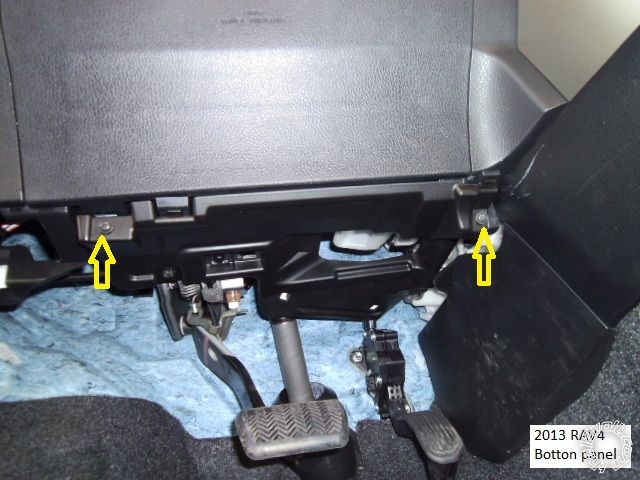
Remove the two Phillips screws shown in the picture below and remove the bottom dash panel.
Remove the two 10mm bolts marked in the next photo.
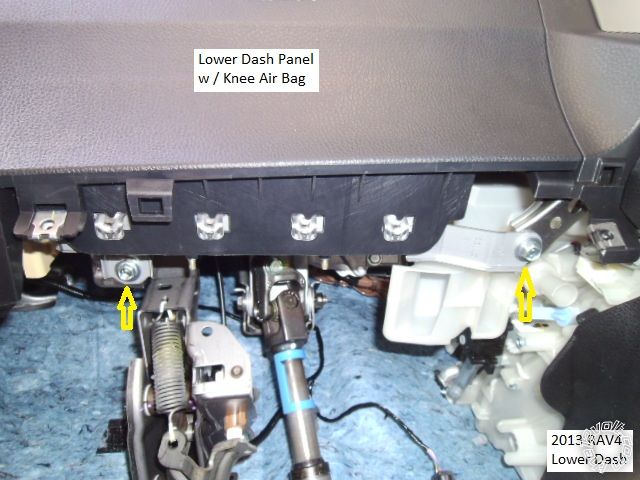
Remove the two 10mm bolts shown below with an extension. They are angled and the steering
column should be raised and extended for easier access. Then pull the lower dash panel gently
straight away ( two clips along top edge ). This panel is the knee air bag! Do not disconnect the
Yellow harness, just rotate the panel and lean it against the center console, out of the way.

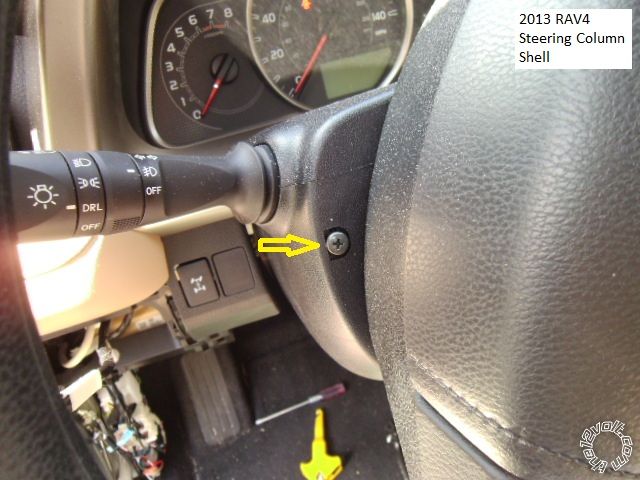
Remove the lower steering column cover by first removing the two screws, one at 3 o'clock the
other at 9 o'clock, then gently press on the lower half at the side seams to seperate.
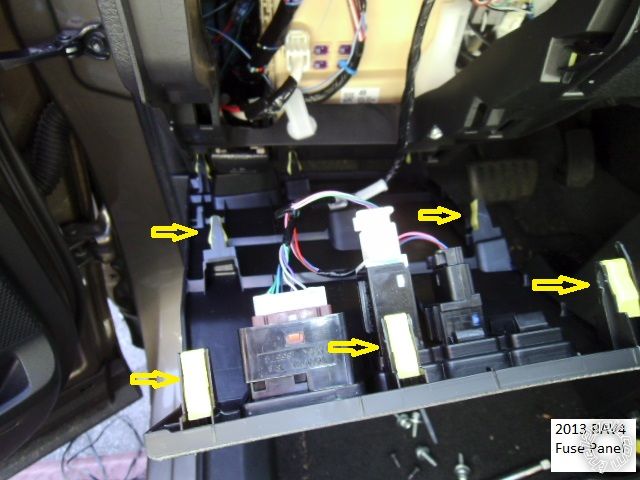
Remove the fuse box cover by pulling it straight away from the dash. There are 3 clips along
the top edge and 2 along the bottom.
Not shown is the driver kick panel. First remove the driver door sill trim by lifting it straight up.
Next remove the plastic nut that retains the DKP, then pull the DKP straight back.
Wiring :
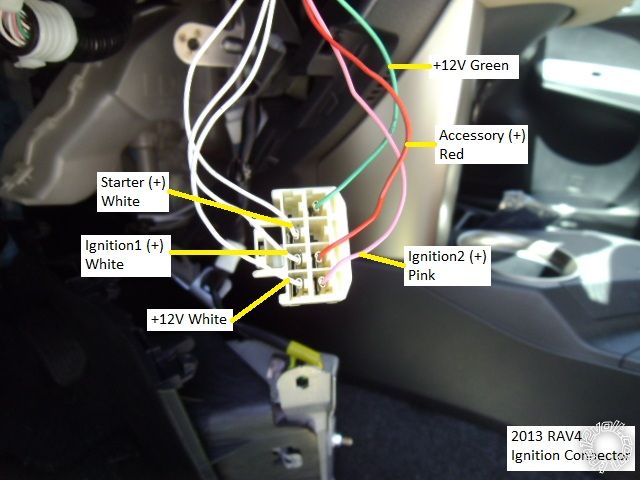
This is a picture of the main ignition connector ( unplugged ) with the wires marked. Toyota
does have a thing for using several wires with the same color in their ignition harnesses so
testing is imperative.
Here is a photo of the Keysense wire ( White two pin connector ).

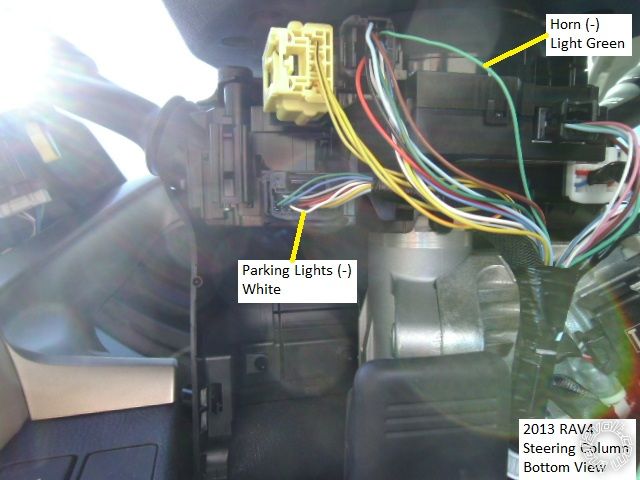
This is a shot of the Parking Light and Horn wires at the steering column.
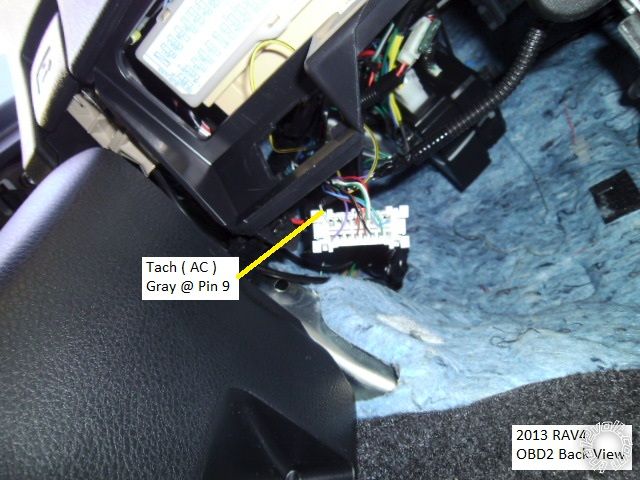
The Tach signal can be found inside the vehicle at Pin 9 of the OBD2 connector as
shown below.
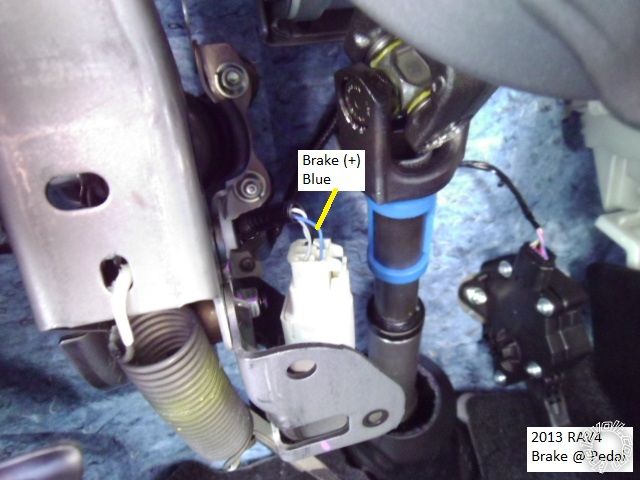
This photo is the Brake wire at the Brake Pedal Switch connector.
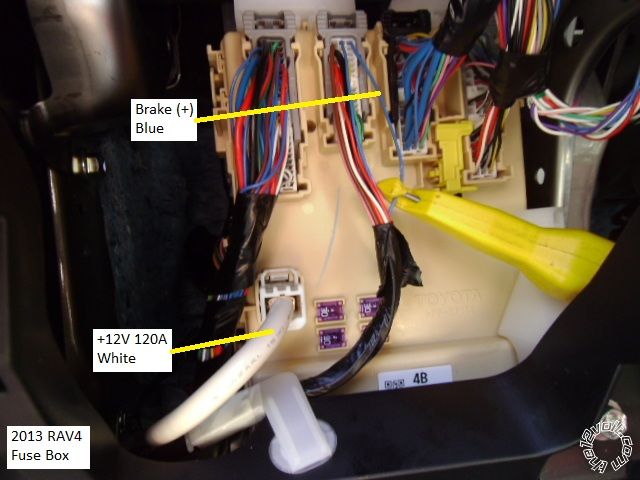
The Brake wire can also be found at the fuse box. The +12V constant source is shown.
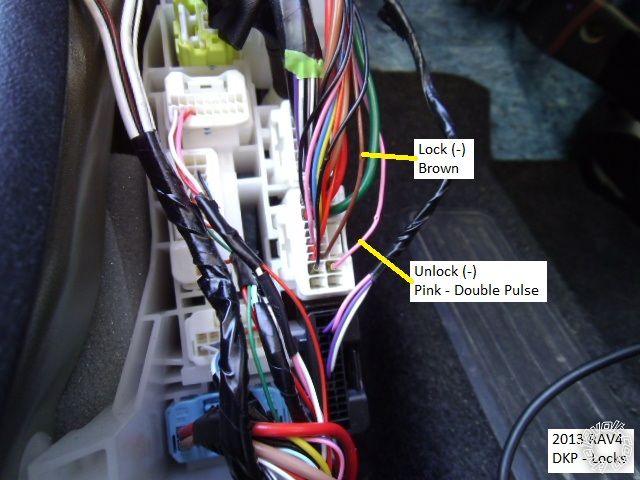
The door lock wires can be found in this connector in the lower DKP. These are actually
the lock and unlock signals coming from the door key cylinder and will also Arm and Disarm
the Factory Alarm if present. Additionally, the first Unlock pulse will unlock only the Drivers
door ( priority unlocking ), the second unlock pulse ( within 2 seconds ) will unlock all the other
doors, including the rear hatch. Test these wires using a key in the drivers door.
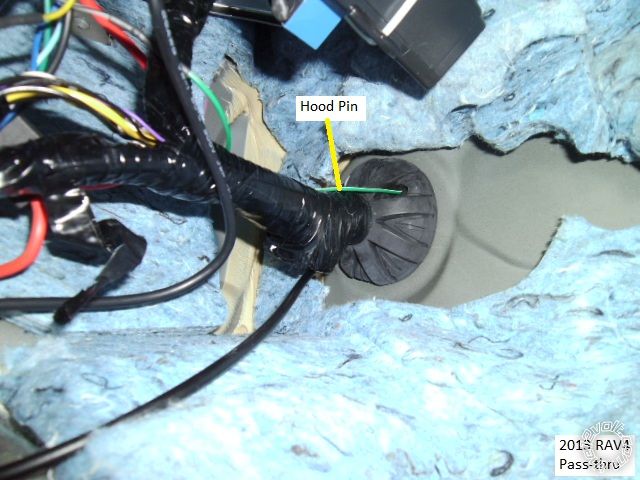
Engine compartment pass-thru can be found at this grommet that houses the main harness
and the hood release cable. It comes out directly behind the driver's shock tower with little
clearance and less access. Use a coat hanger to initially puncture the rubber grommet and
then a 3 foot piece of .080" or .105" weed trimmer line to snake the hood pin wire thru.
Notes: The non-PTS 2013 RAV4 does not have "one-touch-starting", hence running in Tach mode
is preferred. This vehicle does not have built in Anti-Grind, so cutting the Starter wire and adding
an Anti-Grind relay is an option. The Factory FOB's do not function during remote start, therefore
installing a system with keyless entry is a good idea.
As always, verify all wires with a Digital Multi Meter and make all connections with a quality
solder joint. ------------- Soldering is fun!
Replies:
Posted By: smokeman1
Date Posted: April 27, 2013 at 9:51 PM
As always, your pictorials are outstanding and informative. A cold six pak for you.
-------------
When all else fails, Read the Instructions
Support the12volt.com Make a Donation
Posted By: kreg357
Date Posted: April 28, 2013 at 4:57 AM
Thanks, Rich!  It was a nice warm day so the post install refreshment was needed. It was a nice warm day so the post install refreshment was needed.
I might update this post once a decent bypass module becomes available. ------------- Soldering is fun!
Posted By: Ravendarat
Date Posted: May 19, 2013 at 1:25 AM
Sweet, I have to do one of these on Wed, this makes it even easier than I already thought it was gonna be.
-------------
double-secret reverse-osmosis speaker-cone-induced high-level interference distortion, Its a killer
Posted By: kreg357
Date Posted: May 21, 2013 at 7:54 AM
Good luck! Please let us know how it goes and if there are any differences with the Canadian model.
-------------
Soldering is fun!
Posted By: pts760
Date Posted: May 29, 2013 at 11:38 AM
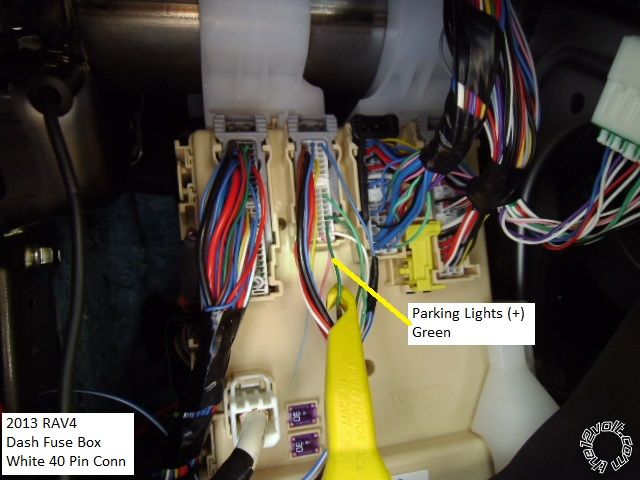
You can also find (+) parking lights (green) at the fusebox next to the brake wire.
-------------
I drink current, eat ohms, and bleed voltage
Posted By: kreg357
Date Posted: June 08, 2013 at 1:42 PM
Just an update with some more info.
As PTS760 pointed out, if you prefer using a (+) Parking Light wire or would rather make your connections at the
fuse box instead of the steering column, here is a photo of the (+) Parking Light wire.
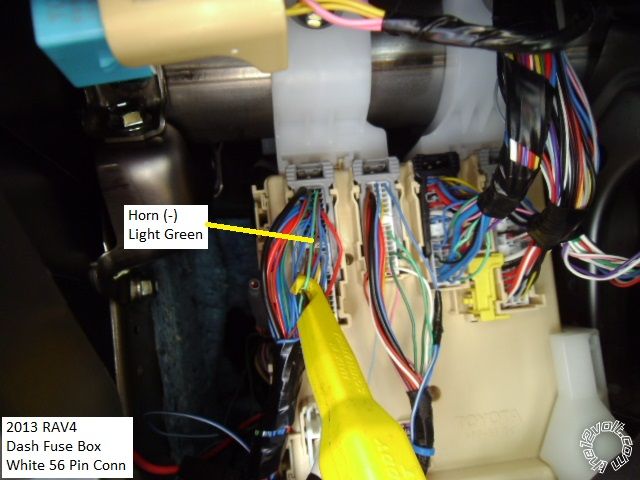
Here is a picture of the (-) Horn wire at the fuse box :
And for those that wish the added convenience ( or profit ) of Defroster control during Remote Start, here is a
photo of the Rear Defroster wire, also at the fuse box.
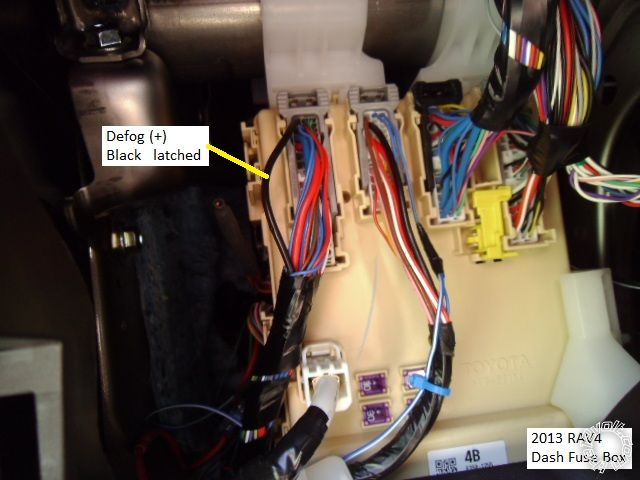
The Defrost is a high current, latched (+). ------------- Soldering is fun!
Posted By: grcore
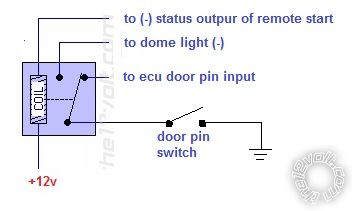
Date Posted: November 10, 2013 at 7:39 AM
A 2013 Rav4 owner here (XLE, no factory alarm or pushbutton start).
I have a 1 button remotes start (DEI 4203v responder one).
Toyota has this feature where if the ignition is on or the key is in the ignition or the ignition on, the keyless entry system is disabled (fob wont work). (so you are not able to lock the doors in pit stop mode).
I added a relay triggered by the door pin switch when the remote start is activated. The NC contact restores original function. I ran a wire to the dome light so it will still work when the remote start is activated.
Now I can at lock the door at the door panel when in pit-stop mode.
Posted By: Anderson463
Date Posted: December 14, 2013 at 12:47 PM
Quick question,
Just so I understand this correctly the valet key (Gray) can be used for the "Key in the box"?
I have a customer that has this exact car and they have a valet key also for it and I want to make sure this will work before I tell them they need to go out and get another key cut.
Thanks for your help,
Derek
Posted By: kreg357
Date Posted: December 14, 2013 at 4:54 PM
Hi Derek,
Yes. As noted, the U.S. market vehicles only come with two remote entry style keys, no valet key. The valet type "H" key pictured above was ordered, cut and programmed by the dealer. I verified it worked properly, starting and operation the car, then secured it inside the Directed 556UW universal bypass ( set at Mode 2 - 60 windings ) and ran the antenna loop around the end of the ignition cylinder. You can see it and the hot glue in the Keysense photo ( taken before clean-up / re-assembly ). It was the old style, wrap it yourself antenna loop wire. No reported issues with remote starts in below freezing weather.
If you are friendly with the dealer, you might be able to get him to program the key to the car without cutting the blade. A little extra security.
Kreg ------------- Soldering is fun!
Posted By: monti755
Date Posted: December 29, 2013 at 10:16 AM
Hello.
Maybe somebody can help me out. I have the same 2013 RAV-4 with automatic Transmission and I need the location or (-)Output of the Parking Brake switch not the hand brake. I already found the Hand Brake but I need the Parking Brake output. Anybody knows the location?
BR.
Posted By: Anderson463
Date Posted: January 06, 2014 at 12:15 PM
Kreg,
Thanks for the info. It took me a while to reply but everything went smoothly! Your write up was a great help!
Thanks,
Derek
Posted By: frozen_
Date Posted: January 12, 2014 at 10:00 PM
I just finished this install on the same model 2013 rav4. Well almost finished, my valet key has not come in yet so I was testing with one of the remote entry keys and I could not get the car to start it would just crank. Can I use the remote valet key for now? Is there anyway to test is the 556UW is working besides trying the remote start?
Also I currently have the remote start/ keyless entry unit wired to the horn. But when using the factory keyless entry it doesn't beep the horn it has it's own slightly nicer and quieter horn. Any idea on how to wire into that instead of the horn.
Posted By: kreg357
Date Posted: January 13, 2014 at 5:42 AM
What Brand / Model remote start system did you use?
Did you test your install by trying a remote start with a key inserted only ( but not turned ) in to the ignition switch?
While the tones produced by the Toyota RKE system are much better than a horn beep, I have not heard of anyone successfully getting an after-market system to integrate with the factory tones. ------------- Soldering is fun!
Posted By: frozen_
Date Posted: January 13, 2014 at 7:24 AM
kreg357 wrote:
What Brand / Model remote start system did you use?Â
Did you test your install by trying a remote start with a key inserted only ( but not turned ) in to the ignition switch?
While the tones produced by the Toyota RKE system are much better than a horn beep, I have not heard of anyone successfully getting an after-market system to integrate with the factory tones.
Thanks for the reply!
I'm using a python 4104P remote start. If I put the factory key in the ignition and leave the key off the remote start does work.
Shane to hear that no one has figured out how to tie into the factory chimes.
Thanks again for the help.
Posted By: kreg357
Date Posted: January 13, 2014 at 7:04 PM
Do you have the Viper 4104 H2/9 DARK BLUE (-) 200mA STATUS OUTPUT wire going to the 556UW Blue wire? This is the wire that
tells the 556UW to turn on and output the transponder chip info to the antenna for the RAV4 to see during a remote start-up.
-------------
Soldering is fun!
Posted By: frozen_
Date Posted: January 13, 2014 at 9:05 PM
I do have that wired to the 556UW. Is there anyway to test the 556UW? I'll take some pictures tomorrow of the wire wrapped around the ignition cylinder to show you that.
Posted By: monti755
Date Posted: February 12, 2014 at 12:10 PM
Hello.
Need a Alternator Sensing output of this 2013 Rav-4. Anybody knows where I can Find it? No.9 Pin OBD-2 port doesn't work for me because it's only for tach sensing and not for alternator sensing. I'm using the battery indicator light output from the altenator for aternator sensing but the battery indicator light goes on when the engine is running, so I need another option. The (+)output must be 0-5V when key is on ignition and 8-14v when the engine is running.
Posted By: kayden101
Date Posted: May 27, 2016 at 10:19 PM
Not sure if i missed it, but what products did you use for the install. i see the picture, but it is fuzzy on the model number.
Thank you, just got a 2013 and im interested in installing a remote start and need to know what i need to get.
Kayden
Posted By: kreg357
Date Posted: May 28, 2016 at 3:52 PM
This Pictorial was on a regular H key RAV4. If you have a Push To Start ignition system on your RAV4 it's a whole
different ball game. Assuming a regular key 2013 RAV4, this Pictorial will be accurate. The parts used were a
Compustar CM6200-s Remote Start controller. The remote / antenna kit is no longer in production but a similar
model would be the RF-1WG9-SP kit. A Directed 556UW was used for the transponder bypass ( along with a spare key ).
The extra mini 12V 10 Amp relays can be found on EBay for ~$1 each.
However, after several years, there is finally a good bypass module solution for this vehicle from the 3 major
manufacturers. Considering the cost difference between a 556UW and a FLCAN ( $40 ) and the price of an extra valet
key ( $100+ ), I would go this route instead. It's even easier to install, just the ignition wires and the bypass
modules wires. Here is a link to the ADS AL-CA bypass module with the TL9 firmware. See the Type 4 Install diagram.
https://cdncontent2.idatalink.com/corporate/Content/Manuals/DL-TL9/ADS-AL(DL)-TL9-EN_20160216.pdf
-------------
Soldering is fun!
|