program new remote, code alarm
Printed From: the12volt.com
Forum Name: Car Security and Convenience
Forum Discription: Car Alarms, Keyless Entries, Remote Starters, Immobilizer Bypasses, Sensors, Door Locks, Window Modules, Heated Mirrors, Heated Seats, etc.
URL: https://www.the12volt.com/installbay/forum_posts.asp?tid=125328
Printed Date: May 20, 2026 at 8:21 AM
Topic: program new remote, code alarm
Posted By: kawi
Subject: program new remote, code alarm
Date Posted: December 29, 2010 at 5:26 PM
Hi all, just bought a new (to me) remote to replace my old one. The installed system on my 2007 Ridgeline is a Code Alarm (CA500 i think)
the remote is the typical 4-button remote (DIYTX). I have the following integration module that is tied into the system, i'm assuming, to override the factory system:
Omega integration module
PKT2
IM05
My issue is, by following the typical remote program instructions, it does not work at all. my OEM key has the chip in it, and the buttons work on it, this was done when i bought a spare key. I'm assuming my OEM system needs to be bypassed again so the new remote will work??
looking to program this DIYTX myself so i can use my remote start, but i'm not sure if this is possible (?) Thanks
Replies:
Posted By: lectricguy
Date Posted: December 29, 2010 at 8:27 PM
Kawi-
DIYTX is the correct replacement tx for the CA500.
Make sure the Code System is in the "unlocked" state, and the red handled control switch is in th "on" position. Then try the following procedure from the install guide:
1) Enter the vehicle, and turn the ignition switch to the ON position.
2) Press and release the Programming button switch 3 times.
3) Press and hold the LOCK button of the transmitter you wish to program.
4) The lights will flash 1 time, indicating that the system is accepting the programming of channel #1 which
is lock.
"Repeat step 3 for each transmitter you wish to program"
5) Press and release the valet push button switch 1 time to advance to channel 2.
6) Press and hold the UNLOCK button of the transmitter you wish to program.
7) The lights will flash 1 time, indicating that the system is accepting the programming of channel #2 which
is unlock.
"Repeat step 6 for each transmitter you wish to program"
8) Press and release the valet push button switch 1 time to advance to channel 3.
9) Press and hold the TRUNK button of the transmitter you wish to program.
10) The lights will flash 1 time, indicating that the system is accepting the programming of channel #3 which
is trunk.
"Repeat step 9 for each transmitter you wish to program"
11) Press and release the valet push button switch 1 time to advance to channel 4.
12) Press and hold the STAR button of the transmitter you wish to program.
13) The lights will flash 1 time, indicating that the system is accepting the programming of channel #4 which
is remote start.
"Repeat step 12 for each transmitter you wish to program"
-------End of Programming Instructions---------
When you attempt to go into programming mode, do your parking lights flash in response? Are you getting into programming mode, but the remote is not being recognized, or are you not getting into programming mode at all?
-------------
Lectric Guy
Posted By: kawi
Date Posted: January 01, 2011 at 11:49 AM
Thanks for the help, unfortunately, i can't seem to get this into unlock/program mode, i don't see a red-handled switch anywhere on the unit.
I got in, turned on the ignition, and the omega LED comes on. I jumped out the blue pins on the CA500 unit 3 times, because i'm 99% sure this is the valet button plug-in, but no light flash, no clicks, etc. Seems i'm not entering into prgram mode. A friend thinks maybe my OEM remote needs to be defeated before it'll let me program my Code Alarm remote.(?)
Thanks again for the help
Posted By: lectricguy
Date Posted: January 01, 2011 at 4:02 PM
Kwai-
To enable program mode for a CA500, the unit needs the following:
1.) Power (+12V) on the Red and RED / Violet wires. Make sure the fuses in line between the lead and the unit are good.
2.) +12V on the Pink ignition1 lead to the unit when the ignition is turned "ON" via the key. .
3.) A good Ground on the Black lead.
4.) Red handled switch in the "ON" position. The red handled switch is connected to the blk/white wire from the unit. You could follow this wire to find the switch. The purpose of this switch is to disable the remote start in the "OFF" or open position.
5.) A programming switch connected to the blue connector on the CA500...not sure if this is what you were shorting out. Switch pressed 3 times will cause the parking lights to flash once indicating that you are in Remote programming mode.
I recommend verifying each of the items above with a DVM. There is no need to defeat an OEM remote to program a Code Alarm unit.
In addition, to actually program the new remote, the antenna must be connected and the antenna cable must be inserted in the CA500 "brain". The antenna cable also must not be pinched or cut.
I included the CA500 install manual link for reference.
https://documents.codesystems.com/701143.pdf ------------- Lectric Guy
Posted By: kawi
Date Posted: January 19, 2011 at 7:31 PM
hi again, finally got around to getting back into this. still having an issue finding any kind of switch as you've referred to. i took a pic of my head unit, and the omega integrator that was installed. I would have to assume, even if buried somewhere, this switch is in the correct position, because i used my remote start up until the remote crapped out before Xmas. as a coincidence, i got a spare key programmed the same week. once programmed, the OEM key fob unlocks the doors, where the original key did not, this task was performed with the code alarm remote.. Not sure if this is any hint? again, i really appreciate this help, maybe my pics will help a little.. 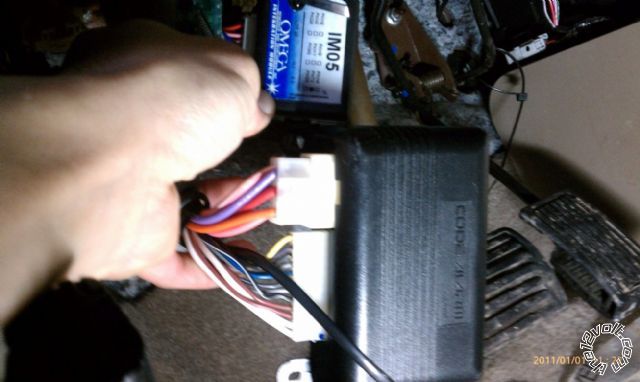
Posted By: kawi
Date Posted: January 19, 2011 at 7:33 PM
just went out again, tried to jump the blue connector 3 times, but no light flash/clicks, etc. Doesn't' seem to want to let me into the program mode
Posted By: godd dan it
Date Posted: January 19, 2011 at 9:48 PM
Programming a new Code Alarm remote has nothing to do with your factory key fob and it has nothing to do with the PKT2 and IM05.
The red handled switch that lectricguy is talking about is also called the valet switch. Code Alarm systems use a red button valet switch. Did you install this system or not? If you didnt, its possible that the installer didnt install the red button valet switch.....it could be black instead. Sometimes you will see this valet switch mounted in the kick panel or somewhere under the dash. Look at the Code Alarm brain. See if there is a 2 pin blue connector port. The valet switch should be conncted to it. If there isnt anything plugged into the blue port , you will need to get a valet switch. -------------
Posted By: lectricguy
Date Posted: January 21, 2011 at 7:06 AM
kawi-
I agree with godd dan it, that sometimes installers don't install the switches in an obvious spot...sometimes they are taped or ty-wraped to the wiring under the dash or in the fuse panel. In the CA500, there are 2 switches; a safety switch (usually a toggle--code supplies a red handled switch) to disable the Remote Start functions, but allows convenience features such as locks and trunk release to still operate--and a push button switch for programming.(momentary switch) .
Note the the safety switch provides a connection to ground when "on", and an installer may have skipped the switch and tied this wire directly to ground.
If you refer to the install manual (I sent the link in a previous post), you can see where these switches connect to the brain. In your picture from your last post, notice the12 position connector on the lower left, where there is a BLACK/ white stripe wire--5th up from the bottom as seen in the photo. This wire goes to the safety switch. Just follow that wire, and you will see the switch or the ground connection.
As far as the program switch, The end on the very bottom of your photo is where this switch connects to the brain--we can't see this from the photo as it is cut off. There should be a 2 pin blue plug for this switch--Again refer to the install guide--from the bottom right refering to your photo, going right to left, there should be the antenna cable (3 wire black cable), Door locks (2 wire blue and green) and then the program switch--Usually a grey and black cable with a blue connector.
This blue connector is the connector you need to use, preferably with a momentary switch. Also note that in order to get into programming mode, the key needs to be in the ON position--this provides IGN power to the remote start, a requirement to get into programming while you are pressing the program switch (or jumping the leads of the blue connector). ------------- Lectric Guy
|