2001 Impala, Viper 5501 Remote Start
Printed From: the12volt.com
Forum Name: Car Security and Convenience
Forum Discription: Car Alarms, Keyless Entries, Remote Starters, Immobilizer Bypasses, Sensors, Door Locks, Window Modules, Heated Mirrors, Heated Seats, etc.
URL: https://www.the12volt.com/installbay/forum_posts.asp?tid=128038
Printed Date: April 28, 2026 at 6:04 AM
Topic: 2001 Impala, Viper 5501 Remote Start
Posted By: billy101
Subject: 2001 Impala, Viper 5501 Remote Start
Date Posted: July 25, 2011 at 10:11 PM
Hi all, New to this forum but would like to get some help on installing a Viper 5501 Keyless Entry/Remote Start system. Here's where I'm running into a little trouble. My 2001 Chevy Impala LS has had a remote start system installed aftermarket for the last 6 years. The thing is, it uses the factory remote, which lacks the remote distance that is pretty much necessary for the remote start to be practical. To activate the remote start; on the keyless entry remote I press "Lock-Lock-Lock" within 7 seconds, and it will remote start the car, Press lock 3 times again, and the car will shut down. I plan on purchasing the 5501 pretty soon and will be installing it myself. The aftermarket alarm doesn't have a model or brand name, nothing on it, I also have no idea how it's wired in, but it's hooked up to another box that says Directed Electronics 457G on the box. When I googled, I found out that it's pretty much just the passlock bypass module? Does that sound right? Will I have to get the XpressKit from Viper as well? Or will the module I have now work with the new Remote Start / Keyless Entry? I can take pictures of what I have installed already if necessary.
Thanks for the help in advance!! Much appreciated!
Replies:
Posted By: kreg357
Date Posted: July 25, 2011 at 10:35 PM
You can re-use the DEI 457G module. Here is a link to the install guide : https://www.the12volt.com/installbay/file.asp?ID=609
It should be just a matter of switching the wires from the old R/S to the Viper, plus adding some additional
connections. The connections to the car will not be changed, nor will it have to be re-programmed.
Here is a link to the DEI wire guides. https://www.readyremote.com/main.asp Look up your Impala for the wire locations
and colors. The current R/S system should be connected to most of them.
Here is a link to the Viper 5501 Install guide. https://www.the12volt.com/installbay/file.asp?ID=967 Read, review
& study..... Practice soldering, too.  ------------- Soldering is fun!
Posted By: billy101
Date Posted: July 25, 2011 at 10:40 PM
Awesome man, just what I wanted to hear!! I'm SUPER talented with soldering. I'm only 16, but I have TONS of experience with soldering. I replaced all the halogen bulbs in my Instrument Cluster, HVAC Controls, along with the rest of the interior bulbs, and soldered LEDs and Resistors into the circuit boards of them all, without destroying them! I took an electronics class in my junior year where we practiced soldering wires and circuit boards as well.
I will read those articles over and over again. Thank you!!!!
Posted By: billy101
Date Posted: July 25, 2011 at 11:37 PM
Quick question, Trying to pair the wires together before I even start it so I know what I'm doing before I go into it.
Do I connect the Viper Remote Start ONLY to the DEI 457G Module? I connect the wires to the 10pin connector coming from the module right? What wires do I connect to my car harness, if any at all?
Posted By: kreg357
Date Posted: July 26, 2011 at 6:26 AM
The DEI 457G will handle the Lock, Unlock, Trunk Release and Passlock2 immobilizer. You will connect the Vipers
Lock, Unlock, Trunk Release and (-) Status Output to the 457G. You can also connect the 457G's Door Status Output
to the Vipers (-) Door Status Input for alarm purposes. If your Impala has the Factory Alarm system, notice that
the 457G will control that with the Lock and Unlock input signals.
Many Viper wires will still be connected directly to the vehicle. Just like your current R/S system, all the main
ignition wires to the H3 connector. All H3 wires except H3/7 will be connected. Your car has two ignitions,
two accessory wires and one starter wire. You might have one or two external relays used in the current system.
The Viper can directly handle IGN1, IGN2 ( flex relay ), ACC1, and Starter1. You will need one extra relay for ACC2.
Other Viper wires to be connected are : +12 Constant, Chassis Ground, Parking Lights, Horn Output ( optional ),
Neutral Safety, Tach, Brake and Hood Pin. ------------- Soldering is fun!
Posted By: billy101
Date Posted: July 26, 2011 at 11:26 AM
This is really starting to get confusing haha.
What wires do the Door lock harness (3-pin connector) and the Remote start auxilary output (5-pin connector) go to? I can't seem to figure it out.
Here is how I have the connections to go as of right now.
From the 457G Module
Black - Already Grounded
Red - Already has +12V
Gray/Black - ?
RED / White - H1/1
BROWN / White - ?
Light Green - H2/2
Blue - H2/1
Violet - Remote Aux. Output (5-pin) Blue wire
Blue/white - ?
Green - H1/8
Are those correct? What other connections need to be made?
From Viper Module
H1 Connector
H1/3 - Black wire (Steering Column)
H1/8 - Blue wire (Gray 16-pin plug @ BCM)
H3 Connector
H3/1 - Ignition (Pink (+) @ ign. harness)
H3/2 - ?
H3/3 - Accessory (Orange (+) @ ign. harness)
H3/4 - Starter (Yellow (+) @ ign. harness)
H3/5 - ?
H3/6 - ?
H3/8 - ?
Remote Start Input (5-pin)
Pin #1 Neutral Safety Switch - ?
Pin #2 Tachometer - White (ac) Ignition Coil (how??? is this necessary?)
Pin #3 Brake Wire - White (+) @Brake Switch
Pin #4 Hood Pin - is this necessary?
Pin #5 2ND Status/Rear Defogger Output - where does this go?
I really need help....I appreciate your help thus far.
Posted By: kreg357
Date Posted: July 26, 2011 at 4:28 PM
From the 457G Module
Black - Already Grounded
Red - Already has +12V
Gray/Black - Not Used
RED / White - H1/1 Trunk Release
BROWN / White - Not Used
Light Green - Viper Door Lock Harness Green - Lock
Blue - Viper Door Lock Harness Blue - Unlock
Violet - Already connected to OBD2 Diagnostic connector Pin 2 Violet wire
Blue/white - Viper Remote start auxiliary output, 5-pin, Pin 5 BLUE (-) 200mA STATUS OUTPUT
Green - H1/8 (-) DOOR TRIGGER INPUT
From Viper Module
H1 Connector
H1/2 - +12V Constant
H1/3 - Black wire (Steering Column) Horn
H1/5 - Chassis Ground
H1/8 - Green wire from 457G
H1/11 - Parking Lights BROWN / white (+) passenger side junction block above kick panel
** Set Viper internal Parking Light Fuse/Jumper to +
H3 Connector
H3/1 - Ignition (Pink (+) @ ign. harness)
H3/2 - +12 constant Red @ ign. harness
H3/3 - Accessory (Orange (+) @ ign. harness)
H3/4 - Starter (Yellow (+) @ ign. harness)
H3/5 - +12 constant Red @ ign. harness
H3/6 - IGN2 Green @ ign. harness
H3/8 - +12 constant Red @ ign. harness
Remote Start Input (5-pin)
Pin #1 Neutral Safety Switch - Ground if auto transmission ( or Parking Brake )
Pin #2 Tachometer - White (ac) Ignition Coil - Most reliable method for R/S
Pin #3 Brake Wire - White (+) @ Brake Switch
Pin #4 Hood Pin - mandatory - install hood pin supplied with R/S kit ( or reuse current pin )
Pin #5 2ND Status/Rear Defogger Output - not used
Extra Relay for ACC2 :
Relay Pin 86 and 87 to +12V Constant thru 20A fuse
Relay Pin 85 to Viper Remote start auxiliary output, 5-pin, Pin 2 ORANGE (-) 200mA ACCESSORY OUTPUT
Relay Pin 30 to ACC2 Brown @ ign. harness
Relay Pin 87A not used - insulate
Things to watch for :
Is the cars' Yellow Starter wire cut?
Does the current R/S have a Hood Pin? Can it be re-used?
Does the current R/S have any external relays? Can the ACC2 relay/circuit be re-used?
Are the current wires well run and soldered?
As always, be sure to check and verify all wires with a Digital Multi Meter. The vehicle wire guides are only guides... ------------- Soldering is fun!
Posted By: billy101
Date Posted: July 26, 2011 at 9:17 PM
You are a life saver. Should the tach wire from the ignition coil already be at the remote start module?
It does not have a hood pin currently. I'm not sure if it has any external relays, as far as I can see there are none. I do not know how he hooked it up, but the a/c works when it's remote started, along with EVERYTHING else. It act's like the key is in and running, but it's not.
I'm not sure if the yellow starter wire is cut, I'll have to take a deeper look into it, but it's still connected at the ignition switch; and get's power when turned to CRANK, so is that a sign of something?
Posted By: kreg357
Date Posted: July 26, 2011 at 9:37 PM
It is possible the current R/S's Tach Input is already connected to the coil.
A hood pin is an important safety feature. It prevents a remote start while the hood is open ( engine repair, etc ). Try a remote start with the hood open.
Usually ACC1 runs the heat & A/C and ACC2 does the less essential things like radio, etc.
A cut Starter wire is for "Starter Kill" or "Anti-Grind". It's something to be aware of when removing a R/S system. Being that your current R/S system is an "add on" with no FOB's or security it might not be present. Try a remote start and while the engine is running, without pressing the brake pedal, insert the key and rotate to "Start". Does the starter engage and grind?
If you can get a Make / Model number from the current R/S unit, you could locate an install guide and know exactly what each wire is and where it should be connected. That would make things easier during the change over. ------------- Soldering is fun!
Posted By: billy101
Date Posted: July 26, 2011 at 10:12 PM
I know it does not have a hood pin for a fact, we have the hood off being repainted and I can still remote start the car.
Regarding the ACC1 & ACC2, they both must be hooked up somehow because everything works, radio, ac, the things that do not work are the blinkers, windshield wipers, basically anything on the multi-function switch.
I do not know if it has a cut starter wire because regardless if the car is remote started or not, if you start the car with the key, once the car is started if you turn the key it will NOT reengage the starter, I guess because everything is pretty much PCM Controlled.
When it's remote started and you get in the car, you can either turn it to "ON" and press the brake and be on your way, or turn it to "Start" and press brake and be on your way the same thing...the starter will not reengage once the motor is running - remote started or not.
I have the FCC ID and some other ID of the R/S Unit, I don't know if that will help at all if you want it, here it is.
FCCID: H50R39
IC: 1640B-R01
Posted By: kreg357
Date Posted: July 27, 2011 at 6:17 AM
Looks like that year Impala has built-in factory anti-grind.
No hood pin is a bit dangerous. You definitely want to add that feature with your new Viper system.
The FCCID number helps. Here is a link to the FCC info :
https://fjallfoss.fcc.gov/oetcf/eas/reports/ViewExhibitReport.cfm?mode=Exhibits&RequestTimeout=500&calledFromFrame=N&application_id=172648&fcc_id='H5OR39'
Unfortunately there is no install guide listed.
The company, Advance Security, INC, is still in business. Here is a link to their WEB site :
https://www.advance-security.com.tw/products.html
You might try searching the internet for an install guide or contacting them directly... ------------- Soldering is fun!
Posted By: billy101
Date Posted: July 27, 2011 at 10:32 PM
So, I won't have to worry about that "cut ignition wire" thing? Cool.
Will the Viper system operate without the hood pin for awhile? The car currently does NOT have a hood, and will be without a hood for at least another week and a half getting prepped and painted. I'd like to get this installed and working while the car is just sitting in the garage.
I just sent them an e-mail asking for some sort of install guide, or something that would let me know what wires are for what.
Posted By: kreg357
Date Posted: July 28, 2011 at 4:31 AM
De-installing the old system shouldn't be too much of an issue. You have a good idea of how the Viper needs to
be connected. In case the original ignition connections were doubled up ( one R/S output joined to two vehicle
ignition wires, i.e. both IGN1 and IGN2 or both ACC1 and ACC2 ) you want to correct that with the Viper install.
The current R/S probably has a wire connection to watch for the three Lock pulses and initiate a remote start.
That won't be necessary with the Viper.
The hood switch is a very important feature but you can use the Vipers' Valet Mode as a safety until you get
it installed. Just make sure the Viper's Gray Hood Pin Switch Input wire is not grounded.
Typical alarm hood pins tend to rust and not work too well after a year or so. Plus, the typical installation
drills a hole in the vehicle for mounting. Search the internet for a DEI 8613 or Omega AU-46 Tilt Switch. If
you don't park on a steep hill, they work well and last a long time. No hole to drill either, just use a hood
hinge mounting bolt. Here is a photo :
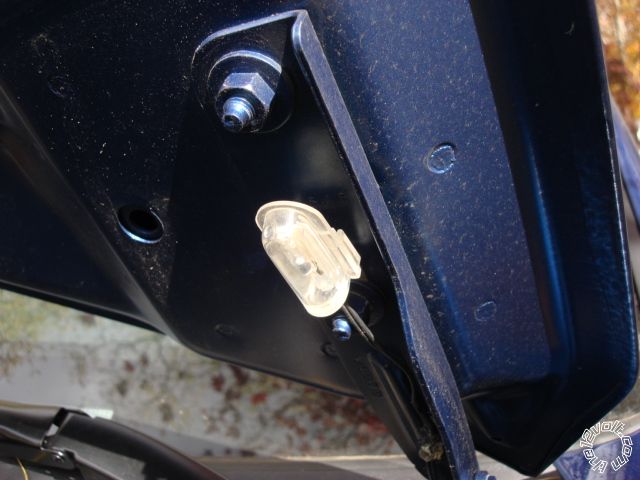
------------- Soldering is fun!
Posted By: billy101
Date Posted: July 28, 2011 at 1:41 PM
That tilt switch looks like a neat idea. I'll probably go with one of those! When de-installing the current remote start, should I basically just cut the wires coming from the bypass module going to the current remote start system and then re-attach them to the Viper?
Should I trace the wires coming from the R/S module right now to the BCM wires and then cross reference them and use those wires for a simpler install?
Posted By: kreg357
Date Posted: July 28, 2011 at 4:55 PM
When re-using wires, check their condition, gauge and how they are physically connected. I have de-installed systems that where connected with T-Taps, ScotchLoks and even just a simple wire wrap and electric tape. Considering the age of your current system, I would only use the existing wires as a guide and still verify everything with a Digital Multi Meter. Use a quality electric tape like Scotch 33+ to insulate everything.
Planning is very important. Comparing the current system wiring to all available wires guides and then to the wires on the new system is a great idea. You can't be over prepared. Consider this a learning experience and give yourself plenty of time to do it right. ------------- Soldering is fun!
Posted By: billy101
Date Posted: July 31, 2011 at 11:35 PM
I'm getting ready to purchase the Viper 5501. It says in the description that it has a "Virtual tach requires no tachometer wire connection required". So does that mean I don't have to connect that wire?
I'll be soldering all the wires together after using the current wires as a guide and then heat shrink wrapping them. Does that sound like a good plan? How long do you think this should take me?
Posted By: kreg357
Date Posted: August 01, 2011 at 8:01 AM
Using an actual Tach connection and setting the Viper to Tach Mode is the most reliable method of remote starting
the car, especially in cold climates. That being said, if your car has "one touch starting" ( just rotate the key
to the "Start" position very briefly and the car cranks the engine until it starts ) you can get away with
Virtual tach or even fixed crank time. You can try it in Virtual Tach and switch over if you notice problems.
Heat Shrink tube is very good but most of your connections will be the "Tap" type. That is where you strip off ~ 1/2"
of insulation from the vehicles wire and tightly wrap ( or "thread the needle" & wrap ) the remote starter wire
and solder. To use heat shrink tube you would have to either cut the wire or temporarily de-pin a wire from its'
connector. Due to testing & retesting and the bad things that can happen when you disconnect the battery, most
installers leave everything connected while installing.
If there are no surprises with de-installing the old unit and you are fully prepared with wire guide lists, tools,
supplies and familiar with the Vipers programming and other nuances, figure on a pleasant 4 hour install. That
includes dis-assembly, removal, wire testing / verification, install, programming, system testing, re-assembly and
clean-up. Position the Viper in the vehicle and run each wire to its connection point (in groups where possible).
Cut to each wire to length and use wire ties to keep things neat and organized.
Some Viper Tips:
1. The factory default is Manual Trans Mode. You must re-program to Auto Trans. ( Be familiar with all programming
menus & options and how to use the remotes to change them.)
2. Connect the Neutral Safety wire. The Viper must see a ground (-) on this wire to initiate a remote start.
3. If using Tach Mode, do a Tach Learn before trying a remote start. ------------- Soldering is fun!
Posted By: billy101
Date Posted: August 01, 2011 at 10:35 AM
My Impala does have the feature where when you turn it to start, you basically just need to tap it there and there is a relay or the computer will take over. No holding it in the start position. That being said...you said there is a way to use the virtual tach or a fixed crank time..are these all settings that the viper system has? and are settable? a crank time of 2-3 seconds would be PERFECT, and ensure a start each time.
Posted By: billy101
Date Posted: August 03, 2011 at 10:16 AM
Is there anything else I should be worried about?
|