compustar cm6000, drone, evo-all
Printed From: the12volt.com
Forum Name: Car Security and Convenience
Forum Discription: Car Alarms, Keyless Entries, Remote Starters, Immobilizer Bypasses, Sensors, Door Locks, Window Modules, Heated Mirrors, Heated Seats, etc.
URL: https://www.the12volt.com/installbay/forum_posts.asp?tid=129847
Printed Date: December 21, 2025 at 6:10 AM
Topic: compustar cm6000, drone, evo-all
Posted By: masber2000
Subject: compustar cm6000, drone, evo-all
Date Posted: December 25, 2011 at 12:33 PM
Hello 12volt team.
First-time poster.
I'm doing the pre-planning work for my install, and have reached the point where I need some assistance:
Alarm&Starter module-Compustar CM6000
Bypass - Fortin EVO-ALL
Drone Mobile DR-2000
Both the EVO-All and the Drone Mobile unit can attach to the CM6000 base through the datalink (RS232) port. My problem is that there's only 1 datalink port that I see. I will attach the bypass to the port, so is there another way to attach the drone mobile unit to the system through the datalink connection, or must I hard-wire the unit to the system, as there's no other port available?
Thanks in advance for your assistance.
Replies:
Posted By: tedmond
Date Posted: December 25, 2011 at 1:52 PM
compustar w2w with fortin piece, and compustar to drone via datalink
-------------
Ted
2nd Year Tier 1 Medical School
Still installing as a hobby...pays for groceries
Compustar Expert
Posted By: masber2000
Date Posted: December 25, 2011 at 2:24 PM
Thank you kindly.
I assume w2w is wire-to-wire?
Bummer that there's no workaround for both datalink connections.
Posted By: tedmond
Date Posted: December 25, 2011 at 4:28 PM
w2w is indeed wire to wire.
you can piggyback the datalink connectors, but d2d is unreliable in my opinion, so i just recommend w2w incase you have problems, its easier to diagnose.
-------------
Ted
2nd Year Tier 1 Medical School
Still installing as a hobby...pays for groceries
Compustar Expert
Posted By: metz35
Date Posted: December 25, 2011 at 5:00 PM
If u have a cm6000 why not just use an Idatalink blade. And then use the drone d2d
Posted By: masber2000
Date Posted: December 25, 2011 at 5:43 PM
I'd already purchased the EVO-ALL, thinking that it would be fully compatible, but I think I'll research the blade a bit more. Thank you.
Posted By: tedmond
Date Posted: December 25, 2011 at 11:55 PM
the fortin is compatable. The blade requires you to have it flashed or flash it yourself with the ads-usb for your vehicle.
-------------
Ted
2nd Year Tier 1 Medical School
Still installing as a hobby...pays for groceries
Compustar Expert
Posted By: masber2000
Date Posted: January 02, 2012 at 6:00 PM
Hello-
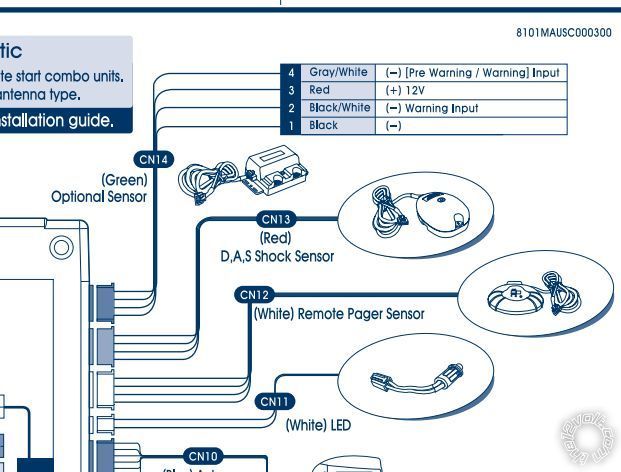
I am adding a 507M tilt sensor to the Compustar CM6000 module. I want to make sure I got the wiring correct. I am using Connector 14 (Optional Sensor Input)to attach the 507M to the control module:
507M Wires......................Compustar Wires
Red (power source 12V)................Pin 3 Red 12V positive
Orange(- ground when armed output)..............Pin 1 Blk Neg Ground
Blue (- instant trigger input)...............Pin 2 BLACK/ White - 2nd stage negative (-) input. (Instant trigger)
Compustar Pin 4 is not used
Is this the correct wiring diagram for adding the 507M to this unit?
Thank you.
Posted By: masber2000
Date Posted: January 20, 2012 at 6:58 PM
Hello-
I'm finishing the pre-planning stages of my install (recently purchased my new truck), and am running into an area in which I need some assistance. I am installing a CM6000 module with the Fortin EVO-ALL bypass and the TBGM2 transponder bypass. I need to w2w the EVO-ALL because the Computech DRONE is using the data connection.
I'm having a bit of a challenge figuring out the appropriate wire connections from the 20-pin connector on the CM6000 (CN3)and the CM6000 door lock module (CN5), to the EVO-ALL 20-pin connector. This is what I've come up with so far (connections shaded Grey):
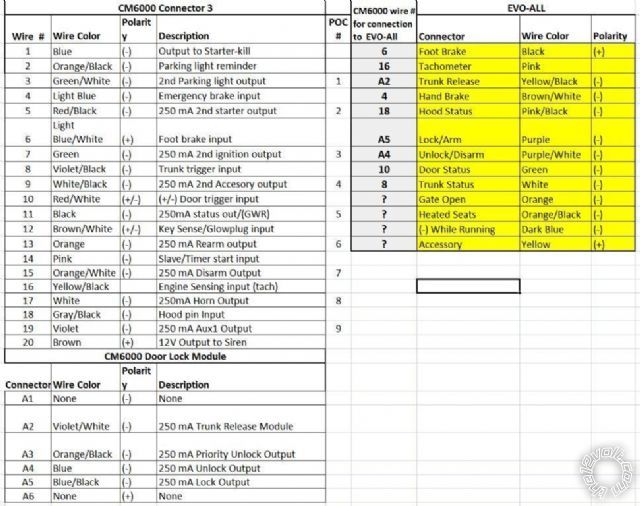
Any assistance given to determine the correct connections would be most appreciated.
Thanks in advance
masber2000
Posted By: masber2000
Date Posted: January 20, 2012 at 7:50 PM
Added information: This will be installed in a 2008 Cadillac Escalade EXT
Posted By: masber2000
Date Posted: January 21, 2012 at 7:18 AM
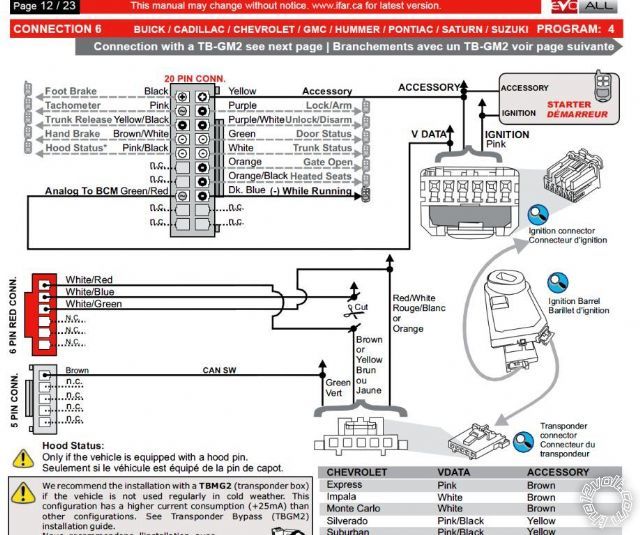
This is the connection procedure I'm using from the EVO-ALL manual:
Posted By: kreg357
Date Posted: January 21, 2012 at 8:16 AM
The EVO-ALL (-) While Running Dark Blue connects to the CM6000 CN3 Pin 11, Black (-) 250mA Status Out.
The EVO-ALL Accessory Yellow wire connects to the CM6000 CN1 thick White Accessory wire
which continues to the trucks Accessory wire ( Brown or Yellow ) at the ignition switch or BCM.
The CM6000 only provides one AUX output ( Violet wire at CN3 Pin 19 ). You can use this for
the Gate Open. If you had the OP-500 programmer you could program one of the unused POC's
( in the Special Option Groups ) for AUX2 and use that for the Heated Seats control.
Also note that in this install configuration ( without the TB-GM2 ), the R/S unit will draw an additional
25mA at rest. If the vehicle is used frequently and has a good battery, you shouldn't have a problem.
------------- Soldering is fun!
Posted By: masber2000
Date Posted: January 21, 2012 at 8:42 AM
My apologies kreg357, I posted the wrong connection! You are correct. I've posted the correct one below. I will update and post the new wiring spreadsheet with your inputs for review asap.
Posted By: masber2000
Date Posted: January 21, 2012 at 9:53 AM
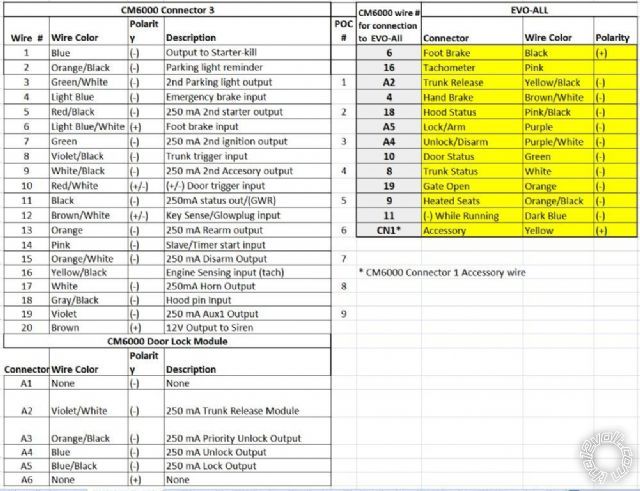
Attached is my wiring chart with the suggestions from kreg357 (thank you kindly kreg357). Is this the correct wiring plan?
Thank you
Posted By: kreg357
Date Posted: January 21, 2012 at 10:23 AM
Looks OK with the possible exception of the EVO-ALL Heated Seats wire going to the CM6000
(-) Acc output. Not sure if the EVO-ALL is looking for a single (-) pulse to turn on/off
the seats or a constant (-) to run the seat heaters. If it does work, then perhaps a switch
in the wire connection for winter/summer operation?
Other connections :
CM6000 CN3 Pin 3 GREEN / WHITE to PARKING LIGHTS ( - ) LT. BLUE (-) @ HEADLIGHT SWITCH
CM6000 CN1 Pin 4 Black to Chassis Ground
CM6000 CN1 Pin 5 Red x 2 to +12V constant ( Battery )
CM6000 CN1 Pin 3 Green to IGNITION 1 PINK (+) @ IGNITION Harness
CM6000 CN1 Pin 1 White to ACCESSORY /HEATER BLOWER 1 BROWN or YELLOW (+) @ IGNITION Harness ------------- Soldering is fun!
Posted By: masber2000
Date Posted: January 21, 2012 at 12:34 PM
Thank you very much kreg357!
Posted By: masber2000
Date Posted: January 23, 2012 at 10:14 PM
Ok, another question lol.
I'm preparing the wires for the 520T backup battery. The DEI installation instructions says to make two connections to the CM6000; the (+) constant power12V and the (-) instant trigger. While I've made the power connection between the two, I am unsure of the CM6000 wire that connects to the (-) instant trigger. The CM6000 has a distinct connection for the backup battery, however, the there's no instant trigger wire on the CM6000, only a ground wire. Thus I need to connect to another CM6000 that will provide the instant trigger function. Any idea on the wire I should use to make the connection with the 520T?
Regards
masber2000
Posted By: tedmond
Date Posted: January 23, 2012 at 10:39 PM
connect that to a hood or door pin. diode isolate.
that just tells the cm6000 a trigger occurred. if you want to be extra, connect to the cm6000 4pin green connection 13
connect the trigger wire from the 520t to the white wire in the 4pin green plug into the cm6000 (connector 13)
-------------
Ted
2nd Year Tier 1 Medical School
Still installing as a hobby...pays for groceries
Compustar Expert
Posted By: masber2000
Date Posted: January 24, 2012 at 4:58 AM
thank you tedmond.
Am I looking at the wrong schematic? I want to tie the trigger wire to connector 13. However, I'm showing the connector 13 as red (the shock sensor), with the 4-pin green connector being CN14 (see diagram below). Do I not have the most recent schematics?
Also, what is the difference between connecting the trigger wire to the hood pin, to connecting it to the white wire on CN13?
Thanks again
Posted By: tedmond
Date Posted: January 24, 2012 at 7:32 AM
woops, its actually CN14. connect to BLACK/ white.
been a long time since i've used that green connector.
-------------
Ted
2nd Year Tier 1 Medical School
Still installing as a hobby...pays for groceries
Compustar Expert
Posted By: masber2000
Date Posted: January 24, 2012 at 4:08 PM
No worries tedmond, thank you! Now, I have the 507m tilt sensor also connected to the BLACK/ white CN14 wire. Do I need to do anything else with the battery wire, or do I simply connect the blue battery wire and the tilt sensor wire together to the BLACK/ white CN14 wire?
Thanks
Posted By: tedmond
Date Posted: January 24, 2012 at 5:34 PM
Diode isolate with diode band towards the sensors
-------------
Ted
2nd Year Tier 1 Medical School
Still installing as a hobby...pays for groceries
Compustar Expert
Posted By: masber2000
Date Posted: January 24, 2012 at 5:44 PM
thank you sir!
Posted By: masber2000
Date Posted: January 24, 2012 at 5:45 PM
....or madam, sorry 
Posted By: tedmond
Date Posted: January 24, 2012 at 8:20 PM
sir haha. good luck with the install. the fortin evo all will make the install very easy.
make sure you test your wires and solder them. great system as well that you chose.
-------------
Ted
2nd Year Tier 1 Medical School
Still installing as a hobby...pays for groceries
Compustar Expert
Posted By: masber2000
Date Posted: January 26, 2012 at 8:06 PM
Quick question- After I hardwire the hood status wires of the CM6000 and the EVO-ALL, do I just tie in the hood pin wire to the wire connection?
Thanks
Posted By: offroadzj
Date Posted: January 26, 2012 at 8:15 PM
You should be able to just connect the hood status out from the Evo to the input on the CM6000... but I could be wrong.
-------------
Kenny
Owner / Technician
KKD Garage LLC
Albany, NY 12205
Posted By: tedmond
Date Posted: January 26, 2012 at 8:44 PM
you can connect it from the fortin evo to the cm6000. if you ran a hood pin wire then you can still tie them in together.
-------------
Ted
2nd Year Tier 1 Medical School
Still installing as a hobby...pays for groceries
Compustar Expert
Posted By: masber2000
Date Posted: January 27, 2012 at 3:20 AM
I apologize for my lack of clarity. I did indeed connect the hood status from the Evo to the CM6000. However I've yet to install the hood pin on my truck (should do this weekend) and am wondering if I am correct in tying the hood pin into the above connection.
Thanks for your help!
Posted By: masber2000
Date Posted: January 27, 2012 at 4:12 AM
Ok, another question-
Do I still connect the CM6000 CN1 Pin 2 (12V to Starter)(Yellow and Yellow/Black) to the Starter wire, or does the EVO-ALL handle this for me? If the EVO-ALL does, will I still retain the CM6000's anti-grind and starter immobilization feature?
Thanks again
Posted By: offroadzj
Date Posted: January 27, 2012 at 7:40 AM
Yes and no.. haha. The Evo-All does not handle the starter wire, but you do not need to connect the starter wire from the remote start to the vehicle either. The factory BCM controls the starter signal automatically when it sees the accessory line drop power. And you do not need the anti-grind because the BCM has it built in as well. So all you need to do (as far as ignition components are concerned) is connect your 12v constant, ignition, and make all of the required connections on the Evo-all and it will automatically work the starter signal.
-------------
Kenny
Owner / Technician
KKD Garage LLC
Albany, NY 12205
Posted By: tedmond
Date Posted: January 27, 2012 at 10:01 AM
masber2000 wrote:
I apologize for my lack of clarity. I did indeed connect the hood status from the Evo to the CM6000. However I've yet to install the hood pin on my truck (should do this weekend) and am wondering if I am correct in tying the hood pin into the above connection.
Thanks for your help!
if the vehicle has a factory hood pin, it will be sent through data to the evo-all into the compustar. you will need to verify this though. worst case just run yourself a hood pin. ------------- Ted
2nd Year Tier 1 Medical School
Still installing as a hobby...pays for groceries
Compustar Expert
Posted By: masber2000
Date Posted: January 27, 2012 at 2:37 PM
offroadzj wrote:
Yes and no.. haha. The Evo-All does not handle the starter wire, but you do not need to connect the starter wire from the remote start to the vehicle either. The factory BCM controls the starter signal automatically when it sees the accessory line drop power. And you do not need the anti-grind because the BCM has it built in as well. So all you need to do (as far as ignition components are concerned) is connect your 12v constant, ignition, and make all of the required connections on the Evo-all and it will automatically work the starter signal.
This is great news! One less wire to worry about lol. Thank you Kenny.
Posted By: masber2000
Date Posted: January 27, 2012 at 2:40 PM
tedmond wrote:
masber2000 wrote:
I apologize for my lack of clarity. I did indeed connect the hood status from the Evo to the CM6000. However I've yet to install the hood pin on my truck (should do this weekend) and am wondering if I am correct in tying the hood pin into the above connection.
Thanks for your help!
if the vehicle has a factory hood pin, it will be sent through data to the evo-all into the compustar. you will need to verify this though. worst case just run yourself a hood pin.
I tell you, the tech advances in these alarms since I last did noe of these is astounding. Thanks so much tedmond.
Posted By: masber2000
Date Posted: January 27, 2012 at 11:04 PM
Quick question- The Drone module has a green wire that connects to the ignition. Should I connect this, as it states in the manual "connect if module does not support 2-way data"?
Also the black wire from the siren, should I just connect it to the ground wire?
Thank you
Posted By: tedmond
Date Posted: January 28, 2012 at 12:10 AM
since you are installing a cm6000, the drone module will be connected by the d2d cable, no need to w2w this.
the black from siren will go straight to ground.
-------------
Ted
2nd Year Tier 1 Medical School
Still installing as a hobby...pays for groceries
Compustar Expert
Posted By: masber2000
Date Posted: January 31, 2012 at 11:18 AM
Ok, almost finished the initial install and am about to power up the system and program (will follow up with pix soon). I'm using the OP500 programmer and want to make sure that I have the latest firmware. As I'm not a dealer, I can't access the firmware on the Compustar site. Does anyone know where I can get the latest firmware, or could you post a copy for me to download?
Thank you.
Posted By: tedmond
Date Posted: January 31, 2012 at 11:49 AM
the brain ships with v6.0 software. currently, the current release is v6.7. if you are worried about issues you can use the v6 with the dr-1/2000 no problem. you only need the update if you're using the BLADE modules.
I don't think any dealer is going to post the brain update, as we're not allowed to do so. the only way you're going to obtain a copy is have a compustar shop update it for you.
-------------
Ted
2nd Year Tier 1 Medical School
Still installing as a hobby...pays for groceries
Compustar Expert
Posted By: masber2000
Date Posted: January 31, 2012 at 3:36 PM
Ok thanks tedmond.
Posted By: masber2000
Date Posted: February 03, 2012 at 3:16 PM
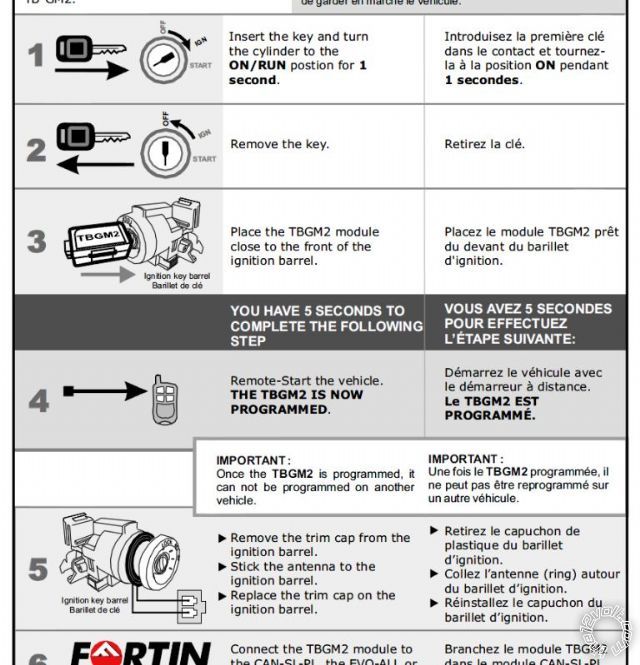
Ok, the install is coming together, got all of the wires hooked up (I think, lol) I am having an issue with the remote start. Tried starting it, didn't start. Realized that I hadn't hooked up the TB-GM2 yet (Stupid!). Tested remote start using key touching the cylinder, started perfectly! Followed directions for TB2 programming. This is where I've run into issues:
1. It states in the install manual to turn key in ignition to "on" for a sec, then hold the TB-GM2 up to the ignition. Remote start the vehicle and the TB-GM2 is programmed. I did this. Should the vehicle actually remote start with the TB-GM2 being held at the barrel? Because the car did not remote start, it just went through the motions as it did before.
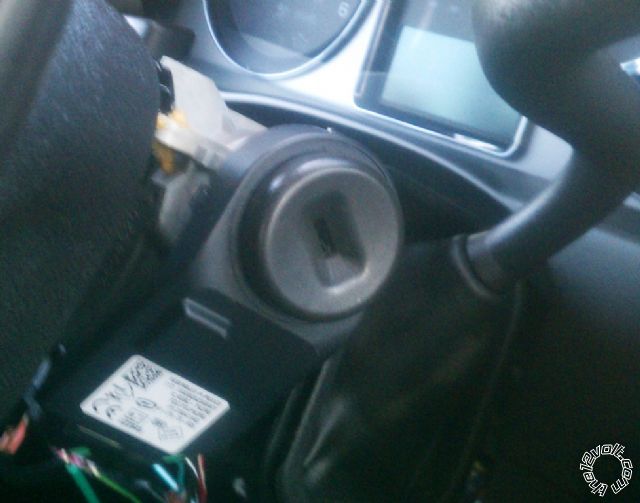
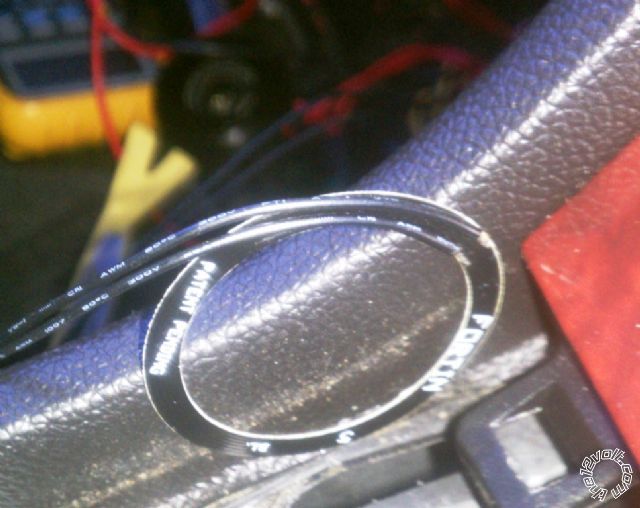
2. How can I take the ignition barrel cap off my 2008 escalade (see pix 1 below) to install the TB-GM2 ignition ring?
Posted By: masber2000
Date Posted: February 03, 2012 at 3:52 PM
BTW, when programming the TB-GM2, there were no wires hooked up to it (as detailed in the instructions).
Posted By: tedmond
Date Posted: February 03, 2012 at 6:22 PM
you answered your own question.
when program you start the vehicle by remote start.
-------------
Ted
2nd Year Tier 1 Medical School
Still installing as a hobby...pays for groceries
Compustar Expert
Posted By: masber2000
Date Posted: February 03, 2012 at 7:14 PM
Hi tedmond, thanks much for your help (again). I think I'm guilty of obfuscation once again. I followed steps 1-3 below successfully. However, upon attempting step 4, I tried to remote-start the vehicle, and it is not starting, only attempting to start (as it did previously). Is this normal, and it will start once I completely install the TBGM2? Or in step 4, should the programmed TBGM2 remote-start the vehicle without being physically connected to the EVO-ALL, as I did when I placed the edge of the key against the ignition?
Thanks again
Posted By: offroadzj
Date Posted: February 03, 2012 at 8:51 PM
I don't believe it will start when you program the bypass. Try connecting it with the ring just sitting against the barrel and see if it works. If not, then it didn't program. If it does, then it did program.
-------------
Kenny
Owner / Technician
KKD Garage LLC
Albany, NY 12205
Posted By: tedmond
Date Posted: February 03, 2012 at 8:54 PM
that pieces programs through inductive coding like any rfid.
when it attempts to start, it programs the chip inside. connect to evo all when all is said, remote start it will work.
the only way to determine if its programmed is to try and remote start it.
-------------
Ted
2nd Year Tier 1 Medical School
Still installing as a hobby...pays for groceries
Compustar Expert
Posted By: masber2000
Date Posted: February 03, 2012 at 10:15 PM
offroadzj, tedmond, your help is much appreciated. Now to find out how to take the trim cap off of the ignition barrel so I can finish this thing lol.
Posted By: tedmond
Date Posted: February 04, 2012 at 1:05 AM
if im not mistaken you will follow method 2.
1) loosen the steering shroud, check to see if the shroud can be take apart. if you can just connect/wrap your wire.
2) if you cannot take the shroud off, such as the cylinder is inbetween the plastic, use a pry tool and pop that black cap off. remove panel and finish wrap
-------------
Ted
2nd Year Tier 1 Medical School
Still installing as a hobby...pays for groceries
Compustar Expert
Posted By: dswift
Date Posted: February 07, 2012 at 5:21 PM
=)
-------------
"dont ground out!"
Posted By: masber2000
Date Posted: February 07, 2012 at 6:10 PM
Ok, thanks to all, got everything working. And with the assistance of the helpful team at Firsttech, I was able to activate my DroneMobile unit. Starting my vehicle from my cellphone was very cool!
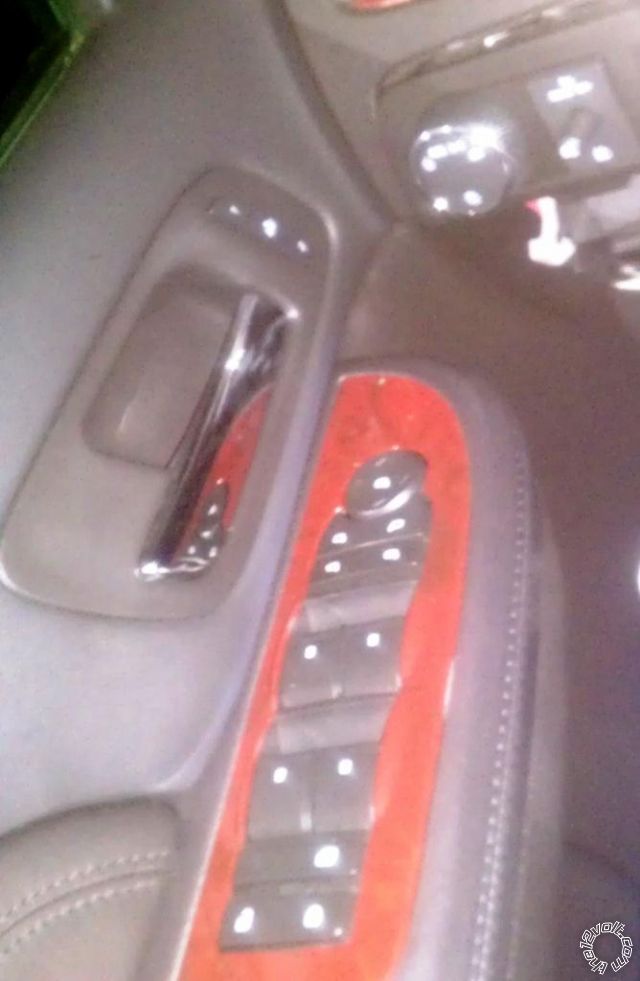
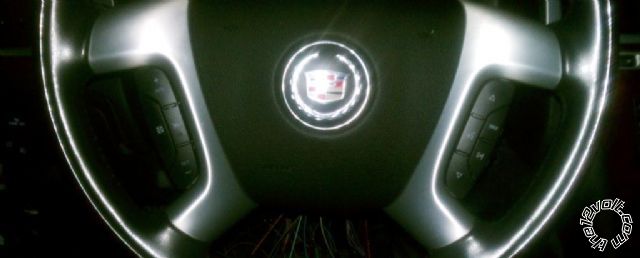
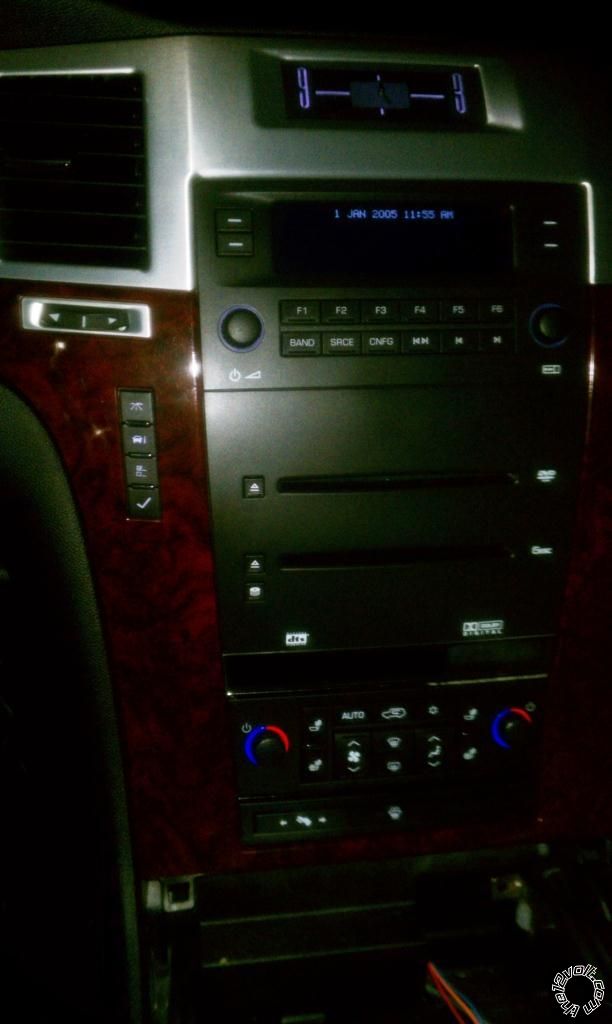
One small issue popped up, and I'm hoping it's a slight wiring problem. After remote starting, and then stopping the remote run, I noticed that upon remote shutoff, everything shuts down as required EXCEPT for the dashboard accessory lights (radio, clock, steering wheel, window switches, etc--see photos below).
These lights stay on after the valet lights in the vehicle have shut down. These lights only shut off when I open the car door.
I'm assuming that I made a wrong wire (accessory?) connection. What could be the possible cause-and remedy- to this?
Thanks in advance for the help.
door switches, light switch, window switch are illuminated
 steering wheel levers (radio, cruise, etc) are illuminated
 Radio clock, clock, etc still active
Posted By: tedmond
Date Posted: February 07, 2012 at 8:42 PM
that is known as the RAP. Retained Accessory Power.
what you need to do is connect the factory alarm ARM wire to the driver door trigger.
upon shutdown, a pulse is sent to the driver door pin, which will mimic as if the door opened.
-------------
Ted
2nd Year Tier 1 Medical School
Still installing as a hobby...pays for groceries
Compustar Expert
Posted By: offroadzj
Date Posted: February 08, 2012 at 6:17 AM
Activate then shut down the remote start so that the accessories stay on and watch them. I have yet to see a single car that didn't time out after a preset time (some are only 5min, some up to 15min). If you verify that they do in fact shut down, and you don't mind them staying on a few minutes after, then don't worry about it.
-------------
Kenny
Owner / Technician
KKD Garage LLC
Albany, NY 12205
Posted By: masber2000
Date Posted: February 08, 2012 at 7:12 AM
offroadzj- Yes I did time it, it shuts off after @ 15 minutes. I hope there is a way to change the timing to 5 min then this would not matter, I'm concerned about the battery drain. I'm preparing to do tedmond's work-around if there isn't a way to set the time.
Thanks tedmond and offroadzj for your help.
Posted By: tedmond
Date Posted: February 08, 2012 at 7:47 AM
i dont think you can change the rap shutdown time. if you have to run a rearm wire, use the compustar arm, run a wire into the driver door. connect with 2 diodes and join to the 2 driver door triggers.
diode band towards the compustar
-------------
Ted
2nd Year Tier 1 Medical School
Still installing as a hobby...pays for groceries
Compustar Expert
Posted By: offroadzj
Date Posted: February 08, 2012 at 9:20 AM
I could be wrong on this, but I believe the RAP only retains the accessories (ie radio, some illumination) so the battery draw should be very minimal... to the point that if it were draining the battery and causing issues, then your battery is on its way out. I personally doubt its worth the hassle of running wires into the door... unless it bothers you that much.
-------------
Kenny
Owner / Technician
KKD Garage LLC
Albany, NY 12205
Posted By: tedmond
Date Posted: February 08, 2012 at 11:25 AM
if im not mistaken,proximitly lighting (headlights) stay on as well. you can simply avoid this issue by not shutting down the remote start, if you have no intentions of going into the car. ------------- Ted
2nd Year Tier 1 Medical School
Still installing as a hobby...pays for groceries
Compustar Expert
Posted By: masber2000
Date Posted: February 08, 2012 at 12:44 PM
How about running the Orange Factory Arm wire (CN 3, Pin 13) to the All door trigger (-) Gray/Blk, which is supposedly located "at the courtesy light under the dash" https://www.the12volt.com/installbay/forum_posts.asp~TID~98454 (init's post). Will this work?
Posted By: offroadzj
Date Posted: February 08, 2012 at 2:22 PM
That should work.... I don't see why it wouldn't. Just verify that it is (-) when the door is open.
-------------
Kenny
Owner / Technician
KKD Garage LLC
Albany, NY 12205
Posted By: tedmond
Date Posted: February 08, 2012 at 4:10 PM
Orange Factory Arm wire (CN 3, Pin 13) is the correct wire, but wiremagic says not to use all door triggers. its controlled via data then turns on the courtesy light.
remember, you can only turn off RAP when the driver door is open. you will have to go to the trigger itself. (thats what wiremagic/firstech shows)
-------------
Ted
2nd Year Tier 1 Medical School
Still installing as a hobby...pays for groceries
Compustar Expert
Posted By: masber2000
Date Posted: February 08, 2012 at 5:32 PM
tedmond wrote:
i dont think you can change the rap shutdown time. if you have to run a rearm wire, use the compustar arm, run a wire into the driver door. connect with 2 diodes and join to the 2 driver door triggers.
diode band towards the compustar
Where would I find the 2 driver door triggers? Why use two wires instead of one?
Thank you tedmond.
Posted By: tedmond
Date Posted: February 08, 2012 at 6:44 PM
one is the door ajar to the vehicle message center, the other is the actual door pin signal.the 2 wires are in the driver door, at the window/locks switch. Running an 18-22 gauge wire into the door is easy.
gray/black (-) and Tan (-)
you can try the all door trigger wire and see if that works for you. It might or might not.
-------------
Ted
2nd Year Tier 1 Medical School
Still installing as a hobby...pays for groceries
Compustar Expert
Posted By: masber2000
Date Posted: February 10, 2012 at 7:30 AM
After re-observing the lights issue, I decided to leave as-is for the time being. So I am wrapping everything up and preparing to enjoy my new system! If it becomes an irritant, then I'll attach the pin during my next project this spring--installing a new head unit.
I can't begin to quantify the gratitude I have for the 12volt team--in particular offroadzj and tedmond. You were essential in making this a smooth process for me.
I will follow up with photos soon. And will see you in the springtime, as I have to get my sound system ready for the summer! Lol
Thanks again
Posted By: offroadzj
Date Posted: February 10, 2012 at 9:14 AM
Glad you were able to get most everything figured out. I really don't think you'll have a problem with the RAP shutdown.... I rarely ever connect the shutdown and I've never had a customer complain. A good battery should have no problem running the radio and a few lights for must longer than the RAP time limit. Heck, when I go to the drive-ins, I'm running my full system (in dash screen, 4ch amp, sub amp) for sometimes up to 2 hours and my battery is fine. Granted, its a Yellow Top, but even a standar battery should never give you an issue.
-------------
Kenny
Owner / Technician
KKD Garage LLC
Albany, NY 12205
Posted By: tedmond
Date Posted: February 10, 2012 at 11:04 AM
no prob.
there is a solution to your problem(user though). just make sure you don't start the vehicle and shut it down without having intentions of opening the driver door. change in habits, but as kenny suggested, it shouldn't affect your battery charge.
-------------
Ted
2nd Year Tier 1 Medical School
Still installing as a hobby...pays for groceries
Compustar Expert
|