Here is a link to info on D2D compatability between the Ultra Start 1280 and the Fortin bypass : https://ifar.ca/en/datalink/ultrastart/1280_series/
-------------
Soldering is fun!
Your R/S to vehicle connections look complete.
12 VOLT CONSTANT PINK/BLACK (+) and RED (+) IGNITION SWITCH HARNESS
STARTER YELLOW (+) IGNITION SWITCH HARNESS
IGNITION 1 DARK BLUE (+) IGNITION SWITCH HARNESS
ACCESSORY 1 RED / BLACK (+) IGNITION SWITCH HARNESS
ACCESSORY 2 BLACK/ ORANGE (+) IGNITION SWITCH HARNESS **Set U1280 thick White wire to ACC2
PARKING LIGHTS ( - ) YELLOW (-) @ HEADLIGHT SWITCH, See DIAGRAM
https://www.bulldogsecurity.com/diagrams/extrainfo/diagrams/14301_GRAND-CHEROKEE_GRAND%20CHEROKEE%20PARKING%20LIGHT%20DIAGRAM.pdf
HORN GRAY/ORANGE (-) @ HORN SWITCH
BRAKE WHITE/ TAN (+) @ SWITCH ABOVE BRAKE PEDAL
Tach signal supplied by the EVO-ALL should be OK.
Here are some good tips on dash disassembly from a senior forum member found in an earlier post :
--Disassembly: Tilt wheel all the way down, unsnap plastic piece below speedometer, remove two Philips screws.
Under the dash, remove two 10mm gold-colored screws. Pull the lower dash panel straight (toward the rear of the
car), and it'll unclip. Behind there is a black metal brace. Remove four more 10mm gold colored screws. Note
that these screws are shorter than the other two, so don't mix them up.
-------------
Soldering is fun!
Perfect, thanks!
One followup question having to do with the data link cable supplied by Fortin. It doesn't fit into the connector on the U1280.
My Ultra Start connector layout is new and shown here https://ultrastarters.com/manuals_download_pdf/2011%20manuals/80_newboards.pdf. I verified with support@ultrastarters.com that the diagram is correct.
I'm guessing the U1280 connector is for an iDataLink and that the iDataLink and Fortin connectors are different. If that's correct, what's the correct way to make the connection? Is there an adapter available? Neither the U1280 nor the EVO-ALL supplied a male connector that will fit into the data port on the U1280.
Here's a pic of both modules and the Fortin-supplied cable.
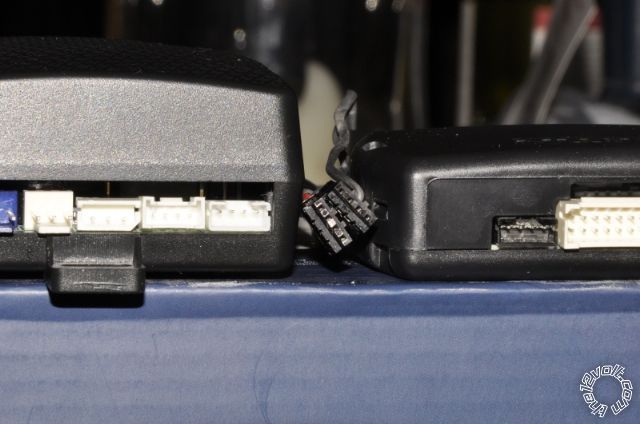
Coincidentally, the cable fits perfectly into the far-right connector on the U1280 :(
Thanks again,
Jim
Think all you have to do is trim the raised edges of the supplied connector flush with the rest of the plug such that it fits into the slot. The rest of the plug dimensions should be OK.
-------------
Soldering is fun!
Trimmed the connector and squished it in there. Everything went together with zero problems. Wife is super happy.
Thanks again for all your help!
Jim