2000 chrysler town and country
Printed From: the12volt.com
Forum Name: Car Security and Convenience
Forum Discription: Car Alarms, Keyless Entries, Remote Starters, Immobilizer Bypasses, Sensors, Door Locks, Window Modules, Heated Mirrors, Heated Seats, etc.
URL: https://www.the12volt.com/installbay/forum_posts.asp?tid=130600
Printed Date: May 15, 2026 at 2:56 AM
Topic: 2000 chrysler town and country
Posted By: antman1
Subject: 2000 chrysler town and country
Date Posted: February 13, 2012 at 10:12 PM
Replies:
Posted By: offroadzj
Date Posted: February 13, 2012 at 10:27 PM
A couple quick pointers before I head to bed.
1) Please don't take this personally, but if you have to ask about how to even get started then you are most likely over your head on the install. I would highly recommend finding someone to install it for you.. just make sure to ask a lot of questions so you know that they know what they are doing (and they aren't a hack). 1 wrong connection can cause hundreds and sometimes thousands of dollars in damage and it doesn't always take much.
2) Before you even start I would try to return that unit and get a quality starter. Fleabay (stolen from howie...thanks!) starters are USUALLY complete junk and aren't worth the plastic the boxes are made of. I'm not sure what you paid for that unit, but you can get a quality remote starter (Compustar or DEI) on Amazon for around $60-$80. They are MUCH more reliable than the off-brand crap that you usually find on Fleabay.
With all that said, if you really want to give it a shot, I will work on getting you an in depth point to point install guide tomorrow morning when I get to work (around 6:30EST).
-------------
Kenny
Owner / Technician
KKD Garage LLC
Albany, NY 12205
Posted By: antman1
Date Posted: February 13, 2012 at 10:33 PM
Thank you for your help. I looked at the features of this alarm and others and then I looked over the reviews and this alarm seemed like a good deal on this. I do have a installer I can go to but I really feel I can do this myself but with this being my first install I want to check with you guys (the experts) and get as much help as I can. Thank you. I do feel that I can do this and appreciate your help.
Posted By: blanx218
Date Posted: February 13, 2012 at 10:42 PM
I've installed one of those before and it was a complete nightmare. I would definitely purchase something better. DEI products are much more installer friendly. Also does the van have a grey or black key. If it has a grey key you will also need a transponder bypass.
Posted By: antman1
Date Posted: February 13, 2012 at 10:44 PM
It has the Black key. No transponder bypass needed.
Posted By: offroadzj
Date Posted: February 14, 2012 at 5:52 AM
I had a little bit of a late start this morning. I will work on the diagram first chance I get today.
-------------
Kenny
Owner / Technician
KKD Garage LLC
Albany, NY 12205
Posted By: antman1
Date Posted: February 14, 2012 at 8:13 AM
I had a quick update on this. I bought this vehicle a week ago and was told that it does not have an alarm. Well last night I found out the opposite. My wife went into the store and she locked the doors with the 1 remote we had that came with the vehicle and I was trying to surprise her with a valentines gift and I came out and opened the door with my key and then I hit the unlock button from the inside and the van acted like we hit the panic button and was going off. It didn't turn off even with the key in the ignition until I found her and got the remote then held the panic button and the horn sounded 5 times.
I still want to install this alarm I got because of its features. Will this factory alarm cause a problem? The alarm I have says it is factory alarm compatible but I wanted to run it by you guys.
Posted By: offroadzj
Date Posted: February 14, 2012 at 8:53 AM
The factory alarm won't be an issue... it just required an additional connection. I'll have that diagram up shortly.
-------------
Kenny
Owner / Technician
KKD Garage LLC
Albany, NY 12205
Posted By: offroadzj
Date Posted: February 14, 2012 at 12:21 PM
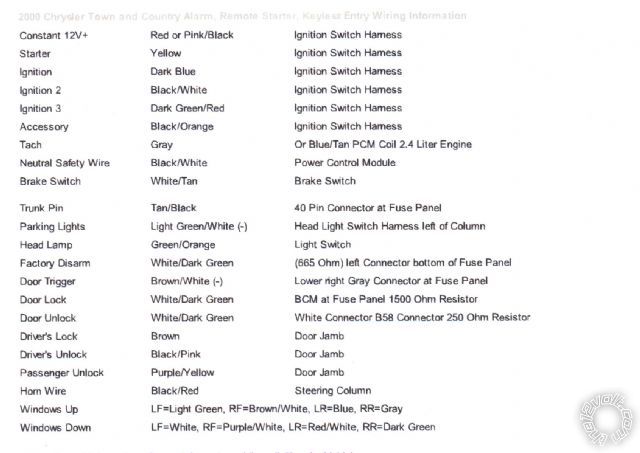
Well that just sucks, I had a whole nice diagram made up and my damn computer froze just before I could save it. So I'm just going to put it in here.
5 Pin Heavy Gauge Harness:
Red - Red (+) 12v constant at ignition switch
Purple - Yellow (+) Starter wire at ignition switch
Orange - BLACK/ Orange (+) Accessory wire at ignition switch
Pink A - Dark Blue (+) Ignition wire at ignition switch
Pink B - N/C
*You will need to use a relay to power the 2nd accessory. Just a standard 30a/40a automotive relay connected as follows:
Pin 85 - Blue/White (-) bypass wire in H4 harness
Pin 86 - Orange Accessory wire from above
Pin 87 - 12v Constant Fused (can tie into fused Red 12v constant above)
Pin 30 - BLACK/ White (+) 2nd Accessory wire at ignition switch
7 Pin Secondary (H4) Harness:
1-3 - Factory wiring to R/S module
4 - Blue/White (See Above)
5 - Gray/Black - N/C
6 - BLACK/ White - Chassis Ground
7 - Violet/White - Gray or Gray/Red (AC) at ignition coil pack. Can also use the odd colored wire at any injector.
10 Pin Primary (H1) Harness
1 - Brown - To Siren (+) input
2 - White - GREEN / WHITE or GREEN/ Red (-) at headlight switch. Must set unit to (-) parking light output. Search for DEI Tech Doc 1080 if the van has automatic headlights.
3 - Violet - N/C
4 - Blue/Black - WHITE/ Green in left plug on bottom of BCM/Fusebox. Must connect a 665ohm resistor inline.
5 - BROWN / Black - Chassis Ground
6 - Violet/Black - N/C
7 - GREEN/ Black - Same as unlock wire. Must connect 4020ohm resistor inline.
8 - WHITE/ Black - Chassis Ground
9 - Red - 12v Constant fused (can tie into heavy gauge red wire from main harness)
10 - Black - Chassis Ground
6 Pin Secondary (H2) Harness:
1 - Orange - Starter kill relay input
*If you wish to enable the starter kill, you will need to cut the factory Yellow starter wire at the ignition switch and you will need another relay (same as above) connected as follows:
Pin 85 - Orange Ground when running (H2-1)
Pin 86 - Ignition (+) (Pink from main harness)
Pin 87a - ignition side of cut starter wire
Pin 30 - Vehicle side of cut starter wire
*Connect the remote start output (Purple) between the relay and the car!
Pin 87 - N/C
2 - Blue - N/C
3 - WHITE/ Black - N/C
4 - PURPLE / Black - N/C
5 - BLACK/ White - BROWN / white at dome light on/off switch
*This connection is not required, but if desired, it MAY require a relay
6 - RED / White - N/C
8 Pin (H3) Harness:
1 - GREEN/ Black - Factory alarm arm/disarm will require either 2 relays or a DEI 451m. The 451m is a better choice as it is more compact and will include a resistor pack. Connect the 451m as follows:
Violet/Black - Chassis ground
Blue/Black - Blue/Black unlock wire from unlock above(*Must connect between the unit and the resistor)
GREEN/ Black - GREEN/ Black lock wire from lock above (*Must connect between the unit and the resistor)
WHITE/ Black - N/C
BROWN / Black - N/C
Small Red - 12v Constant Fused
Small Blue - GREEN/ Black (H3-1)
Small Green - GREEN / WHITE (H3-2)
2 - GREEN / WHITE - See Above
3 - Red - I am not sure if this wire is needed along with the tach sensing or not. If so it will connect to the small wire coming off the alternator that reads 12v-14v only when the vehicle is running.
4 - Gray - Must add aftermarket hood pin.
5 - Brown - WHITE/ tan (+) at brake pedal switch
6 - Yellow - Pink wire from main harness
7 - Green - BROWN / Light Green at dome light on/off switch
8 - Purple - N/C
This is by no means an easy starter. Make sure to take your time and use a quality DMM to test EVERYTHING before making any connections. When making connections, strip, poke, solder, and tape the connection with a high quality 3m tape (super 33+ or better). If the tape is less than $2-$3 per roll then its no good!!!
-------------
Kenny
Owner / Technician
KKD Garage LLC
Albany, NY 12205
Posted By: antman1
Date Posted: February 14, 2012 at 12:30 PM
Thank you so much. This is exactly what I needed. I will break out the multimeter and take my time on this. I will let you know how it goes. The alarm did come with a starter relay for Starter kill function.
Posted By: offroadzj
Date Posted: February 14, 2012 at 12:57 PM
To be 100% honest, I rarely ever put the starter kill relay in. If a thief has gotten that far into your car, there is a good chance that they have already bypasses the starter kill relay. Very few newer cars can be stolen with the old screwdriver method and require being "hotwired". This means that the thief is already under your dash and will simply bypass the relay in about .5 seconds. To me, this extra .5 seconds it might take them is not worth the risk of me getting stranded somewhere if that relay decides to crap out.
Thats just my personal opinion.. I'm sure everyone feels differently about it.
-------------
Kenny
Owner / Technician
KKD Garage LLC
Albany, NY 12205
Posted By: antman1
Date Posted: February 14, 2012 at 2:07 PM
I have found that in the box it has these 2 things. If I don't do the Starter kill option the relay would be available to use for the accessory option you mentioned. Here is a page I forgot to scan and also the pic of the 2 things with the alarm as well.


Posted By: offroadzj
Date Posted: February 14, 2012 at 3:41 PM
Ok, that page verifies that you do not need that Red (+) Oil Sensor / alternator connection wire as long as you connect the tach.
Yes you will be able to use the relay from the starter kill, but not the harness it comes with (unless you re-pin it). But you can crimp a couple connectors onto the wires and connect directly to the relay itself.
-------------
Kenny
Owner / Technician
KKD Garage LLC
Albany, NY 12205
Posted By: antman1
Date Posted: February 14, 2012 at 4:01 PM
ok. getting a little confused. I know I can do most my prep outside the car and was going to do that. Feeling like you said "a bit over my head". lol. I have done Xbox modifications and dual tsop mods and soldered some fine wires to some pretty tight spots. But I think the layout of this is confusing. I can connect a wire to a wire and I can run the wires were they go through the car. I have been installing radios since I was 9 and I am 31 now. lol. I know, my mom was weird and I would hook up radios for her while we were driving down the road and I used to install systems for my friends. I installed a remote start in an oldsmobile I had and it was a used Avital remote start but I have a complete blank on this. Thank you for all your help.
Posted By: antman1
Date Posted: February 15, 2012 at 10:11 PM
so far so good. Been studying and making sure I got everything connected before I install in the van. I believe I have everything prepped now for the install in the 2000 town and country. I have a few questions though. does this look right for how I wired the resistor inline.

I noticed I do have automatic lights that turn on and off by themselves when you have it selected on the switch. Will this be a problem?
Also on the DEI 451m you said Violet/Black - Chassis ground but it shows a Violet wire and a Violet/Black wire connected to a fuse and going to 1 purple wire. see pic below. How should I correct that?

and for the starter kill relay that came with the alarm it had yellow, orange and 2 green wires. I connected the orange wire to the orange wire from the alarm and I am thinking the yellow wire will go to constant 12v and the green wires will go to each side of the cut ignition wire. Does this sound correct?

And last I was planning of installing the LED were my headlight and dimmer switch are in the pic below. Does that seem like a good spot? Also I plan to install the siren in the spot in the pic below it is on the left side under the hood. Do these spots look good?


Thank you again.
Posted By: antman1
Date Posted: February 15, 2012 at 10:14 PM
quick correction. I meant Yellow wire on starter kill relay being I! gnition (+) (Pink from main harness). Not 12v Constant.
Posted By: antman1
Date Posted: February 16, 2012 at 10:25 AM
can anyone confirm those things? Was going to test connections and try to get this done today.
Posted By: antman1
Date Posted: February 18, 2012 at 11:17 AM
I have everything prepped. I took all the ground wires (came to 5 total) and crimped them into a connector to screw into the chassis and soldered it to make sure its good.
Since both Blue/Black and GREEN/ Black go to the GREEN / WHITE I connected them together after the 2 resistors towards the vehicle.
I am guessing the BLACK/ White (Dome Supervisor) wire does not need to be connected.
I still am not sure were I want to install the LED for this. I am open to ideas from anyone on this.
And hopefully the Autolights wont be an issue. The switch lets you turn the auto feature off.
As far as the violet and violet/black wire going to the fuse together and then going to the 1 violet/black wire I grounded it from the DEI 451M like described.
I am still up in the air about installing the starter kill relay. I have it prepped but not sure about using it. Its a valid point about it failing. What are everyone elses thoughts on installing this.
Anyone have any pics of installs they have done on Grand Caravans or Town and Country vans and stuff.
Posted By: offroadzj
Date Posted: February 18, 2012 at 4:19 PM
I responded to your pm, but it looks like you got it figured out in regards to the blue/black and GREEN/ black having the resistors before the 2 wires come together. The 451m (arm/disarm) must go to the GREEN/ black and blue/black between the resistors and the brain (like you show in the above diagram).
You shouldn't need to connect the domelight supervision.
If you have autolights you NEED to connect the headlights using the Directech document 1080. I don't have it but hopefully someone can post it up here.
The starter kill is up to you. I stand by my beliefs in it being useless, but everyone has their own views.
The only other tip I have is if you have an airbag under the knee bolster then be very careful with it. If you unplug it, DO NOT turn the ignition on while it is unplugged.
-------------
Kenny
Owner / Technician
KKD Garage LLC
Albany, NY 12205
Posted By: antman1
Date Posted: February 18, 2012 at 10:47 PM
Awesome Thank you a lot. It looks like I have everything ready except the Autolights wire. All I gotta do is mount the LED, Antenna, the Siren and hoodpin I got then run the wires through the firewall and wire/mount this prepped alarm under the dash.
I also used Quick connect on some of the connections. They have always worked good for my radio installs for clean installs. I soldered the smaller gauge wires. Here are the exact Quick connects I have.

Do those look like they will be good for this?
Hopefully someone can post the Directech document 1080 and I can finish this up.
Posted By: kreg357
Date Posted: February 19, 2012 at 5:06 AM
DEI Tech Tip 1080 is contained in this ZIP file ( located in the Downloads Section ) : https://www.the12volt.com/installbay/file.asp?ID=1076
There are actually 4 ZIP files in the Downloads Section that include most all of the DEI Tech Tips. Search on "Tech Tips".
 Many thanks to forum member SeanW727! Many thanks to forum member SeanW727!  ------------- Soldering is fun!
Posted By: antman1
Date Posted: February 19, 2012 at 7:25 AM
Very cool. Looks like I will be back out to get another relay. Also I have a quick question about the relay connection. Do I just run the 85 relay wire to GREEN / WHITE and have the alarm also spliced into Green white like originally planned?

Thank you goes to Kreg357, SeanW727 and especially offroadzj. You guys have helped me so much. All I can say to anyone that may have been following this. NEVER rush on one of these jobs. so far I have found many bumps in my road and am glad I have been reading and asking questions before doing anything in the vehicle.
Posted By: offroadzj
Date Posted: February 19, 2012 at 9:10 AM
The 2 black things with the white line are diodes. You can pick up just a couple 1n4004 diodes at any radio shack or other electrical place like that. You will have to disconnect / cut your white wire coming off the alarm anyways to put the diode in, so cut that wire somewhere near the switch, connect the diodes, and wire 1 to the parking light wire of the car (GREEN / WHITE) and one to the relay. Basically what the relay is doing is cutting the input connection to the auto lights so that they do not come on during remote start (and thus won't stay on if you shut down before getting in the car).
-------------
Kenny
Owner / Technician
KKD Garage LLC
Albany, NY 12205
Posted By: antman1
Date Posted: February 19, 2012 at 9:59 AM
Does this look right?

Posted By: offroadzj
Date Posted: February 19, 2012 at 10:19 AM
Its tough to tell. The easiest is to just follow the diagram exactly as it is shown in the tech doc. Cut the white wire from the alarm, connect the stripe side of each together to white coming off the alarm. Then connect lengths of wire to the other side of each diode. Connect 1 to the GREEN / WHITE wire at the switch, and connect the other to the relay. Simple and clean.
-------------
Kenny
Owner / Technician
KKD Garage LLC
Albany, NY 12205
Posted By: flobee4
Date Posted: February 19, 2012 at 10:27 AM
The diodes have to used to form a "Y" like the first diagram you posted with the questions embedded into it. The Diagram you posted will not work. Its easier to split the negative parking light wire closer to the remote starter brain anyway. At the brain you can "Y" the parking light wire with the diodes, & you have your constant 12 volts. You can zip tie the relay up near the brain and extend the wires to the switch. I'm pretty sure the switch wires are accessible without removing the switch on that year. They loop down and are wrapped in black tape. When looking up and behind the switch you can clearly see the harness that I am talking about. Also, in that same harness or right next to that harness, is you dome light supervision (BROWN / white). Its a nice feature to have and its only one more wire to hook up, no relay required. You have to access that harness anyway to interface with the parking lights, so why not add it. Also, I'm not sure if you were doing a remote start or alarm/remote start combo. If you are doing a alarm also, the all door trigger is also in the harness with dome supervision(BROWN / light green).
Posted By: offroadzj
Date Posted: February 19, 2012 at 10:48 AM
you may or may not need to connect the domelight supervision though on that car. Once you get everything connected (don't put the car back together just yet). Try unlocking the car and see if the domelight comes one. Then try it again with the car running. On some vehicles, the BCM automatically turns on the domelight with the unlock signal.
Worse comes to worse, if they don't work then you can make the BLACK/ white connection.
-------------
Kenny
Owner / Technician
KKD Garage LLC
Albany, NY 12205
Posted By: antman1
Date Posted: February 19, 2012 at 2:20 PM
offroadzj wrote:
you may or may not need to connect the domelight supervision though on that car. Once you get everything connected (don't put the car back together just yet). Try unlocking the car and see if the domelight comes one. Then try it again with the car running. On some vehicles, the BCM automatically turns on the domelight with the unlock signal.
Worse comes to worse, if they don't work then you can make the BLACK/ white connection.
I do think that when the doors are unlocked the lights come on automatically.
flobee4 wrote:
The diodes have to used to form a "Y" like the first diagram you posted with the questions embedded into it. The Diagram you posted will not work. Its easier to split the negative parking light wire closer to the remote starter brain anyway. At the brain you can "Y" the parking light wire with the diodes, & you have your constant 12 volts. You can zip tie the relay up near the brain and extend the wires to the switch. I'm pretty sure the switch wires are accessible without removing the switch on that year. They loop down and are wrapped in black tape. When looking up and behind the switch you can clearly see the harness that I am talking about. Also, in that same harness or right next to that harness, is you dome light supervision (BROWN / white). Its a nice feature to have and its only one more wire to hook up, no relay required. You have to access that harness anyway to interface with the parking lights, so why not add it. Also, I'm not sure if you were doing a remote start or alarm/remote start combo. If you are doing a alarm also, the all door trigger is also in the harness with dome supervision(BROWN / light green).
Thank you. That helps greatly. How does this look? Sorry the diagram I drew looks messy was in a hurry when I drew it up.

Posted By: offroadzj
Date Posted: February 19, 2012 at 2:52 PM
That diagram is right. Check and make sure that the domelight still comes on when you unlock while the vehicle is running.
-------------
Kenny
Owner / Technician
KKD Garage LLC
Albany, NY 12205
Posted By: antman1
Date Posted: February 19, 2012 at 3:39 PM
Looks like I will just go ahead and wire up that Dome Light Supervision wire because I noticed the interior lights only come on when using the factory remote to unlock the doors. So I might as well do it all while I am in there and do it right.
Also do these look like they will be ok to use?
Here are the exact Quick connects I have.
Posted By: offroadzj
Date Posted: February 19, 2012 at 5:41 PM
No... do NOT use connectors. Those especially will eventually vibrate and cut right through the wires and then you will be in a world of hurt. Strip back the factory wire (about 1/4" - 1/2" depending on size of the wire), poke a hole through the center of the stripped wire, strip back about 1/2" of the wire to be connected, insert it through the hole of the factory wire, twist the wire tightly, solder, then tape with a HIGH quality tape (3M Super 33 or better). If the roll of tape doesn't cost around $2.50 - $3.00 per roll then its no good.
The only connector you should use in the entire installation is a ring terminal on the ground. Then use a factory bolt to ground it. Don't use a screw b/c a screw will eventually vibrate loose. If you ground it somewhere on the metal dash support, make sure that the dash support is either welded to the vehicle at the sides or directly bolted. Some vehicles will have a small rubber mount where the dash support is attached at the sides to help cut down on vibration. If that is the case, the dash support is not a solid ground and cannot be used.
-------------
Kenny
Owner / Technician
KKD Garage LLC
Albany, NY 12205
Posted By: antman1
Date Posted: February 20, 2012 at 12:17 AM
Ok, I removed the quick connectors I placed on 5 of the wires and soldered them like you described. I also got the diodes and the relay and got it prepped and ready. I think I am all set to get this installed in the vehicle.
Do you have a recommendation on were I should put the LED?
Posted By: tedmond
Date Posted: February 20, 2012 at 9:38 AM
i usually put them at the top of the steering shroud. highly visible when flashing.
-------------
Ted
2nd Year Tier 1 Medical School
Still installing as a hobby...pays for groceries
Compustar Expert
Posted By: offroadzj
Date Posted: February 20, 2012 at 9:41 AM
Yup. Top of the steering shroud works great. Or somewhere on the top of the dash.
-------------
Kenny
Owner / Technician
KKD Garage LLC
Albany, NY 12205
Posted By: antman1
Date Posted: February 21, 2012 at 10:49 AM
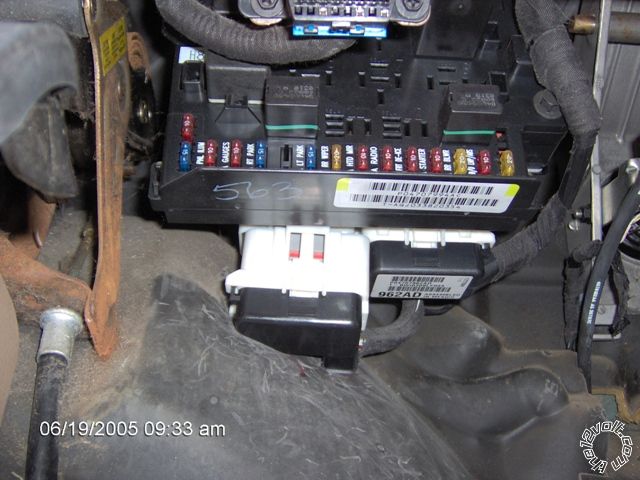
ok. I took the kick panel and stuff off exposing the wiring under the dash and began probing last night. I found the wiring for the headlamps and BROWN / white wire and stuff, but the BLACK / YELLOW wire is a small guage wire I have to cut and the wire from the relay to connect is heavy guage. lol. gonna take some playing with and they wrapped it around another harness making it short. I also found the ignition wiring (easy to get to). Got the break wire at break panel but the wire I am having a hard time finding is the WHITE/ green for door locks. Cant find that sucker. Also have been trying to find an opening for the firewall and were it is.
Posted By: offroadzj
Date Posted: February 21, 2012 at 10:55 AM
The difference in wire size won't affect the connection too much. You just have to be careful and make sure you get a good solder joint between the 2. What's nice is that since you have to cut that wire, you can usually unwrap it / untangle it from the harness to free up a little space. Its a different story for wires that you don't have to cut.. haha. The door lock wire can be tough to find. It should be in the far left plug of the BCM / fuse box.
-------------
Kenny
Owner / Technician
KKD Garage LLC
Albany, NY 12205
Posted By: flobee4
Date Posted: February 21, 2012 at 3:30 PM
Here is the picture of the connector it is at the bottom of the the BCM. Its hard to unplug. While Unplugging, You kinda have to push in on the black rubber stuff on the floor.When you get it unplugged, you can pop off the black top and make your connection. There are 3 WHITE/ green. You can actually use 2 of the 3 wires. 1 tests off the drivers door key cylinder the other tests off the passenger door key cylinder. The one you do NOT want is located on the edge, kinda in a corner. The 2 you do want are more centered on the plug next to each other.
Posted By: antman1
Date Posted: February 22, 2012 at 1:04 PM
OK. Finally. I spent 4 hours on this last night soldering and hiding wires and got this done. However. Everything works but I can't get remote start to even act like it is going to try to start. The manual is poorly written in my opinion. Does anyone know why remote start on the ICBM 7071 system doesn't seem to be working or what I can check?
Thank you again everyone for your help. I don't know how I would have done it if it wasn't for the12volt.com and all of you guys and your support.
Posted By: antman1
Date Posted: February 22, 2012 at 1:53 PM
I figured it out. It was the hood pin switch. It was making the alarm go off too.
Posted By: antman1
Date Posted: February 24, 2012 at 10:10 AM
Just wanted to post a quick update on this. I am very pleased with this alarm so far. Been working great. Only issue I have had was the hood pin switch and I may have to either get a different kind of hood pin switch or something cause this one has been spotty were I have it mounted and there isn't a lot of places on this van to mount it.
Thank you guys a lot for all the help on it. My wife (tha boss) has been very pleased with the remote start and alarm and the range for the keyless entry and the 2way communications on both the keyless remotes.
Posted By: kreg357
Date Posted: February 24, 2012 at 11:10 AM
If the local terrain and parking places are fairly level, try a mercury tilt switch. No holes to drill, no rust, and they last a lot longer than the pin switch. 2010 Dodge Caravan pictured below.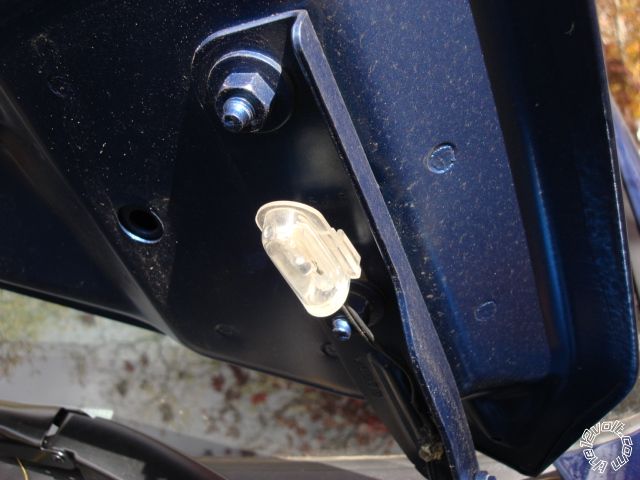 ------------- Soldering is fun!
Posted By: tedmond
Date Posted: February 24, 2012 at 4:34 PM
i use mercury tilt switch as well for hoodpins. much easier to use a self tap and drill it into the hood. one wire and thats it.
-------------
Ted
2nd Year Tier 1 Medical School
Still installing as a hobby...pays for groceries
Compustar Expert
Posted By: howie ll
Date Posted: February 25, 2012 at 12:03 AM
Now I know why I ended up in hospital last week.
Thank the Lord that Kenny noticed the Scotchlock question.
The answer of course is NEVER.
-------------
Amateurs assume, don't test and have problems; pros test first. I am not a free install service.
Read the installation manual, do a search here or online for your vehicle wiring before posting.
Posted By: antman1
Date Posted: February 27, 2012 at 8:30 AM
thanks guys. That worked out great.
Posted By: antman1
Date Posted: March 27, 2012 at 1:30 PM
What would I need to do if I wanted to have the windows roll up when I alarm the vehicle?
Posted By: howie ll
Date Posted: March 27, 2012 at 1:54 PM
DEI529t for close, 530t for close and vent.
-------------
Amateurs assume, don't test and have problems; pros test first. I am not a free install service.
Read the installation manual, do a search here or online for your vehicle wiring before posting.
Posted By: tedmond
Date Posted: March 27, 2012 at 10:34 PM
i was under the impression the 530t was used for vent, open and close?
I remembered the 529t was best used for sunroofs/moonroof. That's what learned from you  ------------- Ted
2nd Year Tier 1 Medical School
Still installing as a hobby...pays for groceries
Compustar Expert
Posted By: howie ll
Date Posted: March 28, 2012 at 2:15 AM
Simple close only, use a 529t.
You can get clever and make a 530t CLOSE ONLY (or even open only) 4 windows or get a 529t to work both ways on a sunroof depending on the roof and it's mech.
P.S. Earlier Hondas, don't know if they still do used a pair of relays on the roof with a NEG going switch.
All you had to do was close off the ignition override to the close relay and make it constant, then ground the switch for close from either tilt or slide.
-------------
Amateurs assume, don't test and have problems; pros test first. I am not a free install service.
Read the installation manual, do a search here or online for your vehicle wiring before posting.
Posted By: antman1
Date Posted: November 20, 2013 at 7:57 PM
Well this alarm has been working great except now I have my first problem. I can arm and disarm the alarm fine and it works fine as an alarm but the remote start is acting up. I can tell it to start and it cranks but it turns off then starts again. It does this 3 times before it gives up. It acts like the tach wire isn't making contact but it passes the test when I test the tach wire but it hasbeen working from the same cconnection I connected it to on the coil pack this whole time. However my van is also acting up and is stuttering while I drive. I am getting cylinder misfire code from the onboard ecm. Could this be the cause or should I try to find a new tach connection and run a new tach wire? Thank you in advance everyone.
Posted By: kreg357
Date Posted: November 20, 2013 at 8:34 PM
It's possible the two problems are connected. Check the R/S's tach wire very closely the entire length. If you ran it too close to anything hot or in a way it could chaff the insulation, it might be grounding out and causing the mis-fire and providing a poor signal to the R/S. Common area's are the firewall pass-through and the jump from the firewall to the engine. It is best to use split-tube loom to protect the tach wire in it's travel from the firewall to the coil pack, using the same path as other wire looms.
-------------
Soldering is fun!
Posted By: antman1
Date Posted: November 21, 2013 at 7:55 AM
I checked the Tach wire and followed it back to the coil pack and looks good. I decided to clip the wire last night at the coil pack and see if the stuttering stops and it still is stuttering. I am wondering if the coil pack is bad. I am gonna get the van repaired and then reattach the tach wire and see if that corrects the problem. I was also thinking of trying to run the tach wire to a fuel injector instead?
Posted By: antman1
Date Posted: November 28, 2013 at 4:01 PM
I replaced the coil pack and no change. anyone know what wire on a 2000 town and country I could connect to on the fuel injector for tach signal?
|