viper 5301 on a 01 silverado
Printed From: the12volt.com
Forum Name: Car Security and Convenience
Forum Discription: Car Alarms, Keyless Entries, Remote Starters, Immobilizer Bypasses, Sensors, Door Locks, Window Modules, Heated Mirrors, Heated Seats, etc.
URL: https://www.the12volt.com/installbay/forum_posts.asp?tid=131026
Printed Date: April 07, 2026 at 2:33 AM
Topic: viper 5301 on a 01 silverado
Posted By: lime4x4
Subject: viper 5301 on a 01 silverado
Date Posted: March 25, 2012 at 2:31 PM
I recently purchased a viper 5301 remote start along with the xpresskit dball module. I thought i have everything wired correctly but i'm starting to think that i don't. First off the install instruction for the viper shows reference to 5 pin and 8 pin connectors which i don't have. I have a 18 pin connector. The door locks work along with the horn and lights. When i try to remote start the truck nothing happens then the lights flash 8 times which tells me the ground isn't hooked up for the neutral safety switch. I did attach the BLACK/ white to ground. The thing i notice is that when attempting to start the truck nothing appears to be getting power on the ignition side. Dash doesn't lite up along with the radio or hvac. I'm thinking i have the wiring messed up for the 8 heavy ones.Currently have all the wires attached to ignition circuits and acc circuits. Isn't atleast one of those heavy wire suppose to have a constant 12 volts?
Replies:
Posted By: lime4x4
Date Posted: March 25, 2012 at 2:49 PM
also i'm using D2D between the modules
Posted By: kreg357
Date Posted: March 25, 2012 at 2:58 PM
Here is a link to the 5301 Install guide for your unit with the 18 Pin H2 connector : https://www.the12volt.com/installbay/file.asp?ID=1061
Did you connect the Neutral Safety Switch and set it to the ON position?
Assuming auto trans, did you program the Viper for such ( Menu 3, Item 1, Opt 2 )?
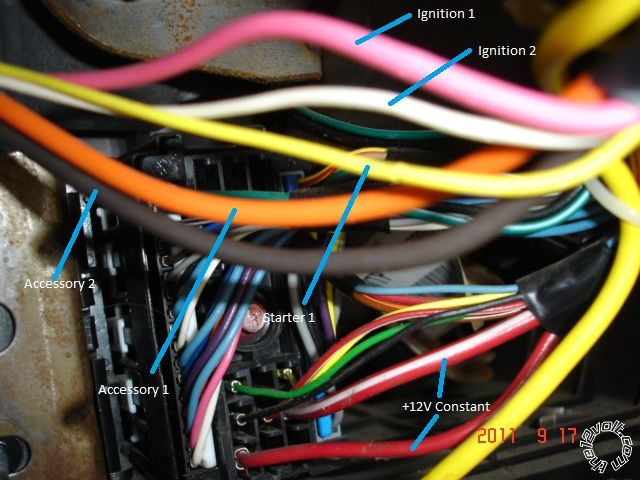
If you list your H3 connection, it would help. Here is a picture of the wires marked.
------------- Soldering is fun!
Posted By: lime4x4
Date Posted: March 25, 2012 at 3:24 PM
I forgot to hook up the switch. Once i did that it still doesn't start but it no longer flashes any codes. If i have the key and turn it to run and hit the remote start it works. Here is how i currently have the H3 wired
red to pink
pink to pink
RED / white to white
pink/white to white
RED / black to brown
orange to orange
purple to yellow
None of those wires are attached to a constant 12 volt wire. Thanks for any and all help..
Posted By: kreg357
Date Posted: March 25, 2012 at 3:29 PM
The Red, RED / White and RED / Black from the H3 connector go to the Red and RED / White +12V constant wires in the photo. Also the H1 Red wire can be connected to these wires, just split it up 2 on one and 2 on the other.
-------------
Soldering is fun!
Posted By: lime4x4
Date Posted: March 25, 2012 at 4:41 PM
I was thinking that the wires that were marked with a + should be hot all the time but the ignition and acc wording threw me off. Thanks works like a charm now
Posted By: kreg357
Date Posted: March 25, 2012 at 8:57 PM
 Two thumbs up! Good job! Time for a cheese steak sandwich.... ------------- Soldering is fun!
Posted By: lime4x4
Date Posted: March 25, 2012 at 8:57 PM
Just another quick question. I was reading the install manual from that link u posted. It said diesels should use virtual tach. So i assume i have to connect the tach wire from the viper to the tach signal wire. Would that be one of the wires for the ipc?
Posted By: lime4x4
Date Posted: March 25, 2012 at 8:58 PM
sorry the manual says not to use virtual tach
Posted By: kreg357
Date Posted: March 25, 2012 at 9:10 PM
If you have a gas engine, you can go in Virtual Tach or Tach mode. Personally, I feel Tach mode is
more reliable, especially in cold climates. Here is some info from DEI on the Tach wire.
Tachometer White (ac) instrument cluster (gas or diesel) or ECM (gas)
The ECM (Engine Control Module) is located near the battery, down low, between the fender and the fan
under the black plastic cover. On the 4.3L, the tach wire is in pin 20 in the connector labeled red. On
the 4.8L, 5.3L, and 6.0L, the tach wire is located in pin 10 in the red connector.
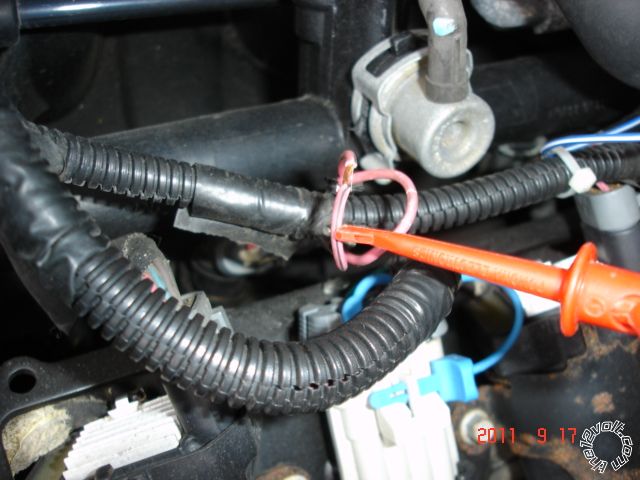
Another good source is a F.I. Each F.I. has two wires going to it. One color wire is the same at
all injectors, the other wires' color is unique for each injector. Connect ( solder ) the Vipers' Tach
wire to the "uncommon" color wire. Below is a picture of a 2002 5.3L V-8 F.I. connector. Think it was
the second cylinder back on the drivers side. Remember to program the Viper to Tach Mode ( Menu 3,
Item 2, Opt 4 ) and do the Tach Learn process.
------------- Soldering is fun!
Posted By: kreg357
Date Posted: March 25, 2012 at 9:21 PM
If I remember correctly, the DB-All in D2D mode needs to have the Tach hardwired to work. Try
connecting the DB-All Violet/White wire from the 10 Pin connector the the Vipers' Violet/White
wire at H2/9 and doing the program change and Tach Learn process. Worth a try...
-------------
Soldering is fun!
Posted By: lime4x4
Date Posted: March 25, 2012 at 9:45 PM
I have a duramax diesel. Everything currently works right now. I hit the remote start button when the glow plug light goes out it cranks and starts. According to the instructions for the dball module the tach input isn't required if using d2d. I found the tach signal wire at the cluster. I'll try hooking up the viper to it and then change the option to use the tach wire signal. But according to the manual i don't have to change any options. Atleast that's the way i read it
To learn the tach signal:
1. Start the vehicle with the key. Within 5 seconds, press and hold the Control button.
2. After 3 seconds the status LED on your Control Center lights constant when the tach signal is learned.
3. Release the Control button.
Note: When the tachometer is programmed, the main unit automatically enters the Tachometer engine
checking mode.
Posted By: kreg357
Date Posted: March 25, 2012 at 10:20 PM
Good info, thanks! That is the way I'm reading it too. The older Viper systems came defaulted to
Virtual Tach and you had to manually change them over in programming to Tach Mode.
If you are going behind the instrument cluster, here is the Wait To Start wire info
from Audiovox :
Wait To Start Dark BLUE (-) INSTRUMENT CLUSTER PIN B3
DEI has this :
Wait to start dk. blue (need to diode isolate see Tech Doc 1090) (-) instrument cluster
Here is a link to a file that contains Tech Tip 1090 : https://www.the12volt.com/installbay/file.asp?ID=1076
------------- Soldering is fun!
Posted By: lime4x4
Date Posted: March 27, 2012 at 5:03 PM
thanks
|