| Print Page | Close Window |
python 574 2000 honda civicPrinted From: the12volt.comForum Name: Car Security and Convenience Forum Discription: Car Alarms, Keyless Entries, Remote Starters, Immobilizer Bypasses, Sensors, Door Locks, Window Modules, Heated Mirrors, Heated Seats, etc. URL: https://www.the12volt.com/installbay/forum_posts.asp?tid=131167 Printed Date: April 20, 2026 at 1:41 AM Topic: python 574 2000 honda civic Posted By: fatal77 Subject: python 574 2000 honda civic Date Posted: April 12, 2012 at 3:51 AM Car: 2000 Honda Civic Ex
Alarm: Python 574 Accessories: Glass Break, Back up Battery, Proximity Sensor, Piezo Siren, Door Lock Actuator (Trunk Pop), Window Automation System, Tilt Sensor Wiring Diagram: https://www.the12volt.com/installbay/alarmdetail/1054.html Hey guys, I recently ordered a python 574 and was thinking about installing it myself but it looks a lot more complicated then your typical alarm. I've done quite a bit of research but Im still lost a few of these wires. Main Harness: - (+) 12vdc Constant Input ---------------White - (-) Chassis Ground --------------------Ground - (+) Siren Output ----------------------Siren - Parking Light Isolation Wire -------------?????????? - Parking Light Output ------------------RED / Black (+) - (-) Ground When Armed Output --------- wire with the starter kill relay? Door Lock: - (-) Unlock Output --------- GREEN/ Orange (-) - (-) Lock Output -----------GREEN / WHITE (-) Remote Start: - (+) Ignition 1 Input/Output ------------------------ BlackYellow - (+) Fused (30A) Ignition 2 / Flex Relay Input 87 ------- Yellow (Flex Relay????) - (+) Accessory Output ----------------------------- Yellow (+) - (+) Starter Output (Car side of the starter kill) -- Wire with starter kill relay? (BLACK/ white) - (+) Starter Input (Keyside of the starter kill) --- Wire with starter kill relay? (BLACK/ white) - (+) Fused (30A) Ignition 1 Input -------------------- BLACK / YELLOW - (+) Ignition 2/Flex Relay Output -------------------- Yellow (Flex Relay???) - (+) Flex Relay Input 87A Key side of flex relay -------- ?????????? - (+) Fused (30A) Accessory/Starter Input ------------- ?????????? Auxiliary/Shutdown/Trigger Harness: - (-) Ignition/Flex Relay Control Output ------------ ??????????? - (-) Neutral Safety Input ------------------------ BLACK/ Blue (-) Location? - (-) 2nd Status/Rear Defogger Output ------------ ???????????? - (-) Trunk Release Output ----------------------- Attach to door lock actuator - (-) Door Trigger Input ------------------------- Light GREEN/ Red (-) - (-) Dome Light Supervision Output --------------- RED / White left. - (-) Horn Honk Output ------------------------- Gray (-) - (-) Status Output ----------------------------- ???????????? - (-) Ignition 1 Output -------------------------- BLACK / YELLOW - (-) Aux 3 Output ----------------------------- ???????????? - (+) Door Trigger Input ------------------------ ???????????? - (-) Aux 1 Output ----------------------------- ???????????? - (-) Aux 2 Output ----------------------------- ???????????? - (-) Aux 4 Output ----------------------------- ??????????? - (+) Brake Shutdown Input ---------------------- GREEN / WHITE - (-) Hood Pin Input ---------------------------- Connect to the Hood Pin - (-) Starter Output ---------------------------- BLACK/ White - (-) Trunk Pin/Instant Trigger Input -------------- N/A - (-) Diesel Wait to start Input ------------------- N/A - (-) Remote Start/Turbo Timer Activation Input ---- N/A - (-) Accessory Output ------------------------- ???????????? - Tachometer Input ------------------ blue wire in a blue connector above the fuse box - (-) OEM Alarm Arm Output -------------------- N/A So thats all the wiring for the brain. The accessories will also need to be wired into the alarm wires since there are only 2 sensor spots on the brain. Ill probably put proximity sensor and glass break in these two, the rest will need to be installed into the brains wires. This part seems pretty straight forward unless they need relays or diodes. For the remote starter, do i need a starter kill relay? Also for the trunk pop and hood pin, I read I either need to install a relay or diode. Is this going to be the only relays and diodes i need or do i need to install more? If anyone could help it would be much appreciated. Thanks Replies: Posted By: kreg357 Date Posted: April 12, 2012 at 5:16 AM Main Harness: Door Lock: Remote Start: Auxiliary/Shutdown/Trigger Harness: There appears to be some conflicting info on the Ignition wires. Here is how Audiovox lists them : Here is info from DEI : 12volts white (40A) (+) ignition switch As always, test. The DMM is your friend and never lies... ------------- Soldering is fun! Posted By: howie ll Date Posted: April 12, 2012 at 6:29 AM To add to Kregg's list, dome light supervision isn't required vehicle should already have it.
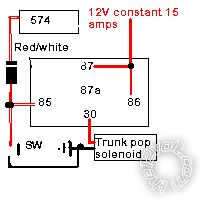
Test by closing doors without locking, dome light should stay on for up to about 30 seconds. Open door, then close, dome stays on, lock doors, should fade within 3 seconds. If above applies, you won't need it. Trunk pop, wire as follows you will need the diode (1N4004):- trunk-pop.bmp CORRECT Ignition wiring 12V+ WHITE IGNITION BLACK / YELLOW STARTER BLACK/ WHITE ACC 1 (set up as Ignition 2) YELLOW ACC 2 (Radio) WHITE/ BLACK Wiring into Honda doors is a PITA. Basic amateur mistake, too many sensors. The KISS rule applies. The glass break is a waste of time if you have a dual zone prox, you will spend literally hours setting it up, if not loads of irritating false alarms. Mount the prox in the roof facing down it works better. If you do go for the glass break remember if two sensors are joined together diode separate (again 1N4004) the green and blue sensor wires. Is this vehicle a manual or auto? Tip:- If you have icons (lights) on the instrument cluster for trunk (hatch) and door ajar, pull the panel (either 2 or 4 screws) and the cluster (4 screws) and take your trunk (hatch) if needed and door trigger to the cluster, there might also be room to mount the 574 there thus stealthing it. ------------- Amateurs assume, don't test and have problems; pros test first. I am not a free install service. Read the installation manual, do a search here or online for your vehicle wiring before posting. Posted By: howie ll Date Posted: April 12, 2012 at 6:31 AM PS On the trunk release diagram I also showed the release switch.
------------- Amateurs assume, don't test and have problems; pros test first. I am not a free install service. Read the installation manual, do a search here or online for your vehicle wiring before posting. Posted By: fatal77 Date Posted: April 12, 2012 at 3:50 PM Thanks for the quick replies guys!
This is an auto. and for the dome light, the light comes on comes on for 30 secs when shutting the door and does the same when you open then close but when you lock the door the light just goes off, it does stay on for 3 secs. Now for locking the car, the dome light doesn't come on. If I do mount the prox. sensor up high and adjust it correctly, does it still have quite a bit of false alarms or does it do what it suppose to do and just go off when people are near your car (nearly touching your car) or are these just going off all the time? As for the icons on the instrument cluster, this particular car does not have this. But seems like a good place to mount the unit even though those wires are not here, would you still recommend this location or a different place. Also for the window automation system do I need to hook this up to the aux 1 of the brain therefore I can roll my windows down by using the aux button? Maybe something like this? https://www.the12volt.com/carsecurity/page6.asp These are the window wires as well: Window Up: Lf=RED / Blue RF=Blue / YELLOW LR=GREEN/ YELLOW RR=Yellow Window Down: Lf=RED / Yellow RF=Blue/Orange LR=Green RR=YELLOW /GREEN Also for the battery back-up do I just need to simply wire these wires into the brain? I heard some people were have trouble with this. Posted By: howie ll Date Posted: April 12, 2012 at 4:40 PM OK so you won't need to connect for dome supervision.
If there's room yes of course you can mount the unit behind, that way it's hidden but you can get at it relatively easily and all of it's wiring is out of the way. Wherever you mount the prox you will still have to adjust. Test in place before sticking to roof metal with D/sided tape inside the headlining. No, the diagram shows roll-up only. For up and vent there are two ways. Use H1/6 Orange GWA (ground when armed) to trigger windows up when you arm, then H/13 WHITE/ violet left as pulsed to vent. OR Program H2/13 as a timed aux, e.g. 10 seconds (I believe that's the default) and then H2/14 violet/black as the pulsed vent. Assuming you're using a DEI 530t per 2 windows. Your windows are type 1. You can leave your 530t (s) in the driver's door between the water seal and door panel but:- If you go to each set of motor wires in each door you will have one-touch as well as normal travel on ALL the switches. Secondly mount under each front chair, then left front and rear, right front and rear separately. Or the same from each kickwell, the units will last much longer in the car rather than in the doors. ------------- Amateurs assume, don't test and have problems; pros test first. I am not a free install service. Read the installation manual, do a search here or online for your vehicle wiring before posting. Posted By: fatal77 Date Posted: April 13, 2012 at 2:30 AM I ended up getting the Install Essentials 530T Window Automation System but i believe it works in the exact same way. Alright, that sounds pretty straight forward for the windows as well. Thanks for the helps guys, yall are a life saver. Hopefully I get some free time soon, and ill get this bad boy installed. Ill keep you posted and let you know how it goes.
Thanks again, Fatal |
| Print Page | Close Window |