viper 5902 2008 f350 diesel
Printed From: the12volt.com
Forum Name: Car Security and Convenience
Forum Discription: Car Alarms, Keyless Entries, Remote Starters, Immobilizer Bypasses, Sensors, Door Locks, Window Modules, Heated Mirrors, Heated Seats, etc.
URL: https://www.the12volt.com/installbay/forum_posts.asp?tid=133197
Printed Date: April 11, 2026 at 7:05 AM
Topic: viper 5902 2008 f350 diesel
Posted By: clayton1985
Subject: viper 5902 2008 f350 diesel
Date Posted: January 05, 2013 at 10:48 PM
Hello,
New here but appreciate the valuable information available. Thank you.
Been a long frustrating couple weeks.
****WARNING**** SOrt of a long story.
I had a buddy of a buddy (used to be an installer) tackle the install on my truck. He said he ran into a problem and the brain had to be sent away to be "fixed", something about the diesel delayed start not functioning.
Got brain back but says he has to tie in the "wait to start" wire, even though these trucks dont have one.... Couple days later says he got it all going but the neutral toggle switch is faulty, he tried a diff one and it worked so just need a new switch but he called all shops and no one has a spare viper switch.
Ok, today I went out to a shop and showed them my switch and he went out back and got me a new/used one! Sweet. (I thought no one had any in town, and this is the shop he used to work at!!) Get home plug it in, same thing.....Fob says "toggle switch off".
Do some research and find the wire in H2/18 called "Neutral Safety Input" needs to be grounded and it wasnt.....So I grounded it. Sweet, now fob says "Remote Start Activated"......... Hmmm, nothing is happening, I hear a few clicks from brain but no engine start.
Snoop around some more and find the wire from harness H2/7 called "Diesel wait to start input (-) ) tied into another wire from H1/10 harness called "Remote Start/Turbo Timer Activation Input (-) )
That doesnt makes sense. He doesnt know Ive looked into this, as far as he knows we are waiting for a new switch.
Also the remote start H3 harness, there are two wires Violet/Green that connect to starter output/input, car side of starter and key side of starter. He only had the Violet/Output connected so I cut the wire in ignition harness and connected the GREEN/ Input to key side, still nothing.
Im lost, anyone have any ideas/advice?
Thanks, Clayton
Replies:
Posted By: beegbie
Date Posted: January 06, 2013 at 6:01 AM
Remove it. Don't call him back. Tell him you sold the truck. Seriously, he has no idea what he's doing. Who knows what else is wrong in there. If you decide to pull it out and restart it, there are many people on here that will help you out.
Posted By: Mike M2
Date Posted: January 06, 2013 at 8:40 AM
Did you wait long enough? If the diesel delay is on it could take up to a few minutes for the truck to start. When you here the clicks, do the dash lights come on?
-------------
Mike M2
Tech Manager
CS Dealer Services
Posted By: clayton1985
Date Posted: January 06, 2013 at 10:34 AM
Thanks for replies. No lights come on. I tried lots of times, waited over a minute a couple times, nothing happens.
I cant even get it into programming mode via the "open door, ignition on then off, press and hold control button, wait for beeps" instructions...no dice.
Its busy time of year and I wouldnt be able to find time to fix myself thoroughly for at least 3 months!
Posted By: clayton1985
Date Posted: January 06, 2013 at 1:04 PM
Couple more wires not connected, not sure if necessary to remote start?
H2 Harness, 18-Pin
H2/11 Pink/White - 200mA Flex Relay Control Output
H2/12 Orange - 200mA Accessory Output
H2/13 Purple - 200mA Starter Output
H2/14 Pink - 200mA Ignition 1 Output
H2/15 Grey - Hood Pin Input
H2/17 Brown - Brake Shutdown Switch
The fob says remote start activated and starts its 12min countdown but nothing happens.
Posted By: kreg357
Date Posted: January 06, 2013 at 7:24 PM
X2 with beegbie. The Hood Pin connection is a big safety feature and the Brake pedal input is mandatory.
Only having the H3 Violet starter wire connected to an un-cut starter wire is OK if you don't want / need Starter Kill and / or Anti-Grind.
Any of these connections soldered?
Typically there are many unused wires on the remote starter.
------------- Soldering is fun!
Posted By: clayton1985
Date Posted: January 06, 2013 at 8:14 PM
kreg357 wrote:
X2 with beegbie. The Hood Pin connection is a big safety feature and the Brake pedal input is mandatory.
Only having the H3 Violet starter wire connected to an un-cut starter wire is OK if you don't want / need Starter Kill and / or Anti-Grind.
Any of these connections soldered?
Typically there are many unused wires on the remote starter.
Yes all connections are soldered. I cut the Starter wire and soldered the H3/5 Green wire to key side myself last night. I will try to get the brake shutdown wire tied in asap.
Posted By: kreg357
Date Posted: January 06, 2013 at 8:51 PM
A few more thoughts...
Does the truck have a transponder base ignition immobilizer system? ( chip in the key ) An easy test
is to get a plain metal hardware store copy made for $1.99 and try to start / drive the truck. If it does
have a transponder then you will need a bypass module.
You can set the Viper to a fixed Wait To Start period in program options. Menu 3, Item 9, Opt 2 should
work. No Wait To Start connection needed.
Using a Tach signal is best but sometimes problematic with a Ford diesel.
To get into Viper programming, a Door Trigger wire must be connected to a valid source. You can get
around this by briefly grounding the (-) Green Door Trigger wire at the right time.
Probably best to make a chart of the Vipers harnesses and the wire connection points on the truck. There
are several sources available for wire guides / lists. Post the list and forum members can verify it and
make any needed corrections / suggestions. ------------- Soldering is fun!
Posted By: clayton1985
Date Posted: January 06, 2013 at 9:08 PM
Thanks kreg,
It has "pats" system. I have the Directed 556uw bypass with a programmed key inside and the ring/loop around key tumbler. I tried remote starting with a key in the ignition as well. No dice. When I hit the remote start button and wait after about 2 mins it warns "battery low" and deactuvates.
Posted By: kreg357
Date Posted: January 06, 2013 at 9:24 PM
OK. Is the Viper's Tach wire connected to anything?
A list of the H3 connections is next. ------------- Soldering is fun!
Posted By: clayton1985
Date Posted: January 06, 2013 at 10:18 PM
Yes the tach is connected and appears to be connected to the correct wire.
I know all but one wire is connected on the H3 harness, and 3 are connected to the same wire. I will go out and check.
Posted By: clayton1985
Date Posted: January 06, 2013 at 10:36 PM
Ok here is what I got for the H3 harness...
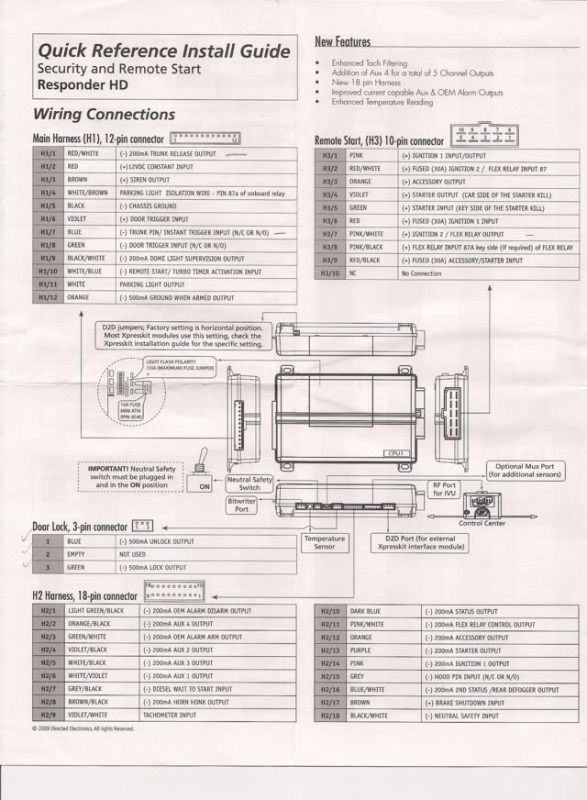
H3/1 Pink wire is connected to WHITE/ Orange in Ign Harness
H3/2 RED / White is connected to WHITE/ Orange in Ign Harness
H3/3 Orange is connected to PURPLE / Green in Ign Harness
H3/4 Violet is connected to Blue/White in Ign Harness
H3/5 Green is connected to Blue/White in Ign Harness
H3/6 Red is connected to WHITE/ Orange in Ign Harness
H3/7 Pink/White is connected to WHITE/ Orange in Ign Harness
H3/8 Pink/Black has no connection
H3/9 RED / Black is connected to Brown(maybe gray)/green in Ign Harness
Thats those!
Posted By: kreg357
Date Posted: January 07, 2013 at 3:52 AM
Major problems here....
H3/1 Pink wire is connected to WHITE/ Orange in Ign Harness OK
H3/2 RED / White is connected to WHITE/ Orange in Ign Harness Blue/Red +12V constant or Red @ SJB Black Plug H
H3/3 Orange is connected to PURPLE / Green in Ign Harness OK
H3/4 Violet is connected to Blue/White in Ign Harness OK
H3/5 Green is connected to Blue/White in Ign Harness OK
H3/6 Red is connected to WHITE/ Orange in Ign Harness Blue/Red +12V constant or Red @ SJB Black Plug H
H3/7 Pink/White is connected to WHITE/ Orange in Ign Harness BROWN / Yellow ***set Viper to ACC2 Menu 3, UItem 8, Opt 2
H3/8 Pink/Black has no connection OK
H3/9 RED / Black is connected to Brown(maybe gray)/green in Ign Harness Blue/Red +12V constant or Red @ SJB Black Plug H
or more correctly ( with ACC1 and ACC2 in order )
H3/1 Pink wire IGN1 WHITE/ Orange
H3/2 RED / White Blue/Red +12V constant or Red @ SJB Black Plug H
H3/3 Orange ACC1 BROWN / Yellow
H3/4 Violet Starter Blue/White cut truck side
H3/5 Green Starter Blue/White cut Key switch side
H3/6 Red Blue/Red +12V constant or Red @ SJB Black Plug H
H3/7 Pink/White ACC2 PURPLE / Green ***set Viper to ACC2 Menu 3, Item 8, Opt 2
H3/8 Pink/Black Not Used
H3/9 RED / Black Blue/Red +12V constant or Red @ SJB Black Plug H ------------- Soldering is fun!
Posted By: clayton1985
Date Posted: January 07, 2013 at 10:20 AM
Kreg,
Thanks man! I leaving for a couple days for work so wont get a chance to mess around with it, but ill get to it as soon as im back and update.
Thanks!
Posted By: lucasoil4u
Date Posted: January 07, 2013 at 3:05 PM
Keep us updated! Tell the guy to get lost. He has no idea what he is doing and surprised the truck even still runs.
Posted By: Mike M2
Date Posted: January 07, 2013 at 6:26 PM
Getting constant from an ignition wire, priceless...
Don't let the guy near your truck... ------------- Mike M2
Tech Manager
CS Dealer Services
Posted By: clayton1985
Date Posted: January 08, 2013 at 11:30 PM
Dying to get working on this but still out of town.
Lol, so 3 of those wires need constant 12v?!? Unreal.
He texted me today to let me know he had a new switch and should be good to go! I havent replied yet....
Posted By: clayton1985
Date Posted: January 10, 2013 at 1:03 PM
Ok. Got wires re done last night. Just went out and hooked up batteries and plugged everything back into the brain. Hit the remote start button and......................................
30 secs later it starts!!!!!!
I still have to connect brake kill wire, hood pin switch and probably some aux items (heated seats, defrost maybe?)
I have one question right away though, after it started and was running I put key in ignition and turned to on/run position. Then I turned key off and removed and waited maybe a minute and didnt shut off. Would it be the turbo timer, or? I hit the remote start button to shut down.
I would like to thank everyone, esp Kreg357 for the quick respones and great help/info. I really appreciate it.
I am mechanically inclined (do all my own work, install lift, exhaust, etc on my vehicles) I have always had a dislike for wires, id rather tear down an engine than deal with wires but this has made me feel alot more confident and comfortable working on electrical stuff!
Thanks!
Clayton
Posted By: kreg357
Date Posted: January 10, 2013 at 2:37 PM
Good job! We are here to help. Now you have to come up with a good story for your friends "installer".
The Viper will continue in remote start mode until it sees the Brake pedal input wire go to (+), the Hood Pin
wire go to (-) or you press the remote start button again. If the key is in the ignition and turned to ON when
you step on the Brake Pedal ( called a "key take over" ) the Viper ends it's remote start control and the engine
continues to run because the key is ON.
The Brake input is mandatory and the Hood Pin input is a necessary safety feature. Just make sure you
solder everything, insulate with a quality electric tape ( Scotch Super 33+ ) and secure all the R/S wires neatly
out of the way. The 30 second "Wait to Start" delay sounds a bit long. You can program the Viper for a fixed
15 second delay, instead. ------------- Soldering is fun!
Posted By: clayton1985
Date Posted: January 10, 2013 at 4:10 PM
Thanks!
I tried getting into programming mode before but couldnt get it figured out or perhaps he messed something else up too....
I just happened to order a bitwriter last week so that should show up soon.
Im going out to hook up brake wire, and finish tidying up the wires/brains.
Posted By: clayton1985
Date Posted: January 10, 2013 at 6:17 PM
Brake wire connected. R/S operates as it should. Hood pin will have to wait a bit.
When truck is running it wont let me lock the doors (to run into the store and leave truck running, etc) via the fob. It I lock them manually it wont unlock them either. Is this a programming thing or more f'd up wiring? Id also like to have it only unlock the drivers door when pressing unlock on fob, then 2x for remaining doors.
Posted By: kreg357
Date Posted: January 10, 2013 at 9:56 PM
Which FOB, factory or Viper? Do the locks work normally while it's not running?
You should follow the Vipers Green and Blue lock wires to see where they connect to. Here
is the info from Ready Remote :
Power Lock Blue/Green (-) @ driver kick or SJB, gray 26 pin plug (C), pin 17
Power Unlock Yellow/Purple (-) @ driver kick or SJB, gray 26 pin plug (C), pin 4
Also, where does the H1/2 Red wire go to? Should be +12V constant, not Ignition1. ------------- Soldering is fun!
Posted By: clayton1985
Date Posted: January 11, 2013 at 9:47 PM
The viper fob. The oem works though.
Ive been down with the flu so haven't got to take a look at those yet but I will asap.
Thanks!
Posted By: clayton1985
Date Posted: January 13, 2013 at 8:13 PM
Still havent got to the alarms wires yet but seems I am having a bypass issue.
I went to remote start yesterday (truck sat for 2 days) and it wouldnt start. Went out to truck and tried RS again and everything powers up as it should but the security light flashes rapidly. So I start with the key in ignition then turn off. Try the RS again and it works....Went to the shop and shut down truck, tried RS'ing on & off a couple times and worked fine. Same thing today.
Posted By: kreg357
Date Posted: January 13, 2013 at 8:58 PM
The "Key-in-the-Box" can be problematic. There are several things to check / do that should help
provide a more reliable PATS bypass during remote start.
1. Find a way to secure the key inside the box so that :
A. The transponder pill in the keys' head is well centered in the pick-up antenna
B. The Key is held securely in place with no possibility of shifting.
C. The metal key blade is insulated so that it can't come into contact with and short-out any internal circuitry.
2. Position the 556UW antenna ring in the best position around the vehicles ignition cylinder / antenna assy.
3. Secure the 556UW antenna ring in position so it can not move or shift out of position.
Additionally, on the 556UW there is a jumper for "Windings" setting. That is another thing to try, if necessary.
Some of this is trial and error. Remember weather and temperature is a big factor in performance.
If you get tired of this setup ( and having a working key hidden in the truck ), consider getting a Data type PATS
bypass module. The price can be very reasonable and the performance and reliability is much better ( all with
less theft risk ). ------------- Soldering is fun!
Posted By: clayton1985
Date Posted: January 14, 2013 at 8:11 PM
Again, thanks Kreg! (How do you know so much?!?! lol)
Last night I just pulled the bypass box/brain out from where I had it and left it hanging. (I had it between a harness and a metal bracket)
I tried RS this morning and it worked! So I tucked it back up in a different spot (away from any metal) and it worked when I left from work this evening.
I will most likely look into the Data type bypass you mentioned.
Thanks, Clayton.
Posted By: clayton1985
Date Posted: February 02, 2013 at 8:27 PM
Well I just received a new bypass. A PKFM PKFORD
Didnt come with any instruction but found a pdf file online, i dont fully understand what D2D is for (data to data)
Its got two harnesses, that d2d one and the main one. Do I plug the d2d into bypass and viper brain and leave it? Then figure out the main harness wires?
Posted By: kreg357
Date Posted: February 02, 2013 at 8:57 PM
Here is the official install guide from XPressKit :
https://www.xpresskit.com/DocumentDownload.aspx?documentid=6492&productid=202&firmwareid=212
If you want to go D2D, plug in the 4 pin harness between the PKFM and the Viper. Then make the 3
connections shown with Black solid lines to the trucks transponder connector Type E.
Here are the expected ( normal ) wire colors :
Year Pin TX Color Pin RX Color
F-Series Super Duty 08-10 3 Yellow/Orange 4 Violet/Gray ------------- Soldering is fun!
Posted By: clayton1985
Date Posted: February 02, 2013 at 10:46 PM
Again kreg, cant thank you enough. You have been very helpful and have saved me many a headache. Thank You.
Posted By: clayton1985
Date Posted: February 03, 2013 at 6:59 PM
Hmmm, cant seem to get this bypass to work/program. Got the d2d connected to viper brain and 3 wires from the 10pin harness connected to the type "E" connector.....RX/TX/Ign. Bypass module blinks red but not rapidly, once every few seconds or so.
Posted By: kreg357
Date Posted: February 03, 2013 at 10:02 PM
These connections should be properly soldered and well insulated.
Are you following the PATS 2 / 3 programming?
Are you using the two Factory keys? ( can't use the same key twice, can't use a cloned key, etc )
Might try a module reset, then program it again. Can also try the Step 4 instead of a remote start.
All else fails, try swapping the RX / TX wire connections. ------------- Soldering is fun!
Posted By: clayton1985
Date Posted: February 04, 2013 at 12:03 PM
kreg357 wrote:
These connections should be properly soldered and well insulated.
Are you following the PATS 2 / 3 programming?
Are you using the two Factory keys? ( can't use the same key twice, can't use a cloned key, etc )
Might try a module reset, then program it again. Can also try the Step 4 instead of a remote start.
All else fails, try swapping the RX / TX wire connections.
Connections are soldered and taped by me.
Yes following the Pats 2/3 programming.
Two keys, one original and the other was programmed by dealer (same one that was in the other bypass)
Ill try messing around again, hopefully get it figured out!
Posted By: kreg357
Date Posted: February 04, 2013 at 2:25 PM
The timing part with each key and the security light can be critical.
-------------
Soldering is fun!
Posted By: clayton1985
Date Posted: February 08, 2013 at 2:14 PM
Got it! You were right about the timing of keys. Just tried it a few times then it worked. Thanks.
Posted By: kreg357
Date Posted: February 08, 2013 at 3:06 PM
All right!  Just in time for the really cold stuff. Just in time for the really cold stuff. ------------- Soldering is fun!
|