pljx problem, viper 4103xv in 1999 buick
Printed From: the12volt.com
Forum Name: Car Security and Convenience
Forum Discription: Car Alarms, Keyless Entries, Remote Starters, Immobilizer Bypasses, Sensors, Door Locks, Window Modules, Heated Mirrors, Heated Seats, etc.
URL: https://www.the12volt.com/installbay/forum_posts.asp?tid=133441
Printed Date: April 10, 2026 at 10:08 AM
Topic: pljx problem, viper 4103xv in 1999 buick
Posted By: sootah
Subject: pljx problem, viper 4103xv in 1999 buick
Date Posted: January 27, 2013 at 4:03 AM
Hello all,
I have a 1999 Buick Regal that I installed a Viper 4103XV remote starter [3/4 installed, anyway :)] and XpressKit PLJX bypass module in.
I've yet to be able to get it to start consistently is the #1 issue that I've got. Usually after programming the bypass module it'll remote start a few times, and then it just decides it doesn't want to any more. The remote starter will try to start the car, but when voltage is applied to the starter circuit, nothing happens - this is why I suspect the bypass module as the culprit.
---Lately even after programming the bypass it won't start. Still will if I just insert the key either before [still don't have to turn the key at all], or while it's attempting to start, but if it's not in there then nothing happens.
I'm quite stumped at this point. The bypass says after programming to connect the brown ground wire to the "ground output on the remote starter" although the 4103XV's wiring guide isn't at all clear about what wire that is. I'd think it's either the status wire on the satellite harness, or the orange "ground when locked" wire in the main harness, but I just don't know.
Because it'll start with the key in and not turned I'd think it may be the keysense wire, but I tried hooking that up [perhaps incorrectly] and it didn't seem to make a difference.
I'm quite desperate for help as I'd really prefer to not have to take it to a shop to get it done since I've got the vast majority of it done successfully myself.
Thanks in advance!
-Sootah
Replies:
Posted By: sootah
Date Posted: January 27, 2013 at 4:06 AM
Here's the PLJX install guide: https://www.bypasskit.com/Manuals/922_PLJX_H00_S00_D00_I_EN.pdf
The Viper 4103XV: https://www.12voltdistributors.com/wp-content/uploads/2012/09/Viper_4103XV_Installation_Guide.pdf
Posted By: sootah
Date Posted: January 27, 2013 at 8:35 AM
Oh, also - WHAT is the "ground when running" output wire on the 4103XV? Absolutely nothing in their install guide lets me know.
Posted By: chev104275
Date Posted: January 27, 2013 at 9:01 AM
Dei calls it status output, its the blue wire on the small 4 pin harness, you can also use the blue/white wire in the harness with the tach and brake wires. The default setting for the blue/white is 2nd status output
-------------
If i Can't Install it I Don't need it Joe
Posted By: howie ll
Date Posted: January 27, 2013 at 9:06 AM
GWR is either H3/5 blue/white on the H3 harness or pin 1 blue on the satellite harness.
You also have a purple NEG (-) starter output at pin 3 on the satellite harness, I believe that's the one referred to.
This info should have been with the 4103.
-------------
Amateurs assume, don't test and have problems; pros test first. I am not a free install service.
Read the installation manual, do a search here or online for your vehicle wiring before posting.
Posted By: sootah
Date Posted: January 28, 2013 at 12:17 AM
I tried the blue status wire on the satellite harness this morning, did not work. As usual would remote start as soon as the key is inserted [and keep running if it's removed] but not otherwise.
I also tested the voltage with my multi-meter on the satellite status wire when engaging the remote and it reads with a bit of voltage instead of ground. [I have the meter set to read volts DC] I've not tried the purple wire yet I'll have to check it out.
At this point I'm tempted to just read the resistance of the key and make my own bypass. From what I've seen of it it looks pretty straightforward.
Do I just read the resistance of the chip on the key, or for Passlock II do I have to read the value between the yellow/black wire when trying to start as I've seen in some guide?
Also, with PLII do I cut the yellow wire, attach the resistors, then splice in to the black one, or do I cut the black one as well? any additional steps I'm missing for a do-it-yourself bypass?
It's cold outside. I want my car to be warmer than sub-zero when I get into it! :)
Thanks a million for the assistance!
Posted By: kreg357
Date Posted: January 28, 2013 at 7:34 AM
The VATS system has a pellet resistor chip in the key head. You can use a DMM to read the actual resistance
value. There are only 16 values possible. Here is a list :
392: Orange, White, Red Black
523: Green, Red, Orange, Black
681: Blue, Gray, Brown, Black
887: Gray, Gray, Violet Black
1,130: Brown, Brown, Orange, Brown
1,470: Brown, Yellow, Violet, Brown
1,870: Brown, Gray, Violet, Brown
2,370: Red, Orange, Violet, Brown
3,010: Orange, Black, Brown, Brown
3,740: Orange, Violet, Yellow, Brown
4,750: Yellow, Violet, Green, Brown
6,040: Blue, Black, Yellow, Brown
7,500: Violet, Green, Black, Brown
9,530: White, Green, Orange, Brown
11,800: Brown, Brown, Gray, Red
There are some odd-ball values but the Directed 652T resistor kit ( which is for this exact purpose ) can be had
for under $5. The resistor value has to be very precise.
However, I'm thinking you are doing something wrong in the install of the PLJX module. The only wires
for the VATS system are the two very thin White or Yellow wires that are encased in a Orange vinyl jacket.
Here is a link to the relay and resistor method VATS bypass : https://www.the12volt.com/installbay/file.asp?ID=237 ------------- Soldering is fun!
Posted By: ziggyb222
Date Posted: January 28, 2013 at 7:40 AM
if you have a chip right on the barrel of the key you have the VATS system and you would be finding two very small white wire in a grey sleeve that come from the switch down to a big plug and junction on the passenger side of the colume. On the pljx you will have to set the jumpers for Vats and connect to the correct white wire.
Posted By: sootah
Date Posted: January 28, 2013 at 8:53 AM
kreg357 wrote:
However, I'm thinking you are doing something wrong in the install of the PLJX module. The only wires
for the VATS system are the two very thin White or Yellow wires that are encased in a Orange vinyl jacket.
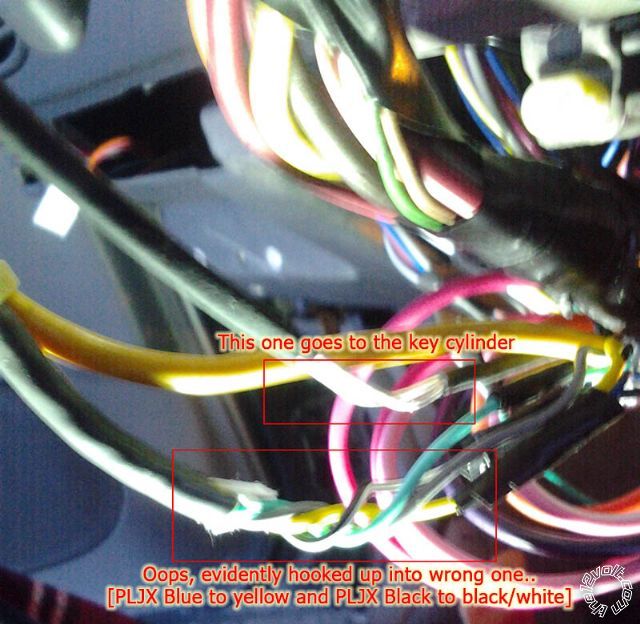
Well aren't I embarrassed.. I had only looked at the PLJX instructions and had read elsewhere about them being possibly in a grey sleeve. I cut open the sleeve shown in the attached pic and found the yellow and black wires mentioned in the install guide as well as a green one that I figured might be keysense.
Sooooo - does the other grey sleeve I cut open [that I did, in fact, verify goes right to the cylinder] look correct? It's got the two tiny white wires inside.
I'd assume that I just hook up the PLJX blue to one and PLJX black to the other [resistors don't care which way the current flows] but at this point I want to make no assumptions.. :)
So A) Is that the correct sleeve/set of wires and B) does it matter which goes to PLJX blue/black? If it does I'd think you just have to try hooking it up one way and if that doesn't work then the other.
And finally - how do I properly test for a ground when using a multi-meter? I'd like to be able to confirm what wire on the Viper 4103XV is actually putting out ground if possible.
Thanks yet again!
PS: My key's resistor reads dead-on at 886.
Posted By: sootah
Date Posted: January 28, 2013 at 8:54 AM
Pic:
Posted By: kreg357
Date Posted: January 28, 2013 at 9:38 AM
I have never used a PLJX for a VATS system. Here is how I think the wiring goes :
PLJX
Brown to R/S (-) 200mA Status Output ( aka GWR )
Green to Regal Keysense Light Green (-) @ ignition harness
Blue to Regal VATS resistance code wire
Pink to R/S thick Ignition Output which also goes to the Regal Pink Ignition wire
Red to +12V constant
Black to Regal VATS ground reference wire
Those VATS wires are very difficult to remove their insulation. One of the VATS White wires will show between
+1 and +6 volts DC with the ignition key inserted and turned to the ON position. The other White wire will
show (-) negative or ground.
As far as testing for a (-) type wire ( like Keysense ) : Set the DMM to 20V DC. Connect the Red test lead to
+12V constant. Connect the Black test lead to the suspect wire. When the (-) signal is present, the DMM will
read +12V. ------------- Soldering is fun!
Posted By: ziggyb222
Date Posted: January 28, 2013 at 10:52 AM
I have put in a ton of Pljx modules and on the Gm cars and trucks have never used the key sense wire. Two key things is the jumper location on the module and programming it with the ground when running wire not hooked up till done programming
Posted By: sootah
Date Posted: January 28, 2013 at 9:31 PM
THANK YOU!! You all are great. I've posted on at least four other forums about the issue and not only were ya'll the first to help me figure it out, but also the first to even respond.
After testing the teeny-tiny white wires I hooked up the PLJX to them, programmed, hooked up the status wire, and finally am able to remote start consistently.
What really threw the troubleshooting off is that it actually would remote start previous to this a few times after me dinking around with it; which is why I had never even considered that I had the resistance and resistance ground ref wires hooked up incorrectly. That, and that other grey sleeve of wires including the BLACK / YELLOW /GREEN wires that matched the PLJX install instructions. Also when I looked my car up on their site it had told me that it was PLII instead of VATS. Even had I found those tiny white wires before I'd not have given them a second thought.
Also - stripping the VATS wires really is a giant pain. Usually to strip a section I use my wire strippers to cut the insulation in a couple spots then use my X-Acto knife to slice between those cuts and just pull the bit off. Those VATS wires are smaller than even the smallest hole in my stippers!
So again - thank you!!
Posted By: sootah
Date Posted: January 29, 2013 at 1:17 AM
I have a couple additional questions about hooking up the trunk release, rear defrost [if possible], and perhaps some other things. Should I stick with this thread or start a new one?
Posted By: kreg357
Date Posted: January 29, 2013 at 4:31 AM
The XPressKit PLJX instructions and diagram for Passlock2 / VATS are very confusing and
typical for Directed products. Glad you were able to get it all sorted out.
It is best to continue this thread. Same vehicle, same R/S install.
The 12 Volt has a bunch of very knowledgeable, enthusiastic installers that are always willing
to help. 
A lot of choices with the Trunk Release. Think I would go with the Ready Remote info, but
like always, test first. With the (-) Trunk Release, you should be able to directly connect the
4103 RED / White wire to the Regal's Brown wire, no relay needed.
Ready Remote
Trunk/Hatch Release Brown (-) @ BCM, 24 pin plug, pin B12
BCM is to the left of the steering column.
Audiovox
Trunk Release BLACK/ WHITE (+) AT SWITCH
Omega
Trunk Release BLACK/ WHITE (+) REAR BODY HARNESS IN PASS. KICK PANEL
Bulldog Security
TRUNK RELEASE BROWN (-) (Requires #775 Relay) @ RELAY BEHIND GLOVE BOX
Only info on the Rear Defrost is from Omega. Rear Defrost N/A TIMER BUILT INTO SWITCH
So if you want to control the Rear Defrost, find the thick +12V supply wire to the rear defrost grid
and follow it back to the front of the car. You can either use an extra relay in the "5 wire mode" or
try to find the cars' defrost relay and control that. ------------- Soldering is fun!
Posted By: howie ll
Date Posted: January 29, 2013 at 4:38 AM
N.B. This has already come up today, the Bulldog #775 is a standard Bosch/Tycho cube relay.
Available in any automotive parts store and R/Shack.
-------------
Amateurs assume, don't test and have problems; pros test first. I am not a free install service.
Read the installation manual, do a search here or online for your vehicle wiring before posting.
|