rain sensing wipers/ auto headlights
Printed From: the12volt.com
Forum Name: Car Security and Convenience
Forum Discription: Car Alarms, Keyless Entries, Remote Starters, Immobilizer Bypasses, Sensors, Door Locks, Window Modules, Heated Mirrors, Heated Seats, etc.
URL: https://www.the12volt.com/installbay/forum_posts.asp?tid=134277
Printed Date: April 07, 2026 at 5:03 PM
Topic: rain sensing wipers/ auto headlights
Posted By: preludes
Subject: rain sensing wipers/ auto headlights
Date Posted: May 26, 2013 at 9:15 AM
Hi, I recently purchased a Raintracker RT-50A and am looking to install it into a 2009 Suzuki SX4 Touring Crossover Hatch. I have the instructions that came with the product
https://www.raintracker.com/compatibility/install_rt-50a.pdf
https://www.raintracker.com/docs/headlamp_control_rt-50a.pdf
https://www.raintracker.com/compatibility/asian/suzuki_grand_vitara_00.pdf
As well as the wiring diagrams:
I would like to use both the wiper and headlight portion of the setup, but am having trouble figuring out the best method for wiring, particularly with the headlights. Based on the thinness of the wires coming from the headlight switch, I would think that the headlights are using a vehicle relay and that I can connect the raintracker's output directly to the wires coming from the switch without an additional relay. (Perhaps only diodes?)
I'm also not sure on where I should tap into the wires, should I do it close to the combination switches in the steering column where I can be sure of the correct wires, or should I unwrap the electrical tape of the bundle somewhere under the dash and tap into it that way? There's not a lot of room to work with either way.
My skill level is such that I've installed my share of car stereos and get the logic of the wiring in most cases, but I'm not a master wire stripper/splicer by a long shot and don't have any cool tools, just some crimpers and other household items. I've taken the car to a few places to try to get it done professionally, but that has proved more difficult than I originally expected and I'm not left with a high confidence level based on their reactions.
Any help/advice would be appreciated. If I can feel confident in the overall setup and which wires I should tap into I'll feel better about taking a stab at it. Thanks in advance.

Replies:
Posted By: racerjames76
Date Posted: May 28, 2013 at 8:45 AM
Hello,
My first piece of advice is that if you do not have the ability to solder or make proper connections yourself I do not recommend attempting this as a DIY project. You may get into a bad situation where your wipers won't work while driving and that could be VERY dangerous. Aside from that I am a bit confused by the factory diagram. I do not see a high speed wire listed. This is where I would get out the DVOM and start testing at the switch. Again if you don't have these tools STOP and find a competent installer who does understand what you want.
------------- To master and control electricity is perfection. *evil laugh*
Posted By: howie ll
Date Posted: May 28, 2013 at 9:30 AM
X 2 with racerjames76, it's why I haven't answered this post.
-------------
Amateurs assume, don't test and have problems; pros test first. I am not a free install service.
Read the installation manual, do a search here or online for your vehicle wiring before posting.
Posted By: ace_boy2099
Date Posted: May 28, 2013 at 5:01 PM
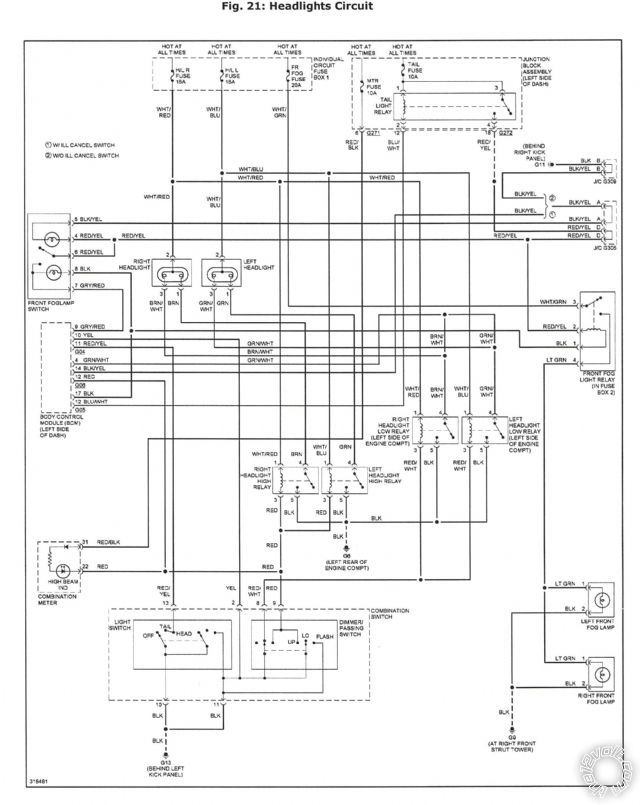
From what I can see in the diagrams for your vehicle if you provide a positive voltage to the Blue / YELLOW wire you will power the Low Speed wipers and Blue/Red for High Speed wipers.
As for the Headlights, again this is what I take from the diagrams, Supplying a ground to the RED / White will power the low beams relay, ground on Red will power the Highbeams relay, and RED / Yellow recieving ground will power the Parking Lamps relay.
What is confusing me is the instalation instructions you linked to, It looks to me like the following, However, TEST FIRST, I am merely going by pictures and nothing in hand but a piece of paper and pen for notes while deciphering the schematics.
WIPERS - HSS Version:
Black -> Ground
Red, Yellow, Orange, Switches Red -> +12V
Grey -> Other side of switch from aboves red
White and Green -> Connect together only
Blue -> *cut* Motor side Slow wire
Purple -> *cut* Switch side Slow wire
Pink -> *no cut* Fast wire
LIGHTS -
Brown -> nothing
GREEN/ YELLOW -> +12V
Yellow -> Pin 86 on external relay (Polarity Reversal relay)
External Relay (Polarity Reversal Relay) Pinout
85 -> Ground
86 -> Yellow on raintracker (as stated above)
87 -> Park, Head lights-Lows (Diode isolate each) Test may have to do the Highbeams too, not sure
87a -> Terminate (or use a 4-pin relay)
30 -> Ground
Closing, TEST EVERYTHING FIRST, I only came up with this by looking at pictures of lines and swirls.
Posted By: preludes
Date Posted: May 28, 2013 at 7:31 PM
Racerjames - Thank you for the response. The high speed wire is the blue/red - the diagram duplicates the switch in order to fit everything - that's my take anyway. I am still considering a professional install, although I am dying to get my hands in there and do it! I would enjoy the experience, plus I like knowing the logic that went into such an install... oh well, maybe next time. It would be nice to find a place that would let me do it with them.
Ace boy, I sincerely thank you very much for your post and taking the time to look it over and respond.
Some general questions I have for this type of install -
Where does it make sense to tap into the wires, near the plug that goes into the switch unit-in the steering column, or further down the line by unraveling the electrical tape that bundles many things together?
Also, are crimped connections good enough for this? Do you pros really solder connections while working up-side-down under the dash?
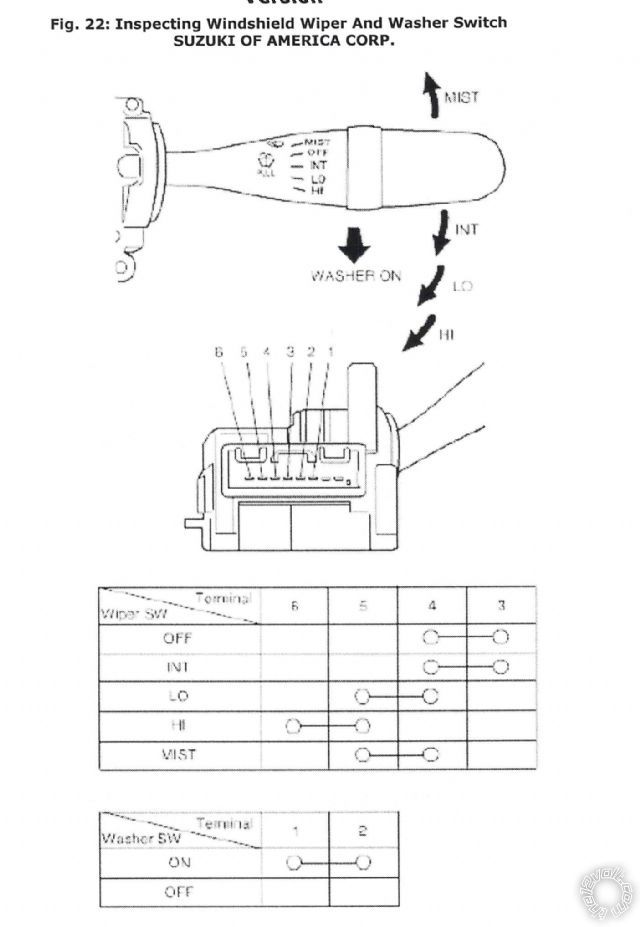
In case you were curious, I took note of the wires going into each combination switch:
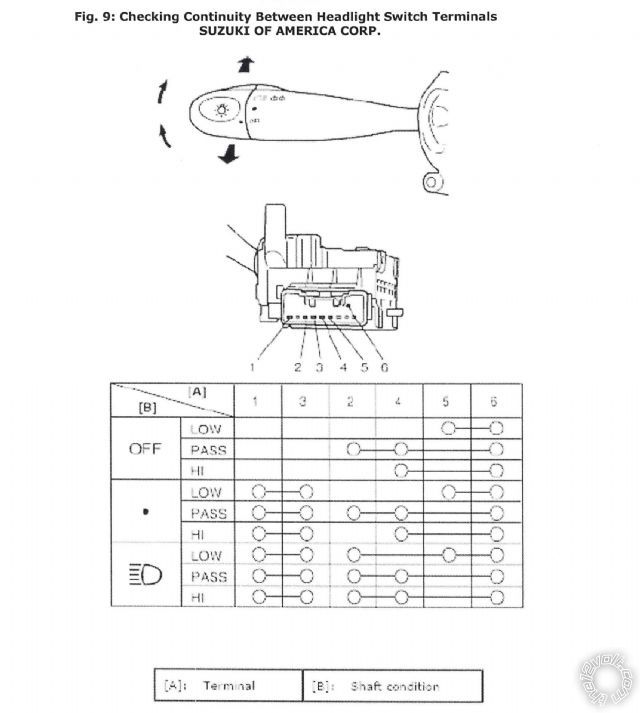
Headlights
1 RED / yellow
2 Black
3 Black
4 Red
5 RED / White
6 RED / Blue
Wiper
1 Blue/Red
2 Black
3 Blue/White
4 Blue / YELLOW
5 YELLOW /GREEN
6 Blue/Red
Posted By: ace_boy2099
Date Posted: May 28, 2013 at 8:22 PM
I say wire it where-ever you feel comfortable, if you can get into the column that will help eliminate wrong wires, I did see quite a couple duplicates in that diagram. However, If it is easier under the dash more that should be fine as long as you can test and make sure it is the correct wire.
as for connectors, I don't see why you can't use butt connectors and the like, In fact, the install diagrams have a little section telling you how to make a "Good crimp connection". Heck, I installed an alarm/starter in my truck with the spade quick connectors and it was fine for about a year untill I sold the truck and took the alarm out, and I just re-installed it into (after updating the firmware) my new truck. If I ever have any problems with it I can then look into how to solder, I've done it, but am not too sure how exactly it turned out (Trial runs).
A while back I had some "Professionals" install an alarm in my other truck and found out when I had to get in there to fix the shift tube (top side of the steering column) that they just clumped the wiring and tossed it together, I also see several crimp connections and even bare wire twisted together with the tape sliding down to now almost expose the wire, This is the reason I decided to do my own alarm even though I do still have open questions for those that know about it in my topic.
Posted By: howie ll
Date Posted: May 29, 2013 at 12:26 AM
There shouldn't be any problems with soldering on this install. The steering column cowling (top and bottom covers) on all oriental cars are easy to remove and refit giving you easy access to your wiring.
The only butt connector I would ever use are the very expensive crimp and heat type. First choice for a butt connection has to be solder and heat shrink. If you're not sure how read some of the extremely good posts in the General Discussion forum.
Never ever use t-taps, vibration and corrosion will destroy them in weeks.
For right angle joints solder and Scotch 33+ or 88+, not 50c Walmart tapes. That's a reference to the quite correct comments by
ace-boy2099. Also the reason why cheap tapes come adrift, the "glue" becomes tacky and oozes out undoing the tapes.
-------------
Amateurs assume, don't test and have problems; pros test first. I am not a free install service.
Read the installation manual, do a search here or online for your vehicle wiring before posting.
|