accessing horn wire 2007 nissan sentra
Printed From: the12volt.com
Forum Name: Car Security and Convenience
Forum Discription: Car Alarms, Keyless Entries, Remote Starters, Immobilizer Bypasses, Sensors, Door Locks, Window Modules, Heated Mirrors, Heated Seats, etc.
URL: https://www.the12volt.com/installbay/forum_posts.asp?tid=139463
Printed Date: April 02, 2026 at 10:18 AM
Topic: accessing horn wire 2007 nissan sentra
Posted By: ttok
Subject: accessing horn wire 2007 nissan sentra
Date Posted: September 22, 2015 at 8:23 PM
Hi All
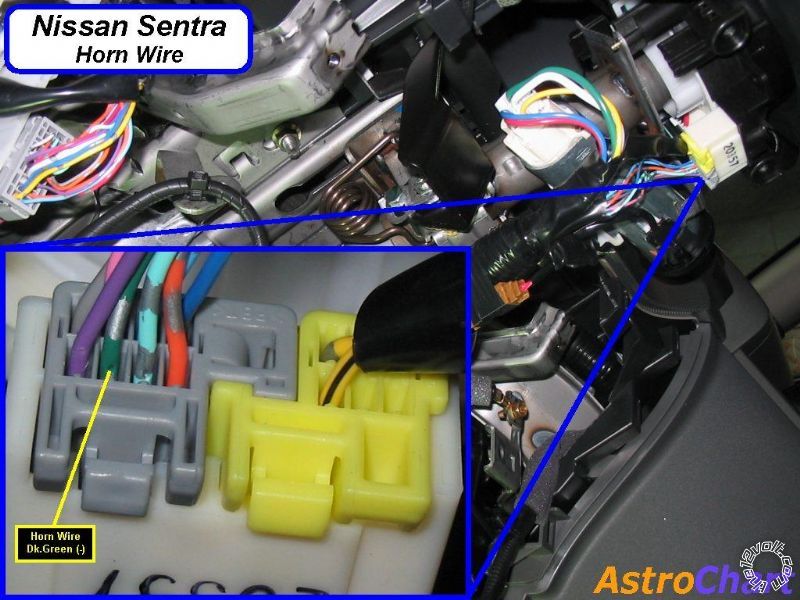
I am hooking up a Viper 4806v my my 2007 Nissan Sentra. Everything is working except the horn wire connection. Everything I have read pointed to pin-3 on a grey 8-pin plug under or near steering column. Unfortunately, i can't find it.
Can somebody point out where it is. And how to access it - by that, I mean do I have to a) take out the steering wheel, b) plastic molding around it? I have removed all the moldings and supporting metal frame under the dash on the driver side - that's how I access the mojority of the wires; just having difficulty finding the horn wire.
Any help/directions/pictures would be much appreciated.
Regards,
ttok
-------------
ttok
Replies:
Posted By: Mark Mizenko
Date Posted: September 22, 2015 at 9:40 PM
Remove the plastic shroud around the steering column (right behind the wheel, 2-3 Phillips screws hold it together) there's a grey plug on the bottom
Posted By: ttok
Date Posted: September 22, 2015 at 11:56 PM
Mark, thanks for the quick reply. I have looked at that plastic shroud around the steering column, and have remove the 3 screws on the under side (of the shroud. But it appeared to be a solid piece around the steering column, and it would not move. The only way it can come out (besides the steering wheel, there are also the turn signal lever and light lever to deal with). Unless I am wrong and the plastic shroud is actually 2 halves, is it? I have looked at it multiple times and it appears to be to be a solid cylinder going around the steering column.
Looking forward to hearing from you again, with clarification, if possible.
Regards,
ttok
-------------
ttok
Posted By: howie ll
Date Posted: September 23, 2015 at 12:43 AM
Remove three screws click out the top then work the lower away.
All modern cars are that way.
-------------
Amateurs assume, don't test and have problems; pros test first. I am not a free install service.
Read the installation manual, do a search here or online for your vehicle wiring before posting.
Posted By: ttok
Date Posted: September 23, 2015 at 1:10 AM
Howie, thanks for the reply. I will give it another crack tomorrow. Thanks for the help again!
Regards,
ttok
-------------
ttok
Posted By: howie ll
Date Posted: September 23, 2015 at 3:04 AM
I was vague, once the screws are undone, pull down on the lower end, use a plastic trim tool or flat screwdriver inside, wash/wipe or lights aperture to prise top away then drop off lower end, the top is "snatched" away.
-------------
Amateurs assume, don't test and have problems; pros test first. I am not a free install service.
Read the installation manual, do a search here or online for your vehicle wiring before posting.
Posted By: howie ll
Date Posted: September 23, 2015 at 3:06 AM
The only variation, VW, Euro GM use internal screws, accessible once the top is levered off, also some Euro GM, Toyota, Hyundai Kia also use screws facing you, turn steering wheel to see them.
-------------
Amateurs assume, don't test and have problems; pros test first. I am not a free install service.
Read the installation manual, do a search here or online for your vehicle wiring before posting.
Posted By: icearrow6
Date Posted: September 23, 2015 at 1:57 PM
 -------------
Posted By: ttok
Date Posted: September 24, 2015 at 3:32 PM
Hi Howie
Thank you for your enlightenment and clarificcations. You are absolutely right, they are indeed 2 halves - I was fooled by what appeared to be perfect seam! With your guidance, I was able to take the two halves apart and access the green horn wire, again my sincere thanks for your guidance!
Sir, you are a scholar and a gentleman, and I thank you! Have a great day!
ttok
-------------
ttok
Posted By: howie ll
Date Posted: September 25, 2015 at 8:19 AM
Did an install many years ago on a CRV, woman complained I'd cracked the cowl around the steering column. Of course she'd never looked before and noticed the seam.
-------------
Amateurs assume, don't test and have problems; pros test first. I am not a free install service.
Read the installation manual, do a search here or online for your vehicle wiring before posting.
Posted By: ttok
Date Posted: September 25, 2015 at 1:16 PM
Hi Icearrow6
Thanks for the picture, it helps a lot, and with Howie's directions, it went perfectly well. Thanks to both of you, I got the remote start working perfectly now.
The last part of my project is to get the trunk release to work. Documentations I have read said to tap into red(+) wire, in "driver door sill", leading to the back of the car or use "Use Trunk Release Motor wire". Neither of which are very clear what these wires is driving. If they are driving the solenoid of the release actuator, will I be needing a relay to help drive it? Viper documentation shows its trunk release signal only provide 200mA, and will require a relay if it needs to drive bigger current.
Any guidance you can provide is much appreciated.
Regards,
ttok
-------------
ttok
Posted By: howie ll
Date Posted: September 25, 2015 at 1:21 PM
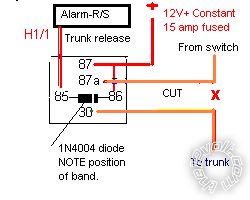
Use this diagram, standard Bosch type 5 pin automotive relay, 15 amp fuse.
DC3_trunk_release.bmp
Diagram's a bit messed up so here's how:-
RED / white from Viper to 85.
12V+ constant, fused 15 amps to 87 and 85.
Cut red trunk release wire, switch side to 87a MANDATORY otherwise blown fuses.
Trunk side to 30.
Diode 1N4004 across coil (86 and 85), band side to 85.
MANDATORY other wise coil shutdown back EMF can fry all your aux outputs. ------------- Amateurs assume, don't test and have problems; pros test first. I am not a free install service.
Read the installation manual, do a search here or online for your vehicle wiring before posting.
Posted By: ttok
Date Posted: September 26, 2015 at 5:58 PM
Hi Howie
Thanks for answer and apology for late reply. Recuperating from leg operation, will tackle this once the leg feels better. Thanks again! Have a great day!
Regards,
ttok
-------------
ttok
Posted By: howie ll
Date Posted: September 26, 2015 at 6:01 PM
I feel for your leg, I have bursitis from too many years on my knees in this game, syphon out and a cortisone shot every 6 months so good luck with the leg.
-------------
Amateurs assume, don't test and have problems; pros test first. I am not a free install service.
Read the installation manual, do a search here or online for your vehicle wiring before posting.
Posted By: ttok
Date Posted: October 10, 2015 at 8:00 PM
Hi Howie
I sympathize with you, I am still nursing my leg. However, have gained enough mobility to return to my project now.
Looking at your instruction on wiring the relay, I wonder if there is a mistake on step-2. Here is what you wrote:
- RED / white from Viper to 85
- 12V+ constant, fused 15 amps to 87 and 85
- cut red trunk release wire, switch side to 87a MANDATORY otherwise blown fuses
- trunk side to 30
- diode 1N4004 across coil (86 & 85), band side to 85
I wonder if in step-2 you meant to say "12V+ constant, fused 15 amps to 87 and 86" - it does not seem to make sense to me to connect 12V+ to 85, when RED / white from Viper is already connected to 85. Can you please verify this step for me before I wire them up. Thanks in advance.
ttok
-------------
ttok
Posted By: howie ll
Date Posted: October 11, 2015 at 12:06 AM
Thank you I was wrong and you are right, I was 69 in Sept. and to be honest that's one reason I've retired.
Fused to 87 and 86.
Diode across 85 and 6, 1N4004 band side to 86.
-------------
Amateurs assume, don't test and have problems; pros test first. I am not a free install service.
Read the installation manual, do a search here or online for your vehicle wiring before posting.
|