PDL relays getting warm
Printed From: the12volt.com
Forum Name: Car Security and Convenience
Forum Discription: Car Alarms, Keyless Entries, Remote Starters, Immobilizer Bypasses, Sensors, Door Locks, Window Modules, Heated Mirrors, Heated Seats, etc.
URL: https://www.the12volt.com/installbay/forum_posts.asp?tid=139900
Printed Date: May 06, 2026 at 8:02 AM
Topic: PDL relays getting warm
Posted By: two12
Subject: PDL relays getting warm
Date Posted: December 10, 2015 at 11:16 AM
hi everyone,
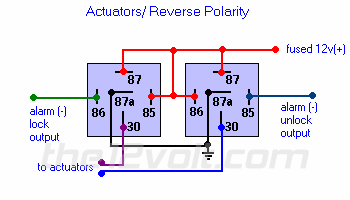
Ive wired up a PowerDoorLock from scratch using an actuator from a GM truck (two wire actuator) following this diagram:
this is working but the relays are getting warm and that concerns me.
seems to me that maybe I have something backwards here. can anyone help me with this?
do I have some wires backwards or should I do this instead:
thanks
Replies:
Posted By: davep.
Date Posted: December 10, 2015 at 2:17 PM
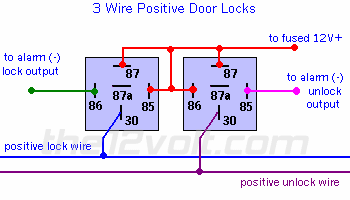
Those are two very different circuits. If you need the actuator to move in both directions, only the top one will work with a GM actuator. The bottom one won't.
If your relays are getting warm, the coils (between 85 and 86) are probably energized at all times.
I would review your trigger connections which are the "alarm output" connections in the diagrams. You need your trigger to be momentary, not continuous. Think of the way the door locks in your car function: You push the button, they move to the other state, you release the button (which stops the current flow) and the lock stays in that state. You want this circuit to function the same way. For a lock actuator function, only energize the relay coil momentarily.
Posted By: howie ll
Date Posted: December 10, 2015 at 5:53 PM
What kind of switch are you using?
-------------
Amateurs assume, don't test and have problems; pros test first. I am not a free install service.
Read the installation manual, do a search here or online for your vehicle wiring before posting.
Posted By: two12
Date Posted: December 10, 2015 at 8:19 PM
Im using an autopage rf425 to control the lock, no manual switch at all right now.
I think I do have it backwards but Im hesitant to try the other ways shown in the install manual. here is a scan:

I hope thats good enough for viewing. the top left diagram is what I have now. seems the lower left might fix this but I think the actuator is a reverse polarity type (pretty sure it is, has only two wires and reversing the polarity operates it) but I dont have a switch for it so I havnt tried the diagram on the upper right.
Ive checked the output from the alarm and it is constant ground on both wires until the remote lock/unlock button is pressed. then depending on which (lock or unlock), a quick positive (12vdc +) pulse occurs then back to ground.
I think the lower left diagram will work but I seriously do not want to fry the autopage so I ask here first. also because I think the actuator is reverse polarity type so the upper right diagram should probably be followed but I dont have a manual switch so that is throwing me off.
what do you guys think? thanks again
Posted By: davep.
Date Posted: December 10, 2015 at 10:38 PM
The upper left should work with the top relay diagram. Recheck your autopage connections.
The violet and violet/red go to GROUND, not +12V.
The brown and white are taped off, not connected to anything.
The blue and green go to the relay coils. (#85 or #86).
You can also eliminate the external relays.The autopage internal relays are enough.
Blue and Green to the actuator wires.
Violet and Violet Red to +12 Volt.
White and Tan to GROUND
Your second post explaining your test results is EXCELLENT. Very clear. It shouldn't do what it's doing. Recheck the 6 wires from the autopage, that you have them correct.
Posted By: two12
Date Posted: December 11, 2015 at 6:03 AM
davep. thanks man! I wired this up a while ago and only noticed the warm relays recently.
the autopage is stuffed in the kick panel pretty tight so instead of checking its pin out thoroughly to start with, I made an incorrect assumption that I had wired it as the upper left but as it turns out I had wired it according to the lower right diagram for "adding actuators".
at the time I was pretty confused since I didnt have a vehicle schematic to follow. this vehicle is an all aluminum chassis motorhome (GMC) so I decided to use the relays since the chassis might have increased resistance and the wire runs are lengthy, to avoid potential problems.
I changed it to be as the upper left diagram, its good now and while I was in there I wired up the "patio" light on program output ch.3 and all outside lights on ch.4 so I can switch them on/off remotely. this will come in very handy but was too much of a task due to the added confusion when I first installed the alarm.
really appreciate your input man! thanks
Posted By: howie ll
Date Posted: December 11, 2015 at 6:07 AM
Lose the relays and use the lower right diagram, 12V+ and ground draw locally. The only difference would be to wire as NEG output and a PAIR of relays in each door with power and ground directly from each to the battery this extremely over the top design was used in some Rolls Royce where the battery was in the trunk, relay section at front and by the time the wiring got to the back doors.......
-------------
Amateurs assume, don't test and have problems; pros test first. I am not a free install service.
Read the installation manual, do a search here or online for your vehicle wiring before posting.
|