viper 5904v, 2003 honda crv
Printed From: the12volt.com
Forum Name: Car Security and Convenience
Forum Discription: Car Alarms, Keyless Entries, Remote Starters, Immobilizer Bypasses, Sensors, Door Locks, Window Modules, Heated Mirrors, Heated Seats, etc.
URL: https://www.the12volt.com/installbay/forum_posts.asp?tid=140820
Printed Date: April 02, 2026 at 10:18 AM
Topic: viper 5904v, 2003 honda crv
Posted By: modfab2502
Subject: viper 5904v, 2003 honda crv
Date Posted: February 09, 2016 at 10:58 AM
Hi,
I am looking forward to install (DIY) VIPER 5904V in my HONDA CRV 2003 model. I have the wiring diagram which has a ton of wires.
Can someone help, let me know which basic wires I need to install first and test the system (before going ahead and ripping all my car wires).
Best,
S. Gupta
Replies:
Posted By: mscguy
Date Posted: February 10, 2016 at 9:58 PM
You're right, there are a lot of wires on on the install guide. The good news is, many of them you won't need.
Is this an automatic? Do you own a Digital multimeter? Do you have a soldering iron and know how to use it?
You will need an immobilizer bypass to go along with your viper.
Depending on which one you get, will determine how many additional wires you have to connect to the car.
If you get a basic one like a PKALL, that will only do the immobilizer bypass. If you get DB-ALL2, that will take of the door lock integration, and factory alarm integration with your Viper 5904. Those two are just examples. You can read about them here. You may need to be able to flash the firmware through a device you can buy, or you can ask/pay a local dealer to do it. According to ready remote, the factory arm and disarm is only done through the factory fob, so I would lean towards a bypass that can do that.
https://www.directechs.com/VehicleCompatibility.aspx?p=-1&year=2003&make=Honda&model=CRV&ps=1&s=0&c=0
Read the install guides for the ones you are considering.
As for wires to connect, take look at the link below, compare it to the viper guide, and try to match them up.
https://www.readyremote.com/main.asp?action=select&yr=5281&product=Remote%20Start&make=Honda&model=CRV
Depending on which bypass you pick will determine what wires connect to the car, and what ones connect to the bypass.
Posted By: modfab2502
Date Posted: February 10, 2016 at 10:14 PM
Hi Copper,
Thanks a ton for the links.
I have a multimeter and a soldering iron and know how to use it.
My CRV is automatic. There is no immobiliser so I will not need to bypass.
Just looking at the amount of wires is not letting me start with the thought that I may not be able to complete it.
I want to do it one step at a time. Can you guide me as to which wires will I need to connect just to start the ignition start function. Will go to the next level once I am confident that I am able to do it.
Best,
S. Gupta
Posted By: mscguy
Date Posted: February 11, 2016 at 11:30 AM
Does it have a factory alarm?
Posted By: modfab2502
Date Posted: February 11, 2016 at 1:01 PM
Hi mscguy,
No, I there is no factory alarm.
Best,
S. Gupta
Posted By: mscguy
Date Posted: February 11, 2016 at 4:58 PM
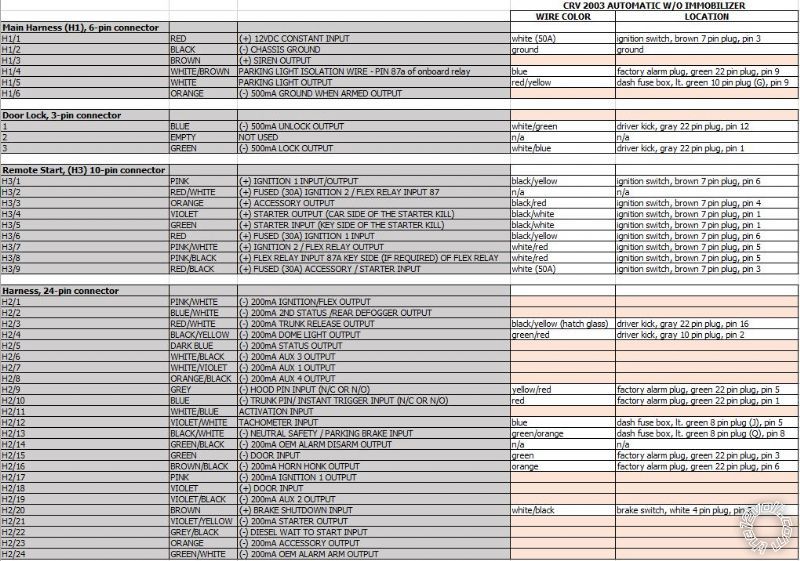
Ok, well, the bare minimum connections for remote start are...
H1/1 RED (+)12VDC CONSTANT INPUT to 12volts white (50A) + ignition switch, brown 7 pin plug, pin 3
H1/2 BLACK (-) CHASSIS GROUND to Ground
H2/2 BLACK/ WHITE (-) NEUTRAL SAFETY INPUT . Verify that car wont start in any gear but Park and Neutral, then connect to Ground
H2/16 BROWN (+) BRAKE SHUTDOWN INPUT to Brake wire WHITE/ black + brake switch, white 4 pin plug, pin 2
H3/1 PINK (+) IGNITION 1 INPUT/OUTPUT to Ignition BLACK / YELLOW + ignition switch, brown 7 pin plug, pin 6
H3/2 RED / WHITE (87) FLEX RELAY +12V INPUT (30A FUSED) to white (50A) + ignition switch, brown 7 pin plug, pin 3
H3/3 ORANGE (+) ACCESSORY OUTPUT to Accessory BLACK/ red + ignition switch, brown 7 pin plug, pin 4
H3/4 VIOLET (+) STARTER OUTPUT (CAR SIDE OF THE STARTER KILL) to Starter BLACK/ white + ignition switch, brown 7 pin plug, pin 1
H3/6 RED IGNITION 1 +12V INPUT (30A FUSED) to white (50A) + ignition switch, brown 7 pin plug, pin 3
H3/7 PINK/WHITE (30) FLEX RELAY OUTPUT (car side of ign, acc or starter wire) to Accessory 2 WHITE/ red + ignition switch, brown 7 pin plug, pin 5
Program above as second accessory
H3/9 RED / BLACK ACCESSORY/STARTER RELAY +12V INPUT (30A FUSED) to white (50A) + ignition switch, brown 7 pin plug, pin 3
These are the minimums for remote start. This doesn't give you any alarm functions, no door triggers, no starter kill, no parking lights, no door locks
Check all connections with your dmm before wiring.
Read the guide you (hopefully) got with your 5904v, and compare the wires that I listed to their respective ones in the ready remote link I posted. Pay particular attention to the (+) and (-) markings in the descriptions.
https://www.readyremote.com/main.asp?action=select&yr=5281&product=Remote%20Start&make=Honda&model=CRV#
Please make sure you're comfortable attempting this, otherwise don't and take it somewhere to have it done. If you don't understand what you're connecting, and to what, you can ruin your Viper unit, as well as potentially hurt your car too.
Posted By: modfab2502
Date Posted: February 12, 2016 at 6:09 AM
Hi mscguy,
I just did the basic installation.
Connected the 2 wires from H 1 and 2 wires from H 2 and all the wires from H 3 (based on your notes above)
When i press the start button on the remote, I am getting 7 flashing sounds. As per the manual this is "Manual transmission mode is enabled and not initialized".
What do I need to do?? Any suggestions??
Best,
S. Gupta
Posted By: mscguy
Date Posted: February 12, 2016 at 6:46 AM
You need to change it to auto trans mode. Menu 3 item 1 option 2. Follow instructions for virtual tach learn too.
Make sure to install the hood pin too. It's a safety thing. You don't want the car to accidentally start while you or someone else has their hands in the engine area.
Posted By: modfab2502
Date Posted: February 12, 2016 at 7:23 AM
Hi mscguy,
Did not quote understand how to change to auto trans mode.
Can you please explain.
Best,
S. Gupta
Posted By: mscguy
Date Posted: February 12, 2016 at 7:37 AM
Did you program the flex out to second accessory like I said in the wiring? It's the bolded part.
You program the automatic trans mode in the same way.
I can't type out all the steps right now, but it's in the install sheet you got with your unit.
Edit. You have to connect the siren too and the door trigger too. I forgot about those.
Posted By: modfab2502
Date Posted: February 12, 2016 at 8:32 AM
Hi mscguy,
I had to step out.
Will check and get back to you in a while. Appreciate your help.
Best,
S. Gupta
Posted By: modfab2502
Date Posted: February 13, 2016 at 10:44 AM
Hi mscguy,
I could not get the time to work on this. Will probably continue on Monday.
Meanwhile, as per https://www.readyremote.com/main.asp?action=select&yr=5281&product=Remote%20Start&make=Honda&model=CRV#
I do not need to connect H3/4 and H4/4. As per your notes I have to connect H3/4.
Can you please review and confirm. Really appreciate all your help with this.
Best,
S. Gupta
Posted By: modfab2502
Date Posted: February 13, 2016 at 10:48 AM
Hi mscguy,
Also, how to program H3/7 as second accessory??
and which side (+) or (-) will the light flash polarity fuse go??
I know that I am irritating but, for me this is like going blindfolded in a jungle.
Best,
S. Gupta
Posted By: modfab2502
Date Posted: February 14, 2016 at 8:46 AM
Hi mscguy,
I hired an installer to do the job, he tried and gave up. I have no choice but to do this myself.
From all the information I could gather, I have made the attached wiring chart. I know that this is going to be too much to ask, but can you review if the attached is correct and also suggest on the missing columns / wires.
Best,
S. Gupta
Posted By: mscguy
Date Posted: February 14, 2016 at 8:59 AM
Hi. Sorry, I've been busy lately and couldn't reply.
You hired a pro to install it and he gave up, or did you hire a friend to install it and he gave up?
Just wondering. End result is the same, you have to do it yourself.
I don't have time to type out the corrections with your wiring, but there are a few. I'll try to do it later this afternoon (my time zone) when I'm a actually in front of my computer. Hard to do on a phone.
While you're waiting, please read the section of your install guide where it discusses how to change the programming options. It's not hard to do, but it will be useful to read about it beforehand.
Posted By: modfab2502
Date Posted: February 14, 2016 at 9:57 AM
Hi mscguy,
I hired a pro to install. Was supposed to be one of the best, was recommended and was very confident....he could not do it....perhaps he has not installed something like this.
I have the wiring on an excel. Can I email the same to you?
Best,
S. Gupta
Posted By: mscguy
Date Posted: February 14, 2016 at 10:18 AM
H1/4, h3/8 don't use
All 3 of your fused wires on H3 connect to the white 50a ign switch wire.
Make sure to cut the starter wire. You want the key side and starter side connections of H3/4 h3/5 going to their respective sides of the cut.
Put light jumper fuse on (+).
I don't have time right now to go through the car side wires that you wrote.
Other than that, looks ok.
Make sure to test wires before connecting. Don't just assume the wiring chart is correct.
Maybe there is something weird about your car wiring. I don't know why the pro would have an issue. I see you're in India. Maybe something is different.
Posted By: modfab2502
Date Posted: February 14, 2016 at 10:45 AM
Hi mscguy,
Thank you. I have updated my spreadsheet as per your instructions.
When you do get the time, let me know on the balance wires I am missing.
Best,
S. Gupta
Posted By: mscguy
Date Posted: February 14, 2016 at 3:27 PM
It doesn't look like you're missing any. Not every wire is used for every application.
Posted By: modfab2502
Date Posted: February 14, 2016 at 9:05 PM
Hi mscguy,
One quick question:
Will I need to use a relay in the door lock 3 pin connector (blue and green) ??
Best,
S. Gupta
Posted By: mscguy
Date Posted: February 14, 2016 at 9:31 PM
Put you voltmeter on it and see.
Find the suspected unlock wire.
Set voltmeter to 20vdc
Put red probe on +12v and black probe on suspect wire. If it reads +12v when unlock is pressed, no relay needed.
Repeat with the lock wire.
Most likely you won't need relays, but it's good to check anyway.
Posted By: modfab2502
Date Posted: February 14, 2016 at 9:39 PM
Hi,
Thank you.
Best,
S. Gupta
Posted By: modfab2502
Date Posted: February 15, 2016 at 3:40 AM
Hi,
I have someone working on the car right now.
He has connected all the wires. Starter is giving a 7 flash error.
Can you explain how to program the MTS.
Learning the Tach (not needed with Virtual Tach)
To learn the tach signal:
1. Start the vehicle with the key. Within 5 seconds, press and hold the Control button.
2. After 3 seconds the status LED on your Control Center lights constant when the tach signal is learned.
3. Release the Control button.
Tried the above but did not work.
Am I doing anything wrong.
Best,
S. Gupta
Posted By: mscguy
Date Posted: February 15, 2016 at 9:15 PM
Do you have the install guide that came with your alarm? The programming is in there.
1. Open a door.
2. Turn the ignition on, then off.
3. Select a Menu. Press and hold the Control button. The number of siren chirps indicates the menu number.
1 chirp indicates menu 1, 2 chirps - menu 2 and 3 chirps for menu 3.
4. When the desired menu chirps are heard, release the Control button.
5. Select a Feature. Press and release the Control button the number of times corresponding to the feature
you wish to change. Then press and hold one more time to select the features.
6. Program the Feature. While holding the Control button, you can program the feature using the remote
control.
For features with only two options;Lock button = option 1 while Unlock button = option 2.
For features with more than two options; Lock button selects the options in ascending order, while Unlock button selects them in
descending order.
So, what this means is from the start...
1. Open the door.
2. Turn ignition On then Off
3. Press and Hold control button until the siren chirps 3 times. (menu 3), then release the control button.
4. Press control button once and release.
5. Press control button again and hold.
6. Press your unlock button while holding control button.
The above will change it to Automatic trans mode. I assume that you didn't change the flex relay to second ignition ether. If you did, disregard the below steps.
7.Press control button 7 times. Siren should chirp 8 times. then release
8. Press and hold control button
9. PRess Lock button
10. Release control button, and turn ign on then off.
If you don't have the install guide, (I'm not sure how since you need to know what wires are what), please download it from here in the downloads section.
|