2005 Dodge GC, Avital 4105L, Xpresskit PKUMUX
Printed From: the12volt.comForum Name: Car Security and Convenience
Forum Discription: Car Alarms, Keyless Entries, Remote Starters, Immobilizer Bypasses, Sensors, Door Locks, Window Modules, Heated Mirrors, Heated Seats, etc.
URL: https://www.the12volt.com/installbay/forum_posts.asp?tid=142210
Printed Date: May 16, 2026 at 7:22 PM
Topic: 2005 Dodge GC, Avital 4105L, Xpresskit PKUMUX
Posted By: gotthelife75
Subject: 2005 Dodge GC, Avital 4105L, Xpresskit PKUMUX
Date Posted: December 09, 2016 at 7:27 PM
Hello. I want to thank everyone in advance for all help and advice.
I want to surprise my wife for Christmas and install a remote starter in her 2005 Dodge Grand Caravan. I have purchased the Avital 4105L with the Directed Electronics Xpresskit PKUMUX. I want to make sure I have everything so I can get the install done in one day without additional trips to the store or online purchases. Will not be much of a surprise if I do not get it done in a day.
I would like to use the remote start, door lock / unlock, and rear hatch open feature of the Avital 4105L key fob if possible. The primary features I want are the remote start (of course) and the rear hatch open. I would assume she could use the door lock / unlock on the factory key fob if needed.
I do have 2 factory keys to program the Xpresskit PKUMUX unit.
My main questions have to do with resistors and relays:
1) Can someone let me know if my installation requires either?
2) If so, where do I need them and what kind of resistor / relay would be needed.
I have found many wiring diagrams online and should have no problem making the connections for the installation. I have plenty of experience soldering, etc. just not much experience when it comes to resistors / relays.
Replies:
Posted By: kreg357
Date Posted: December 10, 2016 at 7:52 AM
You need some more supplies and time is running short.
If let me say that the PKUMUX is not my favorite bypass module for that vehicle. I get a lot more bang for the buck from
an iDalaink ADS DL module. It does more, is easier to install, only needs one key to program and is more reliable.
It also handles the Factory Alarm system, which hopefully your van does not have. The downside for the DIYer is that
the ADS DL needs to be flashed with specific firmware with a special cable.
Anyway, you have the PKUMUX and two factory keys, so use that. It will handle the transponder chip and the Starter MUX
wire.
First, you will need a Directed 451M door lock module for the locks. You could do it with 30/40 Amp SPDT relays and some
resistors but the 451M comes in a nice handy package with a nice supply of resistors. You will need these resistors for
other things in the van like parking lights and hatch release. While you might get away without relays for the Parking
Lights and Trunk Release, it would be best to get the relays and use them for reliability. Buy two 30/40 Amp SPDT Bosch
style automotive relays with the 5 pin harness.
Here is a link to Bulldog Security : https://www.bulldogsecurity.com/bdnew/vehiclewiringdiagrams.aspx
They have the necessary wiring info for your van plus relay diagrams and photos for the various wires, etc. Use that
as your guide.
A few tips :
1. On the 4105 R/S 6 Pin plug you will only connect the Pink, Purple and both Red wires. There is no ACC wire or need
for the Flex relay output.
2. Follow the Type H wiring in the 451M install guide for the One-Wire door lock system using the correct resistors.
3. The other resistors in the 451M kit can be used for the Parking Lights ( 2K ohm ) and the Hatch Release ( 1.5k to
1.7h ohm ).
4. Set the Viper to (+) Parking Light output and follow the Bulldog Parking Light diagram on the top left.
The 451M kit has a 2k and a 5,360 ohm resistor for the locks. For the Parking Lights connect the 1,200 ohm and the
820 ohm resistors in series ( 2020 ohms ). The Trunk Release needs 1,500 to 1,690 ohms, so put the 1,000 and the 560
ohm in series for that.
I would do all the wiring and relay setup on the bench prior to vehicle install. Keep things neat and makes for an
easier install. Plan on spending many hours under the dash. Be careful programming the PKUMUX.
-------------
Soldering is fun!
Posted By: gotthelife75
Date Posted: December 10, 2016 at 8:46 AM
kreg - Appreciate the info.
I took a look at the iDataLink ADS DL module, but it requires the purchase of a $50 cable to program. I did not see any sellers on Amazon or Ebay that offered to program it.
Is there another bypass besides the PKUMUX that would make my install easier? Or will all bypass modules require resistors and relays? I am not opposed to return the PKUMUX.
How do I know if the van has a factory alarm. I know the horn honks and parking lights flash when it locks from the key fob. But thought that was more just to let you know it locked.
Posted By: kreg357
Date Posted: December 10, 2016 at 9:32 AM
Alarm test : Start the engine and roll down the drivers window. Turn off the engine and remove the key. Open and close the drivers door. Watch the instrument cluster while you press the lock button on the Factory FOB, then press the lock button again. Any Security type lights on or flashing? Wait a full 60 seconds and then open the drivers door using only the inside handle. Horn honking?
That gen Caravan / Voyager /Town & Country is a bit of work to do. I used to do them with all relays, resistors and a spare key in a 556UW coffin. Uncut chipped keys cost $5 and are easily programmed to the van. Using a full featured bypass module like the ADS DL or even the more expensive ADS AL-CA cuts down on a lot of wiring. If you don't have the Factory Alarm system, the info above will get it done. Just set everything up during bench prep.
-------------
Soldering is fun!
Posted By: gotthelife75
Date Posted: December 10, 2016 at 10:03 AM
OK, no factory alarm in the van. Since I really do not want to spend the extra $50 for the programming cable the iDataLink requires I will stick with the PKUMUX.
A quick question, do I just connect the door lock / unlock, rear hatch, and parking light wires from the R/S directly to the vehicle (using relays and resistors of course)? Or do they have to go through the PKUMUX for any reason?
I did not have a chance to review the bulldog guide yet.
A quick question, do I just connect the door lock / unlock, rear hatch, and parking light wires from the R/S directly to the vehicle (using relays and resistors of course)? Or do they have to go through the PKUMUX for any reason?
I did not have a chance to review the bulldog guide yet.
Posted By: kreg357
Date Posted: December 10, 2016 at 10:35 AM
The 451M will connect to the 4105 via a 3 Pin harness. The Type H wiring will have 2 wires going to Chassis ground,
2 wires not used and the other two wires will have a resistor added and then they will be combined into one wire that
connects to the vans lock/unlock wire.
The Parking Light relay will connect to the 4105 Parking Light output, chassis ground and one wire with the resistor
will go the vans Parking Light MUX wire.
The Hatch Release relay will have one wire going to the 4105's Trunk Release wire, one wire going to +12V ( 4105 Red ),
one wire going to Chassis Ground through the resistors and one wire going to the vans Hatch Release wire.
As mentioned, I would make all the relay, bypass and R/S module interconnections on the bench prior to install. It
will save a bunch on time when under the dash. You will have all the necessary wires from the R/S assy ready to run
to their respective destinations.
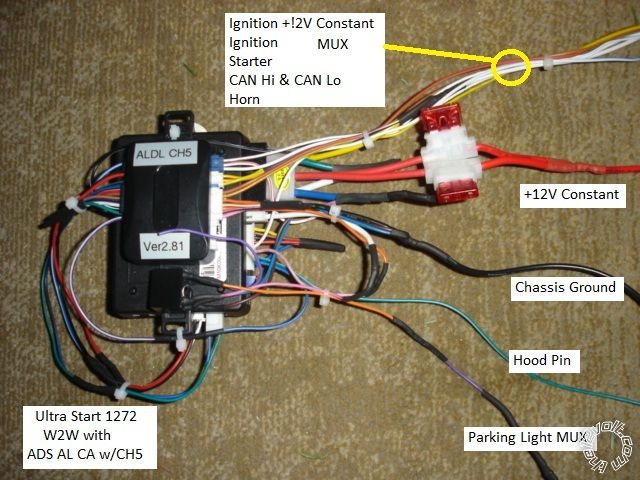
While not as complex as your assy, here is a bench prepped unit for a 2006 Dodge RAM :
-------------
Soldering is fun!
2 wires not used and the other two wires will have a resistor added and then they will be combined into one wire that
connects to the vans lock/unlock wire.
The Parking Light relay will connect to the 4105 Parking Light output, chassis ground and one wire with the resistor
will go the vans Parking Light MUX wire.
The Hatch Release relay will have one wire going to the 4105's Trunk Release wire, one wire going to +12V ( 4105 Red ),
one wire going to Chassis Ground through the resistors and one wire going to the vans Hatch Release wire.
As mentioned, I would make all the relay, bypass and R/S module interconnections on the bench prior to install. It
will save a bunch on time when under the dash. You will have all the necessary wires from the R/S assy ready to run
to their respective destinations.
While not as complex as your assy, here is a bench prepped unit for a 2006 Dodge RAM :
-------------
Soldering is fun!
Posted By: gotthelife75
Date Posted: December 17, 2016 at 11:08 PM
kreg,
I started on the wiring assembly today and have some questions. Here is a link to the PKUMUX guide: https://directechs.blob.core.windows.net/documents/pkumux_en_ig_cp20110630a.pdf.
1) Would I use the PKUMUX Install "A"?
2) Does the PKUMUX blue/white go to 4105 R/S "Primary Harness" 9-pin WHITE/ blue?
3) Do I only use the blue/white, red, and black wires from the PKUMUX?
4) Do I need to connect the 4105 R/S 9-pin brown (horn output) to the van horn wire? I would think so. Do I need a resistor/relay?
5) Do I need to connect any wires from the 4105 R/S's "Remote Start harness" 5 pin to anything?
6) Do I need to connect any wires from the 4105 R/S's "Satellite harness" 4 pin to anything?
7) Do I need to connect any wires from the 4105 R/S's "D2D Harness" 4 pin to anything?
8) Do I need to connect anything to the van's "Starter 2" wire?
9) You mention to use a relay for the rear hatch pop. When reviewing Bulldog security wiring guide it says to only use resistor with (-) NEGATIVE output and shows the relay used with (+) POSITIVE output. Would I wire it the same as their diagram, but the white wire from relay would go to RED / White (-200 mA Trunk Release Output) from "Primary Harness" 9 pin of 4105 R/S?
Posted By: kreg357
Date Posted: December 18, 2016 at 7:48 PM
A lot of questions... Here is the preemptive answer.
Viper 4105
Main 9 Pin
1 LIGHT GREEN/ BLACK FACTORY ALARM DISARM to PKUMUX Blue
2 GREEN / WHITE FACTORY REARM not used
3 YELLOW (+) IGNITION OUT (TO ALARM) not used
4 WHITE/ BLUE (-) ACTIVATION INPUTnot used
5 ORANGE (-) GROUND WHEN LOCKED not used
6 BROWN (-) HORN OUTPUT GREEN/ PURPLE (-) @ STEERING COLUMN HARNESS, WHITE Plug
7 RED / WHITE (-) TRUNK RELEASE OUTPUT to Trunk Relay, Pin 85
8 BLACK GROUND Chassis Ground
9 WHITE (+/-) LIGHT FLASH set to Positive to Parking Light relay, Pin 86
R/S 5 Pin
1 BLACK/ WHITE (-) NEUTRAL SAFETY SWITCH INPUT Chassis Ground ( add to Black wire on 9 Pin )
2 VIOLET/WHITE TACHOMETER INPUT WIRE BLUE/GREEN @ COIL PACK
3 BROWN (+) BRAKE SWITCH SHUTDOWN WIRE WHITE/ TAN (+) @ SWITCH ABOVE BRAKE PEDAL
4 GRAY (-) HOOD PINSWITCH SHUTDOWN WIRE to kit supplied hood pin
5 BLUE/WHITE (-) 200mA 2ND STATUS/REAR DEFOGGER OUTPUT not used
4-pin satellite harness diagram
1 BLUE STATUS OUTPUT to PKUMUX Blue/White
2 ORANGE (-) ACCESSORY OUTPUT not used
3 PURPLE (-) STARTER OUTPUT not used
4 PINK (-) IGNITION OUTPUT not used
Heavy gauge 6 Pin
1 RED (+) (30A) HIGH CURRENT 12V INPUT Battery
2 PINK/WHITE (+) Flex ACCESSORY OR IGNITION not used
3 RED (+) (30A) HIGH CURRENT 12 INPUT Battery
4 ORANGE (+) (30 AMP) OUTPUT TO ACCESSORY CIRCUIT not used
5 PURPLE (+) (30 AMP) OUTPUT TO STARTER CIRCUIT YELLOW (+) (20 Gauge) @ IGNITION SWITCH HARNESS, BLACK Plug
6 PINK (+) (30 AMP) OUTPUT TO IGNITION CIRCUIT PINK/WHITE (+) (20 Gauge) (2 Wires, use either wire)@ IGNITION SWITCH HARNESS, BLACK Plug
Door lock harness, 3-pin connector
1 BLUE (-) UNLOCK OUTPUT DEI 451M 3 Pin plug
2 EMPTY NOT USED
3 GREEN (-) LOCK OUTPUT DEI 451M 3 Pin plug
Trunk Relay
Pin 85 to Viper RED / WHITE (-) TRUNK RELEASE OUTPUT
Pin 86 to Viper thick Red ( add )
Pin 87 to Chassis Ground ( add to Viper Black wire )
Pin 30 to PURPLE / TAN (-) @ BCM, GREEN Connector, Pin 6 through ( 1k ohm and 560 ohm ) resistors
Parking Light Relay
Pin 86 to Viper White Parking Light output
Pin 85 and 87 to Chassis Ground ( add to Viper Black wire )
Pin 30 to WHITE/ BROWN (-) @ HEADLIGHT SWITCH, BLACK Plug though ( 1.2k ohm and 820 ohm ) resistors
451M wiring
3 Pin Plug to Viper 3 Pin Lock output connector
WHITE/ Black wire not used
BROWN / Black wire not used
Violet and Violet/Black to Chassis Ground ( add to Viper Black wire )
GREEN/ Black wire through 5.36k ohm resistor to PURPLE / GREEN (1-Wire Door Lock System) @ BCM, BLACK plug, Plug 2
Blue/Black wire through 2k ohm resistor to PURPLE / GREEN (1-Wire Door Lock System) @ BCM, BLACK plug, Plug 2
PKUMUX wiring ( follow Type B diagram )
Blue/White to Viper Blue (-) Status Output
Pink to Viper thick Pink ( add )
Violet to Viper thick Purple ( add )
Light Green not used
Blue to Viper Light GREEN/ Black
RED / White not used
WHITE/ Violet to vehicle side of cut PURPLE / BROWN (-) (20 Gauge) @ IGNITION SWITCH HARNESS, BLACK Plug
Violet/Black to switch side of cut PURPLE / BROWN (-) (20 Gauge) @ IGNITION SWITCH HARNESS, BLACK Plug
WHITE/ Black not used
WHITE/ Red not used
Red to Viper thick Red ( add )
Black to Viper Black Chassis Ground ( add )
That should do it. More answers :
1) Would I use the PKUMUX Install "A"? No, use Type B. You should have the PURPLE / Brown MUX wire.
2) Does the PKUMUX blue/white go to 4105 R/S "Primary Harness" 9-pin WHITE/ blue? No, follow the above wiring.
3) Do I only use the blue/white, red, and black wires from the PKUMUX? Yes, follow the Type B diagram and the above wiring.
4) Do I need to connect the 4105 R/S 9-pin brown (horn output) to the van horn wire? I would think so. Do I need a resistor/relay?
Not mandatory and horn is slow to respond. No relay or resistor needed.
5) Do I need to connect any wires from the 4105 R/S's "Remote Start harness" 5 pin to anything? Yes, follow the above wiring.
It is best to run in Tach Mode. You are running wires out to the engine compartment ( hood and battery )
6) Do I need to connect any wires from the 4105 R/S's "Satellite harness" 4 pin to anything? Yes, follow the above wiring.
7) Do I need to connect any wires from the 4105 R/S's "D2D Harness" 4 pin to anything? No, not used.
8) Do I need to connect anything to the van's "Starter 2" wire? The PKUMUX connects to that wire. Follow the above wiring.
9) You mention to use a relay for the rear hatch pop. When reviewing Bulldog security wiring guide it says to only use resistor
with (-) NEGATIVE output and shows the relay used with (+) POSITIVE output. Would I wire it the same as their diagram, but the
white wire from relay would go to RED / White (-200 mA Trunk Release Output) from "Primary Harness" 9 pin of 4105 R/S?
Bulldog R/S units output a (+) Trunk Release signal, your Viper has a (-) Trunk Release output. Follow the above relay wiring.
-------------
Soldering is fun!
Posted By: gotthelife75
Date Posted: December 22, 2016 at 9:47 PM
kreg,
Thank you very much for all the info. I have a question about the Parking Light relay. Your recent post gives different steps for the relay connections than the Bulldog site.
Bulldog site says:
Pin 85 to R/S White Parking Light output
Pin 86 and 30 to Chassis Ground
Pin 87 to WHITE/ BROWN (-) @ HEADLIGT SWITCH
Could you clarify which way I should wire the relay?
Also, is it required to connect the hood pin? Will the R/S work without it connected?
Thanks!
Posted By: kreg357
Date Posted: December 23, 2016 at 5:09 AM
The Hood Pin Switch is not absolutely mandatory. The R/S will work without it. However, it is a very important safety feature.
Most people never remember how to put the system into Valet Mode so having the Hood Pin installed protects the vehicle and anyone
working on the engine during service. I always install the Hood Safety, either using the vehicles built in Factory Alarm switch
or adding a tilt switch to a hood hinge bolt.
Either Parking Light relay wiring will work, assuming a (+) Parking Light output control signal from the R/S system. Two things
to mention about the Bulldog wiring :
1. Generally accepted Bosch style relay convention is that Pin 85 has the (-) signal and Pin 86 gets the (+) signal. On most
relays it doesn't matter but on some relays that have a built in coil quenching diode, this polarity ( Pin 85 = (-) ) must be
followed. My diagram follows this protocol while Bulldog's does not.
2. The relay is just a switch and the signal can flow through in either direction. My diagram has the R/S Parking Light signal
going from Pin 87 to Pin 30 while Bulldog's diagram has it going from Pin 30 to Pin 87. Again either way is fine and with the
ground signal we are using, no big deal. But it is important that the unused Pin 87a gets insulated because it's connected to
Pin 30 ( N.C. ) while the relay is at rest ( de-energized ). You can also de-pin that unused wire at Pin 87a.
-------------
Soldering is fun!
Posted By: gotthelife75
Date Posted: December 24, 2016 at 12:11 PM
Kreg,
I installed everything last night and programmed the PKUMUX with both keys.
The doors lock/unlock from the R/S key fob and the lights flash, but it will not start from the remote. If I press the start button on the key fob the green LED on the fob lights up, but nothing happens.
The red LED on the R/S is flashing as well. But it flashes for quite some time (several minutes) and then stops until I use the remote again for anything.
- I did not connect the hood pin to pin 4 of R/S 5 pin.
- I did not connect the On/Off switch to pin 1 of R/S 5 pin or parking brake.
Was not sure if parking brake connection was required, did not see it mentioned in your posts. I did connect pin 1 of R/S 5 pin (BLACK/ White) to chassis ground (Pin 8 of R/S 9 pin).
Not as important as not starting, but I could not locate the green connector at the BCM for the rear hatch release. The van does not have a power rear hatch. Only the button on the hatch you push to pop it open. Then the hydraulic lifts open it. I was hoping to use the remote to pop the rear hatch release.
I am interested in controlling the rear defrost. Would I connect to the R/S 5 pin Blue/White wire and then to the wire at the switch in the van console? I would assume I need to add a relay and resistor similar to the parking lights. Would the wiring layout be the same just a different resistor? Would you know what resistor(s) I would need?
Thanks! I am getting so close.... Hoping to be done by tonight!!! :-)
Posted By: kreg357
Date Posted: December 24, 2016 at 2:24 PM
The BLACK/ White wire at R/S 5 pin harness, Pin 1 must go to chassis ground as shown in the wiring list. You can run it through the switch if you wish to have a Valet Switch.
-------------
Soldering is fun!
-------------
Soldering is fun!
Posted By: gotthelife75
Date Posted: December 24, 2016 at 2:37 PM
I have the BLACK/ white from the 5 pin connected to Pin 8 of 9 pin and then to ground screw.
Posted By: kreg357
Date Posted: December 25, 2016 at 4:19 PM
Good. Hood pin is a nice safety feature. You can add it later but for now make sure it's not grounded.
If you connected the Tach wire, did you program the 4105 to Tach Mode ( Menu 2, Feature 1, Option 4 ), and do a Tach Learn?
You might try disconnecting the PKUMUX antenna loop from the bypass module, inserting a key into the ignition switch ( but not turned ) and then a R/S.
-------------
Soldering is fun!
Posted By: gotthelife75
Date Posted: December 25, 2016 at 5:36 PM
kreg,
I posted earlier from my phone and now see it did not go through. I had already done some additional testing last night.
I did the tach learning as noted in the 4105 installation guide when I first installed. The guide suggested that it would then use the same method when in use. Tonight I went ahead and programmed the 4105 as you just suggested and it still does not start.
Last night I did try using the R/S with a key in the ignition, just in case I messed up the PKUMUX programming and it still did not start. I just tried again after programming the 4105 for the tach.
More on the R/S LED. It only flashes after I lock the doors with the R/S remote. Once I unlock them it stops.
When I try a remote start, nothing at all happens. The van lights do not flash, R/S LED does not flash, nothing...
What else can I test to see where my issue is?
Thanks!!!
Posted By: kreg357
Date Posted: December 25, 2016 at 6:31 PM
You could try forcing a R/S via the WHITE/ BLUE (-) ACTIVATION INPUT wire. Just touch that wire to chassis ground a few
times in a row and see if it tries to start.
You might try Remote Start Shutdown Diagnostics.
Shutdown diagnostics: If the remote start activates but fails to stay running, the remote
start module has the ability to inform you of what may have caused the remote
start failure. Before performing shutdown diagnostics it is important that you let the
remote start shut off on its own i.e. let it attempt to start 3 times then shut down, if
this is not done the unit will report the shutdown you used to shut off the remote start.
Note: Shutdown diagnostics does not report if the vehicles factory immobilizer is
causing the problem.
To perform shutdown diagnostics:
1. With the ignition Off, press and hold the Valet button.
2 Turn the ignition On and then bock Off while holding the Valet button.
3 Release the Valet button.
4. Press and release the Valet button. The LED flashes to report the last
shutdown for one minute or until the ignition is turned on, as shown in the
following table:
LED Flashes Shutdown Mode
I flash Timed out
2 flashes Over-rev shutdown
3 flashes Low or no RPM, low battery (voltage and virtual loch modes )
4 flashes Transmitter shutdown (or optional push button)
5 flashes (-) Hood Shutdown (5 pin Gray wire)
6 flashes (+) Shutdown 15 pin Brown wire)
7 flashes (-) Neutral safety shutdown (5 pin BLACK/ White wire)
8 flashes Wait-to-start timed out
-------------
Soldering is fun!
Posted By: gotthelife75
Date Posted: December 26, 2016 at 11:55 AM
I tried forcing a R/S via the WHITE/ BLUE (-) ACTIVATION INPUT wire and still nothing.
I did the diagnostic test and get 7 flashes.
I have the BLACK/ white wire from the R/S 5 pin connected to the black wire from the R/S 9 pin. Then the black wire from the R/S 9 pin goes to a ground screw.
I also have any wire from the relays that go to ground connected to the black wire from the R/S 9 pin connector.
Posted By: kreg357
Date Posted: December 26, 2016 at 12:22 PM
Strange problem. Seven flashes indicate a Neutral Safety issue but that wire goes to chassis ground. Double check everything, make sure all the connectors are fully seated. you could try pulling the two fuses for a couple of minutes and then re-inserting them.
-------------
Soldering is fun!
-------------
Soldering is fun!
Posted By: gotthelife75
Date Posted: December 26, 2016 at 2:29 PM
I disconnected the BLACK/ white wire of the R/S 5 pin from the R/S 9 pin and ran it straight to the ground screw and the R/S now works.... But I have to have a key in the ignition.
So apparently the PKUMUX is not programmed correctly. I tried to go through the programming steps again and still need the key in the ignition.
Step 7 of the programming is where I think my problem is. After placing the blue/white wire from the PKUMUX to ground I insert the key without the PC board into the ignition and turn to ON position. After 10 seconds I do not hear the chime and the van security light does not turn on.
Any thoughts? To ground the blue/white wire I have a jumper wire connected and just hold it with my fingers to the ground screw I installed. Is that OK, or should I not be holding with my hand and use an alligator clip, etc. to connect to ground?
Posted By: kreg357
Date Posted: December 26, 2016 at 5:11 PM
That is just one of the reasons I prefer data style bypass modules. A couple of possibilities.
Make sure the PKUMUX has good power and ground. Double check that the two wires from the PKUMUX are going to the correct side
of the cut MUX wire. Yes, use a jumper with alligator clips to ensure a good ground signal. At Step 7 make sure you turn the
key to the IGN position. Timing is critical. Additionally, make sure the antenna wire is wrapped the correct number of times
around the right section of the ignition cylinder.
-------------
Soldering is fun!
Posted By: gotthelife75
Date Posted: December 26, 2016 at 5:55 PM
OK, will check that the PKUMUX wires are going to the correct side of the cut MUX wire.
As for wrapping the antenna wire around the ignition cylinder, it already has a loop at the end. Do I just place the loop around the cylinder? Or do I need to make additional wraps of the wire around the ignition cylinder as well as having the loop at the end around the ignition cylinder?
Also, the instructions are not clear... When I am done programming the PKUMUX do I leave the antenna wire wrapped around the ignition cylinder for it to work? Or do I remove the antenna wire when done?
During my installation and testing I have left the antenna wire loop around the ignition cylinder.
Posted By: kreg357
Date Posted: December 26, 2016 at 6:22 PM
If you have the pre-formed loop antenna, just locate it and secure it at the correct ignition switch cylinder location. This
must stay in place permanently. This is what sends a transponder chip code to the vehicles pickup antenna during a remote start.
Basically, the PKUMUX contains a transponder chip and you are adding a new key to the vehicle during programming.
-------------
Soldering is fun!
must stay in place permanently. This is what sends a transponder chip code to the vehicles pickup antenna during a remote start.
Basically, the PKUMUX contains a transponder chip and you are adding a new key to the vehicle during programming.
-------------
Soldering is fun!
Posted By: gotthelife75
Date Posted: December 26, 2016 at 9:11 PM
I checked that the wires from the PKUMUX are going to the correct ends of the cut MUX wire at the ignition. I re-ran the ground wire straight to the ground screw I installed. I also used my meter to verify there is 12 volts at the PKUMUX.
I retried the programming steps and still do not get the confirmation at Step 7 that the PKUMUX is programmed.
Now, when I try to start the van the starter just clicks and it will not start with key or R/S. My guess is that I tried the programming feature to many times and it is locked out. Any idea how long I have to wait before the van will start again?
Any other tips for getting the PKUMUX programmed?
How do I know if the PKUMUX is bad? What else does it do besides send the correct signal to the vehicle when trying to start with R/S?
If I cannot get the PKUMUX programmed what other options do I have at this point? Besides leaving a key in the ignition? :-)
Posted By: gotthelife75
Date Posted: December 26, 2016 at 10:28 PM
kreg,
Have done a bit more research and it seems the van can only program a total of 4 keys. We bought the van used and have no idea if it has programmed any additional keys besides the 2 we have. Could that be my issue?
I would have to test again tomorrow morning, but when programming I do not think the security light stayed flashing after step 5. I believe it just stops flashing when I turn the 2nd key off.
Posted By: kreg357
Date Posted: December 27, 2016 at 12:59 AM
Yes, you definitely need the confirmation beep at Step five to indicate the van is in "add new transponder key" mode to continue on.
Are both the keys Dodge factory keys or do they look aftermarket? It would not allow adding another key ( or PKUMUX chip ) if you had one unique key and one clone key. You need two unique keys to add any more.
That's another nice thing about the iDatalink bypass module I use. They only require one working key to program the bypass module to the van.
If the starter motor just clicks, perhaps the battery is discharged after the having the door open for so long? Think I'd put a charger on it over night or try a jump start.
-------------
Soldering is fun!
Posted By: gotthelife75
Date Posted: December 27, 2016 at 1:23 PM
kreg,
Battery was getting low. Battery charger fixed that.
Last night I remembered we got a new key from the local Dodge dealer shortly after getting the van. It came with 2 keys and I had a local store try to make a copy so we could at least unlock the doors with the spare if my wife locked both original keys in the van. However they got one of the original keys stuck in the key copy machine. So, they paid for us to get a new one from the Dodge dealer. They gave us the original key back, it just has damaged teeth so will not work in doors or ignition.
I took the computer out of the damaged key and placed it in one of the good ones and it starts the van fine, so I know the transponder in all 3 keys work fine
I have tried every combination of the 3 keys to program the PKUMUX and still no luck. At step 7 of the programming, the security light just keeps blinking and does not go solid for 3 seconds and chime to let me know it programmed the PKUMUX correctly.
I have the antenna wire wrapped around the very end of the ignition cylinder and used a wire tie to secure it.
After trying to program the PKUMUX with all key combinations I did turn the key to the ON position and then grounded the blue/white wire from the PKUMUX and I can hear the PKUMUX click so I know that is doing something.
Here are my questions now:
1) What is the possibility that the PKUMUX is bad? Could I have bricked it by trying to program so many times? Should I get a replacement PKUMUX and try to program again?
2) Since I have 3 factory keys (one with damaged teeth) could I use a coffin box with the damaged key? Would I still need the PKUMUX?
I would like to get this resolved the easiest way possible and without having to redo all the wiring between the R/S and PKUMUX if possible.
Posted By: gotthelife75
Date Posted: December 27, 2016 at 2:08 PM
OK, I did some more testing after watching some youtube videos on programming additional keys for the van. It seems that step 7 of the PKUMUX programming is incorrect. The directions from xpresskit says to turn the key without computer to IGN position after grounding the Blue/White wire. The videos I watch shows the key in the ON postion.
With the key only in the IGN position the instrument panel does not activate and therefore no security light, etc.
So, just to clarify I have retried all combinations of the 3 keys I have while turning the key to the ON position for step 7 and still no luck. The security light just keeps blinking and does not go solid for 3 seconds and chime to notify of a successful program. I also tried placing the antenna loop around the plastic receiver ring at the ignition as well. Still did not program the PKUMUX.
I also tested the PKUMUX by grounding the Blue/White wire while the key is in the IGN position and I do not get a click from the PKUMUX. That only happens with the key in the ON position.
Posted By: kreg357
Date Posted: December 27, 2016 at 9:15 PM
Looks like you covered all the bases. Not sure exactly what the issue is. I have added blank chipped keys to those minivans and then used a 556UW to handle the bypass before but when iDatalink came out with their Data solution that programs with just one working ignition key I never messed with them again.
-------------
Soldering is fun!
-------------
Soldering is fun!
Posted By: gotthelife75
Date Posted: December 27, 2016 at 10:29 PM
kreg,
In your opinion what is my best route at this point? I do not really want to undo all the work I have already done if possible. But it seems at this point I am not going to get it to work with what I have. Do you think I should get a replacement PKUMUX and see if I can get it to program from my keys?
Also, if I do get a replacement PKUMUX and it does not program for whatever reason what options do I have at that point?
Thanks for all your help so far, my wife and I really appreciate it!!!
Posted By: kreg357
Date Posted: December 28, 2016 at 8:08 PM
Personally, time is money. Getting another PKUMUX is like throwing good money after bad and you might end up at the same point. While it will be a bit of work to wire in a new / different bypass module, the ability to program it with one key and the reliability of a Data Type bypass makes sense. If you can get an FLCAN flashed with the correct firmware, FLC-AL(DL)-CH6, you would be way ahead.
-------------
Soldering is fun!
-------------
Soldering is fun!
Posted By: gotthelife75
Date Posted: December 29, 2016 at 12:34 AM
In a previous post you mentioned checking that I had the PKUMUX wired correctly to the cut MUX wire at the ignition. Just to clarify, the PKUMUX violet/black wire would go to the PURPLE / brown wire that was attached to the connector (at ignition) after it was cut. I assume that is what is meant by switch side of the wire. If I have a key in the ignition, the R/S works fine. Would it work if I had this part wired wrong?
I had ordered the PKUMUX from Amazon and it is easy to get a replacement, so no extra money lost. Just a couple of days waiting for it to arrive. I am going to try that first just to save myself some hassle and time. I have to be back at work Tuesday and kind of running out of time.
If I have issues with it I will go your route and get the FLCAN. Are you referring to the one by Audiovox?
https://www.amazon.com/Audiovox-FLCAN-Multi-Platform-Doorlock-Interface/dp/B002NENP8U
One of the reviews mentions it comes preflashed with the Chrysler firmware. Does that sound correct? I thought they came "blank".
I also see the idatalink ACLA:
https://www.amazon.com/idatalink-ACLA-Remote-databus-Interfuse/dp/B001983S0Q/ref=sr_1_1?ie=UTF8&qid=1482991791&sr=8-1&keywords=iDataLink+ADS-ALCA
Are they the same unit? The Audiovox is a few dollars cheaper.
If I go with one of these do I still need the relays/resistors for lights, door lock/unlock, and rear hatch pop?
As far as wiring into the van and connecting to the 4105 R/S are they extremely different than the PKUMUX?
I do IT work for a living and this is becoming more frustrating than anything I have done in regards to my job. :-) Must say this has a bit of a learning curve.
Posted By: kreg357
Date Posted: December 29, 2016 at 6:11 AM
The van would still start OK with the key if the Starter MUX wire connections were reversed, but would not start with the
remote starter.
If you can get another PKUMUX for free, go for it. If you are having problems getting the minivan into position to accept
a new transponder chip ( proper response at Step 5 ), then a another PKUMUX might not be the answer. As a side note, you
can use a plain cut metal key from a hardware store ( no chip ) at Steps 7 & 8.
The FLCAN is a re-branded iDatalink ADS AL-CA module. Audiovox OEM's them and they are loaded and packaged for use with
R/S systems that use DBI D2D like your Viper. The FLC type firmware is the same as the DBI firmware. You could also get
the ADS AL-CA and have it flashed with the DBI CH6 firmware, it would be the same as the FLCAN w/FLC CH6 firmware.
The FLCAN with FLC CH6 firmware does many more functions than the PKUMUX. Here is a link to the install guide :
https://cdncontent2.idatalink.com/corporate/Content/Manuals/DL-CH6/FLC-AL(DL)-CH6_20110829.pdf
As noted in the Features Chart on Page 2, it will handle the transponder, locks, alarm system, power lift gate and sliding
doors*. It will also supply a Tach and Brake signal. This will greatly simplify your in-vehicle wiring. I'm not sure why,
but the ADS AL-CA w/DBI CH6 firmware will do all of that and handle the sliding doors via the D2D connection while the FLCAN
needs the sliding doors interconnection made via hardwire. Follow the Type 2 diagram.
* You would need a R/S system with extra AUX outputs to handle the sliding doors. Your 4105 does not have those extra AUX
outputs. For those minivans with power sliding doors and a power hatch, I use a Prestige APS687E system that has a 5 button
remote and those extra AUX outputs.
You would still need the relays and resistors for the Parking Lights and Trunk Release ( if you don't have the power liftgate ).
The door locks would be handled by the FLCAN, so no need for those relays.
The PKUMUX only handles the transponder bypass and the Starter MUX wire. The FLCAN does that and a bunch more. The FLCAN
talks to the minivan via the J1850 connection. If the Viper 4105 DBI D2D connection works properly, it handles a lot of
interconnections between the modules. This will cut down on wiring and save time.
Yes, a big learning curve. Not exactly the same as strapping a modem or downloading parameters to a router but some very
similar functions. J1850 is old like RS232 BiSync while CAN Bus data is newer like 802. But it's still all 1's and 0's.
-------------
Soldering is fun!
Posted By: gotthelife75
Date Posted: December 30, 2016 at 9:00 PM
I received the new PKUMUX today and swapped it out. Programmed on the first try and the R/S now works.
The only issue I have now is the rear hatch. I found the PURPLE / tan wire at the BCM plug 2 pin 6 but no luck. I hear the relay click when pressing the trunk button on R/S remote.
The only issue I have now is the rear hatch. I found the PURPLE / tan wire at the BCM plug 2 pin 6 but no luck. I hear the relay click when pressing the trunk button on R/S remote.
Posted By: kreg357
Date Posted: December 30, 2016 at 9:33 PM
Does the rear hatch lock and unlock with a regular Lock and Unlock command? Do you have a power rear hatch?
-------------
Soldering is fun!
-------------
Soldering is fun!
Posted By: gotthelife75
Date Posted: December 30, 2016 at 10:44 PM
Yes, the rear hatch locks / unlocks with the regular lock / unlock command from the factory remote and R/S remote. No it is not a power hatch, must be manually opened and closed.
Posted By: kreg357
Date Posted: December 31, 2016 at 4:51 AM
On those style Grand Caravans, the non-power rear hatch locks and unlocks with the doors. The factory remote FOB's only
have a Lock and Unlock button ( plus the Panic button ). There is no Trunk release button on the Factory FOB's. I have
never tried to get the rear hatch to unlock independently. I give a demonstration to the customer showing how the Unlock
button unlocks all the doors & hatch and the due to this the Trunk Release button on the R/S remotes is not needed, just
like on the Factory Remotes.
-------------
Soldering is fun!
Posted By: gotthelife75
Date Posted: December 31, 2016 at 11:13 AM
I was hoping I could pop the latch with the R/S remote and then the rear hatch gas lifts would open it. Just like using the button on the rear hatch by hand.
If not, then I would use the R/S remote trunk button to turn on rear defrost. I know there is a combo of two buttons for rear defrost but the single button would be easier for my wife to remember.
Would I tap into rear defrost wire at the switch in dash? Do I need relay resistors like the lights and door lock? If so, how would I wire relay and what resistors do I need?
Posted By: kreg357
Date Posted: December 31, 2016 at 11:22 AM
Sorry, I have no info on the Rear Defrost for that vehicle.
-------------
Soldering is fun!
-------------
Soldering is fun!