Avital 4113 Install on 2013 Highlander "G" Key
Printed From: the12volt.com
Forum Name: Car Security and Convenience
Forum Discription: Car Alarms, Keyless Entries, Remote Starters, Immobilizer Bypasses, Sensors, Door Locks, Window Modules, Heated Mirrors, Heated Seats, etc.
URL: https://www.the12volt.com/installbay/forum_posts.asp?tid=142251
Printed Date: April 08, 2026 at 6:04 AM
Topic: Avital 4113 Install on 2013 Highlander "G" Key
Posted By: esaah6
Subject: Avital 4113 Install on 2013 Highlander "G" Key
Date Posted: December 17, 2016 at 11:37 PM
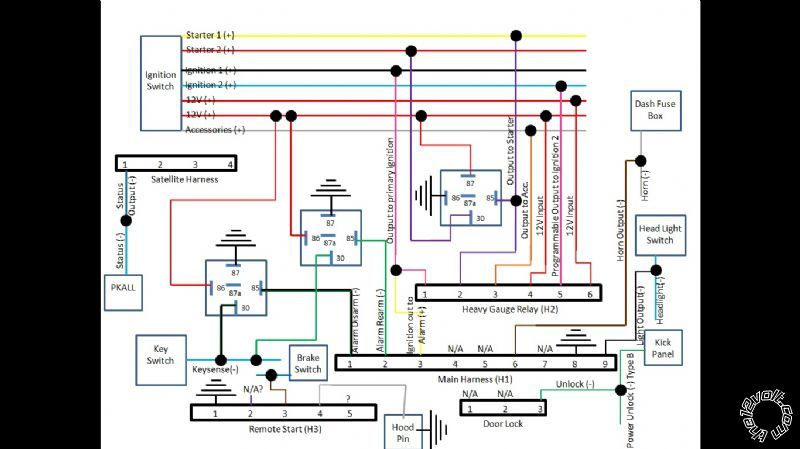
Hello everyone. I'm attempting this Avital 4113 remote start install on a 2013 Toyota Highlander G key (not smart key) with a seperate OEM fob that controls locks, trunk, and alarm. I would like to use the rear defogger with the remote start, but I don't know where the wire is in the car. Also, not sure if it's worth it to connect to tach wire or just use Virtual Tach and save myself 20 minutes work. Please give me some advise and review my diagrams if you get a chance. I would really appreciate it. Thank you all!
Main Harness, 9-pin connector
1 LIGHT GREEN BLACK (-) 200mA FACTORY ALARM DISARM to Keysense (-) via relay
2 GREEN / WHITE (-) 200mA FACTORY ALARM REARM to Keysense (-) via relay
3 YELLOW (+) IGNITION OUT (TO ALARM) to Heavy Gauge Relay (H2/1) Output to primary ignition
4 WHITE/ BLUE (-) ACTIVATION INPUT Not Used
5 ORANGE (-) 500mA GROUND WHEN LOCKED/ANTI-GRIND OUTPUT Not Used
6 BROWN (-) 200mA HORN OUTPUT to GRAY (-) @ Dash Fuse Box
7 RED / WHITE (-) 200mA TRUNK RELEASE OUTPUT Not Used
8 BLACK GROUND to chassis ground
9 WHITE (+/-) LIGHT FLASH OUTPUT set jumper/fuse to (-) and connect to BLUE (-) @ HEAD LIGHT SWITCH
Door Lock, 3-pin connector
1 BLUE (-) LOCK Not Used
2 EMPTY Not Used
3 GREEN (-) UNLOCK to GREEN (-) Type B IN KICK PANEL
High Gauge, 6-pin connector
1 PINK(+) Output to primary ignition to BLACK Ignition 1 (+)
2 PURPLE **(+) OUTPUT TO Starter to YELLOW (+) Starter 1 and RED (+) starter 2 via relay
3 ORANGE(+) output to Acc. to GRAY (+) Acc.
4 RED (+) 12V input to constant 12V
5 PINK/WHITE (+) output to BLUE(+) Ignition 2 (using program Feature6 w/Option2)
6 RED (+) 12V input to constant 12V
Satellite harness, 4-pin connector
1 BLUE (-) 200mA STATUS OUTPUT to BLUE (-) status PKALL
2 ORANGE (-) 200mA ACCESSORY OUTPUT not used
3 PURPLE (-) 200mA STARTER OUTPUT not used
4 PINK (-) 200mA IGNITION OUTPUT not used
Remote Start harness, 5-pin connector
1 BLACK/ WHITE (-) NEUTRAL SAFETY SWITCH INPUT to Chassis Ground
2 VIOLET/WHITE TACHOMETER INPUT WIRE Not sure if I want to use it
3 BROWN (+) BRAKE SHUTDOWN INPUT WIRE to BLUE (+) @ SWITCH ABOVE BRAKE PEDAL
4 GRAY (-) HOOD PIN SWITCH SHUTDOWN WIRE to supplied hood pin
5 BLUE/WHITE (-) 200 mA 2ND STATUS/REAR DEFOGGER to...wish I knew
 ------------- Let's do this!
Replies:
Posted By: kreg357
Date Posted: December 18, 2016 at 8:16 PM
Here is some info on the Rear Defrost wire. Test with DMM to verify.
Rear Defrost WHITE (- LATCHED) PASSENGER KICK GRAY 20 PIN CONN, PIN 20 & 16
Does your Highlander have the Factory Alarm? If yes, use (-) Status Output to Keysense to turn off during remote start. The
4113 will only output an Unlock while the engine is running under a remote start, so the alarm is already disarmed.
Main Harness, 9-pin connector
1 LIGHT GREEN BLACK (-) 200mA FACTORY ALARM DISARM not used
2 GREEN / WHITE (-) 200mA FACTORY ALARM REARM not used
3 YELLOW (+) IGNITION OUT (TO ALARM) not used
4 WHITE/ BLUE (-) ACTIVATION INPUT Not Used
5 ORANGE (-) 500mA GROUND WHEN LOCKED/ANTI-GRIND OUTPUT Not Used
6 BROWN (-) 200mA HORN OUTPUTto GRAY (-) @ Dash Fuse Box
7 RED / WHITE (-) 200mA TRUNK RELEASE OUTPUT Not Used
8 BLACK GROUNDto chassis ground
9 WHITE (+/-) LIGHT FLASH OUTPUT set jumper/fuse to (-) to BLUE (-) @ HEAD LIGHT SWITCH
Door Lock, 3-pin connector
1 BLUE (-) LOCK Not Used
2 EMPTY Not Used
3 GREEN (-) UNLOCK to GREEN (-) DRIVER KICK PANEL BLACK 18 PIN CONN, PIN 9 ( set 4113 to Double Unlock Pulse )
High Gauge, 6-pin connector
1 PINK(+) Output to primary ignition to BLACK Ignition 1 (+)
2 PURPLE **(+) OUTPUT TO Starter to YELLOW (+) Starter 1
3 ORANGE(+) output to Acc. to GRAY (+) Acc.
4 RED (+) 12V input to constant 12V
5 PINK/WHITE (+) output to Light BLUE(+) Ignition 2 (using program Feature6 with default Option 1)
6 RED (+) 12V input to constant 12V
Satellite harness, 4-pin connector
1 BLUE (-) 200mA STATUS OUTPUT to BLUE (-) status PKALL and Keysense LT BLUE (-) IGNITION SWITCH WHITE 2 PIN CONN, PIN 1
thru 1N4001 diode, bands towards the 4113.
2 ORANGE (-) 200mA ACCESSORY OUTPUT not used
3 PURPLE (-) 200mA STARTER OUTPUT To Starter2 relay, Pin 85
4 PINK (-) 200mA IGNITION OUTPUT not used
Remote Start harness, 5-pin connector
1 BLACK/ WHITE (-) NEUTRAL SAFETY SWITCH INPUT to Chassis Ground
2 VIOLET/WHITE TACHOMETER INPUT WIRELT BLUE OBDII WHITE 16 PIN CONN, PIN 9
3 BROWN (+) BRAKE SHUTDOWN INPUT WIRE to BLUE (+) @ SWITCH ABOVE BRAKE PEDAL
4 GRAY (-) HOOD PIN SWITCH SHUTDOWN WIRE to supplied hood pin
5 BLUE/WHITE (-) 200 mA 2ND STATUS/REAR DEFOGGER WHITE (- LATCHED) PASSENGER KICK GRAY 20 PIN CONN, PIN 20 or 16 *
* Program to Latched Defrost
Starter2 Relay wiring :
Relay Pin 85 to 4113 PURPLE (-) 200mA STARTER OUTPUT
Relay Pin 86 and 87 to +12V constant through 20 Amp fuse
Relay Pin 30 to Starter2 Red @ Ign Switch Harness
-------------
Soldering is fun!
Posted By: esaah6
Date Posted: December 20, 2016 at 8:19 AM
Wow. Thanks a ton Kreg. This will definitely help. I owe you big time!  ------------- Let's do this!
Posted By: esaah6
Date Posted: December 22, 2016 at 9:23 PM
Hi again, Kreg. I have updated my schematic for the wiring. I hope someone else will be able to use it someday. Please let me know if it looks good. I'm not 100% sure if I got the diode in the correct position. 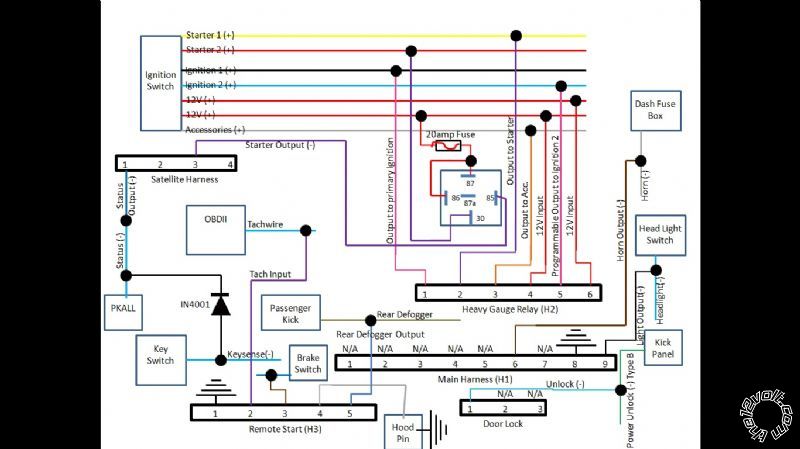 ------------- Let's do this!
Posted By: kreg357
Date Posted: December 22, 2016 at 9:41 PM
Nice diagram! Looks good and the diode is oriented correctly ( cathode ( or band ) towards the Avital ). This will block Keysense from a regular key insertion from turning on the PKALL bypass function but allow the Avital to turn on Keysense during a remote start.
-------------
Soldering is fun!
Posted By: esaah6
Date Posted: December 23, 2016 at 8:04 AM
Thanks again Kreg! I just donated $10 to you guys. Sites like this are what make the internet invaluable. I'll let you know how the install goes. Merry Christmas!
-------------
Let's do this!
Posted By: prince504
Date Posted: December 26, 2016 at 1:24 PM
esaah6 wrote:
Thanks again Kreg! I just donated $10 to you guys. Sites like this are what make the internet invaluable. I'll let you know how the install goes. Merry Christmas!
kreg357 wrote:
Nice diagram! Looks good and the diode is oriented correctly ( cathode ( or band ) towards the Avital ). This will block Keysense from a regular key insertion from turning on the PKALL bypass function but allow the Avital to turn on Keysense during a remote start.
Out of curiosity, why not go to the arm/disarm wires on the Highlander instead of the Keysense wire?
Also, if a remote start module has Arm/Disarm wires, would the lock/unlock wires still need to be connected? Or can you use the arm/disarm wires for the power door lock/unlock function as well to enter and exit the vehicle?
Bulldog Security wiring said the Tach is "not required for remote starting." What does that mean?
Posted By: kreg357
Date Posted: December 26, 2016 at 1:43 PM
I believe that the Arm and Disarm wires are the actual input wires from the drivers side key lock cylinder. Using them will
actually unlock the car. Using Keysense will only turn off the factory alarm. Remember that the 4113 is a one button R/S
system. It will start the engine so using Keysense is the most direct way to disarm the alarm. Additionally, as a one button
system, it does not handle Lock at all and will only do an Unlock while the engine is running under remote start. When the 4113
can do an Unlock, the alarm is already off.
You are correct in using the Arm and Disarm wires instead of the Lock and Unlock wires with a normal 4 button R/S install.
I would still use the Lock and Unlock wires because the Arm and Disarm wires have slightly different functions ( there will be
an Arm output after a R/S shutdown, there is a Disarm before a trunk release, etc. )
-------------
Soldering is fun!
Posted By: prince504
Date Posted: December 26, 2016 at 4:11 PM
kreg357 wrote:
I believe that the Arm and Disarm wires are the actual input wires from the drivers side key lock cylinder. Using them will
actually unlock the car. Using Keysense will only turn off the factory alarm. Remember that the 4113 is a one button R/S
system. It will start the engine so using Keysense is the most direct way to disarm the alarm. Additionally, as a one button
system, it does not handle Lock at all and will only do an Unlock while the engine is running under remote start. When the 4113
can do an Unlock, the alarm is already off.
You are correct in using the Arm and Disarm wires instead of the Lock and Unlock wires with a normal 4 button R/S install.
I would still use the Lock and Unlock wires because the Arm and Disarm wires have slightly different functions ( there will be
an Arm output after a R/S shutdown, there is a Disarm before a trunk release, etc. )
Got it. Thanks for the clarification.
I noticed on some R/S modules, there is an Arm after Start/Lock wire and a separate Arm after Shutdown wire. Must vary from alarm to alarm.
Posted By: esaah6
Date Posted: January 03, 2017 at 7:51 AM
Hi Folks. Happy New Year! Well, I finally completed the wiring and everything works beautifully. Kreg, you da man! My fingers, back, and neck are killing me, but you know what they say: No Pain, No Gain.
Just two minor things:
1) When I shutdown the remote-start, the headlights stay on until someone physically opens then closes the door.
2) I couldn't find the horn wire. According to bulldog, it should be a gray wire at pin 11 on a white 16-pin plug in the dash fuse box.
-------------
Let's do this!
Posted By: esaah6
Date Posted: January 03, 2017 at 9:46 AM
In regard to minor thing #1 (see last post), it may be caused by a switch on one of the panels as I haven't reinstalled the panels yet. I'll keep you posted.
-------------
Let's do this!
Posted By: prince504
Date Posted: January 03, 2017 at 11:52 AM
esaah6 wrote:
Hi Folks. Happy New Year! Well, I finally completed the wiring and everything works beautifully. Kreg, you da man! My fingers, back, and neck are killing me, but you know what they say: No Pain, No Gain.
Just two minor things:
1) When I shutdown the remote-start, the headlights stay on until someone physically opens then closes the door.
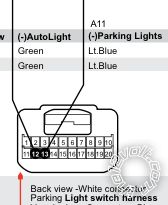
It looks like the Avital 4113 doesn't have a "pulse after shutdown" output. Normally, you would connect this output to your door trigger to send a (-) pulse after the remote start times out to "trick" the car into thinking someone opened the door -- and your lights would turn off.
You need to interrupt the AutoLight (-) wire at the parking light harness -- by cutting it -- with a SPDT relay. It should be the Green wire at Pin 12 on the 20 pin White connector to the left side of the steering wheel.
Pin 86: +12 constant fused
Pin 85: GWR output of the alarm
Pin 87a: AutoLight wire white connector side
Pin 30: AutoLight wire motor side
Pin 87: ** empty
I would also add a diode between Pin 85 and 86 -- with the band facing Pin 86 -- to suppress any voltage spikes after the relay is de-energized.
Posted By: kreg357
Date Posted: January 03, 2017 at 7:42 PM
The diagram above is a good way to prevent the Auto headlight from initiating during a R/S. Another way to prevent battery
run-down is to use the Arm output of the Viper to a Door Pin. It won't be instantaneous but the Headlights will shut off
after 30 seconds. This was mentioned in another Toyota Pictorial, the 2015 and up Sienna with H Key, and is copied below :
If your Sienna has Auto Headlights, be forewarned that with a certain sequence of events the battery can be inadvertently
drained. If the van was parked with the headlight switch in the Auto position and the van was remote started at night and
then remotely shutdown, the headlights would remain on until the battery was drained. Connecting the R/S (-) Rearm
output wire to the driver door pin would make the van think a door was opened after the engine was turned off and
the headlights would be turned off after 30 seconds.
-------------
Soldering is fun!
Posted By: prince504
Date Posted: January 03, 2017 at 9:10 PM
kreg357 wrote:
The diagram above is a good way to prevent the Auto headlight from initiating during a R/S. Another way to prevent battery
run-down is to use the Arm output of the Viper to a Door Pin. It won't be instantaneous but the Headlights will shut off
after 30 seconds. This was mentioned in another Toyota Pictorial, the 2015 and up Sienna with H Key, and is copied below :
If your Sienna has Auto Headlights, be forewarned that with a certain sequence of events the battery can be inadvertently
drained. If the van was parked with the headlight switch in the Auto position and the van was remote started at night and
then remotely shutdown, the headlights would remain on until the battery was drained. Connecting the R/S (-) Rearm
output wire to the driver door pin would make the van think a door was opened after the engine was turned off and
the headlights would be turned off after 30 seconds.
I thought the Factory Alarm Rearm wire only pulses right after the Disarm -- to lock the door right after remote start.
Or is it different with the Avital? Not familiar with DEI products.
Posted By: kreg357
Date Posted: January 04, 2017 at 3:28 AM
You might be right on an Avital 4113 about the Rearm wire output. I'm not a big DEI user. Probably best to test this wire
with a DMM. Most DEI products seem to follow this Rearm wire description :
This wire sends a negative pulse every time the remote start shuts down or when the doors are locked with the remote.
-------------
Soldering is fun!
Posted By: chev104275
Date Posted: January 04, 2017 at 5:57 AM
The rearm wire should work for the door pin shutdown. I use it all the time on 4103s that way. I would think the 4113 is the same. It pulses a ground after shutdown
-------------
If i Can't Install it I Don't need it Joe
Posted By: esaah6
Date Posted: January 21, 2017 at 8:28 AM
Thank you everyone. The lights go out now. Awesome! One last thing...I tried using the valet takeover, but I can't seem to get it to work. The instructions say that I have to press the remote for 1 second, then I should be able to remove the key and keep the engine running. I tried, but it doesn't do anything. The car just shuts off after I turn the key to off.
Here's the backstory: A couple weeks ago I tried to run the valet take-over by holding down the remote button for a few seconds while the engine was running with the key in the ignition, but I think that it messed something up (maybe I held it down for too long). After that, the remote start would run the engine for 10 seconds and cut out. I switched the engine check setting to off, and that seemed to fix it, until I reopened everything to attach the wires for the lights to go out (see previous posts) and maybe I crossed something, who knows, but after that, the remote couldn't even get the starter to run. Kept getting a low tach/low voltage diagnosis. The starter output voltage was good so I figured something got screwed up in either the pkall or the Avital. I decided to return the items and get new ones (actually got a better deal so it's all good). Plugged in the new ones using the wires and harnesses that I already soldered, and voila everything works beautifully.
Long story short, I'm afraid to mess around by trying the valet takeover as I believe this messed things up with the first one. It's so minor that I really don't mind, but if anyone out there has any experience with the valet takeover on the Avital 4X03 one-button, I would love to hear their input. Also, I would love to hear anyone's theories about what went wrong in the first place. Anyway, thanks again everyone. Your help was absolutely essential to my completion of this project. Best Wishes.
-------------
Let's do this!
Posted By: esaah6
Date Posted: January 23, 2017 at 8:38 AM
I have the remote start programmed to activate with two pulses from the remote. Therefore, do I need to press the remote start twice for valet takeover to work? As per the instructions, I've been trying to activate valet takeover by "pressing the remote for 1 second". They don't mention if the pulse setting for remote activation affects the procedure for valet takeover, but I would imagine that it would. Maybe this is my problem. Like I said in my previous post, I'm afraid to mess with it until I can get a confirmation from someone.
-------------
Let's do this!
Posted By: chev104275
Date Posted: January 23, 2017 at 11:41 AM
To activate take over you would do the same as you would to remote start the car ( 2 button presses ) don't hold the brake while doing it
As far as not starting after rewiring the lights maybe you partially unplugged a connector just enough to look OK but not make a connection
-------------
If i Can't Install it I Don't need it Joe
Posted By: esaah6
Date Posted: January 23, 2017 at 11:58 AM
Thanks Chev. I'll give it a shot when I get home.
-------------
Let's do this!
Posted By: esaah6
Date Posted: January 23, 2017 at 12:18 PM
In the "Warning! Safety First" section of the installation guide, it says the following:
Except when performing the Safety Check outlined in this installation guide,
(1) Never remotely start the vehicle with the vehicle in gear, and (2) Never remotely start the vehicle with the
keys in the ignition.
Aren't we performing #2 when we try to activate valet takeover? LOL...these instructions are rife with errors and contradictions. They may manufacture a decent system, but they really don't like making things easier for the DIYer.
-------------
Let's do this!
Posted By: chev104275
Date Posted: January 23, 2017 at 1:42 PM
Yea they don't cater to DIY
-------------
If i Can't Install it I Don't need it Joe
Posted By: esaah6
Date Posted: January 25, 2017 at 8:02 AM
Chev, thank you. The valet take-over works. The only problem is that I can't lock the doors when it's in valet take-over. I thought I would be able to lock them by pressing the lock button on the door. When I press it, the doors lock, but then immediately unlock themselves. Weird.
I guess this is true for the remote start in general. Once unlocked, it cannot be re-locked (at least not electronically).
-------------
Let's do this!
Posted By: kreg357
Date Posted: January 25, 2017 at 8:14 PM
That is why it is not recommended to use a one button remote start on a Toyota, you can't get PitStop Mode to work. Not only does Toyota turn off the factory remotes when the engine is running but it won't allow you to lock the keys in the car.
Some people have found a "work around". Check out the Pictorial on the 2013 RAV4 for more info. You might be able to do something similar to your Highlander.
-------------
Soldering is fun!
Posted By: esaah6
Date Posted: January 26, 2017 at 8:09 AM
Thanks Kreg. I think I'm just going to bring my valuables with me whenever I use it, which probably won't be very often, if at all.
Thanks again, everyone. This will probably be my last post. It's been an adventure with high points and low points and you guys stuck with me every step of the way. I truly appreciate it. Best wishes.
-------------
Let's do this!
|