momentary start to kill lights
Printed From: the12volt.com
Forum Name: Relays
Forum Discription: Relay Diagrams, SPDT Relays, SPST Relays, DPDT Relays, Latching Relays, etc.
URL: https://www.the12volt.com/installbay/forum_posts.asp?tid=123370
Printed Date: May 09, 2026 at 8:24 AM
Topic: momentary start to kill lights
Posted By: ujmchris
Subject: momentary start to kill lights
Date Posted: September 05, 2010 at 12:55 PM
Hey everyone, 1st post here. Hopefully I'm posting in the right spot, please inform me if I'm not. I did search but didn't see anything. Hopefully this isn't to much of a newb question.
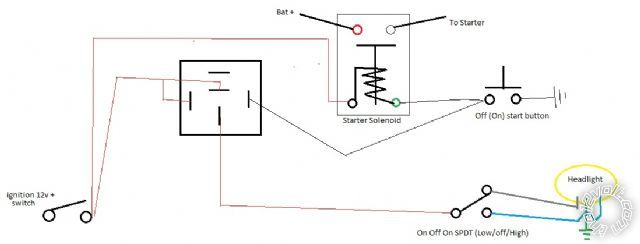
Here is my situation. On a vehicle I'm building, I need the headlights on all the time, but would like them to be temporarily off when starting. I put together the below circuit which, to me, would accomplish this task quite nicely. I didn't include fuses in the drawing, but they will be included. My only question is, is there a problem grounding both the relay and the starter relay with one momentary switch? Do I need to include any diodes?
Any help will be greatly appreciated!
Replies:
Posted By: Velocity Motors
Date Posted: September 05, 2010 at 12:57 PM
How long do you want the time duration for the lights to be off during start ?
-------------
Jeff
Velocity Custom Home Theater
Mobile Audio/Video Specialist
Morden, Manitoba CANADA
Posted By: ujmchris
Date Posted: September 05, 2010 at 1:03 PM
They only need to be off until the engine has started. The battery has a small capacity and I would like max voltage to the ignition and starter while starting until the charging system kicks in.
Posted By: howie ll
Date Posted: September 05, 2010 at 1:12 PM
Diagramme is quite correct, diode between starter switch and relay, 1 amp in line. Jeff, I think our poster might need a timed relay to answer your question, such as a 528t replacing the left hand relay.
Being my normal anal self why is the switch bottom right labelled SPDT when if it's hi-lo beam switch it should be an SPCO.
-------------
Amateurs assume, don't test and have problems; pros test first. I am not a free install service.
Read the installation manual, do a search here or online for your vehicle wiring before posting.
Posted By: ujmchris
Date Posted: September 05, 2010 at 1:35 PM
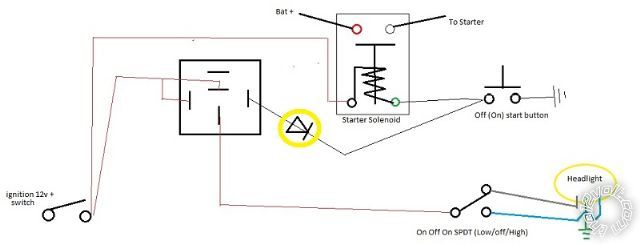
Just to be sure, the diode goes here?
And about the switch, sorry, I did indeed label it wrong, it should be a SPCO
Posted By: howie ll
Date Posted: September 05, 2010 at 1:39 PM
Correct.
-------------
Amateurs assume, don't test and have problems; pros test first. I am not a free install service.
Read the installation manual, do a search here or online for your vehicle wiring before posting.
Posted By: Velocity Motors
Date Posted: September 05, 2010 at 1:44 PM
Why not wire up the headlights to an ACC source or wire it through a relay triggered by an ACC source. The ACC circuit drops out during crank.
-------------
Jeff
Velocity Custom Home Theater
Mobile Audio/Video Specialist
Morden, Manitoba CANADA
Posted By: ujmchris
Date Posted: September 05, 2010 at 1:46 PM
Thanks so much! I'm off to finish my wiring 
Posted By: ujmchris
Date Posted: September 05, 2010 at 1:51 PM
Velocity Motors wrote:
Why not wire up the headlights to an ACC source or wire it through a relay triggered by an ACC source. The ACC circuit drops out during crank.
This is an old motorcycle which doesn't really have an ACC circuit to be cut during cranking. That is basically what I'm trying to accomplish, (all non-vital circuits being cut while cranking).
Posted By: dualsport
Date Posted: September 06, 2010 at 3:29 PM
If you want to try something different, there's a simple circuit you can use to keep the lights off until after you press and release the starter, if you want to maximize the battery. It uses the starter as a virtual ground when it's not being cranked. I can post it up if interested- Uses two relays, one power relay to switch the headlight power, and one small trigger relay.
I installed it on a motorcycle that has HID lights, because I didn't want the lights cycling on when the ignition is turned on, and then going out again when cranking. This way the lights stay off when you switch the ignition on, and only come on after you crank the bike and release the starter again. At that point the bike is presumably started, so the headlights can come on.
Posted By: dualsport
Date Posted: September 06, 2010 at 3:52 PM

Had some spare time, so I posted it up anyway, interested or not- 
The starter pulse input is connected to the actual starter motor, not the relay. When not cranking, it will basically act as a ground for the relays, because it's so low in resistance. The rest is pretty much self explanatory.
Posted By: oldspark
Date Posted: September 06, 2010 at 8:35 PM
Why not do the above with one relay instead of having the latching IGN (upper) relay?
Posted By: dualsport
Date Posted: September 06, 2010 at 11:46 PM
Because the upper relay allows the lights to remain off for the period of time when the ignition is first switched on to the point where cranking begins.
With an HID headlight this prevents double striking the HID ignitor circuit each time the bike is started. The single relay may be used if all you want to do is kill the light during the actual cranking time, but the benefit of the latching relay is worth the small additional cost, if that's the concern.
Posted By: oldspark
Date Posted: September 07, 2010 at 10:22 PM
Excellent!
Sorry - I'm so used to extra componentry for no reason - usually due to convoluted thinking; sometimes due to missed simplified alternatives.
Posted By: howie ll
Date Posted: September 08, 2010 at 9:53 AM
Thank you spark and sport for coming in here, I was treading water waiting for one of you to come up with something here.
-------------
Amateurs assume, don't test and have problems; pros test first. I am not a free install service.
Read the installation manual, do a search here or online for your vehicle wiring before posting.
|