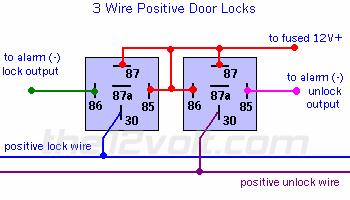
Hi, I'm new to all of this so please forgive me for my lack of knowledge. I saw the diagrams for unlock and lock with and without an alarm system. I have right now a Code alarm in my 95 Lesabre and I would like it to auto lock and unlock when I start and shut off the car.
Can someone point out the right complete set or relays to wire up and what color wires I would hook them up to?
I guess the best place to put this set of relays is under the dash right?
Thanks...
-------------
Oliver
You can start with the diagram below. Ask question if you are stuck on the install.
You can place the relays anywhere you find room. Make it neat and tied it up so that it doesn't interfered with any moving parts underneath the dash.
Power Lock lt. blue + either kick panel
Power Unlock white + either kick panel

DIRECTWIRE™ WIRING INFORMATION - BUICK / LESABRE / 1995 / Security
12volts red + ignition harness
Starter yellow + ignition harness
Ignition pink + ignition harness
Power Lock lt. blue + either kick panel
Power Unlock white + either kick panel
Lock Motor gray drivers door harness
Unlock Motor tan drivers door harness
Disarm Defeat tan passenger door harness
Parking Lights+ brown low in drivers kick panel
Parking Lights-
Hazards
Turn Signal(L)
Turn Signal(R)
Door Trigger dk. blue or white - drivers door harness
Dome Supervision use door trigger
Trunk/Hatch Pin ORANGE / black - trunk light or switch
Notes: Models with a trunk ajar indicator have a RED / black low in the drivers kick panel.
Hood Pin
Trunk/Hatch Release BLACK/ white + low in drivers kick panel
Power Sliding Door
Factory Alarm Arm
Factory Alarm Disarm lt. green - drivers door harness
Disarm No Unlock
Tachometer PURPLE / white AC ignition coil
Notes: You may also use white at the back of the instrument cluster.
Horn Trigger black - steering column
Memory Seat 1
Memory Seat 2
Memory Seat 3
Immobilizer Bypass Module: Required: Yes Type: VATS Part #: 652T resistor pack
Notes: See DirectFax document 1049 for interface information.
This wiring information is being provided free of charge on an "as is" basis, without any representation or warranty. It is your responsibility to verify any circuit before interfacing with it using a digital multimeter.
Directed electronics, Inc. assumes no responsibility with regards to the accuracy or currency of this information. Proper installation in every case is and remains the responsibility of the installer. DEI assumes no liability or responsibility resulting from improper installation, even in reliance upon this information.
-------------
Be careful whose advice you buy, but be patient with those who supply it.

Thanks for the helpfull and quick responce. I will give it a try.

-------------
Oliver


