First Time with Fiberglass Santa Fe
Printed From: the12volt.com
Forum Name: Fiberglass, Fabrication, and Interiors
Forum Discription: Fiberglass Kick Panels, Subwoofer Enclosures, Plexiglas, Fabrics, Materials, Finishes, etc.
URL: https://www.the12volt.com/installbay/forum_posts.asp?tid=91179
Printed Date: April 02, 2026 at 5:00 AM
Topic: First Time with Fiberglass Santa Fe
Posted By: spawn12336
Subject: First Time with Fiberglass Santa Fe
Date Posted: March 02, 2007 at 8:16 AM
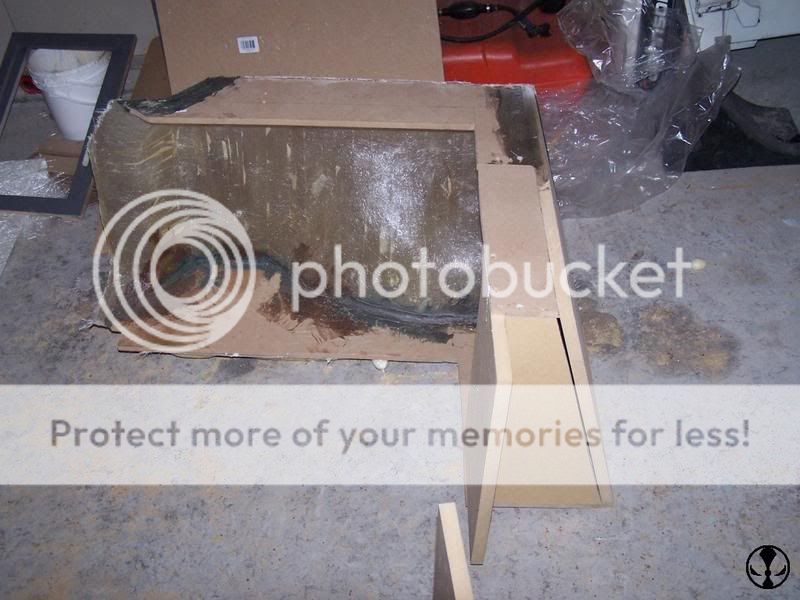
Figured I would throw this up for the pro's opinions. It was my first time playing with FG. After 3 months of research and design, I finally jumped in and started a full redesign on my sub boxes. I've been taking most of the lessons learned here and on mp3car.com. The ride is a 2004 Hyundai Santa Fe, not your typical show ride, but that's why I did it up, that and I got a fantastic deal on it as my wingman was the salesperson. Here is what I started with. The gaping hole was from the previous boxes I had made, the subs stuck too far back so they cut out some of the moulding. Not a big deal, they asked me prior to doing it anyway. 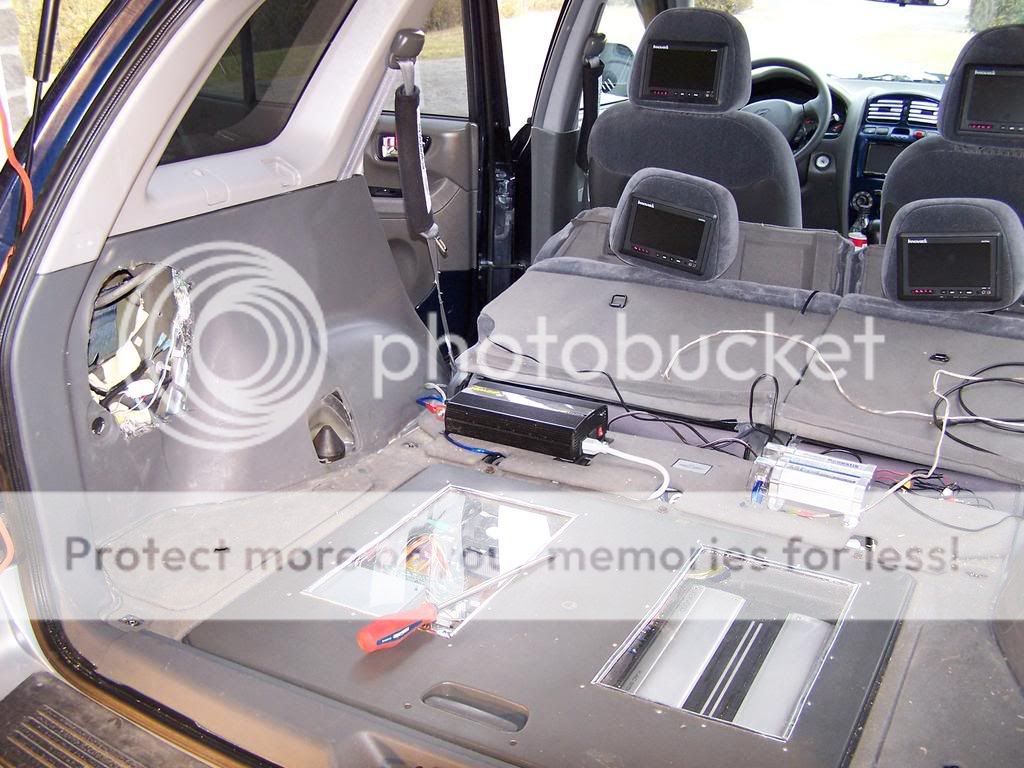
Did all the taping and layed down my first layer of glass. The first time, it was -10 degrees (I'm in Canada), and I didn't know that the glass wouldn't cure that cold. So the pics are actually from the second attempt. I only did 2 layers of glass to get the shape first. 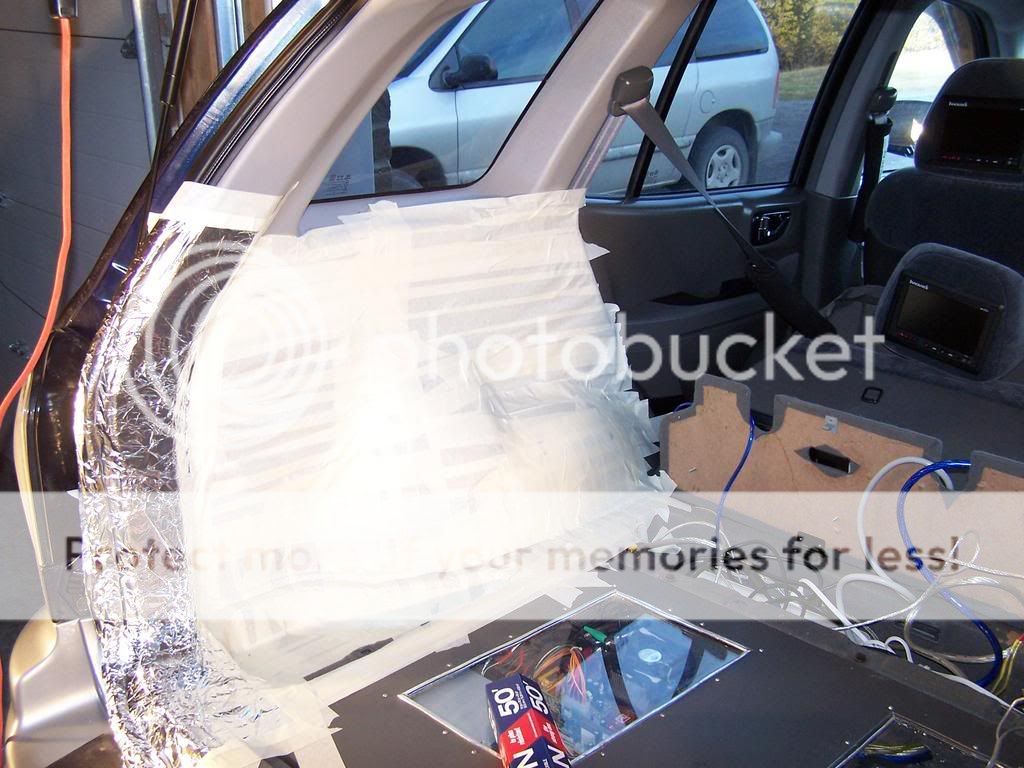

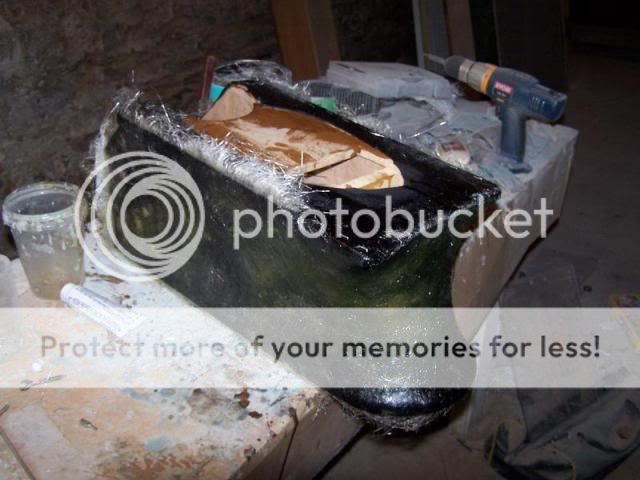
[IMG]https://i15.photobucket.com/albums/a376/spawn12336/Fibreglass/Fibreglass009.jpg[/IMG] I built the top and bottoms from MDF and attached them to the mould with shortstrand bondo glass. The original boxes had an issue with being sealed properly, so even though it's more work, I am taking extra steps to make sure that all seams are perfectly sealed. 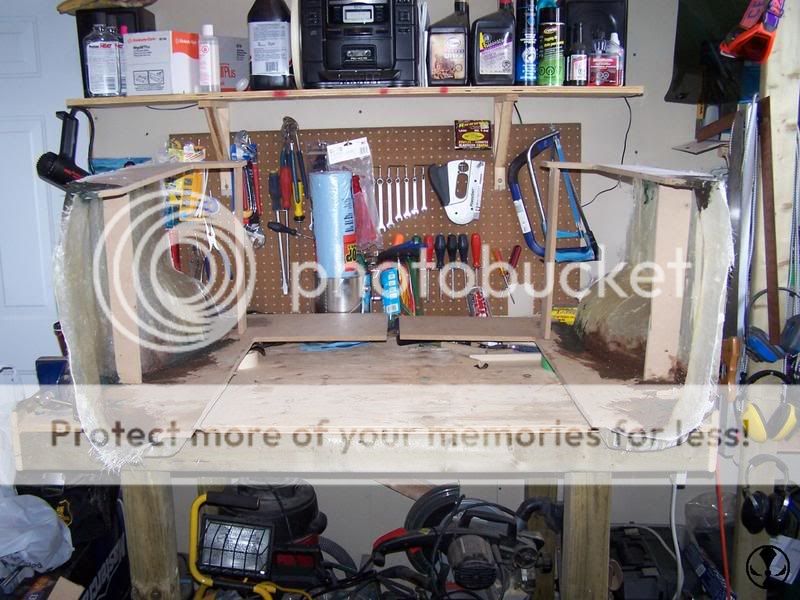
On each side of the the cargo area are 2 little storage areas that are going to be used as the slot-b to the boxes tab-a. I filled them with expanding foam to stabilize them even more. 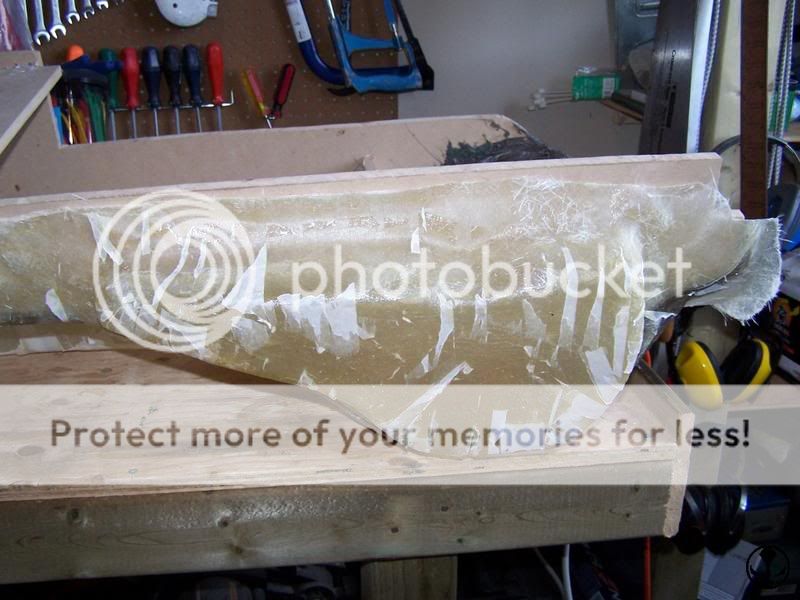
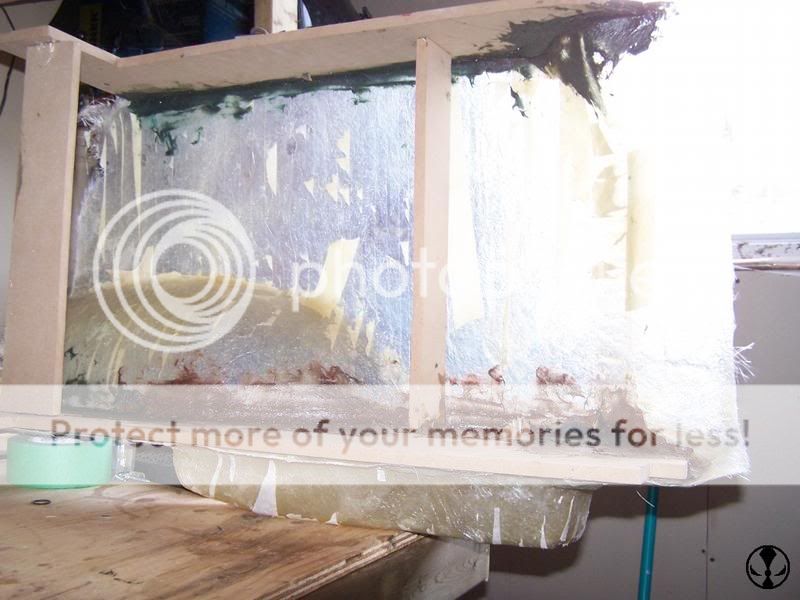
The floor and top were made with 1/2" MDF as they were going to be glassed over anyway, but the panel behind the seat is made of 3/4" mdf. Screwed, glued, and glassed in at the seams. 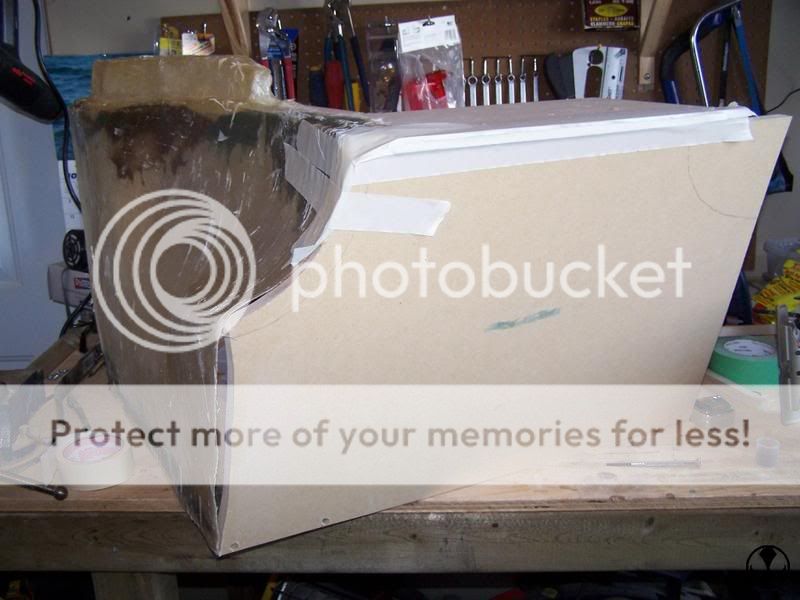
Again, I am working in an un-heated garage, so my best helpers are 2 small space heaters to help with the curing. 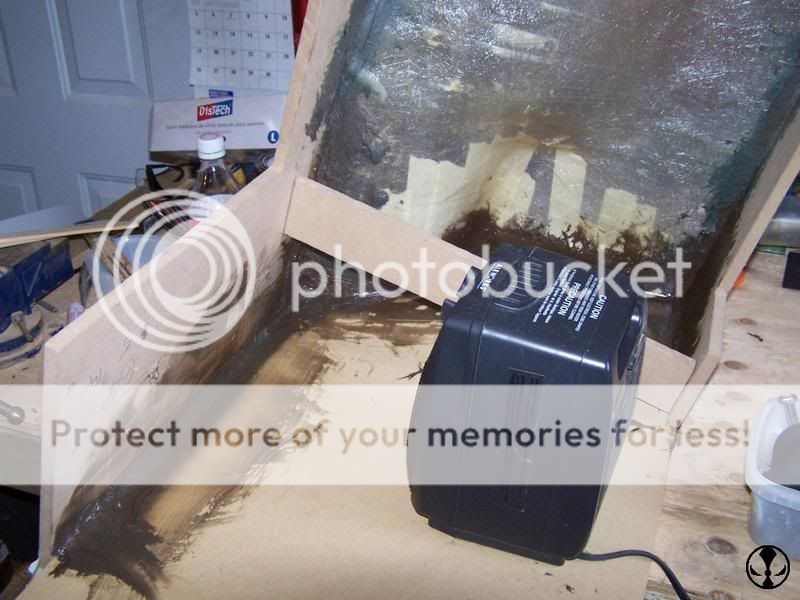
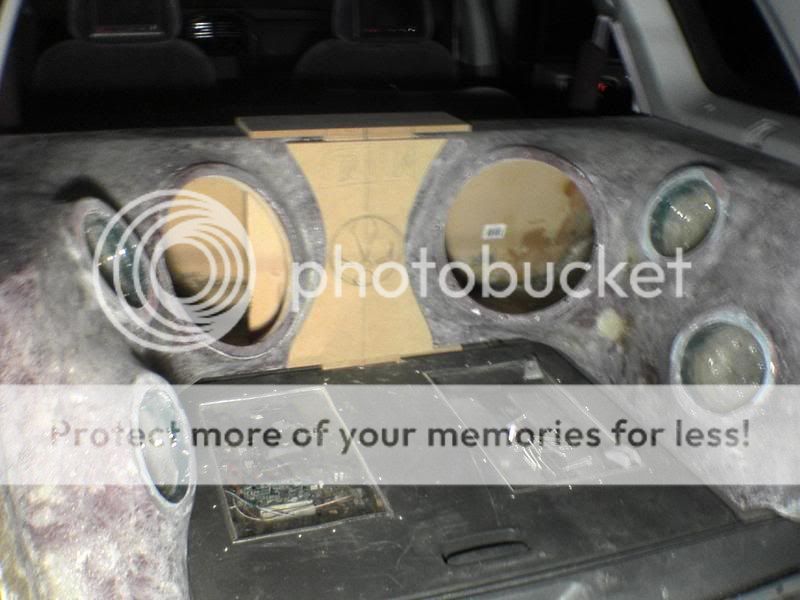
This was the structural base complete. It's 2 seperate sealed boxes, and a trim piece will be covering the join between the 2. 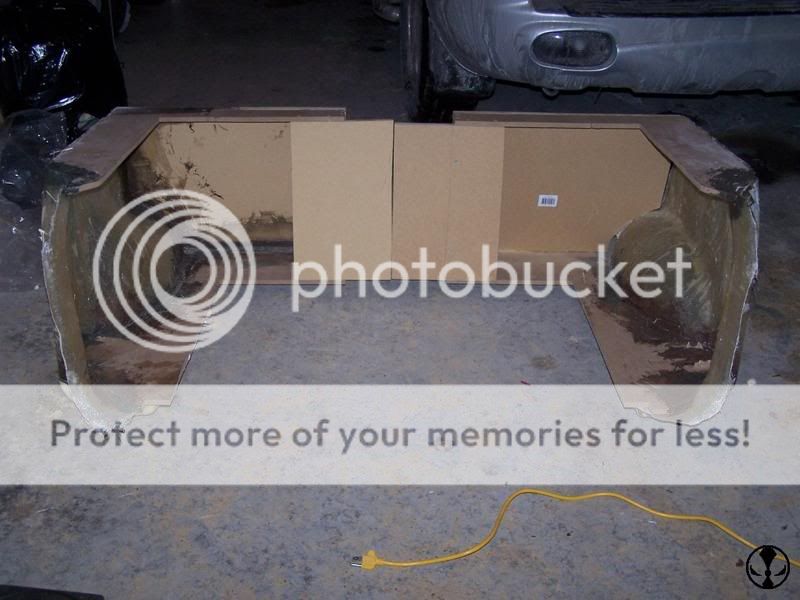
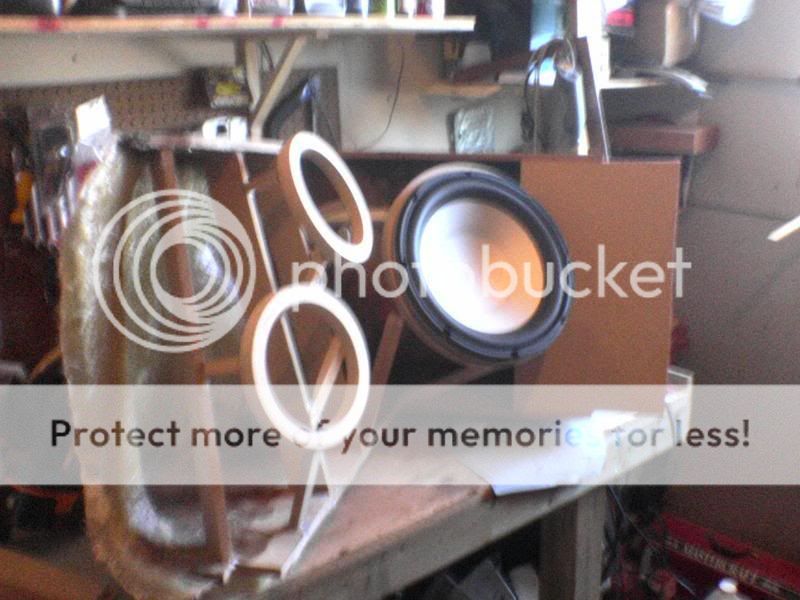
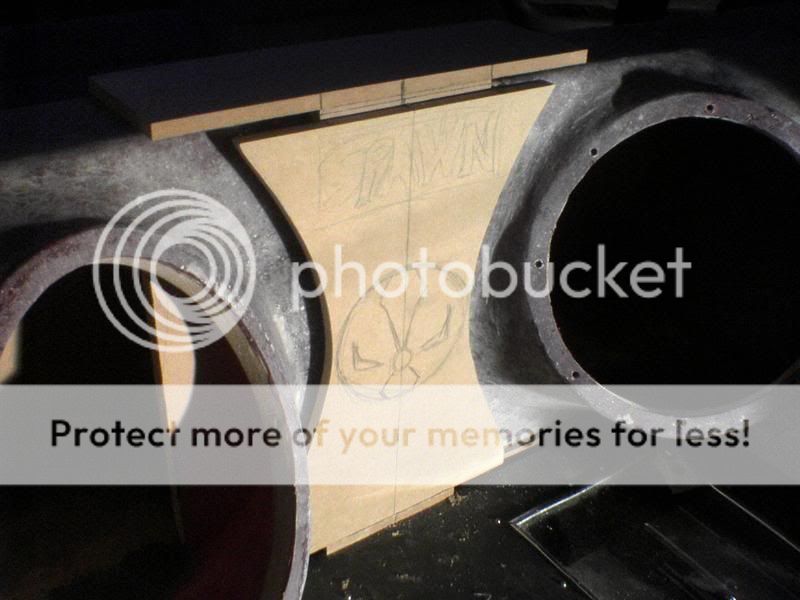
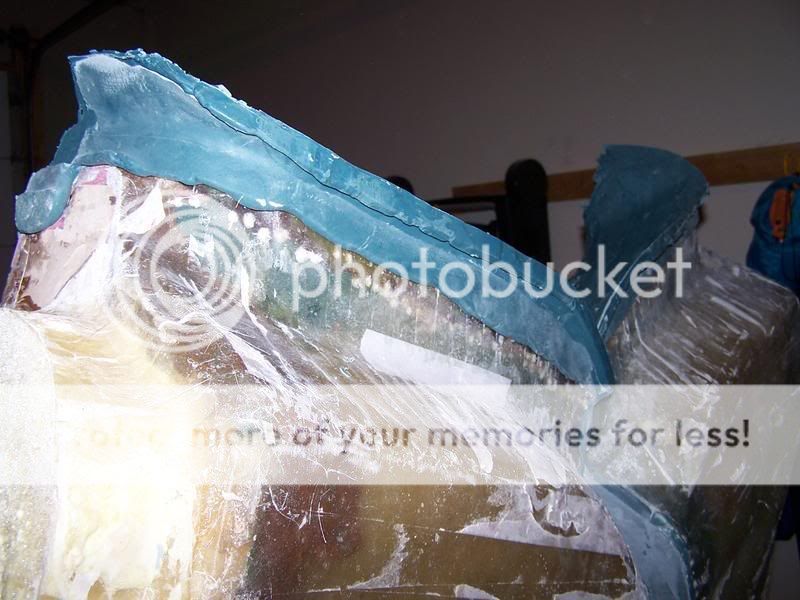
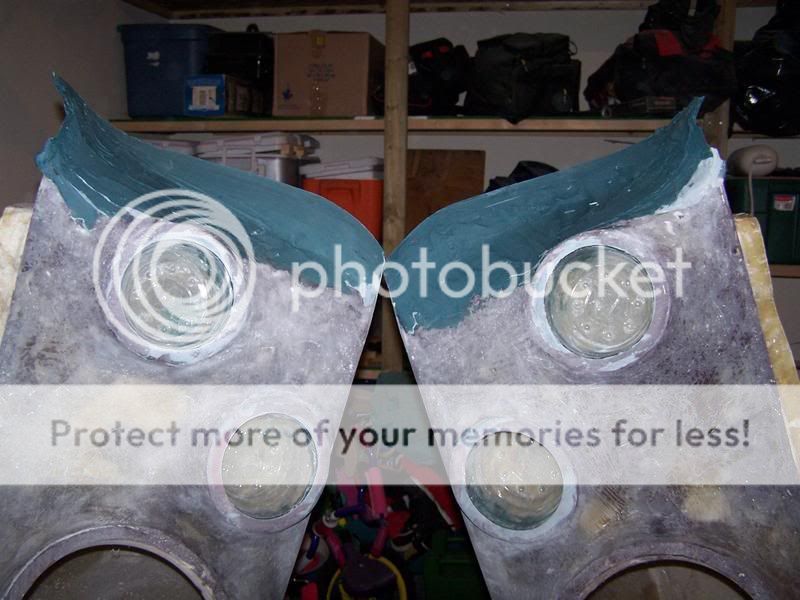
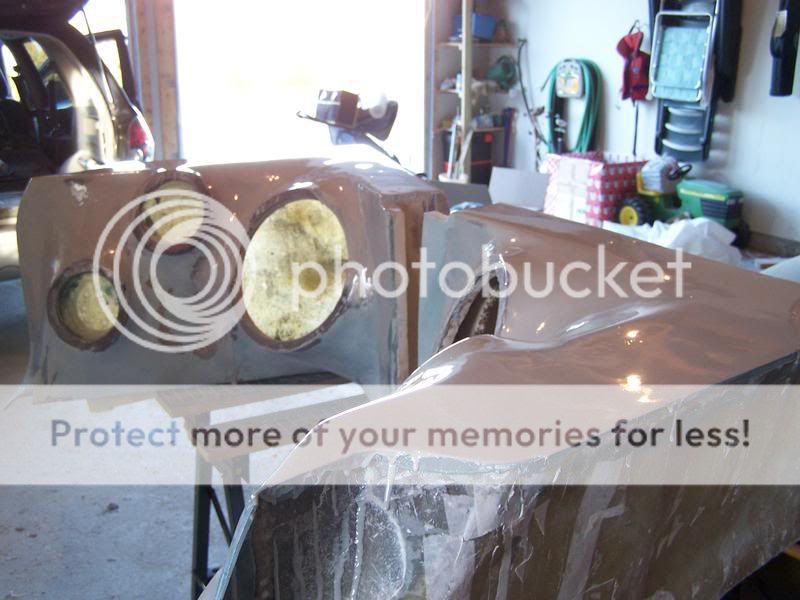
After 5 layers of glass on each piece, the speaker rings and support structure went in, with a test fit of the new subs. Most of the framing is either just for support of the rings and a few of the pieces that look randomly placed are there to give me place to staple the fabric down and shape the curves (freaking geometry) 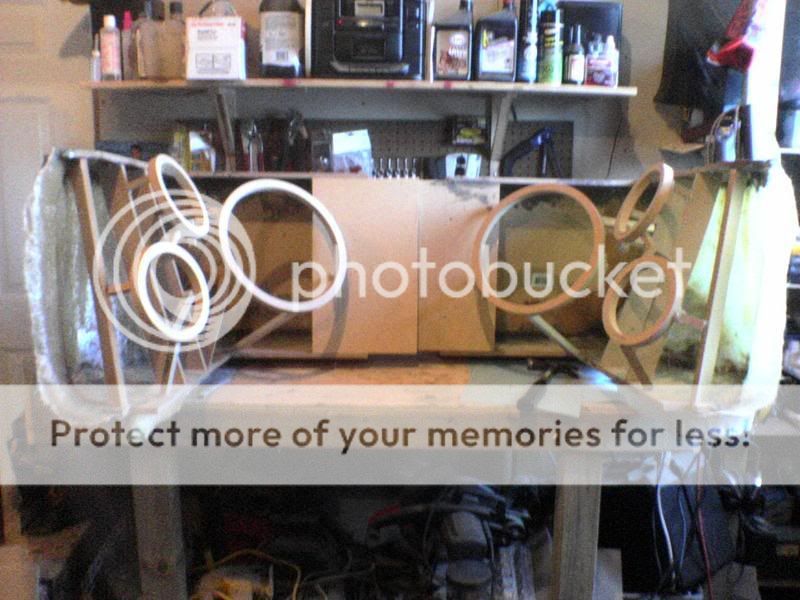
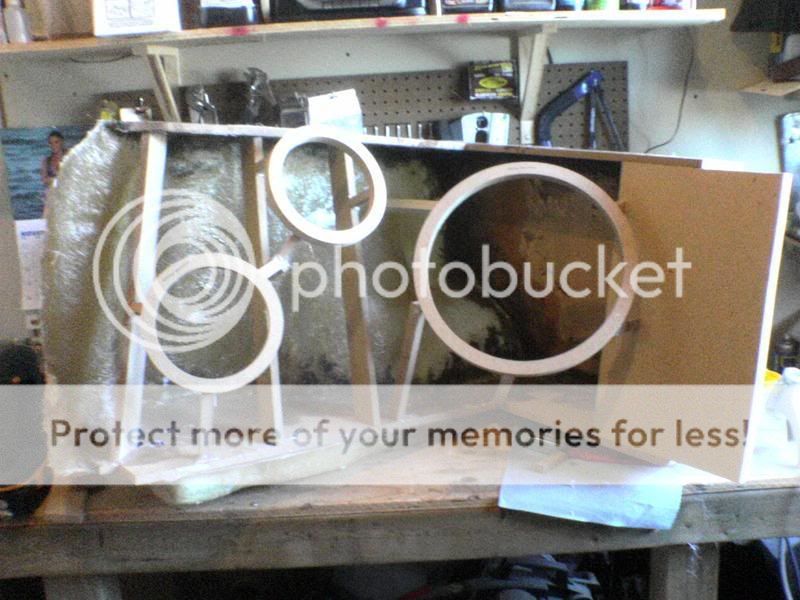
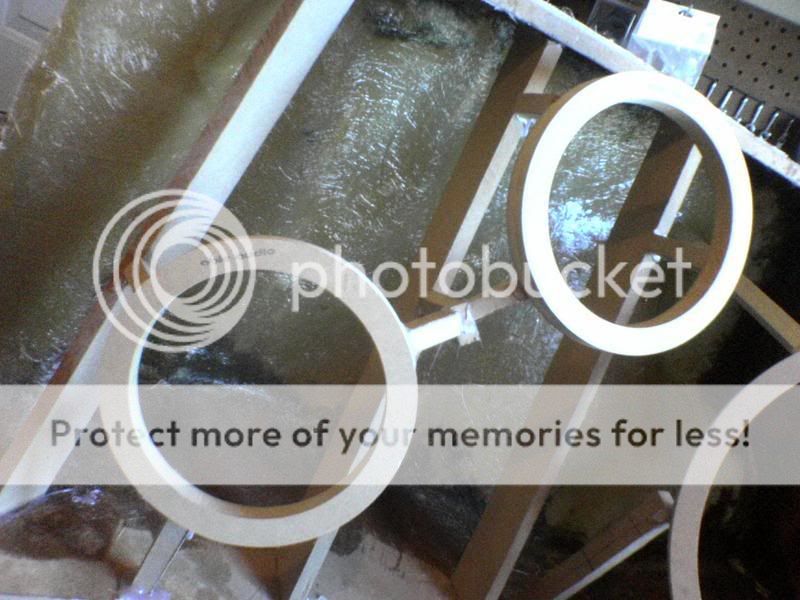
Here the are fleeced and one side has resin, these pics suck as they were from my phone. I was supposed to be laying on 5 layers of glass today, but thanks to this freaking storm, I won't be driving 50 km out to the boondocks to work on it, until maybe later. Before the questions get asked, The expected interior volume is 1.6 Cubic feet including the displacement of the speakers. The 6.5" speakers are isolated from the sub volume with FG compartments. What look like holes in the fleece are where it was stapled to the extra supports to shape the curves deeper, and will be filled and flattened out. 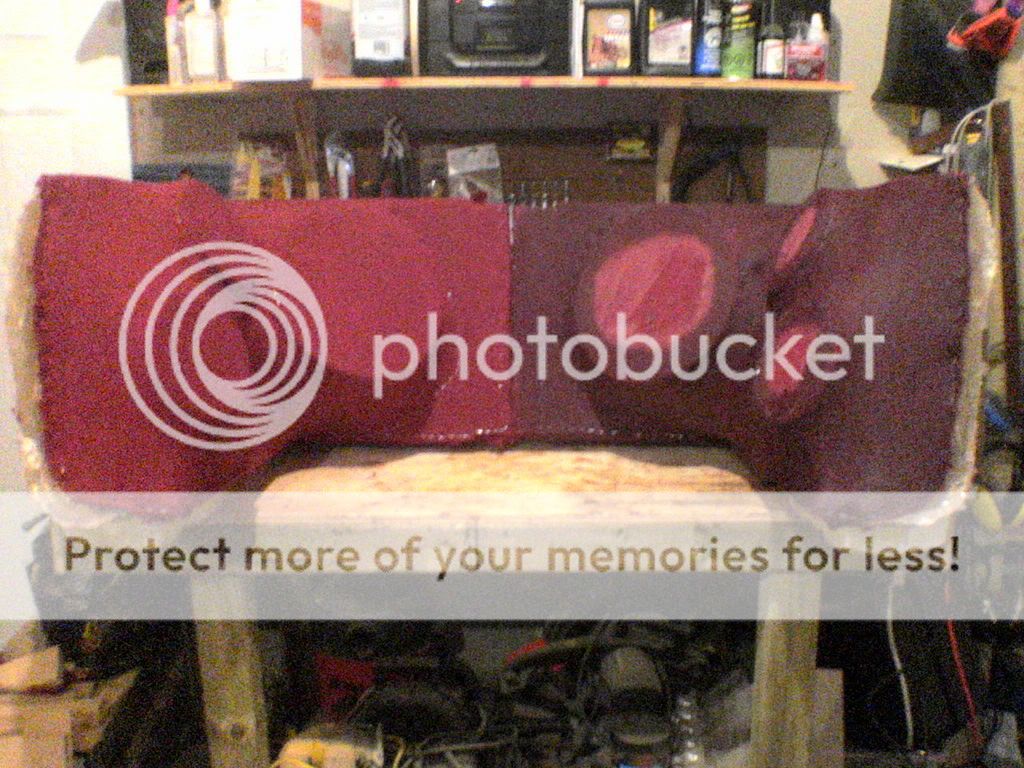
------------- "the universe has a way of balancing itself"
Replies:
Posted By: racerx22
Date Posted: March 04, 2007 at 8:45 PM
Looks frickin awesome. i miss my santafe
Posted By: pmendoza408
Date Posted: March 12, 2007 at 12:34 AM
that looks really cool cant wait to see it finished>.
Posted By: spawn12336
Date Posted: March 12, 2007 at 2:07 PM
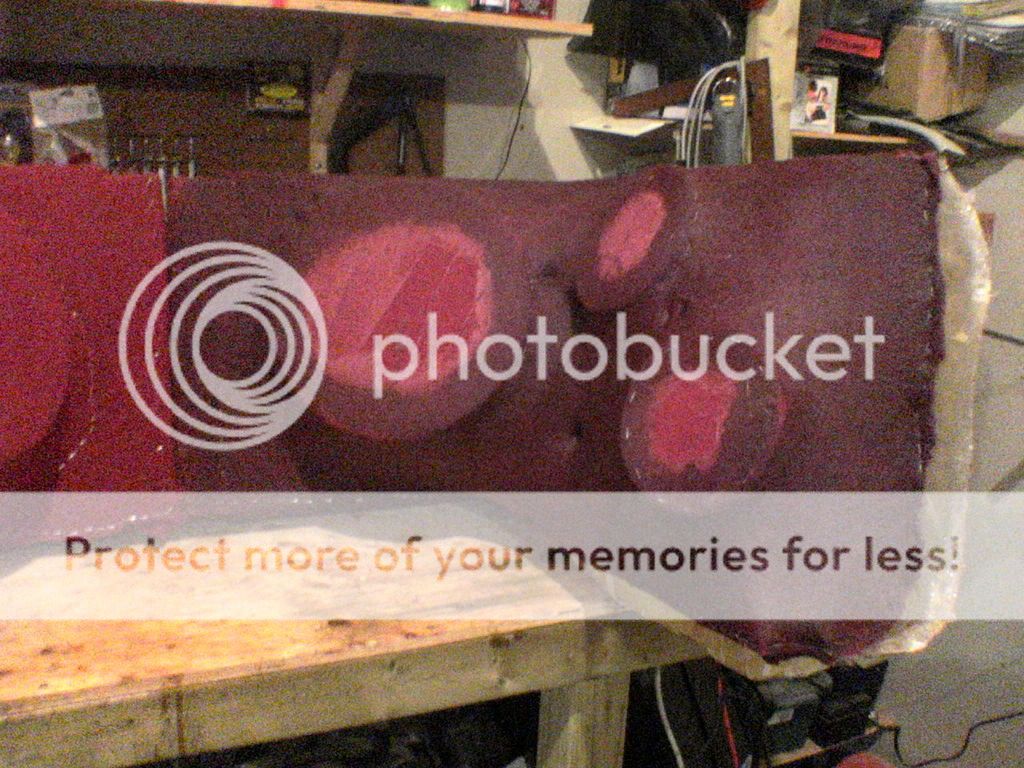
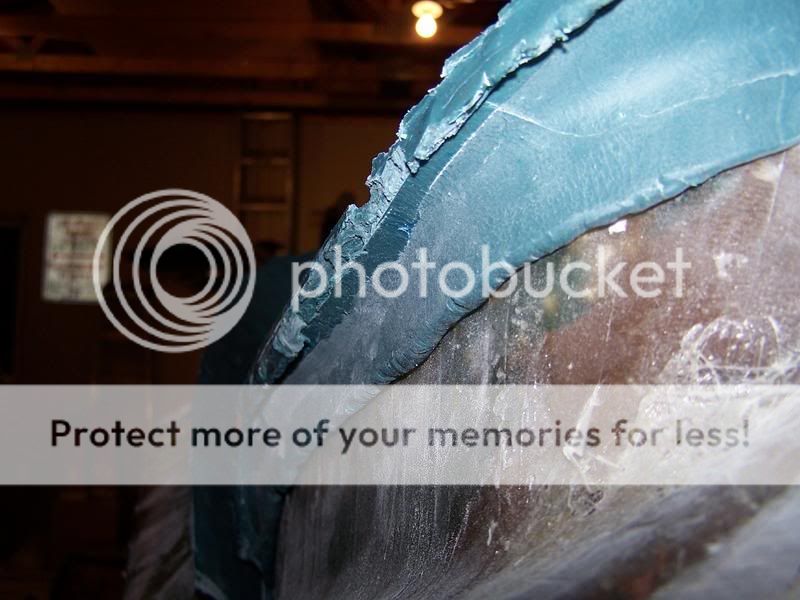
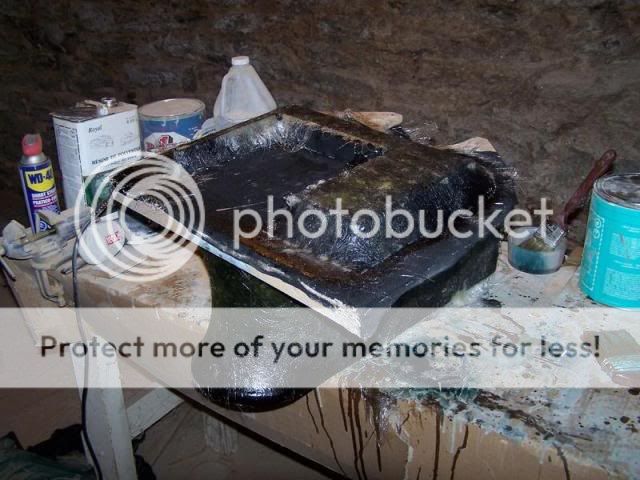
This is definitely the ichiest I have ever been. Saturday was the first sanding day. I smoothed down the irregularities, and made the flat parts nice and smooth. I also glassed in the chambers for the 6.5" speakers. All of the structural supports that were used during fleecing were removed as they aren't needed anymore for strength, the glass handles that now. Sunday was supposed to be the first layer of bondo, followed by the milkshake layer. I am now using Evercoat Plus 1 filler and shortstrand. According to Evercoat it is their replaccement for Rage Gold in Canada. This stuff blows Bondo out of the water in workability, and smells nowhere near as strong. Here is what I left with tonight.

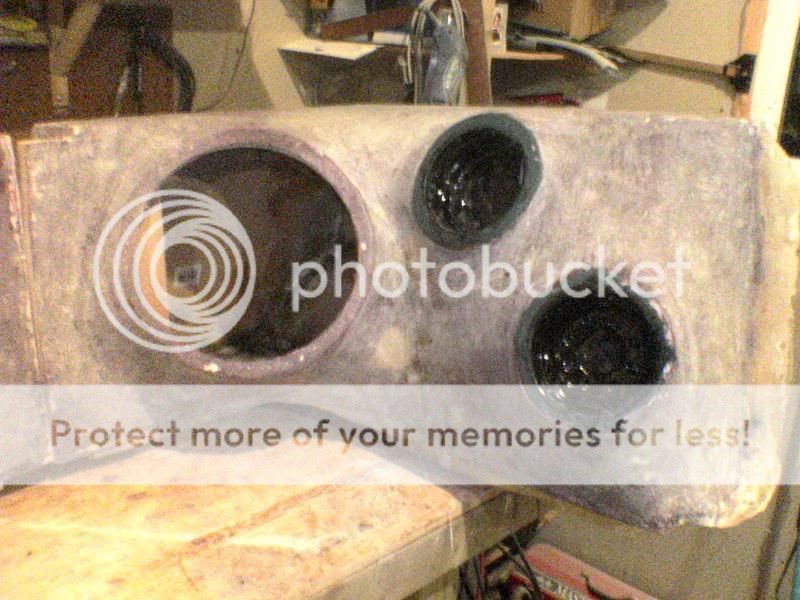 All the airspace I'll need for the new subs
 inside the box behind the small chambers.
 So much for Bondo Sunday. Freaking Daylight Savings Time, got there technically an hour late. Sanded off the excess of the small chambers and pulled out the plastic cups. Tried to mount one of the subs using the T-nuts, let's just say an hour wasted, T-nuts in the garbage. I realized that before I could bondo, I had to test fit everything again. So out with the current system, and in with the new. I also came to the conclusion that I needed to build the trim panel and do some taping before all of the bondo. The Trim panel itself took over 2 hours of trial and error to get it right and finally finished, well the frame of it anyway, I still have to bondo it as well. I also fabbed up the shelf for the cap that will be in between the 2 boxes. So all in all, no bondo, but still alot of progress. Don't worry about the scratched to doodiee floor, it will have a new trim panel for itself soon. 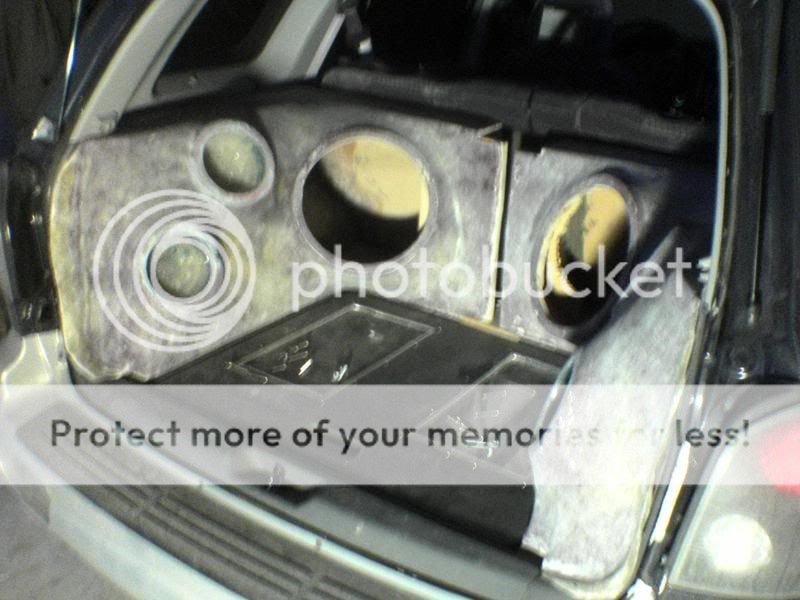
You can see the outline of the special bits that are going to be added and wired up....
 ------------- "the universe has a way of balancing itself"
Posted By: realitycheck
Date Posted: March 12, 2007 at 3:55 PM
Well spawn I've got to say for your first job, that actually looks quite amazing. Good job bud. I hope you enjoy it.
-------------
Learning the trade one fiberglass creation at a time!
Posted By: maliboom
Date Posted: March 12, 2007 at 5:03 PM
Good job. And I hear you on the daylight savings time, still screwin me up today.
Posted By: BUMPINT
Date Posted: March 12, 2007 at 8:05 PM
if thats your first fiberglass project, you got skills! great job!
Posted By: spawn12336
Date Posted: March 13, 2007 at 10:09 AM
Thanks guys. This is indeed my first fibreglass job, and technically my first sub box as well, I started with store bought boxes, then got a body shop to do up the original FG boxes. I wanted to make them exactly as I envisioned them , so after a boatload of reading/research and asking my local shop questions, I dove in.
-------------
"the universe has a way of balancing itself"
Posted By: bellsracer
Date Posted: March 13, 2007 at 12:15 PM
VNB! I would love to see the end product.
-------------
Never send your ducks to eagle school.
The difference between ordinary and extraordinary is that little extra.
The 3Ls of life: Learn from the Past, Live for the Present, Look to the Future.
Posted By: spawn12336
Date Posted: March 13, 2007 at 3:04 PM
I should be at a few of the northeast NOPI shows in the states, and of course the Nationals in Atlanta. I was hoping to be ready for the ATCO show, but it's not looking promising. And what in hades is VNB? ------------- "the universe has a way of balancing itself"
Posted By: spawn12336
Date Posted: March 14, 2007 at 8:18 PM
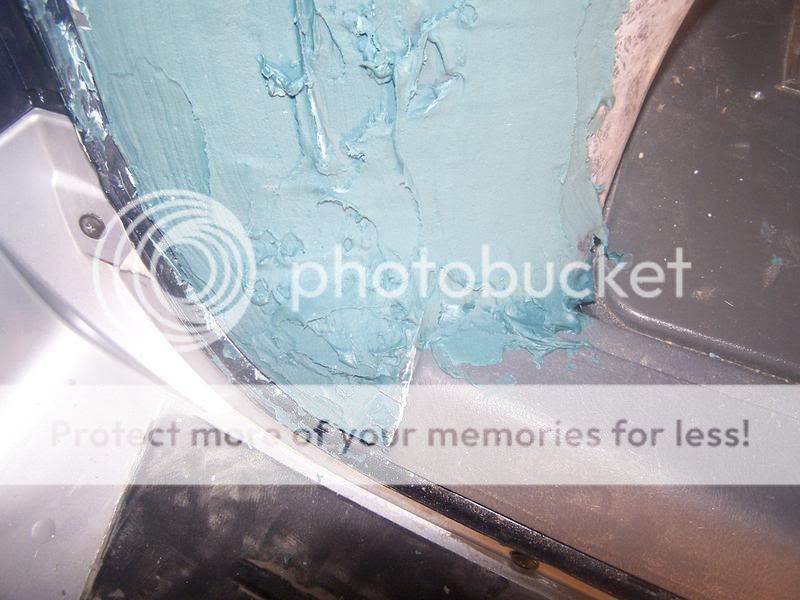
A few more shots from today's work (I have some time off)... In my fight against gaps between the boxes, I tried an experiment, and succeeded. Went out and got some premium shortstrand filler by evercoat (this s*** is gold by the way! I love it!) and figured that 3 years of detailing and armour all would prevent it from sitcking to the panels. BINGO! I was right. So today was spent filling all of the gaps and a little shaping at the edge to flow smoother. It took 2 layers, but the pics speak for themselves. 

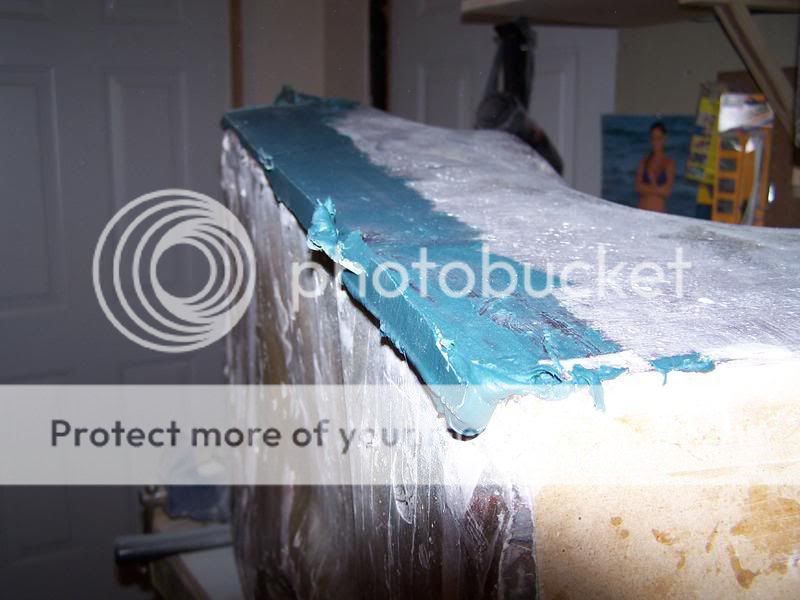

MMMMMMMMM.... TIGHT!!
 The only issue is that when you press the filler into the gap, it wants to fill ALL of the space, so it actually wraps around the panel making it slightly difficult to get out. A little carefull prying and "POP" she's out. You have to trim off the excess once it dries. Not a big deal.
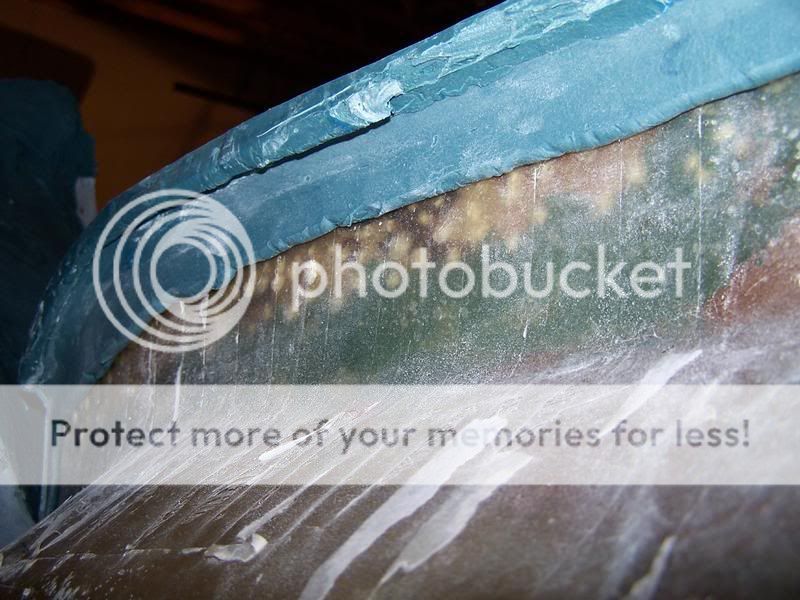
 This is how I left them tonight. Right up to the edge of the rubber strip on the door baby!
 ------------- "the universe has a way of balancing itself"
Posted By: realitycheck
Date Posted: March 15, 2007 at 2:59 PM
Dont get too close you might actually want to pull that back a little bit from the door, and the rubber strip. Trust me I know now from experience the door will hit it will chip the paint and maybe even crack your duraglass. Trust me on this.  ------------- Learning the trade one fiberglass creation at a time!
Posted By: CTOH
Date Posted: March 16, 2007 at 9:56 AM
You've got some skills to build on,,,one small suggestion when you float your edges in, run a layer of masking tape where you're going to dynaglass your edges, it will still give you a tight fit but you won't have to clean your panels off everytime and it acts as a release agent. Nice work though for a first build,,,
Posted By: spawn12336
Date Posted: March 16, 2007 at 6:47 PM
Thanks for the props guys. I went up to the edge to give me enough thickness that when I trim it back 1/4" it would still be strong enough to not have to worry about it cracking. Normally I would have run a line of masking tape, but all I had around was green painters tape, and with 3 years of detailing, it was sliding off faster than an egg on teflon. The excess came off with a little acetone and gentle rubbing. ------------- "the universe has a way of balancing itself"
Posted By: spawn12336
Date Posted: March 20, 2007 at 9:36 AM
So I threw on the first layer of filler last week. I will be doing the milkshake on it after this layer, the only reason is that I had some REALLY low and high spots that I wanted to even out that sanding wouldn't have fixed. And now for my question... on the sections between the speakers where the curves are very pronounced, what is the easiest and best way to sand in those tight spots? I can't use either my 5" random orbit sander, or my detail sander as the curves are too heavy and the space too tight for them to fit and do a proper job. The only thing I could think of was wrapping some paper around a pipe and doing it the old fashioned way. Any suggestions from you guys?
-------------
"the universe has a way of balancing itself"
Posted By: CTOH
Date Posted: March 20, 2007 at 10:22 PM
A 3" DA Sander to get the big stuff then "block" sand the rest, we have a whole kit with like 7 diffrent shaped "Blocks" that help with stuff like that, you're on the right track with wrapping sand paper around something but you do want it to have a little "Flex" to get the contours better,,,I think they may be called "DuraBlocks" or something like that. Run ya about $50,,,
Posted By: spawn12336
Date Posted: March 21, 2007 at 9:10 AM
Only issue is that this is really only for me, I'm not a pro installer by any stretch of the imagination. I don't have an air compressor, although I might look into renting one for a day to see. Can you tell me where to get the Durablocks of which you speak?
-------------
"the universe has a way of balancing itself"
Posted By: david pascale
Date Posted: March 22, 2007 at 5:19 AM
very nice. Dosent it feel good to do it yourself? that same job would have cost a fortune at the shop, I an doing the same thing in my durango.
-------------
information is the key to solving problems
Posted By: spawn12336
Date Posted: March 22, 2007 at 8:55 PM
Hell yeah, it feels great. Here are 2 shots from last week when I was doing the filler, right after the filler was laid on and sitting for about 30 minutes. I couldn't get over just how shiny this stuff dries, is that normal?. I have sanded 95% of one of them down already. I should have them mostly finished next weekend. Hindsight tells me I should have tried to cheese grater the tight spots, but live and learn. 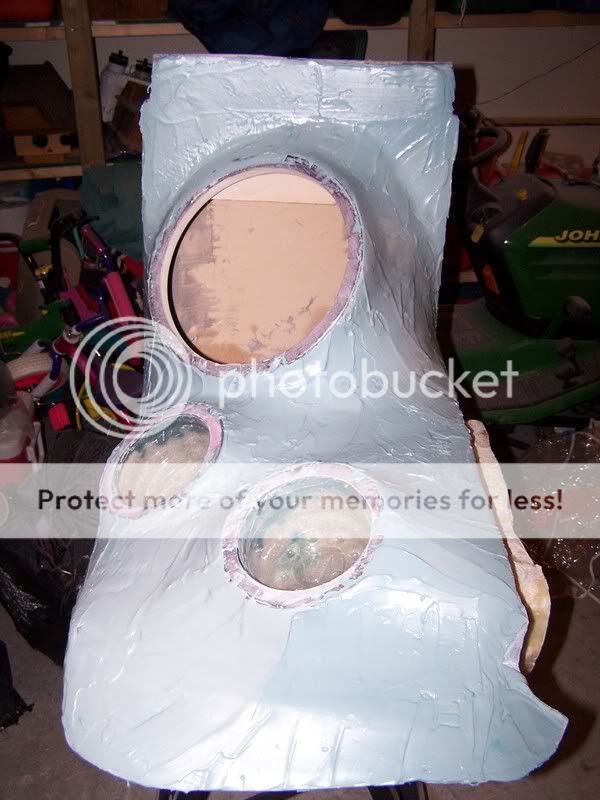 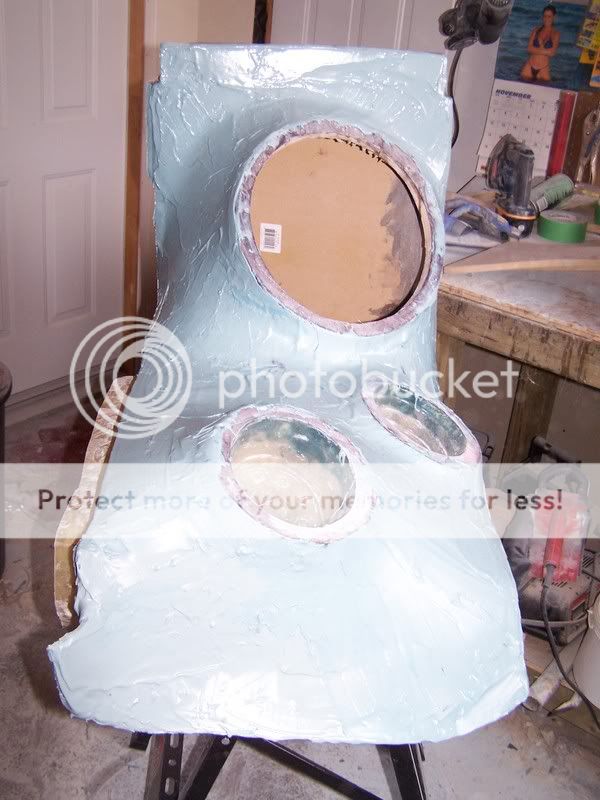 ------------- "the universe has a way of balancing itself"
Posted By: david pascale
Date Posted: March 23, 2007 at 5:12 AM
yes the shiny coat you see is normal. there is a spray to coat that before you sand you can get it from a bodyshop. the spray will help you sand down all the highs and lows, but remember you may still have to add more filler in some spots and the curves around the rings are a real pain in the ass to get just right. are you going to paint or wrap to match the interior?
-------------
information is the key to solving problems
Posted By: spawn12336
Date Posted: March 23, 2007 at 6:12 AM
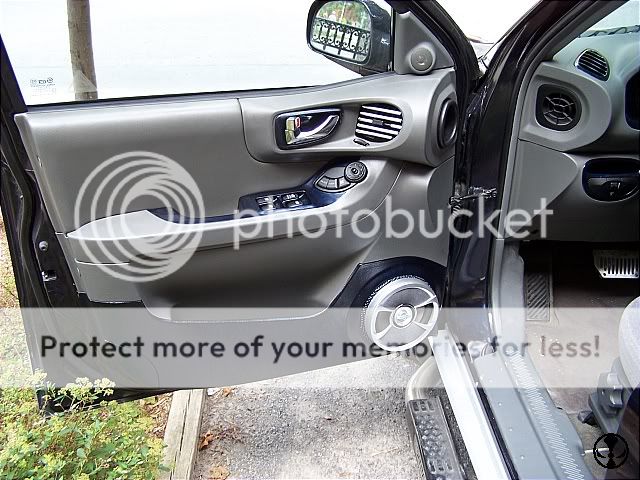
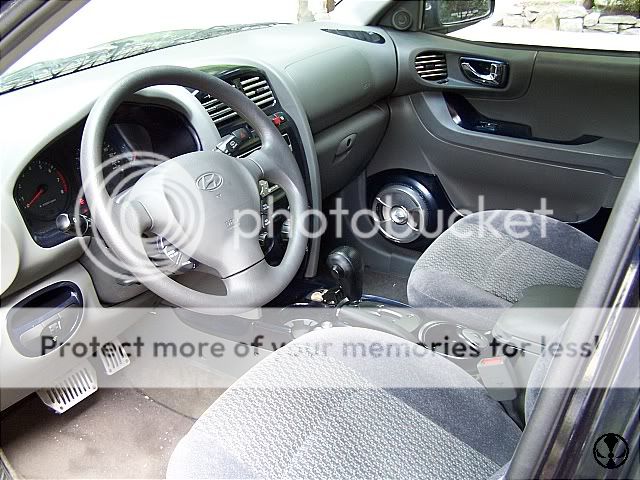
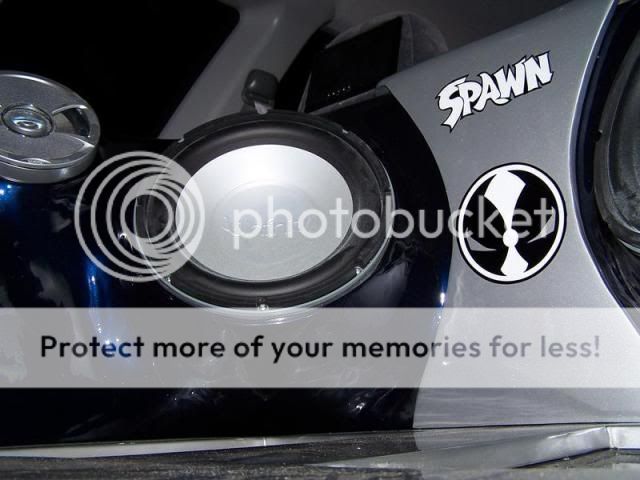
Agreed on the PIA curves around the rings, that's the 5% unsanded on the one, waiting on the 3" DA sander to get here. and they are going to be painted. I colour matched parts of the interior last year to the exertior colour and will be keeping the blue and silver theme for the boxes and the liftgate. The colour is called moonlit blue. Looks darkblue almost black until the sun hits it. This is what she looks like in the sun... 
and on a cloudy day... 
and the interior last season... 
------------- "the universe has a way of balancing itself"
Posted By: racerx22
Date Posted: March 23, 2007 at 10:41 PM
spawn this looks really good. i think i remember u from the hyundai forums. im racerx or racerx22 i cant remmember..i got scion xb now
Posted By: bellsracer
Date Posted: March 23, 2007 at 10:52 PM
spawn12336 wrote:
Hell yeah, it feels great. Here are 2 shots from last week when I was doing the filler, right after the filler was laid on and sitting for about 30 minutes. I couldn't get over just how shiny this stuff dries, is that normal?. I have sanded 95% of one of them down already. I should have them mostly finished next weekend. Hindsight tells me I should have tried to cheese grater the tight spots, but live and learn.
(for people curious) That is the wax inside the filler coming up to the surface. Sand that off before continueing(sp?) on to the next step. David mentioned a spray to help find the highs and lows, most body shops use graphite spray to find them, but a good alternative to it is charcoal powder. Grab a couple chunks of charcoal, throw it in an old sock, smack it with a hammer until it is powder, and pat that onto the surface. the charcoal will stay on the item and show you your high and low spots. Catch is, that these techniques (no offence david) are only really useful on larger flatter surfaces. The best way to really find smoothness is to close your eyes and lightly run your hand over the surface. You'll feel MOST irregularities that way, from there it is careful inspection at a low angle. ------------- Never send your ducks to eagle school.
The difference between ordinary and extraordinary is that little extra.
The 3Ls of life: Learn from the Past, Live for the Present, Look to the Future.
Posted By: david pascale
Date Posted: March 24, 2007 at 5:13 AM
no ofence taken always up for a new trick. I was taught by a body shop man when I did my center console and your right the spay and a gental toach is what it takes. Mine came out as smooth as a babbys ass after alot of sanding, Loved it. I will post mine when I finish everything, eccept I can only document the sub boxes because I didnt think to do the rest. LOOK GOOD spawn
-------------
information is the key to solving problems
Posted By: spawn12336
Date Posted: March 24, 2007 at 8:22 AM
I trust the hand feel over any other trick, I've been using that so far. Thanks for the props and tips guys. And Racerx, I remember you as well. XB, eh, I'll only say that they are my nemesis at certain shows as we usually end up in the same class.
-------------
"the universe has a way of balancing itself"
Posted By: racerx22
Date Posted: March 24, 2007 at 8:26 PM
not my choice on car but whut the hey its my dads and i drive it everyday/ i have no car payments so im cool with that. i want a new ford f150 4dr lariat blk on blk with 22's
Posted By: spawn12336
Date Posted: April 23, 2007 at 11:27 AM
A quick update... Did the final layers of bondo and sanding the last weekend in march, using the "milkshake method" (look it up). I am pleased with the turnout. 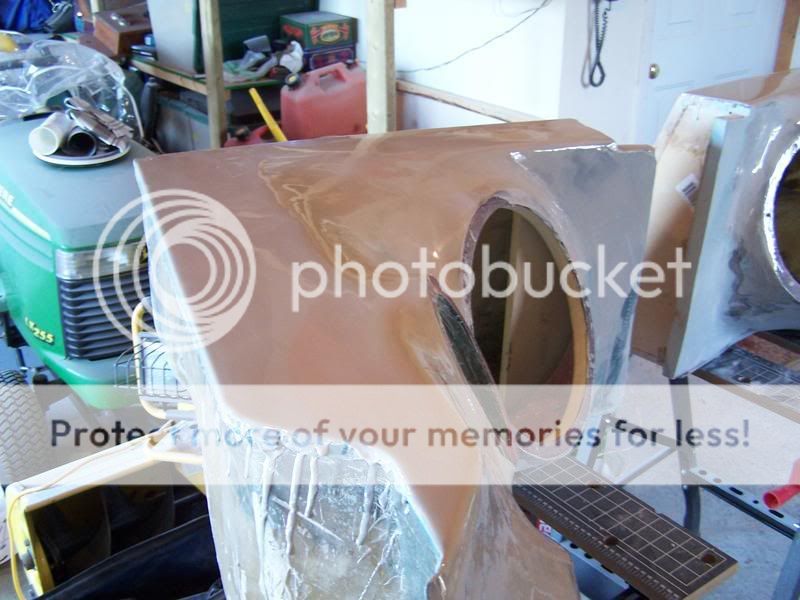
The boxes have been in since then and I have been breaking in the subs. Last weekend was my first chance to really turn them up, as for last season's measly 125.5 db score, let's just say it's a .... little louder now. I ran through a few of my Bass Mekanik test cds, and was more than impressed with the sound now (if you have it, Bass Mekanik - Download, Track 16). Went to the body shop to get a quote on painting them, so they should be in for paint the weekend after the move. I also met up with a decal contact out here as well in order to pick up a set for the trim panel that will be covering the split between the 2 boxes. Here's a teaser shot of the decals, all that is is a 4" led stripin behind the backing paper as the decals will be going on custom cut plates with frosted plexiglass... 
------------- "the universe has a way of balancing itself"
Posted By: spawn12336
Date Posted: June 08, 2007 at 8:05 AM
It's been over a month and a half since the last update, but I was working on some other side projects and waiting my turn in the body shop. Ah the fine art of the teaser pic....dusty as it is 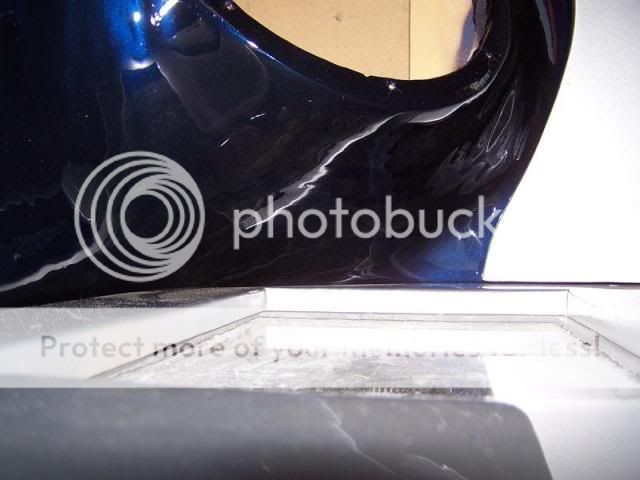
Everything came out from paint yesterday, looks awesome, a few things to deal with, then pics will be up. ------------- "the universe has a way of balancing itself"
Posted By: spawn12336
Date Posted: June 08, 2007 at 9:44 PM
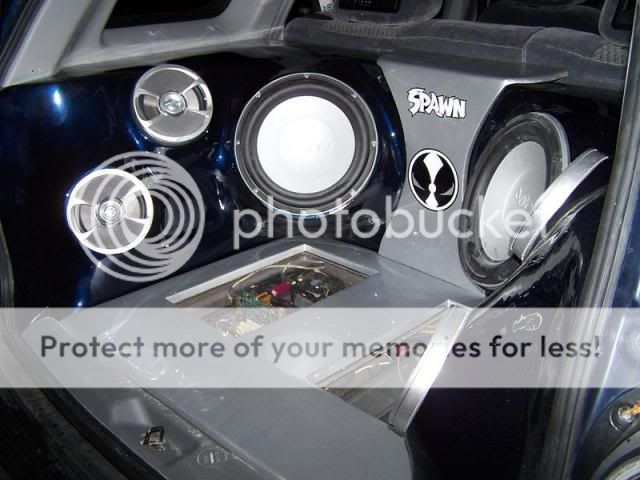
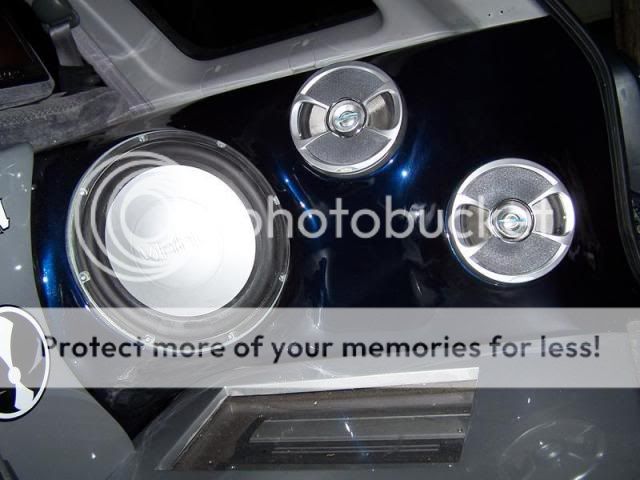
A little more work to do, but here it is installed... 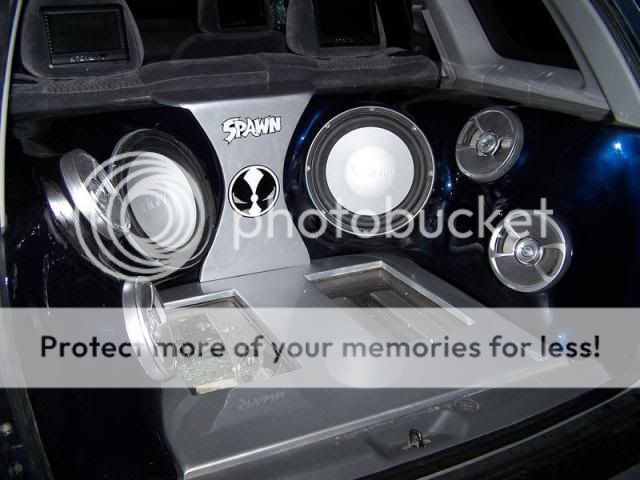

------------- "the universe has a way of balancing itself"
Posted By: One_Dieu
Date Posted: June 12, 2007 at 11:18 PM
WOW!!!!!! This is some nice work pump.
-------------
Respect the Blood Line
Posted By: bellsracer
Date Posted: June 15, 2007 at 1:30 AM
Great job, spawn... however I do have one question... I looked up the "milkshake method" and didn't get any results. Mind filling me in please ^-^; Thank you ------------- Never send your ducks to eagle school.
The difference between ordinary and extraordinary is that little extra.
The 3Ls of life: Learn from the Past, Live for the Present, Look to the Future.
Posted By: jlord16
Date Posted: June 17, 2007 at 5:21 AM
Im assuming by the looks of the pics that the "milkshake method" is when you dilute the bog wiht fibreglass resin so its nice and easy to apply thin and sand off. Great build up mate, youve done a great job and im lovin it ------------- Clarion DB36MP
Infinity Kappa Perfect 10"
Respone 800w Mono
ALPINE MRP-F250
*Custom fabrications*
Posted By: kawieracer27
Date Posted: June 17, 2007 at 3:01 PM
came out great man, really like it, nice work
Posted By: spawn12336
Date Posted: June 20, 2007 at 3:02 PM
Sorry for the late reply, and thanks for the kudos lads. The milkshake is indeed the thinning of the bondo with resin to make it paintable as detailed in Velocity Motors' post How to make a fibreglass enclosureand in speakermaker's post fibreglass trick of the year ------------- "the universe has a way of balancing itself"
Posted By: bellsracer
Date Posted: June 20, 2007 at 9:57 PM
hehe ^-^; Thank you for the information... Love the install Arigatou! ------------- Never send your ducks to eagle school.
The difference between ordinary and extraordinary is that little extra.
The 3Ls of life: Learn from the Past, Live for the Present, Look to the Future.
Posted By: Reeceddogg
Date Posted: June 21, 2007 at 7:40 PM
just want to make sure i do this right but you lay down the tape then put fiberglass mat down then resin on top of that for the base?
Posted By: spawn12336
Date Posted: June 21, 2007 at 10:03 PM
close, after you tape, you will want to lay your first layer down "wet". basically you "paint" on some resin on the tape to get your first layer started. Paint the tape with resin in a small section, lay your matte, repeat. And work from the top down.
-------------
"the universe has a way of balancing itself"
Posted By: spawn12336
Date Posted: August 07, 2007 at 1:11 PM
This is what happens when I get inspired... Threw this together Saturday. It's been in the works for about a month now. I got tired of being razzed for the big stand that took like 10 minutes to set up. This stays in the ride... permanently... kind of ;) These are pics from the test fitting today. Anyway, pics.... 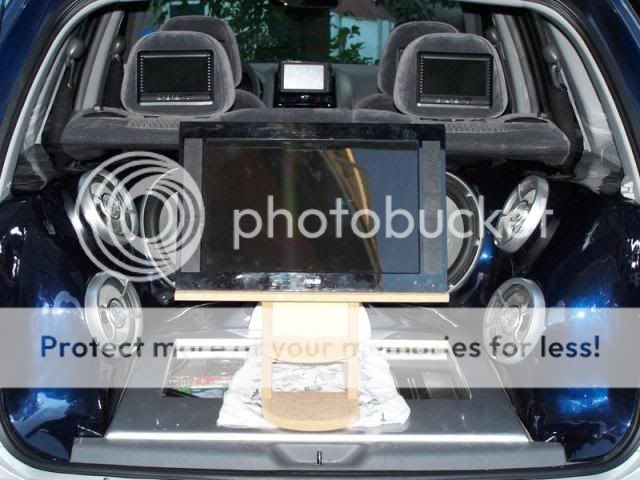


Fleeced and glassed Yesterday. Trimming and sanding tonight, and maybe getting the filler layer on before bed. The milkshake will go on Wednesday, then final sanding. Thursday will be paint and clear hopefully, if not then it will be friday. Pics... it is in 2 pieces now as the top is on drawer slides so that it extends out past the bumper. 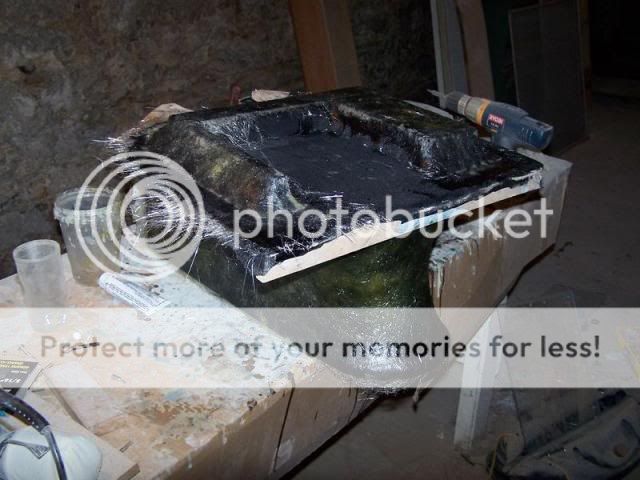
------------- "the universe has a way of balancing itself"
Posted By: psyon
Date Posted: September 05, 2007 at 11:25 AM
that is a heck of a lot of money and time to spend on a Santa Fe, but i have to admit that craftsmanship is top-notch! kudos to you for a GREAT install! :-) ------------- Loving Car Audio since 1992
Posted By: tubbs04
Date Posted: September 06, 2007 at 8:59 AM
I'm working on my 1st big fiberglass project and this has deffinetly helped! thanks for the post!
-------------
...don't crush the weasel...
Posted By: g-twizzl
Date Posted: September 18, 2007 at 6:05 PM
Way to go spawn, that project looks amazing. That color pops real nice, keep posting until its done. Keep it up!!
Posted By: spawn12336
Date Posted: September 27, 2007 at 10:14 AM
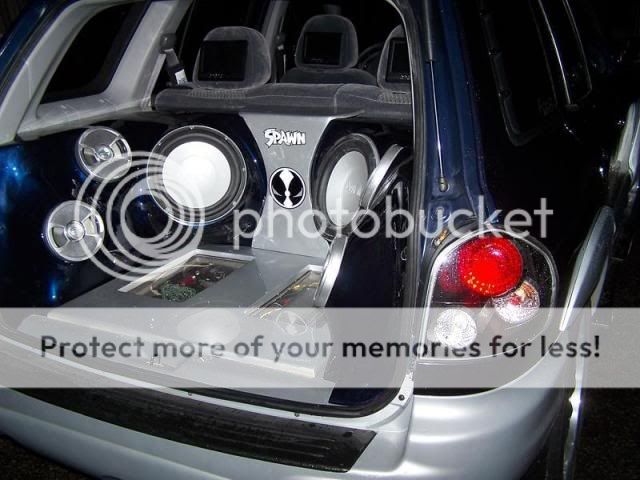
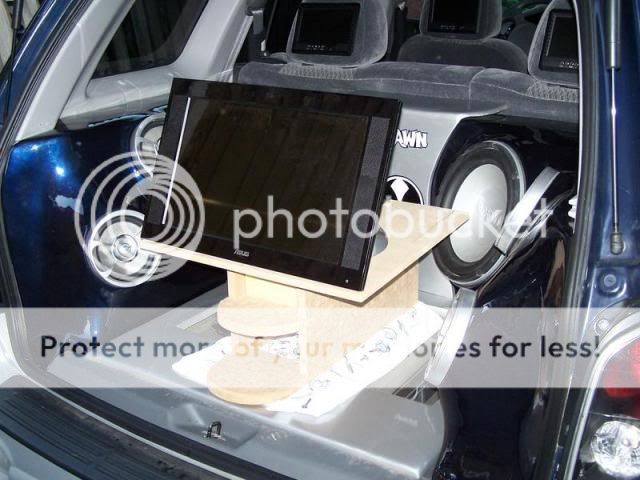
Sorry guys, I completed the project back in August and I clearly forgot to post any pics of it. And so to remedy that.... Completed pics (all taken from my cardomain as i can't access photobucket from work)!! The finished stand. everything hides nicely behind the monitor. 

then when I want to drop a few jaws, or just get bored at the shows and feel like djing.... the monitor gets lifted and out slides the controls. (not motorized, didn't see a need for it) 


The completed touchscreen monitor replacing the centre console vents, the pc now runs on a dual monitor setup to make use of both monitors at the same time. 

And this is why we do it.... 
The setup has won me 2 Best ICE trophies this year, which is really all I ever wanted. Thanks for the props guys, and the help along the way. ------------- "the universe has a way of balancing itself"
Posted By: ice32
Date Posted: October 06, 2007 at 6:57 AM
Great looking install, specially for a first time thing.
Posted By: boogeyman
Date Posted: November 12, 2007 at 11:16 PM
congrats on your awards.... looks awesome....keep it up
Posted By: boogeyman
Date Posted: November 12, 2007 at 11:22 PM
oh yeah .....one thing that may help you tape off speaker rings before glassing and "bondoing" ......tape up everything not getting glassed
Posted By: spawn12336
Date Posted: November 15, 2007 at 7:54 AM
Say what now? elaborate please.
-------------
"the universe has a way of balancing itself"
Posted By: spawn12336
Date Posted: November 15, 2007 at 7:57 AM
Oh, and I removed and rebuilt the trim panel in October after the massive crack from an SPL competion appeared in the upper right corner.
-------------
"the universe has a way of balancing itself"
Posted By: dbcat111
Date Posted: November 17, 2007 at 1:14 AM
this are the best looking trophies I have ever seen
------------- dbcat
Posted By: spawn12336
Date Posted: November 19, 2007 at 1:36 PM
Really.... I personally like the NOPI Chic's more...just me though. and yes, that's me 

------------- "the universe has a way of balancing itself"
Posted By: eric-tech
Date Posted: November 23, 2007 at 10:24 AM
One word..................................................................R E S P E C T. Eric ------------- Take your time, a solution is just around the corner :-)
|